Monthly Archives: November 2014

Figuring It Out

Having completed my first Marfy dress, I now have the pleasure of reflecting upon its creation. Unlike my “Ghost Dress” which caused me so much angst (but turned out okay in the end), this ‘60s-inspired design went together without a hitch, although it definitely took some “figuring it out” along the way.

First I’ll cover the four changes I made to the dress, based on my muslin (toile). Initially I had to lower the apex of the bust darts, an alteration I am now used to making. Second, I decided to lengthen the sleeves by about 2 inches. I did this mostly to make the dress more comfortable to wear in the cold winter months. Even covering bare upper arms just a little bit more is helpful. I was hoping this would not detract from the lines of the dress otherwise. I made a tracing to try it out on paper first:

Marfy Dress

Somehow, the longer sleeves did not look good with the very distinct A-line silhouette of the dress. I thought they would look better with more of a straight skirt. I knew from the muslin that the front detailing had a built-in kick pleat, so narrowing the skirt was entirely doable. I would still be able to walk in it!

Alteration number four was the neckline. I widened it a bit, as I think that looks better on me. Then I widened it again later in the process (I’ll get to that in a bit.)

With no written and illustrated instructions to follow, I relied on my sewing knowledge and experience to execute the seaming on the front left of the dress. I was able to sew the seam by machine from the sleeve down to the lower angle of the point. From there down to about 8” from the hemline, I sewed the seam by hand.

An inside look at the this seam stitched by hand

An inside look at the this seam stitched by hand

There is a pleat hidden beneath the dress here, and sewing by hand seemed to be the only solution.

Showing the built-in kick pleat

Showing the built-in kick pleat, before the hem is sewn

And here is the finished kick pleat.

And here is the finished kick pleat.

When it came to the sleeves, they are shown in the illustration with a contrasting band. However, no band was included with the pattern. I did a muslin mock-up to test the visual appearance of the width of the band.

Marfy Dress

Because I had cut the sleeves with a slight curve to the lower edge, I had to make a muslin guide for the bands, which included the same curve.

The sleeves with bands attached

The sleeves with bands attached

With sleeves, hand-picked zipper and all seams complete, I turned my attention to the lining. Instead of cutting the lining with the same angled detail as in the dress, I chose to cut a symmetrical front, thus reducing bulk at that critical waist area. However, I needed to add a kick pleat to the front lining to coincide with the built-in kick pleat of the dress. Here is how I did that:
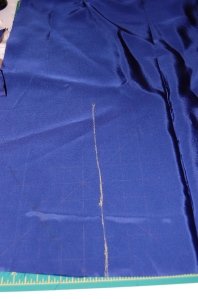
First I marked where I wanted the pleat in the lining to be.  By the way, the lining is Bemberg rayon.  I usually like to use crepe de cine for my linings, but I had this Bemberg in the right color, so I decided to use it.

First I marked where I wanted the pleat in the lining to be. By the way, the lining is Bemberg rayon. I usually like to use crepe de chine for my linings, but I had this Bemberg in the right color, so I decided to use it.

I centered a triangle of the lining fabric  (about 10" x 8") on top of the marked line.

I centered a triangle of the lining fabric (about 10″ x 8″) on top of the marked line.

I stitched on either side of the marked line, graduating up to a point at the top.

I stitched on either side of the marked line through both layers of lining, graduating up to a point at the top.

I cut along the marked line and turned the placket to the wrong side.

I cut along the marked line and turned the placket to the wrong side.

I sewed another piece of ling fabric (10" x 8") to the wrong side of the turned placket.  It is stitched around the edges - a little difficult to see.

I sewed another piece of ling fabric (10″ x 8″) to the wrong side of the turned placket. It is stitched around the edges in a 1/2″ seam.

After securing these stitched together pieces across the top through all layers, I had a kick pleat!

After securing these stitched-together pieces across the top through all layers, I had a kick pleat!

Back to the final part of the dress: the neckline. I still wasn’t sure I had a pleasing neckline, so I got out my French rule and re-chalked one with a little wider stance and depth.

Marfy Dress

For the top-stitching around the neck and around the angled detail on the front, I did what I did with my jacket out of the same fabric: I hand-picked it. I am so happy with how it looks. It’s very subtle, but adds just the right emphasis. The buttons are smaller versions of the (concealed) buttons on my jacket.

Marfy Dress

I set the lining in by hand, under-stitched the neck-edge by hand, and finally the dress was complete.

Marfy Dress

Marfy Dress

Marfy Dress

And of course I have to show it with the coat!

And of course I have to show it with the coat!

Fifty Dresses

Marfy Dress

It is probably unfair to do an assessment of Marfy patterns after just one make, but I’m going to anyway! The things I really like, so far, about using a Marfy pattern are 1) its preciseness, 2) the individually sized patterns, 3) the pattern pieces without seam allowance added. And is there anything I dislike about Marfy so far? Yes, one big thing! I really miss having a pattern envelope with an illustration, variant views and back views. I am so accustomed to vintage patterns, most of which sport envelopes which are like small works of art. There is so much pertinent information on them (fabric suggestions, zipper sizes, garment descriptions, thumbnail pattern piece diagrams, etc.) and even wearing suggestions. The illustrations show outfit styling suggestions (hats, handbags, shoes, etc.). I love studying them. So, yes, it’s true – I feel like something is lost without a pattern envelope for this dress which I like so much.

I won’t be waiting long to wear this dress. Our American holiday of Thanksgiving is this Thursday, and Marfy will be one of my dining companions. To my fellow citizens, may the day be as meaningful and blessed for you as it always is for our family. To all my readers around the globe, my thanks to you for sharing your love of sewing with me!


37 Comments

Filed under Buttons - choosing the right ones, car coats, Color blocking, couture construction, Marfy patterns, Mid-Century style, Uncategorized, woolens

“With Glamour . . . “

Every once in a while unexpected opportunities come along which beg one’s participation. Such was the case on Tuesday evening, November 18. Winterthur Museum in Winterthur, Delaware has been hosting a number of costume designers in a lecture series, as a complement to their “Costumes of Downton Abbey” exhibit, on display through January 4, 2015. When I read that Janie Bryant, costume designer for Mad Men, would be one of the featured speakers, I quickly made my reservation.

Janie Bryant - W-thur

Off I went in the frigid cold on Tuesday evening for my 45-minute trek to Winterthur from my home in Pennsylvania. I took with me my copy of Janie’s 2010 book, The Fashion File: Advice, Tips, and Inspiration from the Costume Designer of Mad Men. Taking it off the shelf was like reacquainting myself with an old friend (well, not so old, but it had been a while since I had read it!). Perhaps, I thought, I might get a chance to have her autograph it.

Janie Bryant Fashion File In many ways, I credit the costumes of Mad Men as inspiring my return to fashion sewing. It is no secret that the widespread, renewed interest in Mid-Century fashion and design has been a direct result, at least in part, of this television series.   The first season was set in 1960, so the elegance and glamour of the 1950s was still very much in evidence. In fact, Janie said she started her research by exploring the late ‘50s’ designs, and used the end of that decade to set the tone for the introduction and development of each of the main characters. In addition, Janie had been fortunate to learn to sew at an early age, making her first dress at age 8. And – she grew up in Tennessee in a family where a true appreciation of fashion, beauty, and ladylikeness was generations long. She brought this sensibility with her as a foundation and inspiration for her position with Mad Men.

Janie covered many topics in her hour+ presentation, but the following made a particular impression on me:

1) I was intrigued with her disclosure that she actually used some vintage clothing from her family for some of the Show’s costumes. Betty’s aprons – many aprons! – had belonged to her grandmother! Little details, such as Roger’s monogrammed cuffs, were based on her observations of family members as she was growing up. And did you know that Don Draper’s belt buckle has the initials DD engraved upon it? As Janie said, no one will probably ever see it, but in a very subtle way, it helps to define and enhance his enigmatic character. Sometimes it is the little things in one’s style (and sewing!) that make all the difference.

2) The importance of color in costumes cannot be underrated. For example, the soft color palette (pale blues, pinks, beiges) for the character of Betty helps to reinforce her icy persona, while the deep jewel tones for Joan’s costumes emphasized the power of her femininity.   By extension, the power of color in clothing for the rest of us is also a key element in dressing well and in having our clothes work for us, not against us.

3) Several times, Janie mentioned that costumes are so vital in helping to “design” the character. For example, Peggy’s chaste, somewhat prudish demeanor was enhanced by costuming which was reminiscent of schoolgirl dress (bows tucked under collars, pleated skirts, lots of plaid). The power of clothing is such that one can change his or her outward persona by altering one’s style of clothing. The flip side of this is that, often, as one grows and becomes more confident, clothing choices become more sophisticated and worldly.

4) Janie said that it is much easier for her to design costumes for characters than it is to dress herself! She admitted to “outfit anxiety” at times, which is probably multiplied for her because of her career and the personal expectations which accompany it. (Hm-m-m-m, I think that’s a problem I wouldn’t mind having!) She has obviously given this idea much thought, and this where I would highly recommend her book. A quick look at some of the chapter headings will tell you some of what you can learn from her observations, her experience, and her expertise: “You as a Leading Lady”, “Defining Your Silhouette and Secrets for Dressing Your Shape”, “The Dressing Room”, “Dressing Chic for Every Occasion”, “The Importance of Being Accessorized”.

5) Which brings me to probably the most important take-away from the evening, at least for me. Without equivocation, Janie wants women to appreciate their own femininity – and their curves! – and strive to feel beautiful in the clothing and accessories they choose and wear.

What a fun evening this was – and a great opportunity for me to meet someone I have long admired. Janie is delightful, funny, kind and engaged, as well as absolutely lovely! I felt very fortunate to have a few moments with her after the lecture when I asked if she uses vintage patterns in her research and design work. “I have bins and bins of them!” she said. She was, indeed, happy to sign my book for me, and in a lovely, stylish flourish, she wrote:

“To Karen, With Glamour & Love XXX Janie Bryant”

13 Comments

Filed under Book reviews, Mid-Century style, Uncategorized

Time for Wool and Something Marfy

It seems like we just welcomed in Autumn – and although the calendar says it will still be Autumn for a few more weeks, the chill in the air tells me that Winter is bearing down on the northeastern United States. Winter means many wonderful things, including WOOL season.

When I made my color-blocked coat last Winter, I purchased some extra yardage from Britex Fabrics with the thought of making a sheath dress to wear with it on occasion, but not exclusively with it.

Magnificent Obsession My original intent was to make a two-toned dress, with a front and back yoke with short sleeves. The bottom, longer section of the dress would be out of the camel wool, with the yoke and sleeves in navy, zipped up the back.   I did not think much more about it during the Spring and Summer, but a few weeks ago, after seeing a full page Marfy ad in a current Vogue Pattern Magazine, I began to think of an alternative to my plan. This dress was featured in the ad:

Marfy Dress

I not only really liked the dress, but it seemed designed with my two color-blocking fabrics in mind. I also liked its mid-century styling. For a while now I’ve been thinking of trying a Marfy pattern, and, I thought “Why not now?”

I wasn’t exactly sure what to expect. I knew that Marfy patterns come without seam allowances (the stitching line is the outside perimeter of each pattern piece), and in only one ordered size. One of the reasons I love vintage patterns so much is that they, too, were produced by particular size. (So that, for those of you who only sew from current multi-sized patterns, if you ordered a size 10, only a 10 was in the envelope.) Most vintage patterns include seam allowances, and the stitching line is marked as well. For those of us who use couture methods for our fashion sewing, having the stitching line marked is incredibly helpful. The stitching line is THE point of reference for alterations, for basting, for sewing. Knowing these two facts about Marfy patterns made me comfortable with the idea of sewing with them, even though they come with no written construction details other than a few notations on the pattern pieces.

What I did not expect was the teeny tiny package in which the pattern arrived. The only identifying mark on the folded up pattern was the pattern number.

Marfy dress I pressed the pattern pieces and got busy making my muslin (toile). From my adjusted muslin, which took the better part of a week to perfect (hopefully perfected, that is), I transferred sewing lines onto white silk organza underlining. (I will go into some of the changes I made in my next post on this dress.) In true couture mode, I then basted the organza onto the fashion fabric. It is always rewarding to sew the first “real” dart or seam! I feel like the dress is practically finished, although reality is sure to set in when all the finishing details start to occupy my time.

The front, showing the seam detail which I like so much.

The front, showing the seam detail which I like so much.

Marfy dress


Incentive to finish this wool dress is fanned by Winter winds to my back , by looming holiday sewing, and the excitement of finishing my first Marfy.  To be continued, hopefully soon!

16 Comments

Filed under Color blocking, couture construction, woolens