Monthly Archives: July 2017

Tunic Time

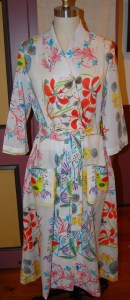
Nothing says Summer quite like crisp white and bright navy blue. Pair those colors with an easy-wearing, dress-length tunic, and it is a recipe for comfort and versatility.

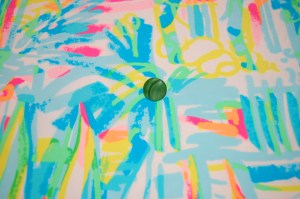
This is one of those projects which took a couple of years to evolve. I purchased the white polka-dotted cotton voile from Britex Fabrics about two years ago, thinking I would make a blouse. I considered patterns for it every once in a while, and then put it back in the cupboard. What was keeping me from moving forward on it was the fact I had over 2 yards of this 56” wide fabric, more than enough for a blouse. Using it for a dress seemed the more efficient way to proceed. All I needed was some inspiration.

Then last Fall, I purchased a copy of the then-newly-released The Tunic Bible by Sarah Gunn and Julie Starr.

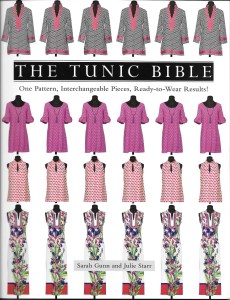
Well, there is lots of inspiration in this book, and I especially was drawn to this style, but in a dress length.

Shown on page 65 in The Tunic Bible is this top. The combination of the wide split placket, the angled collar, and the split cuffs really appealed to me. All three are really lovely details. (I purchased my copy of this book on Amazon.)

(Now here’s a bit of trivia: a tunic dress is not the same as a dress-length tunic, according to the number one definition in Fairchild’s Dictionary of Fashion. A tunic dress is “a two-piece dress with a long overblouse worn over a separate narrow skirt,” although the definition was expanded a bit in the 1960s to cover a tunic mini-dress.)

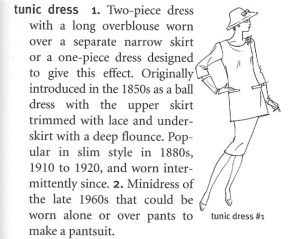
Detail from page 459, The Fairchild Dictionary of Fashion, Third Edition, by Charlotte Mankey Calasibetta and Phyllis Tortora, Fairchild Publications, Inc., New York, New York, 2003

Back to my dress: I knew I wanted to embellish it with Petersham ribbon (which is so malleable and cooperative!) In choosing a color, I went for bright navy blue, also ordered from Britex Fabrics.

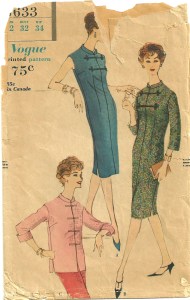
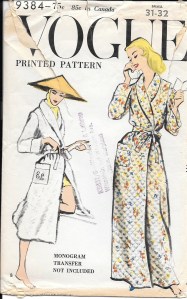
I actually have three tunic patterns in my collection, one just a couple of years old which I have used, one from the 1980s (also used), and this vintage one, not used yet:

The description on the envelope does not describe this as a dress length tunic, rather an “A-line dress with a caftan neckline.” But, of course, it has a tunic look.

But I decided to give the pattern included in The Tunic Bible a go. I transferred my size to pattern tracing paper and made my muslin. I knew I would have to line the main body of the dress (the fabric is translucent.) After considering two types of light-weight white linen, which I deemed not quite opaque enough, I went with white muslin.

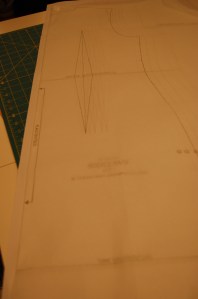
The tapered darts in the back of the tunic are optional, but help to add some lovely shaping.

The first thing I did was make the stand collar, so that I could see how the blue Petersham ribbon would look; I was a little worried that the intensity of the blue color might be too much for the delicate white fabric, but I was pleasantly rewarded with a look I liked:

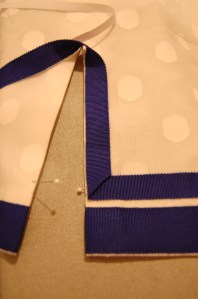
The first line of trim goes on…

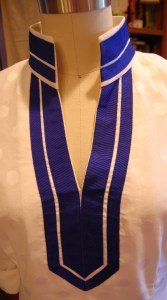
The stand collar is such a flattering design, even from the back.

I used Dritz Wash-Away Wonder Tape to make the application of the ribbon precise. This was the first time I have used this product, and I thought it was wonderful! I haven’t washed my dress yet, but supposedly the Wonder Tape washes away without leaving a residue.

It is especially important to follow the sequence of construction when it comes to the front of the dress, as the neckline trim needs to be applied even before the bust darts are sewn. Once I had the front and back of the dress together, I decided it was a little too baggy (this did not show up in my fitting muslin, which sometimes happens…)   So, I added tapered darts to the front, which was an excellent solution.

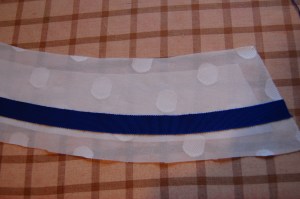
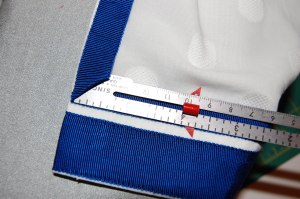
Applying the trim to the hemlines required four mitered corners. One way to help get a precise corner is to use a straightedge to guide the miter. Here you can see I used the end of one of my little slide rulers which was the perfect width:

A nice, precise corner.

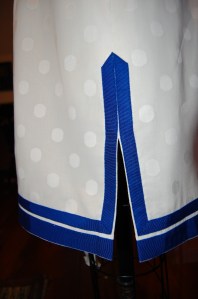
With the ribbon trim all applied.

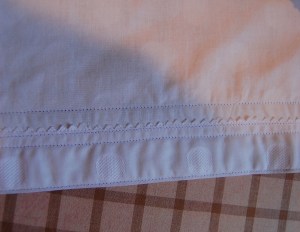
And here is what the hem looks like on the wrong side.

One of the things I love about this color combination is its versatility. In these photos I have paired it with turquoise, but it looks equally good with accessories in orange, red, yellow, green, and of course, blue.

The darts I added to the front give the dress a nice fit. I also used a 12″ side zipper, or else I would not be able to get the dress on!

The dress is loose but not baggy.

Here I have the split cuffs hanging down. I think I prefer them folded back, as shown in all the other photos. However, it’s nice to have the option of wearing them either way.

I suspect there will be a couple more tunics to sew in my summers to come. If there will be in YOURS, I would definitely recommend picking up a copy of this book, if only for the abundance of photos and style options which are handsomely presented. I do recommend that you familiarize yourself with the layout of the book before starting your project. The layout is logical once you understand the formula, but it’s best to give the book a thorough study before you proceed.

And now, with my sights on Fall and Winter (I can’t believe I am saying that!), I think this will be the last of my sewing for Summer. However, I should end with this MEMO to family and friends: Expect to see me in this dress often over the next six/seven weeks.   It is Tunic Time, indeed!

37 Comments

Filed under Book reviews, Linings, Tunics, Uncategorized, vintage Vogue patterns from the 1970s

A Lesson from Lilly

Have you ever purchased a piece of fabric on a whim – and then regretted it? That’s exactly what happened to me, here in the midst of July. I saw this piece of Lilly Pulitzer silk fabric offered on eBay, and without giving it too much thought, I bought two yards.

I have always loved most of the Lilly prints and color combinations, and something about this silk just looked fresh and summery to me. I have long wanted to make the pattern pictured below again, and with its Asian flare, I thought the multi-colored, abstract printed Lilly silk would pair well with it.

The date on this pattern is 1958. I made the blouse/tunic a few years ago and still enjoy wearing it. I would like to make view B sometime…

I had several scraps of solid green silk, one of which I thought would be good as a contrast fabric for the button details on the front of the blouse. (The pattern calls it a tunic, but it looks more like a blouse to me.) As it turned out, I used a scrap of green silk out of which I had made a blouse to go with a purchased Lilly skirt way back in the 1970s! I still have the skirt, but not the blouse…

Anyway, I am digressing. When the fabric arrived – in an itsy-bitsy package that weighed about an ounce – I knew I had made a mistake. Yes, it was silk, but it was so flimsy and slippery I wasn’t very sure it could be sewn with any sort of finesse. (Now I know that assessment was correct.) I contemplated saving it for a lining for something sometime, although truly, it would make a flopsy lining.  Deep down, I knew if I didn’t make it right now, I would never, ever use it. And that would be a waste of money for sure.

Well, now I am going to digress. I find that if I purchase a piece of fabric of impeccable quality, I can hold onto to it for months or even years without ever fearing it will never be used. In fact, the better quality the fabric is, sometimes the longer I wait to use it. That allows me time to think about and search for the perfect pattern, time to explore possible dressmaker details for it, and time to savor its beauty. When it comes to silk in particular, I have found that high quality, fine silk, even very lightweight silk, has a substance to it and a hand to it that makes sewing with it a pleasure.

Let me tell you, this was not a pleasure. I slipped and slid the whole way through the construction of this tunic/blouse. My pins would not stay in place, falling out willy-nilly. Clipping and trimming was a nightmare, as the fabric kept sliding in the way of my scissors. I contemplated spraying the entire thing with hairspray to stabilize it! Then, once I had enough of the tunic/blouse sewn that I was able to visualize my green silk accent strips on it, I realized that the green buttons I had planned to use were going to look – awful.

The green of this button is too deep for the colors of this fabric.

Happily, my luck changed just a bit. I went to my button box and found this card of four buttons.

One button was missing, but that was okay, as I only needed four.

They had been a “bonus” addition in an order of buttons from an Etsy shop, and I really thought I would never have any use for them. But guess what? They were just right for this tunic/blouse. At least this one thing was easy!

The blue of the button seems to work well with the solid green.

As you can see, I persevered and finished this monster.

I made an Obi-style sash to wear with it, which I think improves its appearance.

The back of this blouse has a center seam, which allows for some really nice shaping. I haven’t had a chance to get any self-modeled photos made yet, for which I apologize.

Here it is without the sash. In order to keep the slippery sleeves folded up, I had to add a snap on the inside seam of each sleeve.

I haven’t worn it anywhere yet. We shall see if I get any favorable comments; if I do, then perhaps I will eventually enjoy wearing it. At the least, it will stand as a lesson to me – never, ever again to buy any fabric on a whim.

30 Comments

Filed under Asian-inspired dress designs, Blouse patterns from the 1950's, Blouses, Buttons - choosing the right ones, sewing in silk, Uncategorized, vintage Vogue patterns from the 1950s

Déjà vu

After completing my “Classic French Jacket” and its coordinating sheath dress, I wanted something easy – and relatively quick – for my next project. I didn’t think it was going to be another bathrobe, but that’s what it has turned out to be, to my great surprise.

Because we had such a chilly Spring, I was wearing my newly constructed Winter bathrobe into June. But, suddenly, Summer arrived in the middle of that month, with its humidity and often beastly temperatures. It was then I pulled out my old, lightweight Summer robe – you know, the one with the missing button – and the small tear – and the tea stain which somehow became a permanent fixture. Not such a pretty sight.  Having become used to my new Winter robe which makes me happy whenever I put it on, I decided maybe it was time to replace my Summer robe, too.

I already had a three-yard length of “water-color-designed cotton lawn” from Britex Fabrics.

I forgot to get a photo of the fabric before I cut into it.  This is a partial view of the back of the robe.  I purchased this Italian-produced, fine cotton during one of the online sales at Britex Fabrics in San Francisco.

At 56” wide, I thought it would be enough to make a robe, using the same wonderful pattern I had used for my Winter robe.

This pattern from 1959 is so well engineered, with subtle details which give it a polished appearance.

My only reservation was that the fabric makes quite a statement. I wondered if perhaps it was going to be too, too much in an ankle length robe. Truthfully, though, how many people see me in my bathrobe? I figured I’d go for it.

Once again, laying out the pattern was quite the task, done entirely on the floor. Although the pattern matching didn’t have to be quite as precise as working with an orderly plaid, I did have to pay attention to the large squares and where they would end up in relation to each other and in relation to the dimensions of the front and back of the robe.

The front of the robe, sans its sash.

And a back view. Without lining up the “watercolor blocks” in some relation to each other, the effect would really have been chaos!

The fineness of the fabric is apparent if you look closely at the collar, where there is some fade-through of the design. (The interfacing is attached to the under section of the collar.)

I did not have enough fabric to “match” the designs on the sleeves, but I rather like them not exactly alike.  Also, I shortened the sleeves to below elbow length, more appropriate for a Summer robe, but also necessary to save fabric!

I used flat felled seams for the body of the robe.

After just barely managing to get the two fronts, one back, the sleeves and collar and front facings placed on the fabric, I knew I was not going to have enough fabric left to match the pockets to their underlaying design. I did, however, have two fabric blocks featuring those quirky little birds, enough to make two pockets. The birds could even face each other.

But I knew they would look a little “lost in space” unless I set them off somehow. That’s when I went to my tried and true solution for all kinds of sewing fixes – piping! Yellow seemed to delineate the pockets the best – beating out green, red, pink and purple, all of which I “auditioned.”

I quite like those little birds, looking cheery and chirpy on the front of my robe.


Ready for its debut!

The fabric is so lovely, almost diaphanous in its effect. And that bold, colorful pattern which had given me pause? It has an exotic flair to it, quite acceptable for a summer robe. I just hope it doesn’t panic the cat.

31 Comments

Filed under Bathrobes, Mid-Century style, piping, Uncategorized, vintage Vogue patterns from the 1950s