Category Archives: 1980’s dress patterns

A Tale of Two Dresses, Part 2

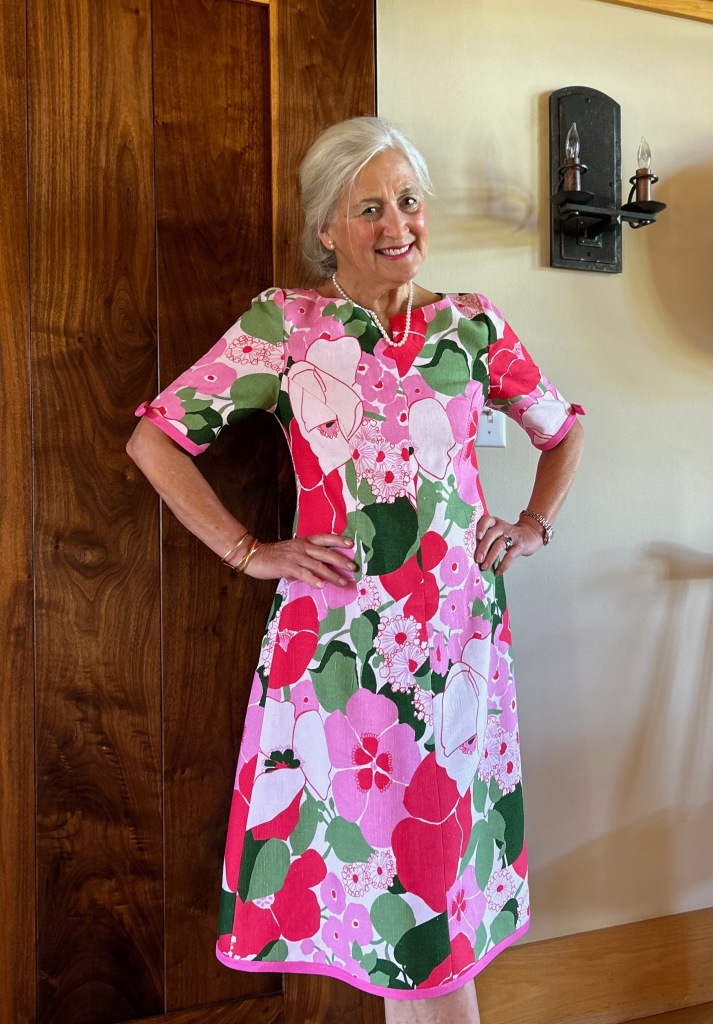
Whenever I am working with vintage fabric, it seems I either have more yardage than I need or, more frequently, less than I need.  I have learned over the years there is usually a way to work around having less fabric than I really need.  I just have to get creative.  And that’s what I did when I made this dress.

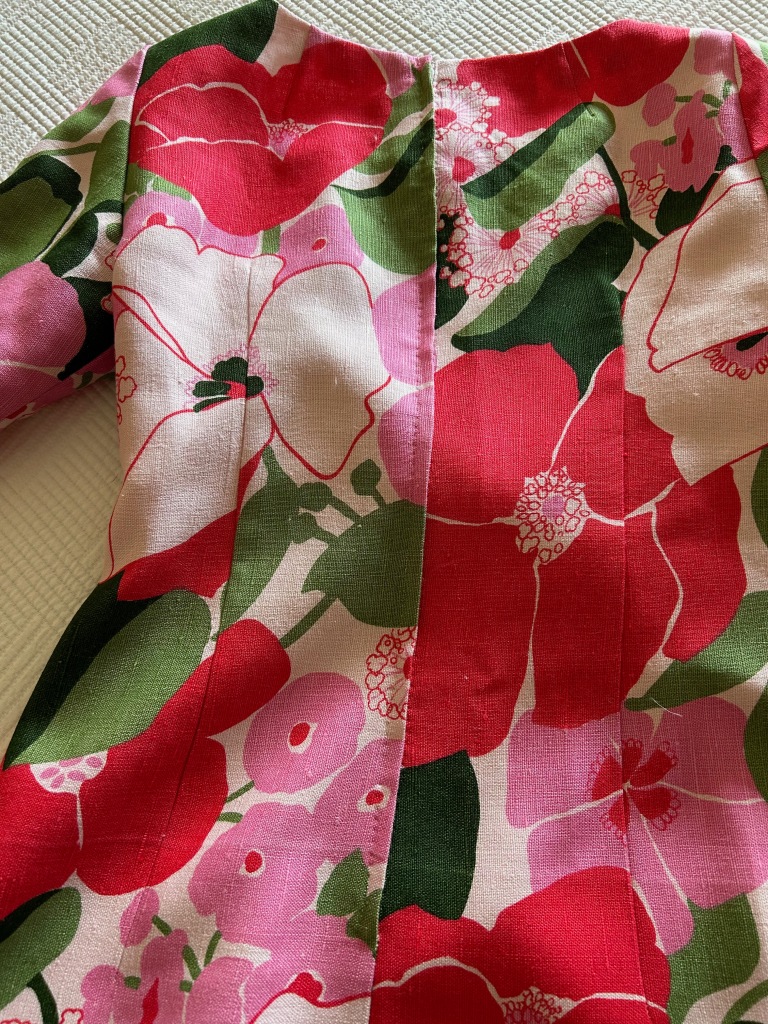
I quickly determined there was no way I could get the dress I wanted by placing the pattern on the lengthwise straight-of-grain.  The flare of the skirt, which I wanted to be mid-calf, precluded any notion of such a layout.  At 45” wide, I knew I could just get the dress length I wanted if I laid out the pattern on the cross-grain, from selvedge to selvedge.  Linen is a very stable fabric, so I was confident the cross-grain would work.  In addition, there were no directional limitations in the floral design of the fabric.  Barely fitting my pattern – from shoulder to hem – on the fabric from selvedge to selvedge, however, would leave no extra fabric to turn up for the hem – or even to face the hem.  I decided to worry about that later.  First I wanted to determine how I could get the four pieces for the dress and the two lengthened sleeves placed on the fabric, keeping in mind three important things:  1) although this was not a fabric to be matched per se, the all-over design of the fabric needed to be on the same plane in contiguous seams; 2) I wanted to space out the larger floral motifs so the dress would be balanced as best as possible (looking critically at the dress I made when I was 23, I clearly could have given this more thought!); and 3) I wanted to avoid large demonstrative blooms at the bust.  Then, and only then, would I worry about the hem.  
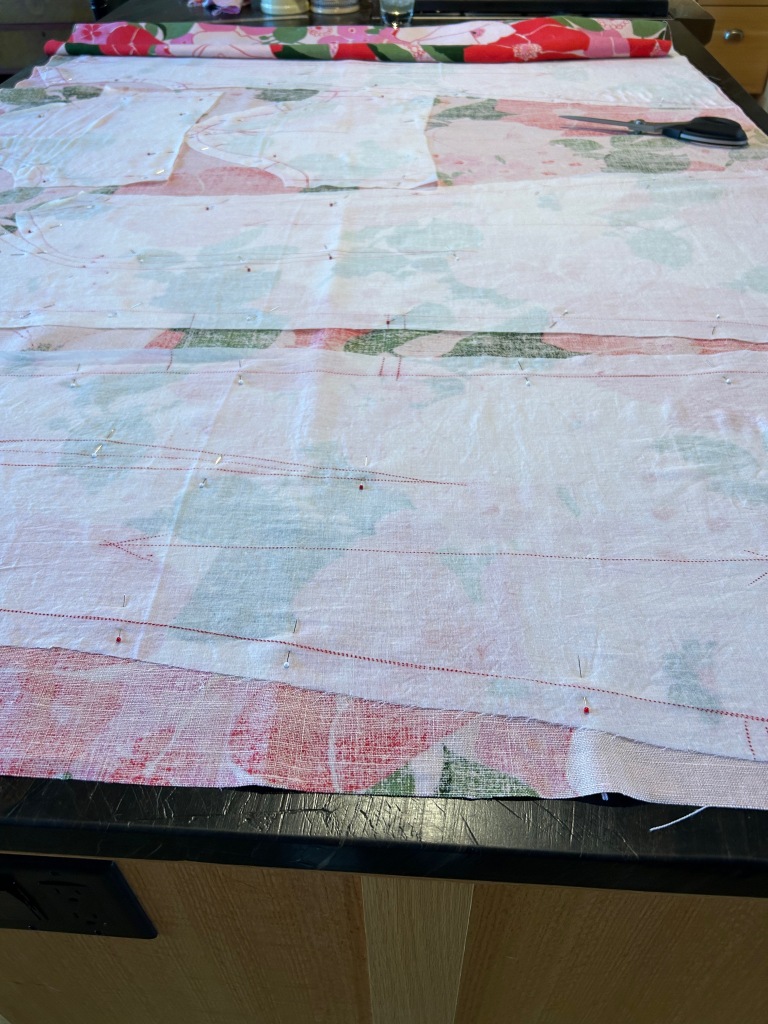
I transposed all the markings from my adjusted pattern onto the cotton batiste, then used those pieces as my pattern. I then basted the two layers together to be treated as one, before sewing any seams or darts.

Once I was happy with this placement, I had a eureka moment when I knew I could accomplish two things with a simple bias trim made from the yardage of deep pink linen which coordinated nicely with the floral.  1) I could preserve the full 45” of cross-grain length by applying bias trim to the hem edge instead of turning it under, and I could do the same with the sleeves.  And 2) the trim would add interest to the dress, just as I had vaguely imagined.  (A quick aside here – I have ample yardage of the solid deep pink linen to make a coordinating coat at some point. Every dress needs a coat, right?) 

I underlined this dress in a very lightweight, pre-washed, cotton batiste, then I lined it in Bemberg rayon.  Moygashel linen washes beautifully, as does Bemberg lining, which is why I chose Bemberg over silk for this dress. I eliminated the neckline facing, choosing instead to bring the lining up to the edge of the neckline seam, then under-stitching it to secure that edge in place.  

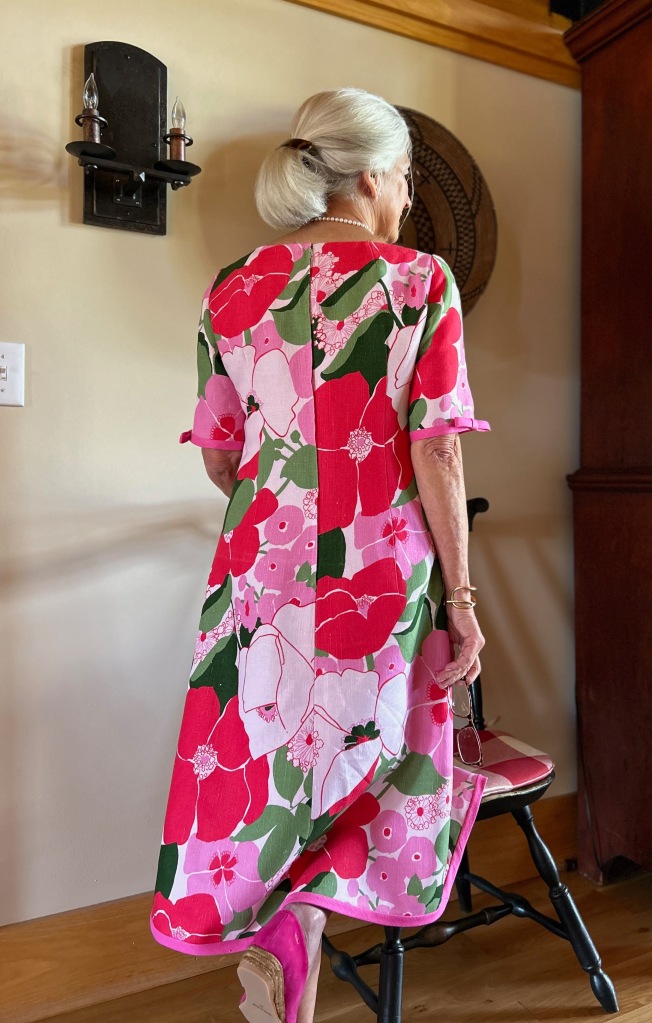
I chose to do a hand-picked, lapped zipper, an application which I think looks so lovely.  Interestingly, I hand-picked the zipper in the dress I made in 1973, although it is a centered application.  

And here is a back view of the 1973 dress. The zipper is metal, which certainly is a telltale sign of a vintage dress.

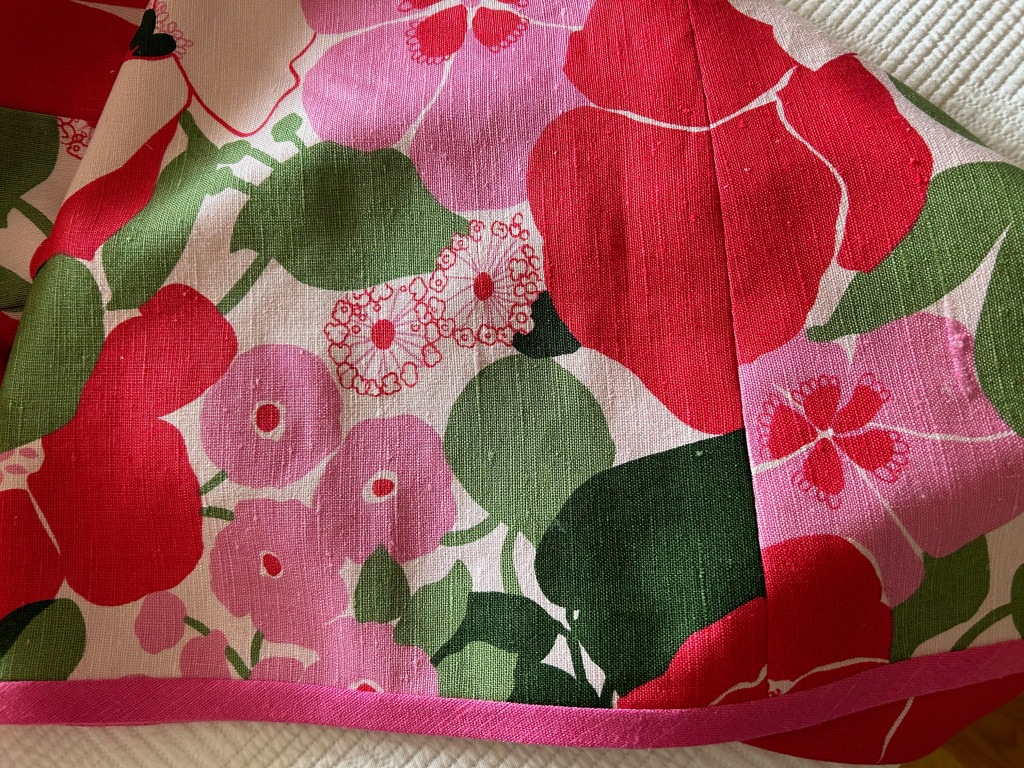
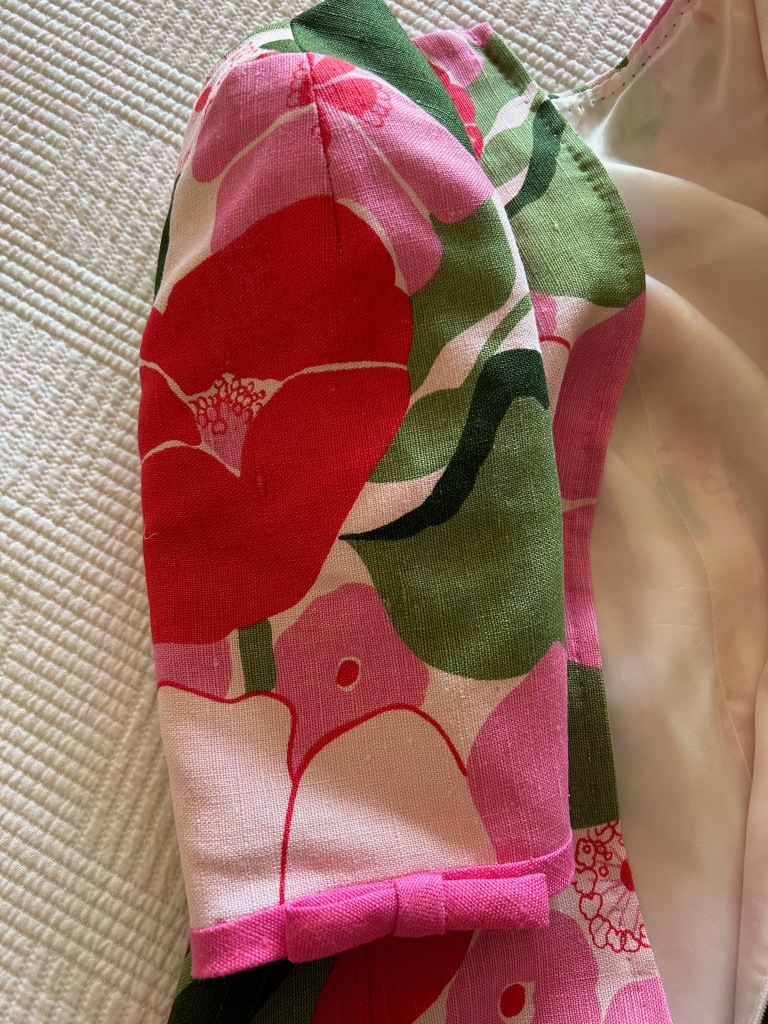
When it came time to apply the bias-cut trim to the hem and sleeves, I had to experiment around a bit.  I didn’t want it too wide, but it needed to be substantial enough to look like it was meant to be and not an afterthought or decision made in desperation!  I finally settled on an exposure of 1/2”.  

Now this is where it gets interesting.  A few weeks ago I saw a vintage dress on a Facebook/Meta post by Xtabay Vintage Clothing Boutique.  It is obviously Moygashel linen (I can tell by its weave and color), but what really caught my eye were the bias strips and low-profile bows adorning its sleeves.  I tucked this idea in the back of my mind for future consideration.  What I didn’t know was that the future was right around the corner!  Yes – I “borrowed” this idea and added a single bias-cut bow to each sleeve.  Somehow, it just seems to finish the dress.  

I never would have thought of adding a bow to each sleeve had I not seen this pretty vintage dress.

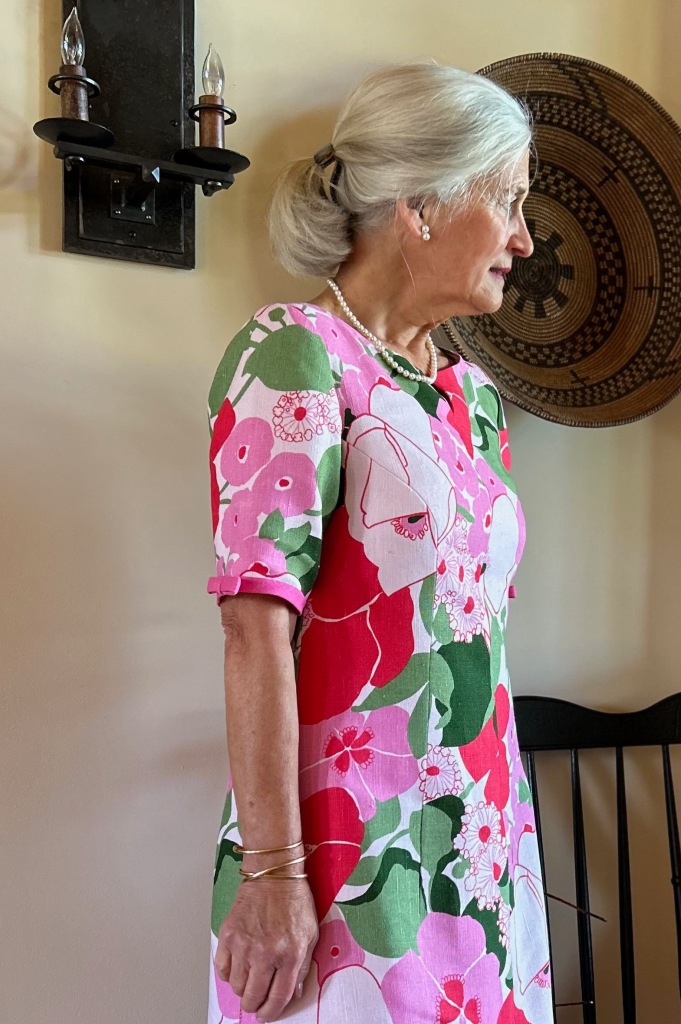
In this view, the princess seam which originates in a dart is visible. This is a nicely engineered, flattering pattern.

Well, you may have guessed by now the reason for making this dress this year.  I will wear it next week when my husband and I celebrate our 50th Wedding Anniversary.  I have changed a lot in those 50 years (and so has my husband!), but I still love pink in all its shades and I still love Moygashel linen (and I still love my husband, too!)  

49 Comments

Filed under Bows as design feature, couture construction, Dressmaker details, Fashion history, hand-sewn zippers, Hems, Linen, Linings, Mid-Century style, Moygashel linen, Sleeves, Summer sewing, Uncategorized, underlinings, Vintage fabric, vintage Vogue patterns from the 1970s

Sewing Ghosts

The ghost of Joan Goetz has been hanging over my shoulder for the last several weeks. She wrote her name on the envelope of vintage Vogue pattern #2718 which has caused me so angst. I can’t help but wonder who this woman was!

Sewing Ghosts

Goetz sounds awfully like Ghost, don’t you think?

I can tell from the changes she made to the pattern that she was much taller than I, with much longer arms! She added 1” to the arm length, while I subtracted 1½”. She also added three inches to the hem length, and I ended up cutting off 3” from the length. However, nowhere on the pattern does she indicate any problems with construction. I, myself, refrained from scribbling “ARG-G-G-H“ on the pattern, although I was certainly thinking it. When last I wrote about this doomed project, I wasn’t sure if I could save it. Thanks to many good suggestions and words of encouragement from my readers, the future for this dress is looking less ghostly and ghastly. Some of you suggested a break from it, working perfectly into my schedule, which included another trip out of state. Others suggested I sew on something else for a while, which I did and will write about soon. The one thing I did not do was set it aside completely. I was afraid if I left it to finish (if even possible) another time, I never would get back to it.

Actually, I have to admit, that the problems I encountered with this pattern were really not the fault of the pattern. It was entirely of my own making. The pattern required a stretch knit fabric. I used a stretch silk woven charmeuse. That would have been fine, except I insisted on underlining it. I cut the underlining on the bias, which I thought would work, but it was a disaster. It caused the bodice to bind crosswise, pull up lengthwise, and it restricted the stretch of the silk, which was necessary for this particular pattern.

This fabric from Mendel Goldberg Fabrics in NYC is a stretch silk charmeuse, with a wonderful drape to it.

This fabric from Mendel Goldberg Fabrics in NYC is a stretch silk charmeuse, with a wonderful drape to it.

With nothing to lose, I started to remove, meticulously, the silk gauze underlining from all the bodice pieces, starting with the back. I was encouraged enough at the improvement that task made, to continue to do the same with front. Then I tackled the sleeves. What a difference it made! The bodice actually started to fit, although it was still tight across the bust. I then reset the sleeves, releasing about 1/4 “ in the front seam on each side. That was all I could steal from my already-trimmed seam allowances.

The reset sleeves and the finished neckline, cut a little wider than the pattern.

The reset sleeves and the finished neckline, cut a little wider than the pattern.

I sewed the skirt yoke without underlining, but I did use an underlining, cut on the straight of grain, for the gathered skirt. Once all assembled, I basted in the zipper to check the fit. Still a little tight over the bust, but otherwise, not bad!!

Both views of the pattern show the dress with a purchased belt. I tried three different black belts, of varying widths, and did not like the effect of any of them. All made the dress look like it was cut in half. I took a few scraps of my fabric and tied them around the waist on my dress form. From this I could tell a self-belt would look so much better, but all I had left were scraps. Hopefully no one will notice that this sash is pieced together in four places!

the pieced sash.  I'm glad this fabric design is so busy, otherwise the multiple seams in this sash would definitely show.

The pieced sash. I’m glad the fabric design is so busy, otherwise the multiple seams in this sash would definitely show.

The finale details of this dress (snaps at the sleeve vents and a good press, for starters) are finally complete.  I think I can finally say that I have saved this dress from a ghostly demise.

Sewing ghosts

The dress on the form does not show the slight tightness across the bust.

Sewing ghosts

A back view. Notice the asymmetrical skirt yoke, which I think is a nice detail.

Sewing ghosts

I do love this fabric!

And here is something fun - a dressy handbag to wear with this dress ( a recent find from one of my travels).

And here is something fun – a dressy handbag to wear with this dress ( a recent find from one of my travels).

A nice complement to the dress...

A nice complement to the dress…

Finally, some photos of me wearing the "ghost" dress!

Finally, some photos of me wearing the “ghost” dress!

Sewing ghosts

DSC_0322

sewing ghosts

sewing ghosts

Finishing this dress successfully definitely warrants a smile!

Will I ever make this pattern again? No.   Have I learned from this project? Yes. Will I enjoy wearing this dress? I think so. And right now, that’s good enough.

22 Comments

Filed under 1980's dress patterns, piping, sewing in silk, vintage Vogue Designer patterns

Panic and Patterns

Being away, as “on vacation” (or “on holiday” as many express it), can take its toll on sewing projects. If I have to leave a project in mid-stream, it seems to take even longer to get back to it and pick up where I left off. A recent trip to the western state of Wyoming necessitated that I abandon my current “Fall” dress at precisely the time of year when I need to complete it! And now I’ve run into some complications with it.

I guess you could say that panic has set in. Here is what the dress bodice looks like on my dress form:

Panic and patterns

I am using vintage Vogue pattern 2718 for this dress.

The fit seems okay. The neckline will need a little adjustment, but nothing out of the ordinary. The sleeves look good, and I am pleased with the piping so far. So what is the problem? When I try the bodice on, it looks awful. It pulls across the bust, it doesn’t want to move with me at all, and the front seems too short-waisted even though it measures perfectly for me when on the form. Worse still, this fabric is too dear (as in expensive) to put it aside or to think about abandoning this dress.

I think I know what is wrong, and it will take a great deal of effort to try to correct it – and hopefully it will be correctable! I insisted on using an underlining on this stretch silk fabric. I thought I could accommodate the stretch by cutting the underlining on the bias. Guess what? It doesn’t work. The bias pulls from underneath, restricting the stretch of the silk. What this means is that I am going to have to remove the underlining. It is not going to be fun to remove black underlining from black fabric, sewn together with black thread, is it?

I have consoled myself with the thought that I can salvage this project by making a skirt instead of a dress, which may be what I end up doing. Needless to say, I am fighting my discouragement, and trying to stay focused so I can finish this and move on to something more fun.

While traveling is not conducive to sewing, it doesn’t put a damper on looking at more patterns and fabrics online! Sometimes I go weeks without finding a pattern and then I’ll find several all bunched together in the space of a few days. You might be guessing that such was the case during the last few weeks. So while I am struggling with vintage Vogue 2718 right now, I look at my new acquisitions to give me encouragement for the future. Here are some of my “new” finds:

I was delighted to find this DvF pattern in my size, at a reasonable cost!  This one should see some fabric next Spring or Summer.

I was delighted to find this DvF pattern in my size, at a reasonable cost! This one should see some fabric next Spring or Summer.

DSC_0303

This one was too good to pass up, although I don’t have any plans for it right now. This looks like a dress, but it is really a skirt and top, paired with the jacket.

DSC_0304

What can I say? I love coats.

DSC_0305

I have been on the search for this pattern for a long time. I hope I’ll have some reason to make this dress sometime soon…

DSC_0306

The sleeves on the blue version of this blouse are so pretty!

In addition to these new patterns, I just ordered two Marfy patterns, which should either add to my current sewing anxiety or help alleviate it. I hope it is the latter!

17 Comments

Filed under 1980's dress patterns, Blouse patterns from the 1950's, Coats, Cocktail dresses, piping, Uncategorized, vintage Vogue Designer patterns, vintage Vogue patterns from the 1950s, vintage Vogue patterns from the 1960s, vintage Vogue patterns from the 1970s, Wrap dresses

Light Load


String is a wonderful thing. I am particularly fond of kitchen string. Usually twisted cotton or a twisted cotton blend, it is useful for many things (such as tying together the newspapers for recycling, playing with the cats, securing open bags of flour and sugar, etc., etc.) It also occasionally makes its way upstairs to my sewing room.
Light Load DSC_1380

“Light load” kitchen string happens to be the perfect weight and diameter for making piping to be used in apparel. And – my current project for Fall features piping as one of the main design details.

The piping is more clearly visible on the green view of this dress.

The piping is more clearly visible on the green view of this dress.

As luck would have it, I had purchased some hand-dyed silk bias ribbon from Britex Fabrics a couple of years ago. One of the colors I had ordered turned out to be a perfect complement to this silk from Mendel Goldberg, which is slowly making its transformation into a dress.

Light Load

After hours and hours of working on the muslin (toile), cutting out the underlining (on the bias to accommodate the stretch of the silk fabric), checking and re-checking (multiple times) to make sure my pattern pieces were laid out properly, and then meticulously basting the gossamer silk gauze underlining and the slippery fashion fabric together, I was ready to do something fun. “What could be easier?” I thought. “The ribbon is already cut on the bias so I’ll just sew up three yards of piping and I’ll be in business.” Except that I kept getting ridges and lumps in my piping as I encased that kitchen string in the silk ribbon. I thought maybe if I stretched it a bit, it might look better, but it really didn’t. I must admit I was discouraged – actually very discouraged. I could not figure out what I was doing wrong, but I knew I needed to take a break from this mess and come back the next day.

Before I left my sewing room, I went to my stack of Threads Magazines to look for a particular issue recently recommended to me for another reason, and in my search found, by chance, the December 1994/January 1995 issue. There on the cover “Techniques for Perfect Piping” was a featured article.

I have many odd issues of Threads Magazine, but earlier in the year I bought the Threads Magazine Archive 1985-2013, available on their website. I can't recommend it highly enough - decades of sewing advice and expertise is readily available at the click of your computer mouse!

I have many odd issues of Threads Magazine, but earlier in the year I bought the Threads Magazine Archive 1985-2013, available for purchase on their website. I can’t recommend it highly enough – decades of sewing advice and expertise is readily available at the click of your computer mouse!

Needless to say, that became my evening reading. One line in this article by Linda Wakefield led me to the solution to my problem: “I also recommend reducing presser foot pressure, if possible, so that the fabric doesn’t twist or ripple as you stitch.” Even though I am unable to change the presser foot tension on my machine, that advice made me think that I needed to stabilize and reinforce the silk bias ribbon somehow to make it feed more evenly through the needle. The next day, back in my sewing room, I got some tissue paper – the kind one uses for wrapping presents – and cut it into strips. I placed a single layer of tissue under the silk ribbon as I stitched – and voila! Perfect piping emerged from my machine.

The tissue is brown (which is just some I happened to have with my gift wrapping supplies.)

The tissue is brown (which is just some I happened to have with my gift wrapping supplies.)


 The tissue paper tears off easily and cleanly from the silk piping.


The tissue paper tears off easily and cleanly from the silk piping.

Further advice in the article gave tips on applying the piping. I decided to try my hand with this added guidance, choosing to start with the sleeves. The pattern calls for piping around the lower edge – a nice short distance and easy to fix if I wasn’t happy with the finished look. What do you think?

Light Load

The sleeve has a side opening - to be secured by snaps.  Here it is just pinned.

The sleeve has a side opening – to be secured by snaps. Here it is just pinned.

There will still, I am sure, be some tedious moments as I continue work on this dress, but my load was definitely made lighter by something as simple as —- tissue paper!

26 Comments

Filed under 1980's dress patterns, piping, sewing in silk, vintage Vogue Designer patterns

Happy New Sewing Year

“Dresses for breakfasts, and dinners, and balls;

Dresses to sit in, and stand in, and walk in;

Dresses to dance in, and flirt in, and talk in;

Dresses in which to do nothing at all;

Dresses for Winter, Spring, Summer and Fall”

William Allen Butler (1825-1902) may have thought “Nothing to Wear”, from which these lines are taken, was a satirical poem, but he obviously did not know 21st century fashion sewers.  Isn’t January just the perfect time to plan for the creation of “dresses for Winter, Spring, Summer, and Fall”?  Yes, thank you for agreeing with me.

Last year I took a rather theoretical approach to the new sewing year, but this year I am focusing on more specific plans.  Let me start with Winter.

I have three things that I want to complete while the snow is still flying (which gives me until the end of March, more or less):

1)  My Chanel-inspired classic French jacket is my current project, and I am happy to report that I am making slow but steady progress on it.

2) I won’t consider the jacket really complete until I have made the bow blouse that will match its lining.

3) I am excited to say that I am going to be joining one of Susan Khalje’s Couture Sewing Classes in February, and my intended project is — ta-daa — this jacket which I have wanted to make ever since Vogue Patterns first issued it in the 1970s!

I will definitely be doing the color blocked version when I make this coat.

I will definitely be doing the color blocked version when I make this coat.

With any luck (or maybe lots of it will be needed), it may still be Winter when I start this project intended for an event in late April event:

I have an authentic Pucci silk from which to make the dress and line the jacket.

I have an authentic Pucci silk from which to make the dress and line the jacket.

In addition, Spring will not be complete for me until I make a dress for my granddaughter who will be 1-year-old in March.  I purchased this fabric last Fall when I was at the Eric Carle Museum in Amherst, Massachusetts.  You can imagine my excitement when I saw that the gift shop included yardage of soft, quality cotton featuring designs from his books.  I envision these little ducks embellished with yellow rick-rack.

Happy New Sewing Year - carle fabric Before Spring bids us adieu, I may divert from dresses to make another pair of slim pants in this vintage 1950s’ linen:

I only have 1 5/8 yards of this 35" wide fabric, so it remains to be seen if i can squeeze pants out of it.

I only have one and 5/8 yards of this 35″ wide fabric, so it remains to be seen if I can squeeze pants out of it.

If Summer of 2014 is as hot as last Summer (or even if it is not), I’ll be making at least two more cool, linen dresses, one sheath-style and one belted.  More on these linen fabric finds in a future post…

And a bathrobe!!  I am dying to make a swishy bathrobe!

Ah, and then comes Fall (already??), probably my favorite season of all.  I have two projects envisioned:

1) I found this stretch silk charmeuse at Mendel Goldberg Fabrics on a quick day trip to NYC in early Fall.

Another gorgeous Italian silk!

Another gorgeous Italian silk!

I bought it thinking I may use it for the lining for my No. 2 French jacket, but shortly after that I found this pattern on eBay and promptly decided it would be perfect made up in this dress (which requires a stretch fabric.  Well, it says “ knit fabrics only” but I say stretch fabric will do just fine).

This os one of the few patterns from the 1980s which I really like.  However, i will not be duplicating the hairstyle.

This is one of the few patterns from the 1980s which I really like. However, I will not be duplicating the hairstyle.

2) I’ve had this buttery soft cashmere wool for a couple of years now.  I originally thought I’d make a suit, but now I’m thinking long-sleeved dress instead.  I’m still sorting this one out in my head so I’m very glad I have until next Fall.

A subtle windowpane check in navy with deep red and ivory intersecting lines.

A subtle windowpane check in navy with deep red and ivory intersecting lines.

Sprinkled among these plans for Winter, Spring, Summer and Fall will surely be more little dresses for granddaughter Aida.  I fully intend for her to have some of the cutest frocks in all of New England.

Finally, if 2013 taught me anything, it is that the unexpected is waiting around every corner.

Lots of corners lurking in this Liberty cotton!

Lots of corners lurking in this Liberty cotton!

Life can take sudden turns and twists that are not always sewing-friendly, so I plan to be kind to myself if that happens.  But wouldn’t it be nice for all of us to have the kind of year when we have the extra time to make a dress in which to do “nothing at all”?

14 Comments

Filed under 1980's dress patterns, Boucle for French style jackets, Chanel-type jackets, Coats, Liberty cotton, Linen, Polka dots, Uncategorized, vintage Vogue Designer patterns, vintage Vogue patterns from the 1970s, Vogue patterns, woolens

New Life from an Old Dress

I’m sure I never would have entertained the thought of remaking/repurposing this dress  –

I made this maternity dress in the Fall of 1980 while pregnant with our first child.

I made this maternity dress in the Fall of 1980 while pregnant with our first child. The fabric is US-made Pendleton wool.

– had Emerald Green not emerged as THE color of 2013.  As it was, it seemed silly not to take advantage of this opportunity to make a skirt in a color I love, from a dress that would not be worn again, and which already carried sentimental memories.  So I told myself repeatedly, “Do this.”  And so I did it, but not without much mental anguish.

Before I did any ripping of seams or cutting of fabric, I needed to decide what kind of a skirt I could make, knowing that, even with a maternity tent-style dress, the usable expanse of fabric was limited.  It seemed fairly obvious that a pencil or A-line skirt was about the extent of the possibilities.  But I wanted some kind of a focal point on it, too.  I kept thinking about the fringed Pendleton wool skirt that I had remade, thinking that fringe on this green one would be quite nice as well.  I did a little testing on an inside seam of the dress and determined the wool was so tightly woven, that any “fringing” would have to be somewhat minimal.  It also seemed to be easier to unravel the threads working up and down rather than across.  I figured if I could wiggle out enough fabric to add one overlap (or pleat) at the side front, I could fringe that edge and get the focal point I wanted.

With this plan in mind, I now had to face cutting apart – and into – this dress, which I so clearly remembered making and wearing over 31 years ago.  Honestly, for a couple of days I really couldn’t face this.  My practical side finally triumphed when I decided I would first separate just the side seams on the dress.  If I chickened out at that point, I could always sew it back together, right?  Right!  And so I snipped and snipped and pretty soon I had two usable sections of wool.

The dress with the side seams separated.

The dress with the side seams separated.

Then –  somehow, miraculously, I was suddenly okay with the thought of cutting into this dress.  The back part of the skirt pattern fit perfectly on the back section of the dress – it was even already seamed for me.

My muslin pattern positioned on the back of the dress.

My muslin pattern positioned on the back of the dress.

The front part of the dress gave me enough room to make a new two-piece front, with a pleat on the left side.  I cut out the pieces and set about to fringing.  Re-runs of Downton Abbey helped tremendously with this – I pulled and picked and created fluffy little towers of green threads while totally absorbed in another time and place.

Then it was back to the sewing room to sew this baby (pardon the bad pun) together.  There was not enough fabric  to fashion a waistband on the straight of grain, so I opted to make an inside pieced-together facing instead.

The facing at the waistline.  I attached the 31-year-old Pendleton label in place after all these years!

The facing at the waistline. I attached the 31-year-old Pendleton label in place after all these years!

Then I made a button tab out of bias tape which I just happened to have on hand in emerald green.  What I could not find was a 7” zipper in emerald, nor lining fabric in emerald.  Guess the manufacturers of such items did not get the memo from Pantone about the color of the year!  So I ended up with a black zipper and dark gray Bemberg lining fabric.

The black zipper and gray lining are okay, I think...

The black zipper and gray lining are okay, I think…

I went round and round with a decision about buttons to hold the top part of the pleat in place.  I found several single buttons in my button box, which I really liked, but I really needed two or three.   A trip to Joann’s yielded some pale gray pearl buttons which would have been lovely, except that one broke after I got home when I was taking it off the card!  So I still have to resolve the button issue – as right now I  have exactly one button on the skirt, although I do like its diamond shape quite well…

The fringe detail on the pleat - and the single button.  Sure wish I had another one of these!

The fringe detail on the pleat – and the single button. Sure wish I had another one of these!

It's finished (except for the button issue, of course!).

It’s finished (except for the button issue, of course!).

green skirt

The back view.

The back view.

Thinking back on this project, I believe the signs were there, telling me to make this skirt.  Consider that I found these Stubbs and Wootton shoes – green and black Buffalo Check to go with my Pendleton wool:

How I love these comfy flats!

How I love these comfy flats!

And among my collection of silk scarves was this scarf, purchased in the 1980’s from the Museum of American Folk Art, featuring one of their quilts in predominant colors of pink and – yes, Emerald Green.

The green in this scarf could not be more perfect.

The green in this scarf could not be more perfect.

A detail of the scarf on top of the skirt.

A detail of the scarf on top of the skirt.

So – where do I envision wearing this skirt?  How about to a baby shower for my daughter, now expecting her own little one?  After all, she herself  was once sheltered by these warm woolen threads of green – and love.

14 Comments

Filed under 1980's dress patterns, Buttons - choosing the right ones, hand-sewn zippers, Scarves, Uncategorized, woolens

Green, green, and more green

When Pantone announced the color of the year for 2013 last week, I was immediately smitten.  Actually, I’ve been smitten with Emerald Green (Pantone 17-5641 TCX) for as long as I can remember – and finally, finally, it’s going to be center stage again after at least 30 years in hiding (as deliciously detailed by Christina Binkley on the Personal Journal front page of The Wall Street Journal on December 6.)

My initial euphoria turned to smug (yes, I admit it!) satisfaction.  Why is this?  Just this Fall I had seen emerald green silk matka on the website of Waechter’s Fine Fabrics.    Well, I sent for a swatch and upon its arrival I speedily ordered three+ yards. I knew I would have to make a Spring suit out of this fabric.

This is the swatch I ordered from Waechter's Fine Fabrics

This is the swatch I ordered from Waechter’s Fine Fabrics.

Of course, this was before Pantone made its announcement. And although I still would have purchased it even if this shade of green were the “uncolor” of the coming year, I’m looking forward to being stylish, to boot!

But wait, that’s not all!

Much earlier in the year, I had purchased this yardage of Moygashel linen from an Etsy shop.  What attracted me to it was that emerald green is featured so dominantly in it.  I’ve shown this fabric before on this blog, but I could not resist showing another peek at it.  I still keep thinking it would make a gorgeous Spring coat… or pants.

The emerald green in this design really makes it pop!

The emerald green in this design really makes it pop!

Finally, this color – this Emerald Green – has given me the perfect opportunity to tell (and complete) a story about a dress I made for myself in 1980 – and share some wonderful, wonderful family news, too.  Here’s the pattern:

Yes - it is for a maternity dress...  from 31 years ago.

Yes – it is for a maternity dress… from 32 years ago.

And yes, I made it in Emerald Green:

With a few hang lines after 32 years!

With a few hang lines after 32 years!

DSC_0737

A detail of the yoke. I chose two pearl buttons from my button box of 32 years ago to add a little interest.

This was a piece of Pendleton wool I picked up on sale in the Fall of 1980 when I was scrambling to make some dresses for my first pregnancy (our daughter was born in April 1981).  I loved the color and thought it would be quite beautiful over the holidays. In fact, two years later, when I was pregnant again (with our son), I wore it for our Christmas photo:

.

Our growing family, in 1982.

Whatever possessed me to save this dress, I’ll never know.  I actually saved all the maternity clothes I made for myself.  I dug them out of the cedar closet this Fall to show to our daughter (the little girl in the photo)– who (taa daa!), with her husband, is excitingly expecting their first child (our first grandchild!).  Whatever thoughts I had about the suitability of these dresses for “today’s” pregnant style made both of us laugh!  My daughter will not be wearing vintage maternity dresses, even if one of them is an au courant color.  But oh dear, the wheels started to turn in my head.     Hm-m-m-m, why not take this green “tent” and make a skirt for MYSELF out of it??  Wouldn’t that be a story to tell?

So now, I’m realigning my winter projects.  Come January I’ll be seeing and sewing GREEN.

By the way, Pendleton fabric yardage used to come with labels to sew into finished garments.  I never sewed the label into this dress, but here it is:

A pristine label, still attached to its card.

A pristine label, still attached to its card…

... with care instructions on the back.

… with care instructions on the back.

This time around I plan to use it!

14 Comments

Filed under 1980's dress patterns, Uncategorized, vintage Vogue patterns from the 1970s, woolens

Eating my words.

I never expected to find a pattern from the decade of the ‘80s that I liked, as my refrain about fashions from that span of time has always been:  “Those ’80s’ styles were just too awful”.  But I humbly ate my words when I finally found a pattern (from an Etsy shop) for a sarong skirt, which just happens to be from 1985.

I won’t be making the bra top… And notice the “big” shoulders on the blouse, which otherwise would be kind of cute, I think!

It’s quite obvious where the Vogue pattern designer got the inspiration for this sarong and “bra-type top” look.  Here is the scoop from Fairchild’s Dictionary of Fashion , p. 395 (Fairchild Publications, Inc., New York, New York, 2010):

“Long straight wraparound skirt made of bright-colored tropical design fabric with deep fold in front, held on by a scarf around waist.  Worn by men and women of the Malay Archipelago.  Adapted as a beach dress style with wraparound skirt draped to one side and strapless top first designed by Edith Head for Dorothy Lamour film Hurricane, in 1937.  Worn by Lamour in many films of the 1930s and 1940s. [my emphasis]

This sketch accompanies the entry for sarong skirt/dress in Fairchild’s Dictionary.

The original owner of the pattern made the long version skirt while I decided to make the shorter version.  She left cryptic notes throughout the instruction sheet.

Here is an example of some of the notes which the original owner made on the instruction sheets.

I made some of my own notes, but I wrote them on the muslin which I made to test the pattern before cutting into my fashion fabric.   I am glad I did, too, as I discovered that the overlap for the skirt was not quite enough for a “street” skirt (as opposed to the beachy/resort intent of the pattern).  So – I made the side panels each about 2” wider.  Then to make the waist still work, I added a dart in the left side front (which is the hidden side of the wrap).  I  made the ties each about 2 inches longer, as I thought they would be more becoming and lay flatter if they had a little more length to them.

Here is the diagram from the envelope which shows the thumbnail details of the two skirts.

I had picked out this tropical-look fabric, ordered a swatch, then the yardage from B & J Fabrics in New York.

Here’s how it all turned out:

Not quite Dorothy Lamour.

A close-up view, showing the ties.

When I was putting my new skirt in my closet, I spied my chartreuse green Tommy Bahama top, which is almost vintage itself, it’s so old.  But, h-m-m-m-m, the wheels started turning and I paired the two together here:

The green in the top actually matches the green in skirt better than it shows here. Just wish I had some green shoes to match…

From 1937 – to 1985 – to 2012, I suspect this is one style which will never go out of style.

16 Comments

Filed under 1980's dress patterns, Asian-inspired dress designs, Uncategorized, vintage Vogue Designer patterns, Vogue patterns

Give me Liberty . . .

. . .  and I’ll make a dress!  Of course, I’m referring to Liberty cottons, one of the great fabrics of the world.  There is, as most of you already know, more to Liberty than just cottons – they make silks, too, and one look at their website will introduce you to the full range of Liberty products, appeal, and mystique.  It is so exciting to me to realize that this company, which was founded in 1875, is still producing some of the finest quality fabrics in the world. Their most famous fabric is that cotton, more properly referred to as Tana Lawn.  Here I quote from The Liberty Book of Home Sewing (about which I’ll tell you more shortly):

Tana Lawn   Synonymous with Liberty, this 100% cotton fabric has a very fine thread count and soft, silky feel.  New print designs are created each season, heritage classics are continuously reworked, and there is also an array of coordinating plain colors.”

It just so happens that I lucked into two pieces of Tana Lawn, originally purchased by a relative in the ‘60s, and tucked away, unused, into a bureau drawer.  When the contents of that drawer were being emptied about a decade later, I was the happy recipient.  At that point in time, Tana Lawn was only 35” wide, so in order to make a dress or blouse, it was necessary to have a good bit of yardage at one’s disposal, to compensate for the narrow width.  Of course, the piece I liked the best had the least yardage:

I find the colors and design of this cotton so appealing.

It sat in my fabric drawer for about another 12 or 15 years, until I finally made it into a dress for my daughter when she was about 8 years old.

The only reason I saved this dress is because of its vintage Liberty fabric.

The second piece had a bit more yardage to it, but it, too, sat in my fabric closet, until last Summer, when I finally decided I would make myself a dress.

This is the same fabric design in different colors.

I knew it would have to be sleeveless, and I envisioned a simple belted bodice with some fullness in the skirt.  The only pattern I could find which came close was this Butterick one:

I chose this pattern primarily for the bodice in View A (the blue one).

Then I began making alterations to it:  a few soft pleats for the skirt instead of all that fullness; I wanted to add pockets in the side seams; to add pockets, I had to move the zipper from the side to the back, which also made it easier for me to fit the pattern pieces onto the narrow fabric. Finally, I wanted it lined, which I did with a very lightweight white cotton lawn.  Here’s how it turned out:

I did not have enough fabric left to make a self belt, so I have worn it with one I already have, until I can find one I like better!

I really like the back of this dress.

Here is a close-up of the back neckline.

Well, it seems I am always rediscovering pieces of fabric in my extensive collection, and although I have known this fabric was there, it always seems like a new discovery when something so pretty surfaces again.  I purchased this piece of Tana Lawn in Bermuda (probably at Trimingham’s, now unfortunately out of business) sometime in the 1980s.

I still love this fabric over twenty-five years after purchasing it!

I could never decide on a pattern to use for it – those ’80 styles were just too awful.  So this fabric is another one of those “Thank goodness I never made this!”  Although it is also just 35” wide, I have a plentiful 4½ yards so I should be able to pair it with a vintage pattern from the ‘50s or ‘60s – I’m still looking and deciding…  Ideas, anyone?  (Interestingly, Liberty apparently changed their production in the early 1990s, and now their Tana Lawn is 44” wide.)

Now, about that afore-mentioned book:  last Summer I was browsing books on sewing and fashion on Amazon, and The Liberty Book of Home Sewing popped up for pre-order.  Being a complete push-over for any books which showcase beautiful fabrics, I signed up for it and it arrived in October.  Of the 25 projects featured, my favorites are the vintage ‘50s look apron on the cover and the peacock pincushion.

This is the cover of the hardback book, showing the frilly '50s' style apron.

And here is the whimsical peacock pincushion project.

What I really like about this book, however, are the full-page representations of Liberty cottons; the Glossary of Fabrics, which includes a little history about each featured design; and the Foreword, which includes a history of the production of Tana Lawn.

Here is one page of the Glossary of Fabrics.

Finally – one last thing:  when I purchased my Liberty fabric in Bermuda, this label came with it:

This tag is small, but packs a powerful message! I'll definitely be sewing it into whatever dress I eventually make.

What is it about a label that can give a fabric or pattern purchase – and ultimately the finished garment – its own persona?  How can something so small add so much validation and completeness to the dressmaker’s labor of love?

4 Comments

Filed under 1980's dress patterns, Liberty cotton, side-placed zippers, Uncategorized

Thank goodness I never made this!

I kept thinking that at some point years ago I had purchased yardage of bright pink and navy blue silk to make a dress, but I had never used it.  In my fabric closet I found three yards of pink Moygashel linen and a small quantity of navy blue linen, but I could tell from the odd shape of the blue fabric that it was just leftovers from some other garment (I think a navy blue suit I made for myself in the mid 70’s).  So – I didn’t think this was the fabric I thought I was remembering.

This was really bothering me and from time to time, I would look again in my fabric closet, hoping to find proof of my suspicions.  I found lots of other fabric, but not what I was looking for.  I had just about determined that I simply was mistaken,  when just a few weeks ago, I came across an unmarked white bag in one of the drawers of the high chest in our living room.  Now, I had looked in this drawer just recently, as it was stuffed with fabric scraps, some unfinished projects (I hate to admit this, but it’s true!), and a few patterns.   The white bag had just not caught my attention, as it seemed almost empty.   I took a peek inside – and voila!  Gorgeous pink and navy crepe de chine silk – and this God-awful pattern, which obviously I purchased to make up in pink and navy.  No wonder I lost interest in sewing for myself in the 80’s!!!

1980's Butterick pattern which I did not make - thank goodness!

I am absolutely delighted to have rediscovered this fabric – there are about three and half yards of the pink and a half yard of the blue, and it has a fine hand to it.

Pink and blue silk which I found in my fabric drawer

I still love the combination of these two colors, and in the right mid-century style, I think this fabric will finally one day meet its destiny!

3 Comments

Filed under 1980's dress patterns