Category Archives: Cocktail dresses

A Fussy-to-Make, Fuchsia-Pink Silk Dress

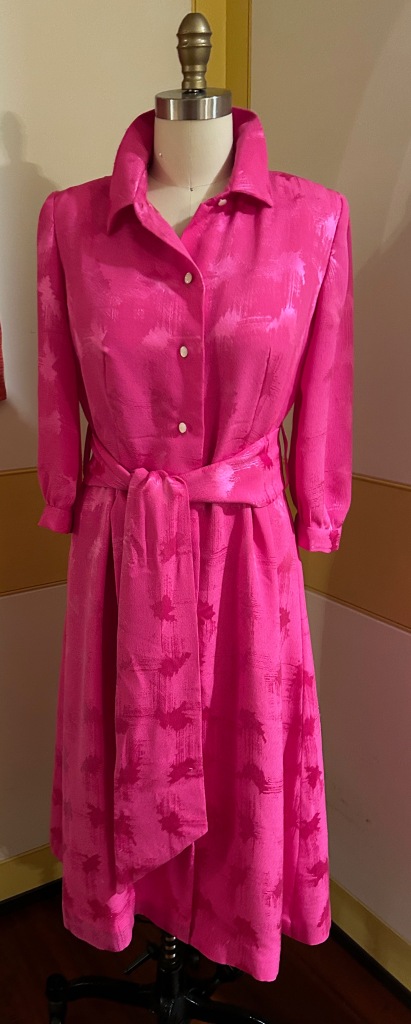
Sometimes extra incentive is needed to push through a project which turns out to be more difficult than anticipated.  Such was the case with this pink silk jacquard dress.

I had purchased this fabric quite a few years ago online from Britex Fabrics.  I knew it was a dressy fabric, and unsure of what form this dress would take, I made the decision to purchase four yards of this 58” wide silk.  That gave me some latitude in my selection of pattern.  

Finally last Spring I made a decision about what I wanted this dress to be.  That was precipitated by the arrival of a beautiful invitation to a very special event this Fall, and of course (!) I needed a new dress to wear to it. The fabric is a dressy, shimmery silk jacquard, so by its very nature it would make up into a dress which had a certain glamour to it.  

I decided to use a go-to pattern I have used a few times already and make a classic shirtdress.  That may seem like a strange choice, but I envisioned it as very dressy and flowing, and quite appropriate for the fabric.  

While this idea was percolating, I happened to attend a luncheon/presentation by a wonderful organization called the Ibu Movement.  (Pronounced ebu, with a long “e,” this is an Indonesian word meaning “a woman of respect.”)  

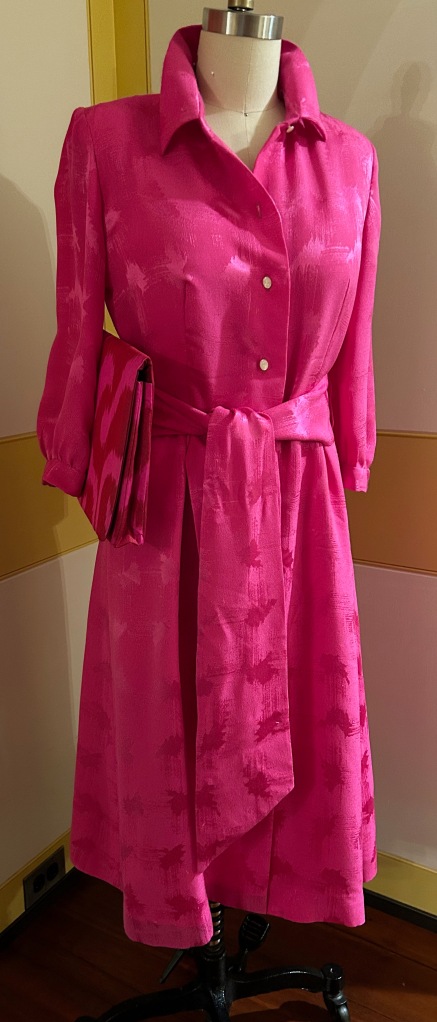
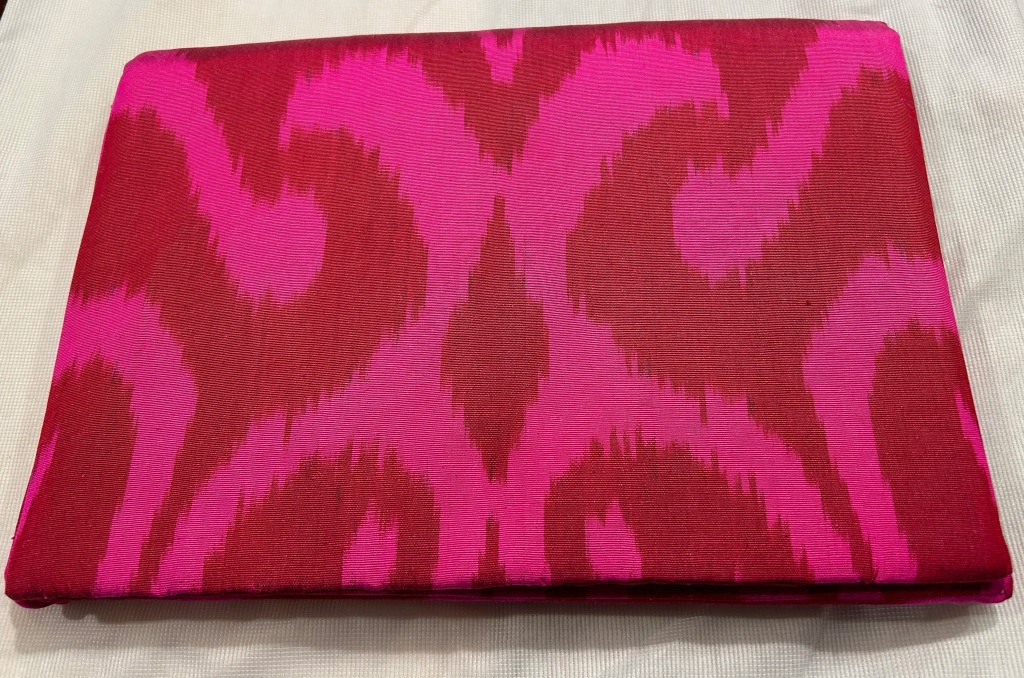
The pop-up shop accompanying this event was filled with gorgeous clothing, accessories, even shoes. When I saw this envelope clutch, I knew it would match my silk fabric perfectly and would be the perfect addition to my as-of-yet-to-be-sewn pink dress.  Little did I know at that time it would be the catalyst to make sure I finished the dress!

My first clue as to the fussiness of the fabric was as soon as I pressed it and laid it out for the placement of my muslin pattern. Here is what I noticed:

  1. The fabric had a slightly loose weave to it, making it almost stretchy, certainly very slinky.  Keeping it properly aligned on the straight of grain was going to be a challenge.  
  2. The fabric frayed easily.
  3. It also was prone to shedding silk fibers.  I decided I needed to handle it as little as possible to mitigate this situation.
  4. The jacquard weave in it had a definite horizontal and vertical pattern to it, meaning I would have to match the design horizontally and vertically across seams.  Although I am used to matching plaids and prints, this was a little different as the woven design was of irregular form.
The irregular nature of the weave is apparent in this photo.

I decided to underline the dress (except for the sleeves) with a very lightweight silk batiste, which I hoped would give it some substance, but still preserve the flowing nature of the fabric.  I made the conscious decision not to add an additional lining to the dress.

Although I rarely use fusible interfacing, I realized very early on that sewn-in interfacing was going to shift around and cause all kinds of problems.  Luckily, I had been introduced to a very finely woven, fusible German interfacing available from Farmhouse Fabrics.  I had some on hand and found it to be the perfect stabilizing foundation for the cuffs, the front facing, the collar, the collar stand, and the hem.  

So, that solved one big problem for me.  I was still concerned about being able to get the hem even.  I had good reason to be concerned!  It took two tries to avoid having either a bubble appear or uneven dips around the perimeter. 

The final quandary I had was the buttonholes.  Because the fabric shed silk fibers so easily, I was really worried that my buttonhole attachment might grab onto those fibers and make a mess.  I did some sample buttonholes, which confirmed my suspicions.  So – I used wax paper between the foot of the attachment and the fabric, cutting little windows in the wax paper where the buttonholes would be sewn.  It worked like a dream.  

I found vintage pearl buttons with a slight iridescence to them which I thought worked well with the fabric.
And here is that handbag with the dress!

This was not a particularly fun dress to sew, but that “perfect” handbag kept me focused.  And I am glad it did, as the dress was a success in the end.  And it always feels like an accomplishment to use fabric which has been lying in wait for so long.  

29 Comments

Filed under Buttons - choosing the right ones, Cocktail dresses, Linings, sewing in silk, silk, Uncategorized, underlinings, vintage buttons, Vogue patterns

An A-Line Cocktail Dress

The A-Line silhouette is certainly a very recognizable and common style.  Although there is nothing spectacular about it, it does have a rather interesting origin in modern fashion history.  I had lots of time to think about this style as I worked through my most recent project, and I was surprised with what I discovered.

This entry in Fairchild’s Dictionary of Fashion gives a succinct history:

“Apparel styled close and narrow at the shoulders or waist and flaring gently away from the body to the hem in a line resembling the letter A.  Introduced in 1955 by Paris couturier Christian Dior, the term is used as an adjective in describing a wide variety of apparel with this shape, including coats, dresses, jumpers, and skirts.” (The Fairchild Dictionary of Fashion, by Charlotte Mankey Calasibetta and Phyllis Tortora, Third edition, Fairchild Publications, Inc., New York, New York, c2003, page 11)

A further entry adds “…Usually made with narrow shoulders, [and] a high neckline…” (Ibid, page 11)

Dior’s “A-Line” collection in the Spring of 1955 featured a “fingertip-length flared jacket worn over a dress with a very full, pleated skirt.” (“A-Line dress,” by Susan Ward; Encyclopedia of Clothing and Fashion, by Valerie Steele; Thomson Gale, Detroit, Michigan, pages 35-36) Fairchild’s Dictionary has a depiction of this very dress which was called “the most wanted silhouette in Paris.”

Obviously the A-Line shape then evolved into a less dramatic, and more ubiquitous style during the 1960s and ‘70s, much closer to  what we recognize today as A-Line.

When I was contemplating which pattern to use for my dress (I had purchased the fabric, 1½ yards, 54” wide,  from Mendel Goldberg Fabrics in April of this year), I wanted a style which would showcase the fabric. Although I originally thought I would go with a sheath dress silhouette for this fabric, when I found this pattern, it struck a chord.

The line drawing for the shorter length shows more detail of its seaming and darts. The description on the pattern envelope reads: “Evening or street length, high shaped, slightly A-line dress has short sleeves and scoop neckline with or without slit at center front…”

I liked that center front seam with its notched neckline, even though I knew it might be a little tricky to match the embroidered vines and flowers.  However, I thought  the semi-attached appliqués would be lovely overlapping the seams.

The small slit in the center front neckline.

It took me a full week to finish my muslin.  The bust needed to be dropped so those princess-seamed darts needed a lot of adjustment.  In the shoulder area I had some gaping in the front, and I also needed to reshape the top of the shoulders.  Instead of easing the sleevecaps to fit the armscye, I decided to replace that ease with a shaping dart to the top of the sleeves.  I really liked the fluid look that gave to the shoulder line. I drafted three-quarter sleeves as I was contemplating that change to the original pattern.

It is difficult to see in this black fabric, but this is the top of the sleeve with its shaping dart.  If you look closely, you can see some loose edges of the larger appliqués.

Can you guess what is coming next?  As is often the case when I purchase fabric first and then choose a pattern, I created a challenge for myself.  It was almost immediately obvious to me that I would not be able to work on the lengthwise grain of fabric, as I could not begin to fit the pattern pieces onto the fabric and do any matching whatsoever. As luck would have it, I preferred the appearance of the meandering of the vines and flowers on the crossgrain, and I figured out how to stagger the pattern pieces to both fit the fabric, and match the seams.  But those three-quarter length sleeves?  No way were they going to happen!  I could just fit in the original short sleeves, so short they were going to be!

Here are the silk organza underlining (pattern) pieces laid out on my fabric. I had to stagger the four main pieces to fit it on the fabric. Fortunately I was still able to match the pattern of the vines and flowers. Whew! (I took pictures on my iPad to help with the matching.  You can see it in the upper right corner.)

I ended up basting by hand every single seam on this dress.  Even with great care, it was incredibly easy to catch corners of those loose appliqués by mistake, so it was much easier to make adjustments in basting rather than in the finished machine-sewn seams.  The basting also showed me I needed to take out a small bit of the width of the skirt from the waist down, about an inch total.  When is an inch more than an inch?  In this dress!  That one inch made a huge difference in its final appearance.

Because I was sewing this dress using couture techniques, the neck facing was eliminated, with the black crepe de chine lining fell-stitched to the edge of the neckline.  When I under-stitched the lining to secure it in place, I used an off-white silk buttonhole twist. It was so much easier to see light thread on the black lining, and also, I think it looks pretty.

I hand picked the zipper, which virtually disappears in this dark jacquard embroidered fabric.

I was able to arrange the hem of the skirt so the larger of the semi-attached appliqués would hang just beneath the fold-line.

This shows two of the appliqués at the hemline.

I love the graceful flow of this dress.

The simple look of this dress belies the hours and hours I spent on it!

And I am so pleased that I was unable to make three-quarter length sleeves. These short sleeves are just perfect!

I am quite happy with the way this dress turned out.  I do think its simple lines show off the fabric well – no need for anything too fussy when the fabric is so incredibly lovely!  I love that I can wear this 1960’s A-Line style and somehow feel – and hopefully look – very current.


30 Comments

Filed under Cocktail dresses, couture construction, Fashion history, Formal or fancy dresses, hand-sewn zippers, Mid-Century style, Uncategorized, underlinings, vintage Vogue patterns from the 1960s

A Sewing Draught

The weather outside is frightful, as the popular Christmas song goes.  It has been too hot and too wet here in eastern Pennsylvania (USA) this summer.  Our family travels, however, took us to areas that were both too hot and much too dry. It was exactly those lengthy travels which helped determine the atmospheric conditions in my sewing room during the past weeks.  There has been a definite draught in that part of the house.  The sewing machines have been huddled under their covers, the fabric has lain folded and fallow, there has not been even a bubble of moisture from the steam iron, nor the slightest snip from the scissors.  It has been a place undisturbed and quite barren.

So, finally, it is time to change all that!  Now I am faced with the question – Do I try to squeeze in the making of one more summer dress (it certainly still feels like summer) – or do I forge ahead with a project which has a mid-October deadline?

If I go with one more summer dress, it will be one made from this vintage Moygashel linen, which has been in my queue for quite some time – and somehow never made it to the top.

Realistically, it would probably be wiser to focus on that mid-October dress, which is going to be a cocktail dress made from this amazing fabric, a lightweight brocade, embroidered and with with lace appliqués.  One of the perks of attending Susan Khalje’s Couture Sewing School in Baltimore (which I did last April) is the opportunity to see and purchase fabric from Mendel Goldberg Fabrics.  Alice Wildes, the proprietress, arrives at the beginning of each week-long class with a car full of her gorgeous, carefully selected yard goods, and that is where I purchased this piece.

The embroidered flower stems are a light gray, and the flowers themselves are a pale pink.

Getting this brocade was actually a last minute decision, as I already had one cotton piece selected – and I was trying to be circumspect in buying more fabric (remind me again of why I ever think this will work?) Anyway, I’m so glad I succumbed as I love it and have determined which pattern to use for its construction:

I will be making the shorter dress, without the jacket.

I like the notched neck detail on the shorter dress. I may make below elbow length sleeves – still to be determined.

Although this dress appears to be a simple silhouette, I have plans to change it up a bit, which will add to its complexity, so it certainly cannot be rushed.

With any luck, the weather will start to change for the better no matter which project I embark on.  The only question is – which one will get the nod?

13 Comments

Filed under Cocktail dresses, Formal or fancy dresses, Lace, Linen, Moygashel linen, Uncategorized, Vintage fabric, vintage Vogue patterns from the 1960s

Wearing Dots

From this …


To this…


How did that happen?

After my purchase of that pattern a couple of years ago, I definitely had second thoughts.  While I loved it when it was first available back in the 1970s – and at that time I was of the age when I probably could have actually worn it – I immediately realized it would not be appropriate for a 60-something-year-old! I tucked it away in my pattern file where I knew I would come across it occasionally and indulge a long-ago dream.  Little did I know it would play a major roll in the realization of this polka-dotted dress.

It took almost eight years for me to come up with a plan for this polka dot silk fabric.  I kept envisioning a waisted, sleeveless dress with a “flowy” skirt, but I could not find a pattern I liked, either vintage or new.  I wanted to avoid darts as much as possible (that’s a story in itself for someday), which meant I needed a princess style bodice.  Many princess line bodices have side seams, but I wanted one without side seams, and with princess line seaming on the bodice back as well.  Pondering all this, I again came across my Belinda Bellville pattern above and thought maybe it would work, with a few changes. But then I noticed that the bodice was supposed to be cut on the bias. 

This pattern detailing from the instruction sheet shows the thee bodice pieces at the top of the picture. The bias is clearly marked.

After not having any success in finding any other suitable pattern, I gave it another look.  Why not cut it on the straight of goods?  It was at least worth a try in muslin, so that’s what I did.  The changes I made to it included; 1) lowering the bust line, 2) eliminating the short-waisted front of the dress and restoring it to waist level, 3) placing the front center part of the bodice on the fold, eliminating the center seam, 4) lowering the neckline just a little, 5) making the waist larger, and 6) adding some ease across the back and shoulders.  With all those changes, I had a bodice I really liked.

But then I needed to make a skirt to complement the bodice.  When I looked at the skirt pattern, I knew I needed to divide it in thirds (for one half of the width of the skirt) and match the seam lines to the seams in the bodice.  Here is what I came up with:

On the left is the one-piece tissue pattern for the skirt. Using the dart lines on that pattern helped me determine the angles I needed for my skirt.

It was about this time I got the idea to make this dress in a longer skirt rather than knee-length, which is where I usually wear my dresses.  The only question I had was – did I have enough fabric to do this?  My silk was 45” wide, and I only had two yards.  I spent at least an hour laying out and eyeballing my muslin pieces on the silk, on the floor, just to see if I could possibly accomplish this task.  I found one combination that would allow this, and took a photo so I could remember how to do it!

It literally took an entire week to work out the pattern and perfect the muslin, but then the sewing began!

As soon as I completed the construction of the bodice, including its silk organza underlining, its catch-stitched raw seam edges, with the seam allowances around the neckline and armholes appropriately tacked in place, I knew I had a bodice which was just what I had envisioned.

Somehow the skirt seams all matched up perfectly with the bodice seams and the center front inverted box pleat, which I added, looked wonderful, I thought.  I made the lining out of navy blue crepe de chine, purchased from Emma One Sock Fabrics.

When it came to under-stitching the neckline and armholes, I decided to do it in white.  It mimics the white polka dots in the fashion fabric and also was much easier to see while doing all that handwork.

Instead of a box pleat in the lining, I did two side pleats to reduce bulk in that critical tummy region!

Fortunately, for the belt, I had silk taffeta left over from two previous projects, which turned out to be a perfect match.  I did not want the belt to take away visually from the rest of the dress, so I made it a modest 1.5 inches wide.  I think it is enough to complete the look, but not overpower it. And OF COURSE I wanted to finish it off with a tailored bow.  (I am planning a post on making this tailored bow belt, so I will not go into the details of it right now.)


An oyster-colored clutch helps to complete the look.

This is a very comfortable dress to wear!

No attempt was made to match any dots, as the pattern was completely random. This is the hand-picked zipper. I love the fact that the navy thread shows up on the white and coral dots.

And should I need a dress coat, this one matches the belt!

While this dress was firmly in my queue for summer sewing, at the time I did my planning I was not making it for any special occasion.  However, as good fortune would have it, two unforeseen occasions are now approaching in late summer for which this dress will be perfect.  I am definitely looking forward to wearing these dots!

41 Comments

Filed under Bows as design feature, Cocktail dresses, couture construction, Linings, Mid-Century style, Polka dots, sewing in silk, silk, Silk taffeta, Uncategorized, vintage Vogue Designer patterns, vintage Vogue patterns from the 1970s

Seeing Dots

Who doesn’t love a polka dotted motif?  The term “polka dot,” dating from 1880-85, is of American derivation, and of course it immediately conjures up a mental picture of a field of spots forming a pattern on a textile.

Here is what Christian Dior had to say about Dots in his Little Dictionary of Fashion, first published in 1954:  “I would say the same about dots as about checks.  They are lovely, elegant, easy, and always in fashion.  I never get tired of dots…  Dots are lovely for holiday clothes … and for accessories.  According to their color, so they can be versatile…  Black and white for elegance; soft pinks and blues for prettiness; emerald, scarlet, and yellow for gaiety; beige and gray for dignity.”  (The Little Dictionary of Fashion, by Christian Dior; Abrams, New York, New York, 2007, page 34.)

“Lovely, elegant, easy and always in fashion.”  That is quite an endorsement, and one with which I completely agree.  I also have to agree with these quotes, the first one  from Marc Jacobs: “There is never a wrong time for a polka dot,”  and this one from the American actress, Anna Kendrick, “You can’t have a bad day in polka dots.”

While images of polka-dotted dresses, blouses, ensembles, and sportswear are in abundant supply from many sources, it’s always inspiring to look at a few select examples, many from the 1950s.  The following two images were part of a feature in the February/March 1955 Vogue Pattern Book Magazine.  Although pictured in black and white the first example is described as “Tiny white polka dots on red crepe. A soft day-long dress.”

The next image is titled Gigantic Dots:  “Bold black dots on hot pink surah.  A dramatic sheathed bodice dress.”

Can you imagine how beautiful this dress was in hot pink with black dots?

The June/July 1957 VPB Magazine featured “the most romantic dress of the season – a pouf of black-and-white silk polka dots.”

Less than a year later, in the April/May 1958 VPB Magazine, an entire feature was on Polka Dots and Patent Leather:  “Exciting goings-on in polka dots: fresh new arrangements – at their most polished in black and white silk surah, spruced with gleaming black patent leather.”

Below is the dress of this description: “Dots blown up to impressive sizes – a look for relaxed but festive evenings.”

This two-piece dress could easily be worn today and look very current.

And here is the image for “Classic polka dots – square cut blouse [with] reverse-dot cummerbund:”

One of my favorite outfits from the show Mad Men was this white linen dress with a built-in silk polka dot sash. The two-color sash makes this dress a standout:

Image from The Fashion File; Advice, Tips, and Inspiration from the Costume Designer of MAD MEN, by Janie Bryant with Monica Corcoran Harel; Grand Central Life & Style, New York, New York, 2010, page 8.

This famous – and stunning – 1958 dress and coat ensemble by Arnold Scaasi, an American couturier, was featured prominently in the retrospective of his work at the Museum of Fine Arts in Boston, September 25, 2010 – June 19, 2011:

Now this is an exhibit I wish I had seen.

And finally, this is a Carolina Herrera ad which I plucked out of some magazine a while ago. The ad is for the handbag, but the polka-dotted dress, with its bright red sash steals the show:

So why all my focus on polka dots?  They have been much on my mind lately, as I have finally begun the many-step process of making a couture dress, using this vibrant silk, purchased seven or eight years ago:

This is a crepe de chine which I purchased from Britex Fabrics in San Francisco. Smaller irregular dots are woven into the design.

The background color is navy blue.

Now my hope is that one cannot have a bad sewing day when working with polka dots.


20 Comments

Filed under Cocktail dresses, Day dresses, Fashion Exhibits, Fashion history, Mid-Century style, Polka dots, The Conde Nast Publications, Uncategorized, vintage Vogue patterns from the 1950s

Reflections on the Couture Legacy of Norman Norell

It was my distinct pleasure and good fortune to visit the current Exhibition on Norman Norell at the Museum at the Fashion Institute of Technology (MFIT) in New York City last week. For those of you not familiar with this mid-century American designer, you may be surprised to learn of his enduring influence on, and remarkable contributions to American fashion and glamour. He also, in his extensive and versatile body of work, employed the finest couture techniques, making his clothes still the envy of designers and those of us who strive for excellence in our fashion sewing.

Norell: Dean of American Fashion opened on February 9, 2018 and will close on April 14th. Guest Curator and designer Jeffrey Banks and Deputy Director of MFIT, Patricia Mears, collaborated on this Exhibition. Included are examples from his entire career; however, the Exhibition focuses for the most part on his final, spectacular 12 years, from 1960 – 1972. Norell (1900-1972) left his native Indiana to pursue his interest in illustration and fashion design in New York. He worked under Hattie Carnegie, and then at the beginning of World War II he began a partnership with Anthony Traina, the label for which is the well-known Traina-Norell designation. It was in 1960 that Norell started his own eponymous line of clothing, and it was during this period, up to his untimely death in 1972, that he set his real mark on American fashion.

To all of you I commend the MFIT Exhibition website for learning more about Norell’s life and the evolution of his body of work, including a fascinating video presentation by Exhibition Curator Jeffrey Banks. (Be sure to click on “explore the Exhibition website” which will lead you to some excellent content.) It was with this background knowledge that I entered the Exhibition, knowing I wanted to view it on two levels – 1) as a dazzling display of some of the most beautiful fashions ever assembled, and 2) as an opportunity to see up close some of the construction details, style lines, and elegant touches in his fashions, serving as inspiration for my own fashion sewing.

The Exhibit is physically divided into two areas, the first of which serves as a guide to his trademark themes, each with a small grouping of fashions. I was immediately smitten with this selection of LBDs:

All of these dresses have a timeless appearance, making them as stylish today as when they were designed. From left to right, #1 Label: Norman Norell New York. Black sleeveless bodice with skirt and satin sash, 1963. wool jersey, wool twill. Lent by Kenneth Pool [a major lender to the Exhibit.];
#2 Label: Traina-Norell New York. Black cocktail ensemble, 1950. silk chiffon, silk satin. MFIT, Gift in memory of Miriam Abrams; #3 Label: Norman Norell New York. Black dress with belt, 1962-1963. Wool, leather. MFIT, Gift of Mortimer Soloman.

As a way of illustrating the impeccable couture construction for which Norell fashions are known, this “inside-out” dress was displayed.

Click on the photo for a closer look.

It was all I could do to keep from reaching over to see more of it. Noted on the caption were ”the hand-picked zipper and extra wide seam allowance, the deep hem … edged with bias-cut silk so that it is softly defined yet sturdy. Furthermore, the neckline and armholes are minimally interfaced to give shape without impeding movement, and they are under-pressed in order to hide the seams.”

The larger gallery of the Exhibit practically took my breath away when I entered. The large center stage is resplendent with examples of his famous eveningwear, including his sequined “mermaid” dresses.

The low light in the Exhibition gallery only added to the ambience and allure of these creations.

Around the perimeter of the gallery were featured many, many of his glorious coats, capes and dress suits, as well as dresses. I snapped this photo of one of his trademark sailor dresses to show the hand-picked zipper and the large patch pockets applied by hand (note the provenance on this dress in the caption):

Label: Traina-Norell New York. Off-white sailor dress with navy collar and red tie, circa 1957. Linen. MFIT, Gift of Lauren Bacall.

There were so many terrific examples of Norell’s vibrant use of color, including this coral cape from 1962.

Label: Norell. Coral double breasted cape, 1962. Wool melton. Lent by Kenneth Pool.

And I could not take my eyes away from this combination of off-white evening gown with a red bolero jacket and peacock blue sash from 1968.

The beautiful shape of the jacket, with those amazing buttons and bound buttonholes, sets off the sash to perfection. Label: Norman Norell New York. Off-white evening gown with red bolero jacket and peacock blue sash, 1968. Cotton organdy, wool, silk taffeta. Lent by Kenneth Pool.

Another brilliantly hued ensemble is this pink evening coat with matching skirt and blouse from 1964. Note the rhinestone buttons, the beautiful bound buttonholes, the angled pockets, and the lovely seaming detail of the high yoke on the coat which descends into the sleeves.

Label: Norell, Norman Norell New York. Pink evening coat with matching skirt and blouse, 1964. Wool, rhinestone buttons. MFIT, Gift of Lauren Bacall.

Norell was known for his cone and wedge-shaped coats, of which this purple one is an excellent example.  Note the spread of the descending buttons on this coat:

Photography was permitted, although flash photography was not, so my pictures do not do justice to many of these fashions. Label: Norell. Purple cone shaped double breasted coat with Peter Pan collar, 1966. Wool melton. Lent by Kenneth Pool.

This coat and pants ensemble from 1970 is set off beautifully by its wide belt:

Label: Norell. Coat and pants ensemble, 1970. Wool herringbone, leather. Lent by Kenneth Pool.

The collar is absolutely stunning. And those bound buttonholes are a work of art in that heavy wool herringbone weave.

Norell used the talented stitchers of the garment worker’s union to make his clothing.

While I am writing about coats (one of my favorite subjects!), I want to show you details from two which help to illustrate the quality and finesse for which Norell’s fashions are known. First is this pocket detail from an off-white coat with black collar, 1962-1965.

Label: Norell. Off-white coat with black collar, 1962-1965. Wool and velvet. MFIT, Gift of Mrs. Jane Albert

The right edge of the flap is angled slightly to follow the side seam line, a subtle touch which gives it a graceful appearance.

Second is another pocket detail on a beige coat with pilgrim collar from 1968:

Label: Norell. Beige coat with pilgrim collar, 1968. Wool. MFIT, Gift from the collection of Margery J. Davidson, lovingly donated by her son Harold S. Graham.

The pocket is an extension of a princess seam, beautifully angled. And more shaping is apparent to the left of the full-length seam, giving this coat such elegant and refined lines.

Seeing this following grouping of dresses and jackets gave me a new appreciation of the concept of “less is more.” According to the caption, Norell “chose to trim his day and evening wear with mink, fox, and sable. The judicious use of this expensive and sensuous material elevated the glamour quotient of his restrained daywear.”

From left to right: #1 Label: Norell. Pale oatmeal midi dress and bolero jacket, 1967. Wool, crystal fox. Lent by Kenneth Pool. #2 Label: Norell. Pale peach jacket and black gown, 1966. Brushed wool, fox, sheer jersey. Lent by Kenneth Pool. #3 Label: Norell. Red and black check suit, 1962. Wool, black fox, leather. Lent by Kenneth Pool.

One more Little Black Dress has the most beautifully placed buttons:

Label: Norman Norell New York. Black dress with jeweled buttons, 1965. Wool crepe. Lent by Kenneth Pool.

I loved the caption which (partially) stated: “Deceptively simple, Norell’s dresses were visually quiet but strategically constructed… to enhance a woman’s body.”

I could go on and on as there is so much more to celebrate about this remarkably talented “Dean of American Fashion.” Fortunately, the Exhibition is accompanied by a book, titled: Norell: Master of American Fashion, by Jeffrey Banks and Doria de la Chapelle.   Published by Rizzoli, the book is lavishly illustrated and beautifully presented, both in content and inspiration. I commend it to you.

In closing, on a personal note, I cannot help but think back to 1972, the year I graduated from college and the year Norman Norell died. So much has changed in the world of fashion and fashion sewing since those heady years. Seeing an exhibition like this one is a lovely reminder of the true timelessness of quality and restrained elegance, providing endless inspiration to those of us who dream and sew.
15 Comments

Filed under bound buttonholes, Capes, Coats, Cocktail dresses, couture construction, Day dresses, Dressmaker coats, Dressmaker suits, Fashion commentary, Fashion Exhibits, Little Black Dress, Mid-Century style, Suit dresses, Uncategorized

The Champagne Dress

It is a fact of sewing life that the construction of some dresses is just more difficult and time-consuming than other ones. This was a difficult dress to make and at times I really wondered just how long it would take to finish.

Before I go into the making of this dress, I want to put its pattern into historical context. This pattern is one of Vogue Patterns’ “Paris Originals.”

A former owner of this pattern made the notation about the bust enlargement.

As is obvious from the envelope cover, the dress was designed by Guy Laroche (1923-1989; pronounced Ghee Lah-rush); it is copyright 1960. According to the St. James Fashion Encyclopedia, Laroche was a French couture and ready-to-wear designer who worked for Jean Desses from 1950-57. Desses was known for his intricately draped dresses, asymmetry in his designs and ornament derived from the “architecture” of the garment, according to his profile in The St. James Fashion Encyclopedia by Richard Martin, Visible Ink Press, Detroit, MI, c1997, page 100. Bingo! It appears that Laroche learned well from his time with Desses and incorporated some of the same details into his couture designs once he opened his own fashion house in 1961.

I find it interesting that this pattern is dated 1960, one year before Laroche opened his couture house. Perhaps this statement in the Vogue Sewing Book from 1963 helps to explain how Vogue Patterns managed to obtain a Guy Laroche design before he had his own eponymous line:

Please click on the image to enlarge the print.

In any event, the appeal of this pattern, for me at least, was the asymmetrical draped bodice back and the tailored bow which anchors the drape on the right shoulder of the dress. It was also these details – and others – which made it a time-consuming project.

I made some alterations to the pattern before I even got started, as I wanted to eliminate some of the blousing above the waist of the dress. I do not have enough height to carry off too much excess around the mid-section, so I pulled most of the blousing into darts. Doing this made me rethink the instructions for the lining, the waistline of which was supposed to be sewn to the waistline of the dress itself. I assume the joining of these two elements was to insure that the blousing of the dress remained at the proper “elevation.”

The series of dots around the waistline indicate the sewing line to anchor the dress to the lining.

Having removed most of the blousing, I did not need to anchor the dress to its lining, so I left the lining loose.

This photo shows the loose lining and also the back neckline. Ordinarily, in couture sewing, facings are eliminated. However, in this case, knowing that the weight of the drape would be added to the back neck, I chose to use the facing to add more stability. I finished its edge with Hug Snug tape.

As you can see from the diagram of the lining (above), the back neckline is asymmetrical, to accommodate the attached drape on the bodice. I’m not sure why, but I found this rather confusing, resulting in sewing the lining together, first correctly, then thinking I had done it wrong, redoing it in what I thought was correct – and then realizing I had it right the first time. Fortunately it was easy to remove the stitching from the crepe de chine lining silk, but really? Three times? And then guess what this is?

Yes, this is a backwards back bodice!  Apparently I had flipped (or marked incorrectly) my silk organza underlining/pattern when I placed it on the fashion fabric, cut it out incorrectly and even had the underlining and the fashion fabric all carefully basted together.  When I discovered my mistake,  you can imagine my panic until I realized I had enough of the charmeuse left to cut it out again, this time correctly. Of course, then I had to baste it to the organza underlining for a second time. Tick tock, tick tock!

Things then went along fine until I got to the front neckline, which presented a quandary to me. From the instruction sheet, it seemed there was to be no interior finishing of it. It appeared to be a draped version of a bateau neckline. When I tried the dress on, it was uncomfortable as it pulled too tightly from the shoulders (which did not show up in my muslin).  It also did not look good. I decided the only way out of this predicament was to reshape it. I carefully basted and clipped and trimmed and clipped and trimmed some more (no photos of this, I am sorry to say. I was too intent on the task at hand to even think about photos!) But it all worked out. The front neckline certainly isn’t as draped as was intended, but I love the way it fits and looks.

The lining is not supposed to be attached to the dress at the front neck, according to the instruction sheet. In order to finish the neckline without adding any bulk (which would surely show up on that wide bias expanse), I stay-stitched and then catch-stitched the raw edge to the organza underlining. Not as finished a look as I would like, but it works well.

Another section of the pattern which did not present a proper interior finish for this very particular dressmaker, was the drape. It is partially gathered as you can see from the instruction sheet.

#7 shows the gathering of the interior drape.

As I did not care for a raw edge to be hiding under the drape, I decided to bind the edge with Hug Snug tape. This worked out so well and looks nice and tidy!

Besides these time-consuming corrections and additions, there were the hours of work involved in making the bow, attaching it to the dress, and making the belt. Then when I thought I was just about finished, I remembered I needed to add lingerie keepers, due to the wide stance of the shoulders. Okay, I thought. What else??

I have decided the belt is a little loose, so I need to reset the fasteners… What else, indeed!

What a good feeling of accomplishment to finish this dress and like it!

Here is a detail of the bow. I do love a tailored bow!

I haven’t worn it yet for any occasion, but when I do, I hope there is champagne involved, as I am going to toast myself for successfully finishing this one!


46 Comments

Filed under Bows as design feature, Cocktail dresses, couture construction, Linings, Messages from past owners of vintage patterns, Mid-Century style, sewing in silk, side-placed zippers, The Conde Nast Publications, Uncategorized, underlinings, vintage Vogue Designer patterns, vintage Vogue patterns from the 1960s

A Passel of Patterns

“Just when I thought I had seen it all…” That was my reaction when not one, not two, not three, but four “new-to-me” vintage Vogue patterns came up for sale in the span of just a couple of weeks. Although I am always on the lookout for any pattern which might expand my collection in a meaningful way, I am, nevertheless, quite particular when it comes to buying new ones. I only want to add patterns which I think I will use at some point, even if it is just one detail which I might combine with another pattern. But I admit to having certain proclivities which seem to guide (no, sabotage) my pattern collecting – such as coats. I am complete mush in the face of a beautiful coat pattern! Another weakness is cocktail dresses and ensembles, especially ones with little jackets. Oh, I do love a classy cocktail dress! So, is it any wonder, that when these four patterns came “on the market,” I put considerable effort into trying to make them mine? And I hope that, even if you would never see yourself using a vintage pattern, you might still find much to admire in these beauties.

If you follow me on Instagram (@fiftydresses), you have already had a sneak peek at the first pattern.

The description reads: “Slim dress has flange with front draping. Narrow shoulder straps. Short jacket with below elbow length kimono sleeves has crossed over fronts. Left shoulder scarf is joined to front shoulder.”

Lots of pattern pieces as you can see in the diagram.

The front draping and the left shoulder scarf, adding back interest, put this ensemble on a notch well above ordinary.

This Vogue Couturier Design by Ronald Paterson was next to come on the market, at which time I happened to be traveling. Of course, that did not discourage me from keeping at the important business at hand, i.e. pattern collecting.  I felt very fortunate to have the winning bid, tucked in between airline flights!

This coat is a perfect example of what is known as a “dressmaker coat.”

I was initially drawn to the blouse pattern, which has such a demure, ladylike feel to it, but, of course, the coat with its lovely collar and flattering seaming completely won me over.

The description reads: “Narrow, semi-fitted coat has curved seaming at back of waistline. Small, shaped collar; long sleeves, four fake welt pockets [I can live with that, or perhaps eliminate them…] Fly-front, tuck-in blouse has kimono sleeves in front, set-in at back. Trim-stitching on shaped neckline and sleeve bands. Slim skirt.”

The long darts in the coat sleeves are an unusual detail, and notice the four neck darts on both the coat and the blouse.  These vintage patterns give so much useful information on the backs of their envelopes.

No sooner had the last pattern appeared than another one from the same decade came to my attention. From the House of Dior, this classic dress and coat have some notable stylistic details, such as the Dior darts in the bodice of the dress and the shoulder line extensions on both the dress and the coat.

The description reads: “Sleeveless, semi-fitted dress has back shoulder line extension and high round neckline. Ribbon belt. Slender coat has padded [YES! Padded!] band edging at side closing, around neckline and on long sleeves.”

If I make the dress, I will be cutting in the shoulders by a few inches and probably slightly reshaping the neckline. Also, the ribbon belt looks a bit too wide, but that will take some more thought. I think the coat is gorgeous.

When the final “new-to-me” pattern came up for sale, I was still traveling! I was getting proficient at keeping up with multiple bids, but the auction for this one was ending when I was going to be landing at our home city, so I resolved myself to losing this one. How lovely when I found out a few hours later I had, indeed, had the winning bid.

I have found that vintage Guy Laroche patterns often have a bit of “drama” to them. Certainly that is the case with this dress with its draped back.   That detail and the perfectly placed, half-looped bow at the shoulder make this design a winner in my opinion.

This pattern is copyright 1960, making it the earliest of these four patterns.

The description reads: “Slim skirt in two lengths joins the bloused bodice at waistline. Loose draped back section below shaped neckline. Three quarter length fitted sleeves and sleeveless. “ I quite like the options available: long, short, three-quarter sleeves, sleeveless. This dress could be quite fancy or understated, depending on the fabric and how it is made.

Once these patterns started arriving in the mail, I was, happily, not disappointed.  However, since I’ve been home, I have been trying to tow the line on any more pattern purchases after my flurry of activity! I have, instead, been trying to concentrate on a flurry of sewing. It’s great, finally, to be back in the sewing room. Dare I say (without jinxing myself) that I am excited to show you – soon – what I am working on?

13 Comments

Filed under Bows as design feature, Coats, Cocktail dresses, Dior darts, Dressmaker coats, kimono sleeves, Mid-Century style, The Conde Nast Publications, Uncategorized, vintage Vogue Designer patterns, vintage Vogue patterns from the 1960s

Just for the Chill of It

Autumn is a delightful season here in the northeastern part of the United States. One can tell it is on its way when the warm days quickly take on an evening chill once the sun slips below the horizon. It is the time of year when a light coat or sweater is a necessity, especially with a sleeveless dress.

With this scenario, and a September wedding to attend, what better excuse did I need, to make a coat to go with this dress?

The Year of Magical Sewing

If you follow my blog then you probably already know this was my intention all along, when I made the dress two years ago. But it took a while to find the right coordinating fabric for a coat. I was looking for something between a coral and a pink. While the silk taffeta I found at Britex Fabrics looks more like a deep persimmon color when photographed, the fuchsia pink warp is very apparent when being worn.

Taffeta coat - swatch

Once I decided the Jo Mattli-designed coat, part of the original dress pattern, was too voluminous, I went to another pattern. I wanted to keep the “intention” of the original coat, but have it more streamlined.

The "original" coat designed by Jo Mattli.

The “original” coat designed by Jo Mattli.

Taffeta coat - %22too scimpy%22

The coat pattern I settled on.

Somehow along the way, in making my muslin, I got the idea to add a curved belt to the back of the coat. I knew I had used a coat pattern several years ago with a curved belt back detail, so I went through my pattern collection to retrieve this:

This is a 1957 pattern, but look at the belt shown on the back of the envelope, below.

This is a 1957 pattern, but look at the belt shown on the back of the envelope, below.

taffeta-coat-belt-pattern-thumbnail

The belt is only shown in view A.

It took a couple of tries with the muslin to get the placement and angling of the belt correct, but once I did, I knew it was a winner. Dressmaker details like this always give me a thrill!

I anchored the belt in the side seams right under the bust darts.

I anchored the belt in the side seams right under the bust darts.

Just for the Chill of it

The curve of the belt needed to fall at my waistline.

The curve of the belt needed to fall at my waistline.

One of the things I like about this pattern is the two-part sleeve with a center seam. I think this design is always flattering to the shoulder. Here are the constructed sleeves:

Just for the Chill of it

That center seam also provides the opportunity for a faux vent, and since I just happened to have three buttons, which I thought would be perfect for the coat, I happily included vents, as the pattern dictated:

Just for the Chill of It

A small, cylindrical, crystal button!

A small, cylindrical, crystal button!

Although I originally thought I would leave the coat “closure-less,” that third button kept calling to me. While I did not want to have a single bound buttonhole in the center of the chest, I thought a button loop might do the trick. If I didn’t like it, I could remove it fairly easily from the front facing seam.

Just for the Chill of it

I also decided to add a loop at the neck, with a plain flat button under the collar. This way, I could close the collar if I chose to do so.

I pad-stitched the collar, but forgot to take a picture. Pad-stitching is like magic in how it makes the collar roll properly!

I pad-stitched the collar, but forgot to take a picture. Pad-stitching is like magic in how it makes the collar roll properly!

I have to say, I think the coat looks equally good any way it is worn: with the single button at the bust line closed, with both buttons secured and with neither of the buttons secured.

I chose not to add the optional pockets to this coat, but if I make it again in a less formal fabric, I would absolutely include them.

Once I got to the lining, I had to decide if I wanted to add the flat piping detail which I like so much. Of all the bias silk ribbon I have on hand, the only one which looked good was deep pink. Because of that, it doesn’t show contrast all that well, but I still like the subtle finishing look it gives to the lining.

Just for the Chill of it

Just for the Chill of it

Here, by the way, is the coat before I inserted the lining:

I underlined the entire coat with silk organza and added "cigarette" sleeve headings.

I underlined the entire coat with silk organza and added “cigarette” sleeve headings.

I love a center back seam!

I love a center back seam!

I used some vintage silk buttonhole twist to tack the center back fold in the lining at the neck and at the waistline.

Just for the Chill of it

There is no question that the dress and the coat go together once the lining shows!

There is no question that the dress and the coat go together once the lining shows!

Just for the Chill of it

I love that the lining peeks out from the sleeves when I am wearing the coat.

I love that the lining peeks out from the sleeves when I am wearing the coat.

taffeta-coat-full-copy

I was delighted when the photographer at the wedding wanted to take my picture because he "liked my outfit so much." (This is not that photo...)

I was delighted when the photographer at the wedding wanted to take my picture because he “liked my outfit so much.” (This is not that photo…)

Here with my husband - with a coordinating tie, no less (not planned, but makes for a great photo!)

Here with my husband – with a coordinating tie, no less (not planned, but makes for a great photo!)

It may seem a bit frivolous to make a coat like this, knowing that it will not be worn all that often – although I do have two other dress-weight silks in my collection which would look fairly stunning paired with this coat!  However,  it really is the perfect weight and look for an elegant, but chilly, evening out – and it was so much fun to make.

38 Comments

Filed under Buttons - choosing the right ones, Coats, Cocktail dresses, couture construction, Dressmaker coats, Dressmaker details, Linings, Mid-Century style, piping, sewing in silk, Silk taffeta, Uncategorized, vintage buttons, vintage Vogue patterns from the 1960s

At The Met

Much has already been written about the current fashion exhibit at The Metropolitan Museum of Art in New York City, Manus x Machina. People far more savvy about current fashion than I am are certainly more qualified to offer a critique of the Exhibit. (Check out The Vintage Traveler’s three-part review of the Exhibit, for an excellent overview.) However, having just had the opportunity last week to view the Exhibit, I feel compelled to add my two cents.

The Exhibit Logo

The Exhibit Logo

I found the title of the Exhibit off-putting. Yes, I know it is a trendy way of saying “hand-made by(?) machine made,” but exactly how does one pronounce the title? It is not a comfortable invitation to what is a unique way of looking at haute couture fashion and fashion history.

The entrance to the Exhibit, which was difficult to find, especially with the crowds at the Museum on the day I attended, includes storyboards to introduce the viewer to the premise of the Exhibit. It is worth quoting from this introduction:

“Manus x Machina is structured around the métiers, or trades of dressmaking outlined in [Diderot’s] Encyclopedie, [which] placed these trades on the same footing as the arts and sciences, which had been regarded as the noblest forms of scholarly activity since Greek antiquity. The elevation of these . . . métiers served as an incendiary challenge to established prejudices against manual labor, biases that the authors sought to refute by showing the creativity and complexity such work involved.”   These trades – or métiers – which are still cornerstones of haute couture today, were listed as: embroidery, featherwork, artificial flowers, pleating, lacework, and leatherwork. Also included were sections on the actual arts of dressmaking and tailoring, including the development of toiles (muslins) and paper patterns. As lovely as some of the fashions were (but not all!), I found myself drawn to the storyboards in these sections for their clear explanations and definitions, which spoke to this dressmaker’s heart!

But first, some of the creations on display, culled by my hearty preference for classic and/or vintage fashion:

This cape and dress from the House of Chanel, Spring/Summer 2010 was stunning. The cape is made from “1,300 hand-pieced pink silk satin Flowers by Lemarie with pink frosted crystals.”

Met - Chanel cape copy

Although my photo for the next dress is very poor, I have to share it. From the House of Dior, Autumn/winter 2015-16, this evening dress is “machine-sewn, hand-finished, gray silk tulle and organza, hand glued with blue, orange, brown, and black rooster feathers by Lemarie.” It was simply remarkable and gives a whole new meaning to “King of the Barnyard!”

Met - rooster dress

The next two dresses, two of my favorites, are both by Norman Norell (American, 1900-1972). The dress on the left is from 1965, hand-embroidered with blue sequins, and the dress on the right, ca. 1953, is also hand-embroidered with blue-ombre sequins. Both of these dresses have a timeless quality to them, being chic, elegant and with an understated sexiness to them.

Met - Norell Dresses.PDF

Imagine my surprise when I saw this next dress. From the House of Givenchy, this evening gown from 1963, is made from a “hand-sewn orange cotton Mechlin-type lace hand-embroidered with red-orange glass beads, tinsel, and pieces of coral.”

Met Givenchy Dress

The Robert and Penny Fox Historic Costume Collection at Drexel University in Philadelphia, Pennsylvania (USA) has a similar example, which I actually prefer. Circa 1964, it was owned and worn by Her Serene Highness, Princess Grace of Monaco and given by her to the collection:

MET - coral dress, Princess Grace copy


Of all the gorgeous Balenciaga cocktail dresses out there (and many surely owned by the Met), this example on the right, looked a bit dowdy to me. From 1963-64, it was “hand-sewn black silk machine-embroidered lace, hand-applied self-fabric flounces and silk satin bows.” The dress next to it is by Simone Rocha (Irish, born 1986), 2014, “Wet Lace Frill Dress,” so called by the use of nylon and polyester laminated with polyurethane foil, which evokes a wet look!

Met - Black Balenciaga dress copy

No exhibit is complete without an Yves Saint Laurent ensemble. This one, Spring/Summer 1963, was stunning with its overlay of machine embroidered cutwork, hand-stitched with guipure lace:

Met - Dior ensemble copy

I loved seeing this dress from the House of Dior, the prototype of which had been the feature of a Dior video in 2015. Hand-pleated, hand-embroidered with silk grosgrain ribbon, topped off with a green wool-silk crepe bodice. And don’t miss the Dior darts and the 1960-ish look of the armholes and overblouse styling:

Met - Dior pleated dress copy

Well, what could be more classic than a Chanel suit? Circa 1963-68, the description reads: “machine-sewn ivory wool boucle tweed, hand-applied navy and ivory wool knit trim hand-braided with interlocking chain stitch.” Those of us who have made one or more “classic French jackets” know how much hand-work is in one of these jackets!

Met Chanel suit

After reading the storyboards on tailoring and dressmaking, I really wonder where a Chanel jacket fits in? The tailoring division of a fashion house specializes in suits and structured garments, with an emphasis on “manipulating fabric on the grain,” and “precision and accuracy when cutting.” The dressmaking division “specializes in draping and soft construction,” “being less beholden to line and structure.” It seems to me that a Chanel jacket straddles the line between the two concepts, being structured, but with a soft fluidity that feels like a dream to the wearer.

The final storyboard, which I found captivating, was the treatise on toiles and the related development of dressmaker’s dummies. To quote: “Alexis Lavigne, a French professor, introduced one of the earliest patented dummies in the 1850s. His figures – composed of papier-mache lightly padded with cotton batting or wadding and covered in pieced and seamed canvas – contributed to the precision with which a garment could be fitted and gradually evolved to help delineate measurements and geometries essential to dressmaking.” Leave it to the French to be innovative in this regard!

There was much in the Exhibit that unfortunately brought to mind this quote from P. J. O’Rourke: “Never wear anything that panics the cat.”   But there was plenty to admire, and obviously, that is what I concentrated on. The mark of any good exhibit is its ability to make you think and expand your knowledge, and this one, despite its awkward title, certainly does that.

17 Comments

Filed under Capes, Cocktail dresses, Dior darts, Fashion Exhibits, Uncategorized