Category Archives: Sleeves

Part I:  How Does One Pack for A Trip to Paris in mid-March?  

With considerable thought!

I was a participant on Susan Khalje’s Paris Couture Tour in mid-March.  I dutifully checked the expected weather in central and northern France for that time of year (Mr. Fifty Dresses and I were spending a week in Normandy and Brittany prior to the Paris component, which meant even more thought). Chilly, rainy, breezy were the parameters most often appearing in my weather search.  Add to that the fact I did not want to look too Wintry nor too Springy, and, well, I was quite in a quandary!  

Fortunately, Susan provided us with some guidelines for the type of clothing we would need.  This included day wear for our scooting around Paris to see exhibits, fabric stores, specialty stores, museums, etc.  She indicated that dress in Paris is “noted” so I took that to mean we needed to look “sharp” and “put-together.”  We also would have two days with special visitors and demonstrations in the hotel.  Again we didn’t need to be all dolled up, but we needed to look presentable.  And then there were those special nights out.  For those we would need dressy clothes – for a night at the Ballet at the Palais Garnier, a Gala dinner at a fancy restaurant, and an evening at a fashion show in a private Paris apartment.  

Of course, I decided I needed a least a couple of new things to wear.  And of course, that meant sewing.  I started in mid-January, making a muslin for this dress (pictured in green):

Before I started on the actual dress, however, I thought I would resurrect a pink wool jacket I had purchased 20 years ago.  Made in France, with some amazing details and handwork, the jacket had hung in my cedar closet for over 12 years, unworn.  Its color and weight, however, seemed to be perfect for Paris in March. 

When I tried it on, the shoulders were much too pronounced for today’s sensibilities.  Undaunted, I knew I could easily remove the hand stitched lining from around the top and sides of the shoulder armhole area.  I could see how the shoulder pads were configured and make adjustments.  I plowed forward, expecting this project to take no more than one day.  

No wonder those shoulders were so pronounced!  There were four layers of padding, all custom cut and applied to each shoulder cap.  I took out three layers for starters.  I knew I needed some definition, and that seemed to do the trick.  If I had been starting from scratch, I probably would have used even less padding, but this was acceptable to me.  
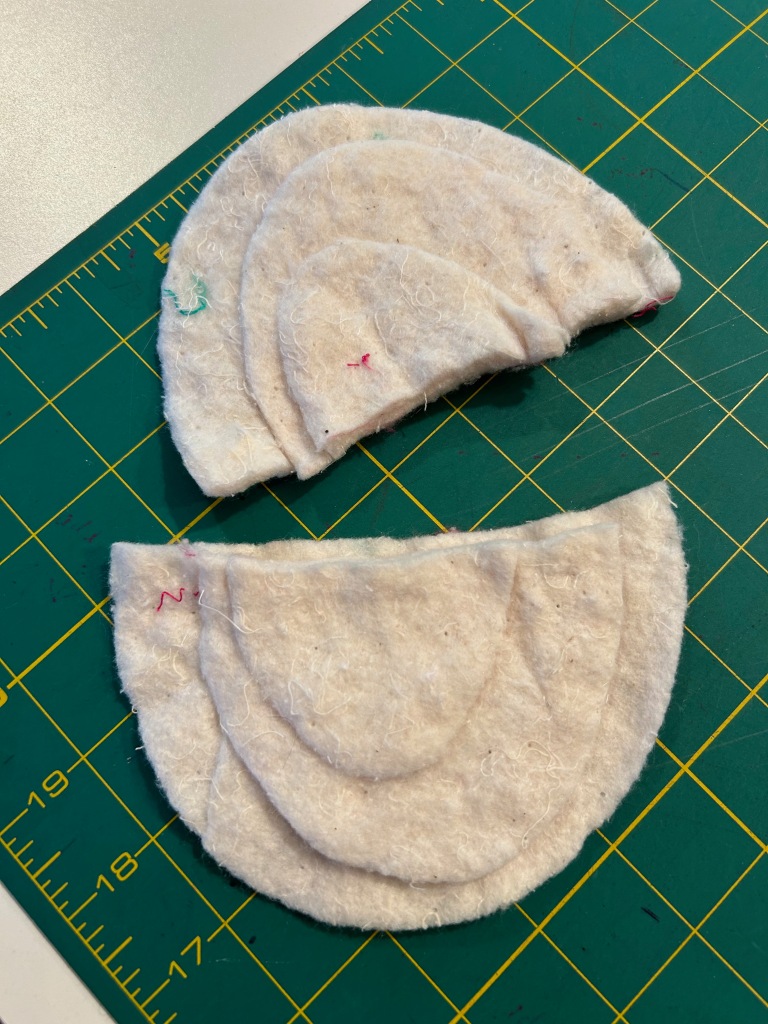
Here are the three layers of padding I removed from each shoulder. They were originally hand-stitched together, with big loopy stitches; I removed that stitching to access the largest of the four layers which I then used by itself for each shoulder.

What I had not anticipated was the fact that removing such a depth of shoulder padding had implications for the sleeve length.  There was no way around the realization I was going to have to shorten the sleeves – or not wear this jacket in Paris – or anywhere, for that matter.  Suddenly what promised to be a quick fix had morphed itself something much more time-consuming.    

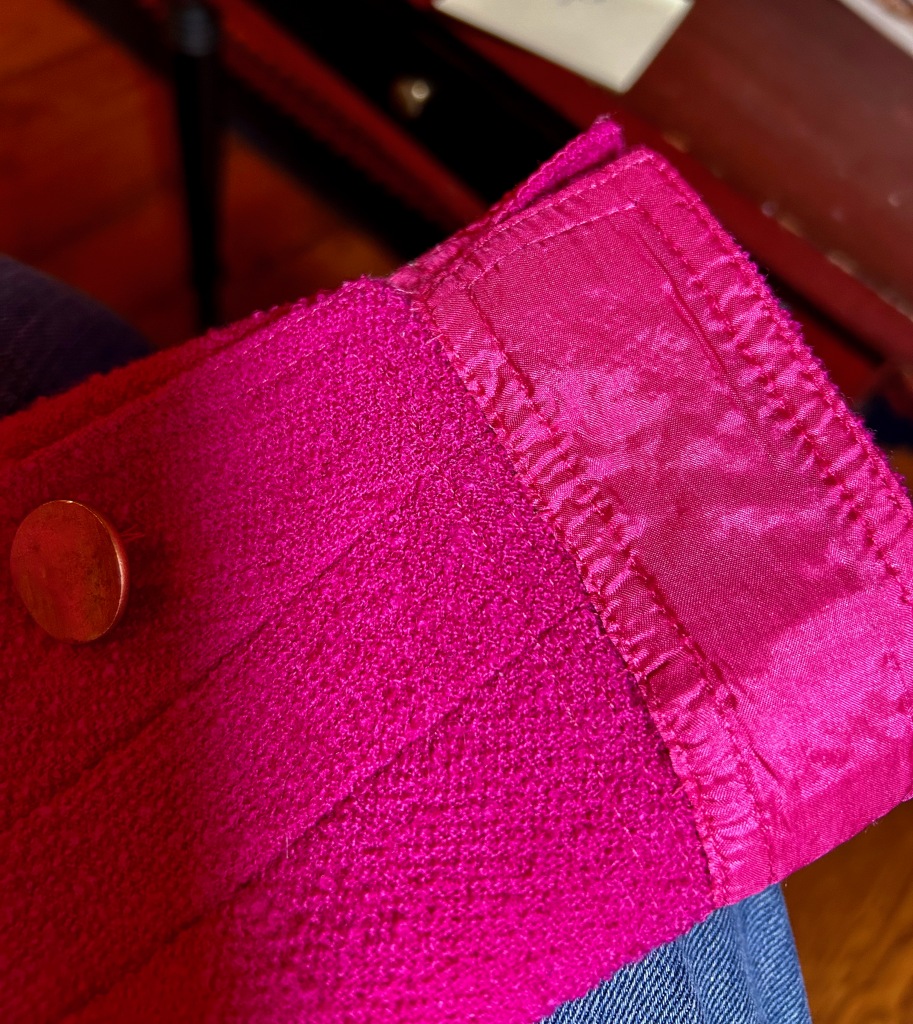
One of the beautiful details of this jacket was the applied tailored cuff on each sleeve.  Shortening the sleeve was going to have to be in two parts.  

If you look closely, you can see how the cuff has been applied to the sleeve.

I buckled down and removed the cuff on the first sleeve.  I had determined I needed to reduce the sleeve length by 7/8 of an inch.  I was worried the circumference of the sleeve end might “grow” enough to make the applied cuffs too skimpy.  By now I was asking myself how I got myself into this?  I was spending all sorts of time on this jacket when I had whole garments to sew.  But it was too late to back down at this point.  I  cut off the necessary length from the sleeve and its lining, stitching them back together by hand.  I then had to redo some top-stitching and found some thread which was a close match to the existing thread.   Then I re-applied the cuffs by hand.  Fortunately, they were split cuffs, so they had some “give” and molded nicely to the slightly larger circumference of the sleeve.  

One down and one to go before I could respace the buttons above the cuffs.  

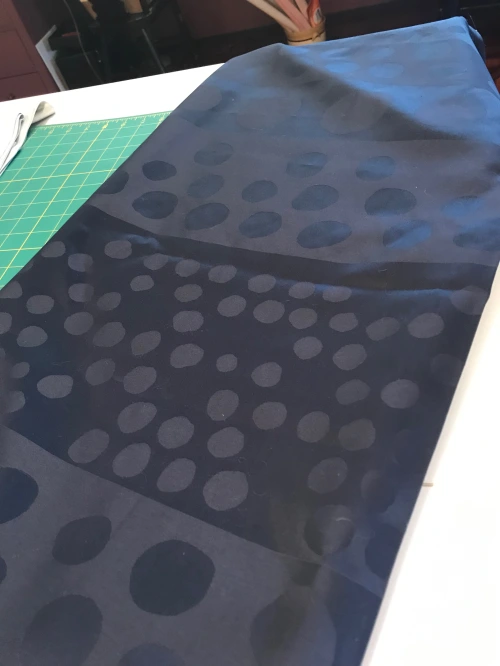
With that jacket ready to go to Paris, I finally was able to turn my attention to that dress I wanted to make.   Some of you may remember seeing this cotton sateen/jacquard fabric mentioned in a prior post.  I had debated whether to make a dress or a long skirt with it, but ultimately decided on a dress as I thought I would get more wear out of it that way.  

I thought this would be the perfect weight and fabric for early spring in Paris – not too heavy and not wintry looking.  I envisioned wearing this to the fashion show which we would be attending one evening at a private apartment.  So much for those plans!  Our schedule that day did not allow us to return to the hotel to change clothes.  We would have to wear our out-and-about day clothes into the evening.  

I went to Plan B and wore this jacket I had made several years ago.  I paired it with navy slacks, a pale pink blouse, and a scarf which matched the lining of the jacket. I carried along a change of shoes to look a little dressier and that was that!  

So what about that navy blue polka-dotted dress?  Yes, I did finish it.

It’s still a little wrinkled from being packed!

I carried it all the way to France for 15 days and back home again and never wore it…  More about it in a future post.  

29 Comments

Filed under Chanel-type jackets, classic French jacket, Day dresses, Polka dots, Sleeves, Uncategorized, vintage Vogue patterns from the 1960s

The Last Pink (and Blue and White) of Summer

Sometimes the smallest thing can be the deciding factor in the trajectory of a sewing project.  In the case of this dress – my last dress of summer sewing – the buttons told me how to proceed.  There was some serendipity involved as well, which is often the case with my sewing, it seems.  

I purchased the very light and airy white and blue fabric from Britex Fabrics two or three years ago. When it arrived, I tucked it away to think about it.  Somewhere along the line, I purchased the buttons you see here, but not for this fabric.  (I rarely let deep pink vintage buttons get away from me if I can help it.)  Somehow the two – the buttons and the fabric – found each other and became best friends.  That was all well and good, except for the fact those six little buttons needed some help to bring out the fuchsia and orange dots sprinkled amongst the blue flowers on the white background.  Enter deep pink Petersham ribbon left over from holiday dresses I made for my granddaughters last Fall.  Somehow, although this ribbon was not a match to either the fuchsia or the orange, it worked!  I had my palette….

The interesting thing about the color of the pink ribbon is it seems to be the shade if one mixed the fuchsia and orange dots together. And yes, the buttons are very old!

I had decided to use this pattern again, but a longer version, with different sleeves.  

However – and doesn’t it seem there is always an “however” to muddle the plans – I only had six of those petite little buttons.  And theoretically I needed at least eight.  So – I had to get creative.  

I decided I could eliminate two buttons on the bodice if I reconfigured the front opening and collar.  Here is what I did:

  • I angled the front opening: starting at about 6 inches down from the neckline seam, I drew a line from the fold line to the center front line, ending at the neckline.   
  • This allowed me to shorten the collar stand (so it was flush with the front edge of the collar), thus eliminating the need for a button on it.  
  • I redrew the collar so that it would be most attractive either standing up or lying flat.
  • The original pattern had a self-facing for the bodice (as you can see below), so I had to make a separate, applied facing to accommodate the angle.  
  • The angled opening also allowed for the first button to be 6 inches down – meaning I could get away with two buttons on the bodice – if I used snaps at the waist (which isn’t a bad idea anyway.)
On the right above is my muslin pattern made from the original design. On the left is my reconfigured bodice pattern showing the angle detailed above. (My separate facing piece is not shown.)

Here is what the reconfigured collar and collar stand look like up close:

Two buttons on the bodice allowed me 4 buttons for the skirt, which was adequate.  I actually added a small snap 3+ inches below the lowermost button to hold the skirt together indiscreetly. 

Moving on with more changes:  the flowing nature of the fabric dictated a change in the tailored sleeves of the pattern.  I knew I wanted below elbow length with a little bit of fullness, but not too much. A narrow sleeve band seemed appropriate.  And then there was the decision where to apply the narrow Petersham ribbon on the sleeve bands.  Next to the seamline with the gathered line of the body of the sleeve looked best to my eye, so that’s what I did.  

I was fortunate enough to have enough of the narrow Petersham ribbon to put two rows of it at the lower part of the skirt.  These two rows of trim are absolutely essential for this dress to look balanced. 

Unfortunately I didn’t have my preferred blue shoes with me for these photos.

I should mention I underlined the entire dress, with the exception of the sleeves, with very lightweight cotton batiste.  I finished all the seams with Hug Snug seam binding.  

I like the bodice “angled” neckline and the reconfigured collar so much, I will probably use these alterations again sometime, even if I am not compromised by too few buttons!  

Without those little rosy-pink buttons – and without leftover trim from my granddaughters’ dresses – the white and blue flowered fabric would probably still be sitting in my fabric cupboard.  Instead, I was able to finish my summer sewing not only with more pink, but with a dress I really like!  

28 Comments

Filed under Buttons - choosing the right ones, Sleeves, Uncategorized, vintage buttons, Vogue patterns

A Very Pink Coat, Part 2

The pattern for a very pink coat has many pieces.  

When I am getting ready to start a new project with a pattern new to me, I like to read through all the instructions just to get a feel for what is ahead.  That lets me know if I can mix things up a bit, deviate from the step-by-step instructions, prepare a component ahead of time (such as sleeves.  If I feel confident about the fit, I will often make the sleeves first and set them aside until I am ready for them).  During this initial study of the instruction sheet, all was straightforward except for one thing.  For the life of me, I could not figure out how the  concealed – or fly – opening on the front was constructed.  I have done this type of opening before (here and here), but this construction was different.  

Because I wanted to use my gray lining fabric for one layer of the buttonhole side of the opening (to reduce bulk) I needed to know if I could do that and be confident that the lining would not show.  So I REALLY needed to understand how this detail went together.  I decided I would have to do a trial run.  What better use of a well-marked muslin (toile) than to use it for this task?  Armed with pins, I proceeded to do a mock-up.  

Here are the two separate fly pieces, one attached to the facing and the other one attached to the right front coat piece.
Here are the attached fly pieces folded back from the front edge. This detail allowed me to use the lining fabric for one layer of the buttoned side.
Here the two sides are sandwiched together to show the concealed opening.

Instead of taking my mock-up apart, I decided to keep it for referral when I got to that point of the coat.  And I am so glad I did.  It helped me through many a confusing moment, giving me confidence that I was doing this correctly.  Wouldn’t it be nice if all of life gave one a trial run first before facing the real thing – and then stood by to offer reassurance?  Well, you will have to wait to see the finished opening in my next post, but it is all but complete.  And I must confess, I think it is going to be very lovely.

Now here is something to ponder.  A few days ago I walked into my sewing room and was startled to observe something that did not seem right on my up-to-that-point constructed coat.  I had it hanging on my dress form and almost had a panic attack when I looked at the to-be-buttoned tabs on the sleeves.  It certainly looked as though I had sewn them on backwards!  The buttonholes, and therefore the soon-to-be-attached buttons, were oriented toward the front of the sleeve, rather than the back.

Before completely losing it, I went to my pattern, and there, plain as day in the illustration, the tabs wrapped around to the front of the sleeve.  

I still could not quite believe it, so I went to the illustrations in the 1957 Vogue Pattern Book Magazine, shown in my last post.  Yep – the tabs were oriented the same way as mine.  Just to make sure, I checked the silk organza under-lining on the two-part sleeves to double check my markings which would tell me that the backs of the sleeves were truly in the back (although my common sense had already answered this question for me.  Of course, the sleeves would not have gone in as smoothly as they did if I had put them in incorrectly).  

After being reassured repeatedly that I had not made a BIG mistake, I started to question why the tabs were oriented that way.  I looked for other examples of buttoned sleeve tabs.  I found one or two in which the tab wraps around to the front, but most tabs were sewn into the inside seam, wrapped around the front and buttoned just past the center point of the sleeve (or seam, if there was a center seam as with my pattern), toward the back.  I wondered if this might one of those things which is distinctly feminine, such as the fact that buttonholes on womens’ apparel are on the right, whereas mens’ are on the left.  But no, I could not verify that.  

Here is one of the few examples I found showing the tab buttoning toward the front of the sleeves.
And here is an example of the more customary orientation of the buttoned tab. Both illustrations are from Fairchild’s Dictionary of Fashion, ibid.

Now I am left with a decision to make.  Somehow, I think I would like the tabs on my coat to button toward the back.  I had faced the tabs with my gray lining fabric, again to reduce bulk.  I think that gray lining would better stay undercover should the tabs button in the back. I also think a backward orientation will reduce the incidence of “catching” the tab on things.  Both of those considerations obviously figure into my thinking.  Do I take out the bottom part of the finished sleeves, with their pretty catch-stitched seams, remove the tabs and reorient them?   

This photo of the interior seam of one of the sleeves shows the end of the tab catch-stitched in place along with the seams. The clips you see are where the hem turns back.

Or do I leave well-enough alone and stay true to my vintage pattern? I must decide before the lining goes in the coat. Which brings me to the realization I have just 4 pattern pieces remaining, all for the lining.  Part 3 of this saga is just around the corner.  

20 Comments

Filed under car coats, Coats, couture construction, Mid-Century style, Sleeves, Uncategorized, vintage Vogue patterns from the 1950s, woolens

A White Eyelet Blouse

Eyelet is one of those fabrics which can conjure up memories from one’s life.  So often associated with pinafores, eyelet is lovely for little girls’ dresses – and petticoats.  It is often used for lingerie or sleepwear for all ages, as well as dresses and blouses.  It is a summer fabric, with its “built-in” air conditioning – ie. all those little holes surrounded by embroidery.    Often eyelet trim – and sometimes eyelet yard goods – have one or two finished borders.  Such was the case with the eyelet I found earlier this year for the ruffled collars for sundresses for my granddaughters.  

This lace was a 14″ wide double scallop-edged panel, which I cut down the middle to use for the two collars.

It was working on those collars which convinced me I needed to make an eyelet bouse for myself.  I went back to Farmhouse Fabrics, from which I had purchased the double-sided eyelet panel for those collars, to find a suitable eyelet for a blouse.  Farmhouse Fabrics has quite an inventory of lovely eyelets, so it was difficult to decide.  But decide I did, and purchased this all-cotton eyelet made in Spain.  

I liked the meandering motif in this design.

For a pattern I used this vintage Vogue pattern from 1957.

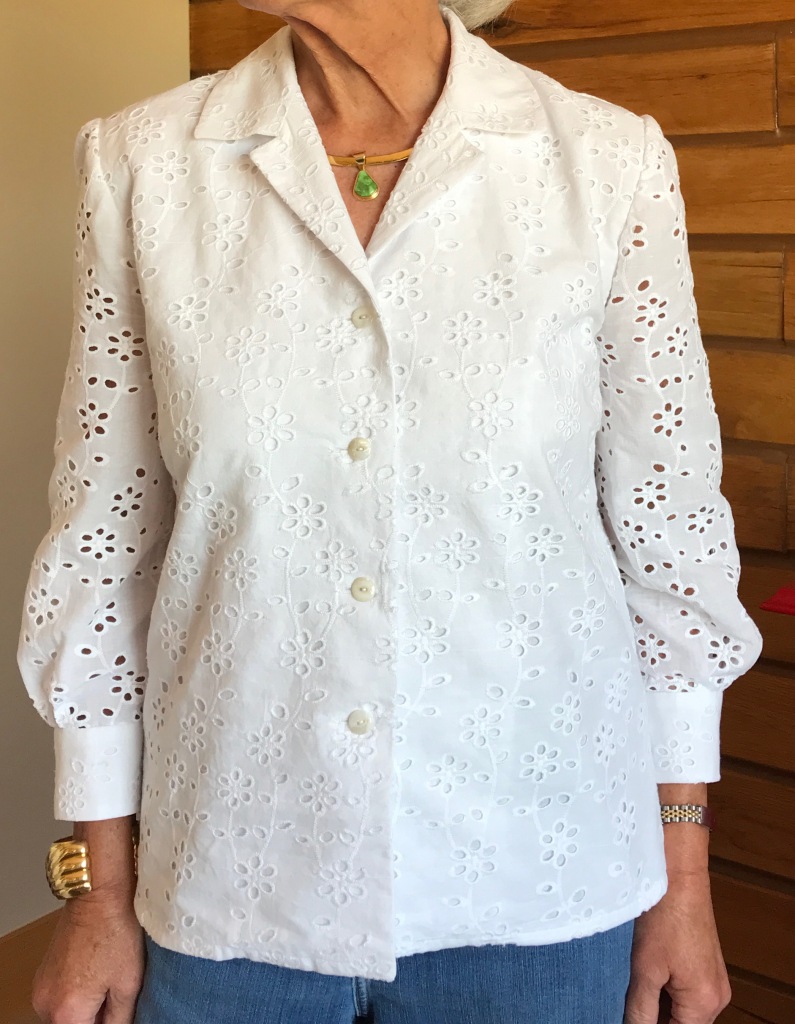
I liked the convertible collar of this pattern, as shown in View B. A convertible collar is one which can be worn open or closed. The collar is sewn directly to the neckline.  I did, however, shorten the sleeves to below elbow-length.  I also chose to make plain, buttoned cuffs without the extra turn-back detail.  

Although the blouse is described on the pattern envelope as “tuck-in,” I liked the gently curved and split hem which would also allow me to wear the blouse as an over-blouse.  The thumbnail detail from the pattern envelope shows the curved hem.  

I lined the main body of the blouse with white cotton batiste, leaving the sleeves unlined.  To reduce bulk, I made the undercollar and the cuff facings from the white batiste.

Buttons are always a favorite component of a blouse for me.  I had a card of vintage Lady Washington Pearls which seemed a lovely complement to the scale of the fabric embroidery.  

One button remaining!

I first wore this blouse on a very warm evening to attend an outdoor concert.  I was amazed at how cool the blouse was. The little breeze there was, did indeed feel like air-conditioning as it wafted through all those embroidered holes!

In my case, this collar is not “convertible” as I did not put a button and buttonhole at the neckline!
I made the cuffs with a bit more width than needed so I can push the sleeves up further if I want.
After I finished the blouse I went back and added two narrow fisheye darts to the back to make the fit a bit more streamlined.
I think this blouse might be a good pairing for the Liberty cotton skirt featured in my last post.

Finding beautiful eyelet fabric is now on my sewing radar.   I would like to make more with this timeless, feminine and versatile type of lace. 

26 Comments

Filed under Blouses, Buttons - choosing the right ones, Eyelet, Lace, Mid-Century style, Sleeves, Uncategorized, vintage buttons, vintage Vogue patterns from the 1950s

The Last Dress of the Year Past

Little did I know when I found this “end-cut” earlier in the year at Mendel Goldberg Fabrics that “classic blue” would be chosen as Pantone’s Color of the Year for 2020.  But so it was, which makes my last dress of 2019 the perfect transition into the new year and the new decade.

This an Italian silk charmeuse, in a dotted and printed jacquard.

I am one of those people who rarely goes looking for a particular fabric.  I think fabrics find me and when this fabric found me, I really had no plan for what I would make out of it.  But as soon as it arrived, I knew immediately I wanted a sheath dress with three-quarter length sleeves and a V-neck.  I tucked it away, happy with the thought of making this dress, and knowing I had the perfect pattern to make it a reality.

View C, of course! And look at those lovely shaping darts.

This Vogue pattern is from the early 1960s, a little tattered and worn, but very versatile and beautifully engineered.

After finishing my granddaughters’ December dresses, and then my pink Parisian Jacket, and then some cute little flannel blouses for gifts for my little girls, I envisioned finishing this dress to wear to holiday parties.  What was I thinking?  First of all, after tweaking the pattern one last time (I had had the pattern fitted a couple of years ago while in a class with Susan Khalje), it took two full days – yes, TWO – to figure out how in the world to lay out my pattern pieces.  Truth be told, I really did not have enough fabric.  I should have reconsidered, but I am stubborn and tenacious when it comes to my sewing “visions.”  I finally decided that I could exactly match the print on the back center seam and make it sleeveless – OR I could have sleeves and not match the back.  I really, really wanted sleeves.  It had to have sleeves.  So I did the best I could with making the back seam look okay, and I got my sleeves.

Fortunately the all-over placement of the floral motifs lent itself to imprecise matching better than many fabrics would.

And what lovely sleeves they are!  When Susan fitted the pattern, she elongated the top curve of the sleeve to accommodate my prominent shoulders.  She also added a dart at the shoulder of the sleeve (actually slightly forward from the marked shoulder of the pattern to accommodate the roll of my shoulders).  I added a slight amount to the width of the sleeve, about 3/8”.  I have found these vintage patterns are often narrow in the sleeves.

The purple lines are the changes to the muslin.

The double elbow darts in the sleeves make a lovely fit and are placed precisely where they should be.

It’s a little difficult to see the double darts, but they are there!

When it came to the V-neck, I knew I would need to use a facing of some sort, but I did not have enough fabric to cut a full facing.  So – I cut a partial facing instead, just enough to be able to turn the V and have it stable.  (The first thing I did when I started sewing the dress, was to reinforce that neckline with a strip of silk organza selvedge.)  Well, this worked like a charm, much to my delight.

The partial facing extends up from the bottom of the V about 2.5 inches, and then the turned- back seam allowance takes over.

Then I brought the lining fabric right to the edge of the neckline and understitched it to secure it in place, just as you would expect a couture dress to be finished.

I chose a “mushroom” colored crepe de chine for my lining. Blues are very difficult to match as you know, so I decided a contrast color would be best. The lining fabric is from Emma One Sock Fabrics.

I used blue thread for the under stitching.

I used a lapped application for the hand-picked zipper.  The more I use the lapped insertion for zippers, the more I like it.  And I especially like it in a center back seam.

I’m feeling quite pleased with this dress!

There is not much more to say about this blue floral dress, except that it was not finished in time to wear to any holiday event.  Which was fine!  Once I realized this would be the case, I was able to really enjoy the process of making it.  It was a delightful way to end the year – and the decade, which has had such a profound effect on my sewing.


37 Comments

Filed under couture construction, hand-sewn zippers, Linings, Mid-Century style, Pantone Color of the Year, Polka dots, sewing in silk, Sheath dresses, Sleeves, Uncategorized, vintage Vogue patterns from the 1960s

Making a Parisian Jacket, Part 1

Another title for this post could be “Sewing with Professional Instruction – the Parisian Jacket.”  One of the advantages of having a subscription to Susan Khalje’s online Couture Sewing Club is exclusive access to videos which take the viewer, step-by-step, through the process of making one of these jackets.  

When this pattern was released a few months ago, I was immediately interested in making one.  There are several details in this jacket which I find especially appealing.  The first – and salient one – is the cut-on sleeve, also called an all-in-one sleeve. This is a design feature which was prevalent in the 1950s, but no longer often seen.   Usually sewn with an underarm gusset to enhance moveability, this sleeve forms its own crease lines below the shoulder at the front and back.  You can see that detail in the diagram on the pattern envelope above.  Take a look at this magazine cover from November 1956.  You can see both the crease line and the coat’s gusset.  

I suspect at least one of the reasons this particular type of sleeve fell out of favor is that the pattern pieces do take a sizeable amount of fabric to accommodate the width of the attached sleeve.  I also suspect sewing in those gussets demanded a certain expertise to be finished successfully, adding time to both home sewing and to ready-to-wear.  But I love the look of the cut-on sleeve.  It really is a classic style, and one which I am happy to have the opportunity to incorporate into my sewing.  It is worth mentioning here that this sleeve is similar to a “kimono” sleeve, but it is not cut as full under the arm.  (This seems like a good time to show the pattern piece for the jacket’s gusset.  Rather than diamond shaped, it is a triangle with a curved top edge.  Pretty clever!)

Another design feature of the jacket which appeals to me is the prominence of the buttons.  The jacket is shown with just two buttons, although certainly a third one could be added.  However, with two larger ones, it is really possible to use showcase buttons, if desired.  And if you follow my blog, you already know that vintage buttons – and unique new ones – are one of my weaknesses.  I am always looking for opportunities to use beautiful buttons.

A third construction detail I find appealing is the center back seam.  This allows the opportunity for lovely shaping and more precise fitting than if the back piece were cut without a seam. 

With all this in mind, I was anxious to get started on this project.  As I already had several lovely woolens waiting for their turn, I decided to use one of them rather than buy new fabric.  And my attention kept coming back to this vintage piece of Linton wool which I purchased from an Etsy shop about a year ago.  

It is entirely coincidental that the jacket Susan is making in her instructional videos is also pink!  Of course, I love pink.  I would describe this particular hue of pink as a “Winter pink.”  It has a bit of a dusty appearance to it, making it ideal for a November project.  The best thing is that I have enough fabric to make a matching sheath dress to go with my jacket.  (Although I feel sure that particular project will have to wait until after the new year.) 

Well, back to Susan’s video instruction…  She is very thorough in what she includes, so much so, that those of us who have taken classes from her already, are able to whiz through the early lessons for the most part.  However, one suggestion she made was to use pins rather than machine sewing to fit the muslin together.  Here is what I mean by that:

The seam lines are pinned together horizontally throughout, and then the muslin is ready to try on. No stabbing occurred during the process!

I found this method far superior to putting the muslin together by machine.  It was much easier to make changes and alterations, and I felt like the “seams” laid flatter, enabling me to ascertain the fit, on me, more precisely.  

Once I had my muslin perfected (as much as possible), I transferred all the markings onto white silk organza, to be used as my underlining and also as the pattern pieces from which to cut the fashion fabric.  I had to move to my dining room table to accommodate the expanse of the wool. 

It is easy to see here the amount of fabric needed for the cut-on sleeves. (I use my candlesticks as weights to keep the fabric from slipping.)

Once I started assembling some of the jacket pieces, I realized I had not perfectly matched the facings.  Although the wool is solid pink, there is that very distinct weave in it which needs to be matched.  Fortunately, because I had left such wide seam allowances, I did not need to cut a new facing.  I just needed to readjust the organza on the one facing which was a bit askew.  

You can see the organza adjusted on the righthand facing, before I had re-basted it.

I still have a long way to go on this jacket, but here are two “work-in-progress” shots, with the seams sewn but nothing trimmed, ironed or catch-stitched yet.  It is fun to see it taking shape, however.  

I have a pink button pinned onto the front to see how it looks, but I have already decided against it.

Two more things need to take shape very soon – namely Holiday dresses for my granddaughters.  Somehow, I think they will be finished before my jacket!  

21 Comments

Filed under Buttons - choosing the right ones, Sleeves, woolens