Category Archives: woolens

Completion – How Sweet It Is. 

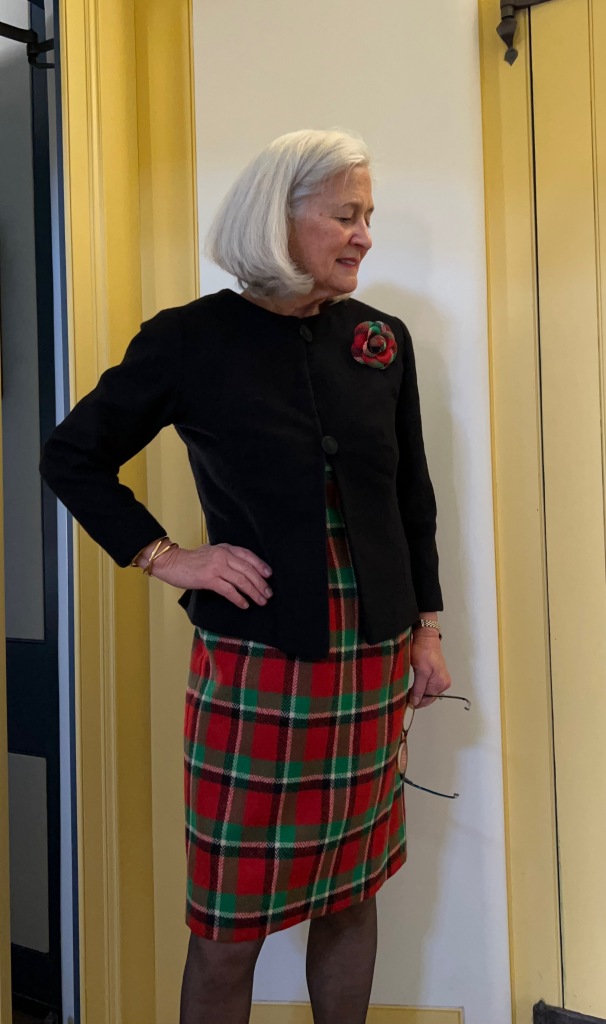
It has been a slow start to the new sewing year of 2023.  Although I had anticipated the completion of my first project – this black jacket – to be a speedy endeavor, I anticipated incorrectly!  (Has anyone ever said fashion sewing can be very humbling?)

I was making this jacket to go specifically with a wool sheath dress I made two years ago – and also, hopefully, to pair with other dresses or skirts which might benefit from the addition of a somewhat dressy black jacket.  I had the pattern, and I had the fabric, a very soft light-weight cashmere (which I found a number of months ago at Farmhouse Fabrics.) 

I chose this jacket pattern primarily for its “split” center opening which would work well with the unusual center stripe woven into the wool to balance its uneven plaid.

I first needed to make a fitting muslin (toile) and I needed to determine what changes I would make to the original pattern.  That ended up being three items:

  • I changed the neckline to match the neckline of the sheath dress.
  • I added a dart to the top of each sleeve, using that method as a substitute for the running stitches normally used to facilitate the insertion of the sleeve into the armscye. I have used this alteration frequently as it seems to fit my shoulder anatomy well.
  • I shortened the sleeves from full-length to 7/8 length.  I did this as I enjoy wearing bracelets, thus giving them a little “breathing room.”  

Before I started making this jacket, I had the perception I would need to tie the sheath dress and the black jacket together in some way.  Without a shared element, I wasn’t so sure they would necessarily look like they were made for each other.  The only problem was, I had very little yardage remaining from the sheath dress, as I had made it from a limited piece of vintage wool.  What to do?  

Covered buttons would limit my ability to wear the jacket with other pieces, and besides, I thought they would look stark as the only two small embellishments on a very black jacket.  I did not have enough fabric left, even for a small neck scarf, so that idea never had a chance.  I’m not sure when it came to me, but in a eureka moment, I thought a fabric flower made from the vintage plaid would be just the thing to make this outfit work.  

I knew M & S Schmalberg Custom Fabric Flowers in New York City would be my best bet (or only bet) for having a matching flower made.  I wasn’t sure I had enough fabric even for that, but I contacted them, sent pictures and measurements of my scrap of wool, and they made it work!  

I chose a 3” camellia option for my flower.  Look what they did!

A few other details for the construction of the jacket: (1) I under-stitched the facing to control the front edges and neckline of the jacket.

(2) I used a black crepe de chine lining (and lots of extra light when I was sewing it in!) I should mention that I underlined the jacket with silk organza.

(3) The only bit of whimsy I added to the interior was to cover up the ends of the loops for the two buttons with two small jacquard ribbon pieces appliqued on.  No one will ever see these except for me, but I like them.

This is definitely a “dressmaker detail!”

(4) I covered the required snaps with the lining fabric.

I am so happy to have this jacket completed.  Most of my projects seem to take longer than they should, but that makes completing one just that much sweeter.  

.  

59 Comments

Filed under couture construction, Dressmaker details, Jackets, dressy, Loops for buttons, Mid-Century style, Uncategorized, vintage Vogue patterns from the 1960s, Vogue patterns, woolens

A Very Pink Coat, Part 3

Added Value….  There is a significant little entry in 101 Things I learned in Fashion School (Alfredo Cabrera with Matthew Frederick, Grand Central Publishing, New York, New York, 2010, page 40).  Although aimed at Ready-To-Wear customers and the designers who cater to them, it certainly is meaningful to those of us who sew our own fashions:  “Fashion customers often need to be convinced to buy a new garment that, in effect, they already own.  …  Value added details [my emphasis] are those that are inherently necessary to a garment but are executed in a novel or interesting way…”  thus making them attractive to potential customers.  

Well, not that I really need convincing to make another coat for myself, but I will freely admit it is the unique little details in a pattern (and gorgeous fabric, of course) which convince me I MUST make THIS coat, even though I might not really NEED it.  Such was the case with my very pink coat, which is now finished.  

Those details included 1) the three welt pockets with flaps, 2) the concealed front closure, 3) the  arrowhead detail accompanying the minimal top-stitching, 4) the sleeve tabs (okay, not really a necessary detail, but a very nice one!), and 5) the opportunity to add a little flash to the lining with edge-piping.

I’ll cover the sleeve tabs first since they were the detail in question in my last post. 

 As you can observe, I decided to leave them with the buttons facing forward.  Several comments left by readers (thank you – you know who you are and I am very appreciative!) got me thinking anew about the orientation of the tabs.  Then I had an aha moment when I realized that the one button which is visible on the front of the coat, at the neckline, might look a bit disconnected without its counterparts showing on the sleeves.  Decision made, with confidence!  However, I doubt I will ever look at a sleeve tab in quite the same way again. 

The three welt pockets with flaps are quite likely my favorite detail on this coat.  First of all, I like making them.  There is a certain feeling of empowerment, although slightly nerve-wracking, to cut those big slashes into the front of the coat and be confident it will all be okay. And this type of pocket is just so pretty when they are done.  In addition, while they are utilitarian, they also suggest refinement, elevating a simple car coat to a coat with some sophistication and flair. 

Here is the underside of one of those pockets, with the slash” clearly visible.
As you can see, I used lining fabric (Bemberg from Emma One Sock Fabrics) for the facing on the flaps. And here’s a fun fact – that small pocket on the right side is called a “ticket pocket,” small and shallow, perfect for a printed ticket. As printed tickets go the way of the dinosaurs, this little pocket may become obsolete – but I sincerely hope not. It adds so much to the visual pleasure of this coat and other similar garments.
A good view of the small “ticket pocket.”

I must have a certain penchant for concealed coat fronts.  This is the third one I have made and I can let you know there may be more to come (but not soon.)   As I mentioned in my last post, I was able to reduce the bulk of the closure by using my lining fabric for one layer of the buttonhole side of the front flap.  

I made three machine buttonholes for this part of the flap, which made everything lay flat and neat. 

The gray buttons – 6 of them, which is what I needed – were in my collection, so that was a happy find. They are 1950s’ vintage gray pearl, very appropriate indeed for this 1957 pattern.

Although this coat pattern called for some topstitching, it was minimal.  Just the sleeve tabs, the pocket flaps and the collar, plus the front detail on the right side.  I was unhappy with the machine topstitching I did at the front closure.  There was enough bulk from the wool and the facing and the fly front, that it interfered with the smoothness of the topstitching.  So I took it out.  Initially I was going to do without topstitching and the arrowhead detail, but it looked a bit plain and unfinished.  So I did my fallback to what I know works – topstitching by hand.  Because of the hand-worked arrowhead detail, I felt hand topstitching would not look out of place.  Of course, I had never done an embroidery arrowhead before, so I had to practice, practice practice  so it hopefully does not look amateurish.  

I purchased matching embroidery floss for the arrowhead detail and the hand top-stitching.

Finally, coat linings lend themselves so beautifully to that extra little treatment – a narrow edge piping.

  I deviated from my Vogue pattern to add this dressmaker detail, but I am sure they would have approved.  My Avoca wool scarf which is such a perfect complement to this coat inspired me to choose checked piping.  I “robbed” a small corner from some pink silk gingham (intended for a Spring coat, as mentioned previously here) to make my flat piping.  

I purchased the pink cashmere wool for this coat from Farmhouse Fabrics.

Well, there you have it.  My first major project of 2022 finished.  I am happy I chose pink for my theme this year as it has brightened up many a dark day in this troubled world of ours. 

24 Comments

Filed under Buttons - choosing the right ones, car coats, Coats, couture construction, Dressmaker details, Mid-Century style, piping, Scarves, Uncategorized, vintage buttons, vintage Vogue patterns from the 1950s, woolens

A Very Pink Coat, Part 2

The pattern for a very pink coat has many pieces.  

When I am getting ready to start a new project with a pattern new to me, I like to read through all the instructions just to get a feel for what is ahead.  That lets me know if I can mix things up a bit, deviate from the step-by-step instructions, prepare a component ahead of time (such as sleeves.  If I feel confident about the fit, I will often make the sleeves first and set them aside until I am ready for them).  During this initial study of the instruction sheet, all was straightforward except for one thing.  For the life of me, I could not figure out how the  concealed – or fly – opening on the front was constructed.  I have done this type of opening before (here and here), but this construction was different.  

Because I wanted to use my gray lining fabric for one layer of the buttonhole side of the opening (to reduce bulk) I needed to know if I could do that and be confident that the lining would not show.  So I REALLY needed to understand how this detail went together.  I decided I would have to do a trial run.  What better use of a well-marked muslin (toile) than to use it for this task?  Armed with pins, I proceeded to do a mock-up.  

Here are the two separate fly pieces, one attached to the facing and the other one attached to the right front coat piece.
Here are the attached fly pieces folded back from the front edge. This detail allowed me to use the lining fabric for one layer of the buttoned side.
Here the two sides are sandwiched together to show the concealed opening.

Instead of taking my mock-up apart, I decided to keep it for referral when I got to that point of the coat.  And I am so glad I did.  It helped me through many a confusing moment, giving me confidence that I was doing this correctly.  Wouldn’t it be nice if all of life gave one a trial run first before facing the real thing – and then stood by to offer reassurance?  Well, you will have to wait to see the finished opening in my next post, but it is all but complete.  And I must confess, I think it is going to be very lovely.

Now here is something to ponder.  A few days ago I walked into my sewing room and was startled to observe something that did not seem right on my up-to-that-point constructed coat.  I had it hanging on my dress form and almost had a panic attack when I looked at the to-be-buttoned tabs on the sleeves.  It certainly looked as though I had sewn them on backwards!  The buttonholes, and therefore the soon-to-be-attached buttons, were oriented toward the front of the sleeve, rather than the back.

Before completely losing it, I went to my pattern, and there, plain as day in the illustration, the tabs wrapped around to the front of the sleeve.  

I still could not quite believe it, so I went to the illustrations in the 1957 Vogue Pattern Book Magazine, shown in my last post.  Yep – the tabs were oriented the same way as mine.  Just to make sure, I checked the silk organza under-lining on the two-part sleeves to double check my markings which would tell me that the backs of the sleeves were truly in the back (although my common sense had already answered this question for me.  Of course, the sleeves would not have gone in as smoothly as they did if I had put them in incorrectly).  

After being reassured repeatedly that I had not made a BIG mistake, I started to question why the tabs were oriented that way.  I looked for other examples of buttoned sleeve tabs.  I found one or two in which the tab wraps around to the front, but most tabs were sewn into the inside seam, wrapped around the front and buttoned just past the center point of the sleeve (or seam, if there was a center seam as with my pattern), toward the back.  I wondered if this might one of those things which is distinctly feminine, such as the fact that buttonholes on womens’ apparel are on the right, whereas mens’ are on the left.  But no, I could not verify that.  

Here is one of the few examples I found showing the tab buttoning toward the front of the sleeves.
And here is an example of the more customary orientation of the buttoned tab. Both illustrations are from Fairchild’s Dictionary of Fashion, ibid.

Now I am left with a decision to make.  Somehow, I think I would like the tabs on my coat to button toward the back.  I had faced the tabs with my gray lining fabric, again to reduce bulk.  I think that gray lining would better stay undercover should the tabs button in the back. I also think a backward orientation will reduce the incidence of “catching” the tab on things.  Both of those considerations obviously figure into my thinking.  Do I take out the bottom part of the finished sleeves, with their pretty catch-stitched seams, remove the tabs and reorient them?   

This photo of the interior seam of one of the sleeves shows the end of the tab catch-stitched in place along with the seams. The clips you see are where the hem turns back.

Or do I leave well-enough alone and stay true to my vintage pattern? I must decide before the lining goes in the coat. Which brings me to the realization I have just 4 pattern pieces remaining, all for the lining.  Part 3 of this saga is just around the corner.  

20 Comments

Filed under car coats, Coats, couture construction, Mid-Century style, Sleeves, Uncategorized, vintage Vogue patterns from the 1950s, woolens

A Very Pink Coat, Part 1

Some projects deserve more than one blog post and this pattern and coat fall into that category. 

I am making View A, although with the concealed (fly front) opening.
I purchased this cashmere and wool blend from Farmhouse Fabrics. It has a “brushed” surface, giving it a nap which provides a depth to the deep pink color. I have underlined all the components of the coat with silk organza. Basting holds the two fabrics together and also gives me my stitching lines and other pertinent information.

From the magical year of 1957 (I promise some time I will devote an entire post to the notable spot that the year 1957 occupies in the modern history of fashion), this coat pattern is in a class of its own.  Referred to as a “car coat” in two Vogue Pattern Book Magazine entries, it is a quintessential example of that genre.  Here’s why:

  1. It is a wonderful example of fashion following lifestyle.  The copyright date of 1957 puts it firmly in the early appearance of this form.  To wit, the entry for car coats in Fairchild’s Dictionary of Fashion reads:  “Sport or utility coat made hip-to-three-quarter length, which is comfortable for driving a car.  First became popular with the station-wagon set in suburbia in the 1950s and 1960s and has become a classic style since then.”  (ibid, p. 89)
  2. The flap pockets – three of them – are intentionally utilitarian, but also add a certain finesse to the coat.   Those flaps help protect the contents of the pocket – in the case of a car coat, obviously keys, perhaps gloves, or even a change purse. 
  3. The side slits give a bit of wiggle room to the area of the hips, for sliding in and out of car seats.  And the buttoned tabs at the wrists add to its aesthetic appeal.  No, they are not really necessary, but that is not what this coat was all about.  It was meant to be extremely functional, but smart looking.
  4. The concealed front in View B, commonly referred to as a fly front, steps the appearance of this coat up a notch.  Particularly notable is the arrowhead detail at the top of the topstitching on the front of the coat.  
  5. The busy mother and wife would have looked very “put-together” wearing this coat out and about.  Later versions of the car coat style included Benchwarmer, Duffel coat, Ranch coat, Mackinaw jacket, Stadium coat, and Toggle coat (according to Fairchild’s Dictionary of Fashion)  But this coat was a car coat, in its very pure early, but fashionable form.

This pattern is featured twice in the Vogue Pattern Book Magazine from August-September 1957.

Here is the longer version shown on page 22:

“The coat that goes over everything.” Here is an interesting observation which might not be readily apparent. When I was fitting my muslin (toile) for this coat, I initially thought the sleeves may be a bit too loose. You can see in this photo they are not slim on the model. But then I realized they have a bit more girth to them for a reason – to give the wearer comfort and unrestricted movement while driving. (And in 1957 there was a good chance she was driving a stick-shift car!) I kept them the way they are as I will appreciate being able to wear a heavy sweater under my coat.

And here on page 37 is a drawing (by illustrator Dilys Wall) of the coat in red with this description:  “A hounds-tooth-check car coat with three flap pockets, side-slit seams, and tab-button detail on the sleeves.  Designed in sizes 10 to 18.”  

Interestingly, also featured in this same magazine is this example of a child’s coat, also with a fly front.  This type of opening takes more skill – and time – to make.  I love the affirmation this item gives to the commitment and ability of the home-sewer in the 1950s.  

Because this coat has those extra details which put it a notch above ordinary, there is a lot of preparation work before seams can actually be sewn together.  The sleeve tabs, with their bound buttonholes must be complete before the sleeve seams can be sewn.  Additionally, the set-in pockets with their flaps present a considerable amount of prep work on the fronts of the coat.  Sounds like fun to me! More to come . . .

16 Comments

Filed under car coats, Coats, Fashion commentary, Fashion history, Mid-Century style, Pattern Art, pockets, Uncategorized, vintage Vogue patterns from the 1950s, woolens

A Return to Sewing

Did you think I had abandoned my cape?  After an unexpectedly long hiatus from sewing – due to busy holidays, travel, and things out of my control – I finally returned to my sewing room last week.  And although PINK is supposed to feature large in my 2022 sewing agenda, I first had “anything but pink” unfinished business from 2021.  Yes, that cape which I thought would be such an easy make…  I put the final stitches in it last week, only about 6 weeks after I imagined that would happen.

Hah… Those buttons are much more of a deep olive green in reality!
Can you tell it was freezing when I took these photos? This duo will be a good Fall ensemble, but it is not quite warm enough for the middle of Winter!

In all fairness, I should say whenever I must stop a project and then return to it weeks later, I always imagine that it has taken me much longer than it should have.  There is a “reacquaintance” factor in the time involved.  “Now, just where am I in this?  What’s the next step?  What did I do with the undercollar?  Is the lining already cut out?  If so, where is it?”  and on and on. Believe it or not, I tend to be rather organized about my sewing, leaving notes for myself – that sort of thing.  But still – the momentum needs to be rebooted, both for the project and for myself!

Enough of this babble. On to the cape – what worked, what didn’t, and what will I do differently, should I make this pattern again.  Regardless – the cape is ready to wear, and I am very pleased with how it turned out.  

I had to pay extensive attention to laying out the pattern and matching plaids as best I could, knowing that this uneven plaid was going to play some tricks on me.  For the most part, I think I was fairly successful; at least there aren’t any glaring mismatches.  

I must have sewn, torn out and resewn the collar at least five times until I realized those stripes were never going to perfectly align.
I chose an olive green silk charmeuse from Emma One Sock Fabrics for the lining.

The arm slits are just lovely, both outside and inside:

The welts are continuous with the front princess seam.
The lining is brought right up to the inner edge of the welt and slip-stitched in place.

I was a bit concerned about the size of the collar.  This is a pattern from the 1970s, when collars tended to be a bit oversized.  I certainly did not want this cape to scream 1970s, so I was ready to pare down those collar points if necessary.  But I think the collar is perfect just the way it is.

I under-stitched the collar to control the edges.
I think the size of this collar is just right.
I also under-stitched the front edges of the lining. The entire cape is underlined with silk organza, which gave me the perfect anchor upon which to attach those stitches invisibly.

The one component of this pattern I did have trouble with was the separate closing tab.  The pattern, surprisingly, did not specify bound buttonholes.  Rather it called for machine or hand-stitched buttonholes.  I usually like to make bound buttonholes on wool fabric (there are exceptions, of course, but I did not look at this as one of those).  So I dutifully went at it.  But the narrow width of the tab made turning it, with bound buttonholes applied, nearly impossible.  No, make that totally impossible.  It was lumpy, uneven, and unacceptable.  But I was not going to give up on my bound buttonholes.  I decided to redraw the tab, using “squared-off ends” rather than rounded ends.  I knew that would give me more space to manipulate all the interior buttonhole bulk.  I also oriented the buttonholes horizontally instead of on an angle as shown in the lower pattern piece below.

The lower figure is the original tab as taken from the pattern. The upper figure is my redrawn tab.

Voila!  It worked, and I think it might even be a better look than the tab with the rounded ends.  

Not sure why my olive green enameled buttons look almost mint green in these photos.

So – what would I change next time?  I think I might add an inch or two in length.  I think the cape pictured on the pattern envelope looks longer than the reality of it.  

I also think I would taper the back hem of the cape to a gentle extended curve so that the back of the cape is about one to one-and-a-half inches longer than the front.  When I visualize that, I like what I “see.”  

Making this cape has reinforced my opinions about this type of outer covering – it is graceful and quietly elegant in this unfussy form, even in plaid.  Finishing up this project was necessary, but also, as it turned out, a successful start to the new sewing year.  

27 Comments

Filed under bound buttonholes, Capes, couture construction, Uncategorized, Vintage fabric, vintage Vogue patterns from the 1970s, Vogue patterns, woolens

A Fabric Full of Surprises

Several years ago I purchased a piece of vintage French Lesur wool, which I subsequently made into one of my favorite pieces ever, my pink Christian Dior-designed coat.  

When I received the length of pink wool from the eBay seller, I wrote her a note to tell her how excited and grateful I was to have the opportunity to purchase that fabric.  It apparently had been from the estate of an accomplished dressmaker, known for her good taste.  The seller then kindly offered me another piece – very different in aspect – from the same collection.  The photos she sent me showed a wool plaid which looked to be a medium khaki background with purple and lavender lines woven into it.  It wasn’t exactly what I usually gravitate to, but I knew the quality of the fabric would be superb, and being a pushover for vintage fabric, I decided to purchase a five-yard length from her.  

When the fabric arrived, it wasn’t at all what I had expected.  This is one of the downsides of purchasing fabric – especially vintage fabric – online.  You don’t always get what you think you are getting.  This fabric was deep brown and the purple and lavender intersecting lines were more the colors of eggplant and lilac.  It seemed kind of dark to me. Except for black and navy blue, I’m not usually a dark-wearing person.  The quality of the fabric, however, was indeed superb.  Soft, lightweight with a beautiful hand to it.  

I was a little disgruntled about this purchase, though.  I don’t like to spend money frivolously, and this suddenly seemed like an unwise decision.  But – it was done, so I put the fabric in my fabric closet for storage.  Every once in a while I would take it out and ponder it.  I started to like it more and more, but I couldn’t for the life of me figure out what to make with it – all 5 yards!  

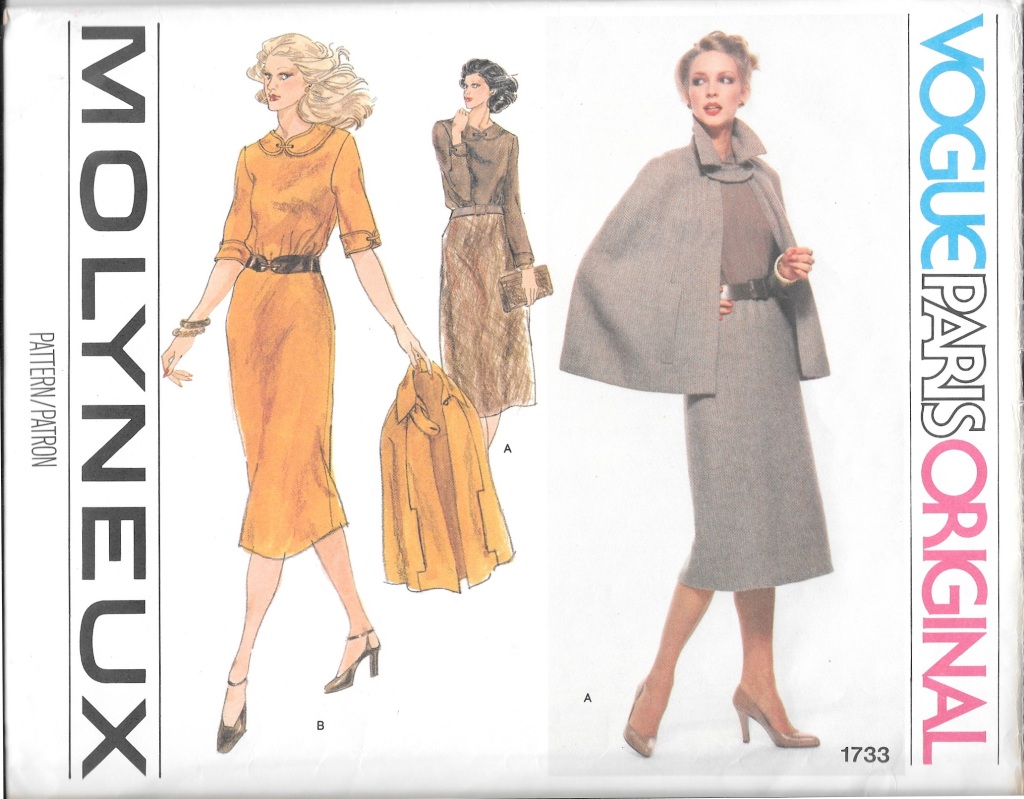
Now. . .  I have discovered with fashion sewing, that sometimes time allows creativity and inspiration to blossom, and that is what happened with this fabric. At some point over the summer, I decided this wool would make beautiful slim slacks.  But what to do with all that remaining fabric?  Somehow, a matching jacket did not appeal to me at all – and then I remembered a lovely vintage Vogue pattern, designed by Molyneux, I had in my collection at home in Pennsylvania.  I knew it would be perfect with the pants – and the fact that I had long wanted to make its featured hip-length cape sealed the deal!  

In preparation for this project, I needed to order lining fabric, both for the pants and for the cape. I selected 5 shades of brown silk charmeuse on Emma One Sock’s website and sent off for swatches.  (I often prefer to use a contrasting color for a lining, but in this case I determined a matching lining would allow me greater flexibility in wearing the cape with something other than the matching pants.)  The swatches arrived in short order, and I was astounded to discover that not one of them was even close to a matching color.  

The swatch second from the right was the closest match, but it was still a long way from viable, even more so in person than in this photo.

And then it hit me – like an iron in the face! – this wool was not brown, it was a true olive green!  No wonder it had started to appeal to me.  I have long been a fan of olive green, which I now know to be a little bit of an enigmatic color.  Off I sent for 5 more swatches of silk lining, this time in shades of deep green.  When the swatches arrived, it was a Bingo moment.  One was clearly a perfect match.  

The center swatch “reads” brown in this photo, but it is a true olive green, as is the background of the wool fabric.

Please stay with me in the next couple of posts, as I work through this two piece outfit – a project whose time has finally come.  

16 Comments

Filed under Capes, Christian Dior, Linings, Uncategorized, Vintage fabric, vintage Vogue Designer patterns, vintage Vogue patterns from the 1970s, woolens

Too Late – or Too Early?

This sewing out of season is perplexing.  On the one hand, I am happy to have been able to complete this dress.  But on the other hand, the timing of its completion means it is too late in the season to even think about wearing it – or much too early.  Not that it will matter six months from now. 

After my successful use of a new sheath dress pattern earlier this winter, I was anxious to use it again.  And I just happened to have a piece of cashmere herringbone wool tucked away for such an occasion.  I had been on the hunt for a wool to coordinate with the Classic French Jacket shown, and I was quite excited when I found this selection at Farmhouse Fabrics.  The bonus was the fact that it is cashmere, and oh, so soft.  

Wool is quite possibly my favorite fabric on which to sew.  Christian Dior certainly had kind words to say about wool in his Little Dictionary of Fashion.  “Wool shares with silk the kingdom of textiles…  And like silk it has wonderful natural qualities.  Always before you cut woolen material it has to be shrunk to avoid disappointment afterward.” [I always steam wool fabric heavily before I cut into it for just this reason].  Dior continues, “Wool has the great advantage over all other materials in that it can be worked with a hot iron and molded.” (The Little Dictionary of Fashion, by Christian Dior, Abrams, New York, New York, c2007, Page 122.)  

Additionally, I have always loved the herringbone weave.  The chevron pattern in this particular fabric is achieved by the use of two contrasting colors, yellow and pumpkin, which produces the lovely and soft deep persimmon color.  

The two contrasting colors are apparent in this photo.

Making this sheath dress was very straightforward, its details identical to the sheath dress which preceded it:  lapped zipper, underlined with silk organza and lined with crepe de chine, under-stitched neckline and armscyes, and a real kick pleat.  

I chose this delicate crepe de chine for the lining. I purchased it from Emma One Sock, which has a beautiful assortment of silks suitable for linings.
Oh, how I love this kick pleat.

This jacket and skirt will be perfect for Fall – and I am delighted to have a dress to wear with my jacket which I completed two years ago.  

And now for those of you who like to see the sewing I do for my granddaughters, here are two more dresses which were definitely too early (although on time for Spring birthdays.)  Unseasonably cold Spring weather kept these dresses on their hangers apparently, but I do have pictures of them before they went on their journey across many, many miles to their final destination.

I found the fabric at Emma One Sock last Fall.  It looks and feels like Liberty Lawn but is not.  The bordered eyelet which I used for the collars is from Farmhouse Fabrics, as is the pattern, which I have used before.  (This is the last year for this pattern for my girls, as I used the [largest] size 12 for my very tall and slender eight-year-old!) 

This diagram helps to show the details of the pattern. Notice the narrow darts in the bodice, which gives such a nice degree of shaping. This is the type of detail found on well-engineered patterns, of which this is one.

The buttons are vintage Lady Washington Pearls.  The pale pink rickrack is also vintage – and 100% cotton – which makes it lay beautifully flat, molding itself with the cotton fabric.   


Beautiful vintage buttons like these are a good match for this timeless pattern.
Such lovely eyelet and just the perfect weight for gathering into a collar.

So quickly these weeks turn into months and then into seasons! Whatever the season from whence you are reading this, I wish you dresses which are just right!  One of these days, mine will be, too.

13 Comments

Filed under Buttons - choosing the right ones, Chanel-type jackets, Christian Dior, classic French jacket, couture construction, Eyelet, Sewing for children, Sheath dresses, Uncategorized, vintage buttons, vintage Vogue patterns from the 1960s, woolens

One for Winter

And Winter it has been!  BRRRR….  Seriously cold weather calls for some seriously warm fabric, and I had just the right piece waiting for such an occasion.  

When I found and purchased this vintage piece of Viyella several years ago, I thought the plaid was of a larger format.  I’m not quite sure what I thought I might make with it, but I tucked it away for another day.  After making so many casual cotton blouses over the past few years, last Fall I had one of those “Aha” moments, and decided this Winter would be good time to make one for cold weather – and what better fabric to use than this small-scaled plaid Viyella?  

It is always reassuring when there is documentation attached to a piece of vintage fabric. Two of these paper labels were attached to the fabric when I purchased it.

I have had direct experience with the warmth that Viyella provides, having made two bathrobes out of this storied fabric.  And unlike some wool (Viyella is a wool/cotton blend), this fabric does not itch against bare skin.  I made the robes pictured below in 2017 and 2019, respectively. I expected the Viyella which is the subject of this post to be of the same scale as these two plaids. Yes, purchasing vintage fabric online can have its surprises!

I’m not sure any single garment I have made has been worn and appreciated more than this robe.
I made my second Viyella robe to keep in our vacation home in Wyoming.

The background of this current fabric “reads” blue, but it turns out gray thread and gray buttons seemed to be the best complement to it.  

Always on the hunt for vintage pearl buttons, I found these gray ones to use for this blouse.

This is the time-tested and altered Simplicity pattern I have used repeatedly – with its yoked back – and shirttail hem.  

Every time I make this pattern, I have to go to the instruction sheet for the yoke construction details, and EVERY time I get confused!  

This may be the first time I have actually made this pattern without having to take out at least one seam in the process of joining the yoke to the back and fronts. 

How difficult can it be to attach a yoke? Somehow I make it difficult every time!

There is really not too much more to say about this blouse, except perhaps to wonder why it took me so long to decide to make it. 


I have a number of Viyella labels in reserve, so I was happy to use one for this blouse.
Staying warm!

Hmmmm.  One for Winter might become Two for Winter… 

27 Comments

Filed under Bathrobes, Blouses, Buttons - choosing the right ones, fabric labels, Uncategorized, vintage buttons, Vintage fabric, woolens

A Dress That Was Meant to Be – in Vogue

Sometimes the sewing stars align to ensure success (and sometimes they don’t.)  But this story is a success story, although it played out differently than I originally planned.  

I wrote about this vintage Forstmann wool fabric in a previous post.

Having only 1.25 yards of this vintage wool restricted my options to either a simple sheath dress or a skirt.  I opted for the sheath, with all good intentions of using the princess-lined pattern I had recently used for a pink dress in vintage Linton wool.  In fact, one of the reasons I made the pink dress was to see if I would be able to successfully match plaids when I started on the red/green wool.  (The weave of the pink Linton has a plaid woven into it, which I knew would be helpful to me in determining the pattern’s useability for a multi-color plaid.)  Only one problem – when I laid out the pattern pieces on the Forstmann wool, I didn’t have enough fabric.  I should have realized that the 7-panel princess dress would take more fabric than I had – and this time there was no making it work.

SO – I had to find another pattern.  I have, over the years, made several sheath dresses using a newer Butterick pattern, but I really wanted to use a vintage pattern for this wool.  Now, I have a lot of vintage patterns in my collection – and I went through every single one looking for the right sheath dress.  At first I didn’t realize this pattern had the look I wanted.  

I had originally purchased this pattern for that gorgeous shawl collared coat.  But – BINGO – when I took another look, there was the perfect sheath looking right at me.  

Although the pattern was not dated, I knew it was from the early 1960s.  But of course, I thought it would be wonderful to know the year it first appeared.  A lengthy search through old Vogue Pattern Magazines proved to be successful – not only successful, but timely.  This pattern was included in the December 1962/January 1963 issue, and was the featured pattern for a Special Capsule Catalog included in the issue.  Not only that, the caption read: “110 IDEAS TO START THE NEW YEAR IN VOGUE.”  Yes, I thought, that’s what I want to do!  

What a glamorous look!
And here is the entry for this pattern in the capsule catalog.

Of course, starting with a pattern I had not before used meant I had to make a muslin (toile)  and fit it.  That little effort took two days.  But then I got started in earnest, cutting out the silk organza underlining and positioning it right where it needed to be on the fabric.

You will notice that this fabric has a center front, woven to provide a mirror image of the plaid on each side. Really a brilliant way to handle an uneven plaid.

There were two important considerations for placing my silk organza underlining “templates” on the plaid:  1) the orientation of the plaid vertically and 2) the correct placement of the hemline on the grid of the plaid and making this placement work with the position of the waistline and neckline.  

I thought the wider, darker part of each woven “block” on the plaid should be oriented to the bottom of the dress, which I believe is apparent above.  

I find, when working with plaid, it is very important to have the hemline determined before you cut out your fabric.  Visually it is more appealing if the hem does not cut a block of the plaid directly in half or, especially with smaller plaids, end right at the edge of a block.  I think it looks better if there is a bit of a “float” around the bottom of the dress to anchor the bottommost blocks. (Larger plaids have their own considerations. Look at the art on the pattern envelope above to observe this.)

The red “band” at the hemline serves as this “float.”

One of the design features of this dress is the kick pleat, which has its origin in the back seam starting at the bottom of the zipper.  I wasn’t sure how I was going to work the lining around this, but I also thought I could probably figure it out.

The instruction diagram shows the kick pleat quite well.
I angled the raw edges to finish the bottom edge of the seam.
Here is the finished kick pleat.

I loved that fact that this type of kick pleat made the perfect setting for a lapped zipper, shown below.  

The left side is pressed slightly to the middle to accommodate a lapped zipper.

You will notice this dress has two shaping darts on either side of the front panel, in addition to the bust darts.  The back has one shoulder dart and one shaping dart on either side.  

All these darts make for such a lovely fit. In addition, I used a trick I have learned from Susan Khalje. Instead of sewing the bust dart into the side seam, I allowed it to float free, stitching the seam above and below the dart. I did this for both the fashion fabric and the lining. Using this method provides more ease to the bust.

This photo shows what I did with the side seam at the bust dart.

I did lower the neckline by about ½ inch, and I cut the shoulders in by about an inch on either side.  These changes just seemed to look better on me, as determined by my muslin (toile).  

I lined the dress in black silk crepe de chine. (I find almost all my lining silk at Emma One Sock.)  When it came to the kick pleat, I found that a slanted seam below the end of the zipper was necessary to divide the lining between the two sides of the kick pleat. 

Black is so difficult to photograph, but hopefully the angle is apparent.

 I have no idea how to explain what I did to finish the lining in this area.  Just know that whatever I did – worked!  I ended up with no lumps and no restriction on the functionality of the pleat.  

How lovely to have a label for this vintage wool.

This dress was such a fun project.  I loved working with such a beautiful wool and such a beautiful pattern.  There will be more such sheath dresses in my future. 

I now would like to make a black jacket to wear with this dress; I do have a small amount of fabric remaining to use as trim in some way…

So now, how about you?  Have you started the new year in Vogue? I hope so!

52 Comments

Filed under couture construction, fabric labels, Hems, Linings, Mid-Century style, Pattern Art, Sheath dresses, Uncategorized, underlinings, Vintage fabric, vintage Vogue patterns from the 1960s, woolens

Visionary or Illusionary? Sewing in 2021

Every January I take some time to think about my sewing plans for the year ahead.  I make my “project” list, which usually includes at least one or more items which never made it to the cutting table in the previous 12 months and simply transfer from last year to this year.  My list includes those things which are “traditions” such as Christmas dresses and birthday dresses for my two granddaughters.   It includes any home decorator sewing I’d like to accomplish, and it usually includes at least one project that is “just for the fun of it,” meaning I have no occasion in sight for it or no need for it, but I just want to make it.  The rest of the things on my list are pieces I know I will wear and which will be good additions to my wardrobe.    So, I guess one could call this list my sewing vision for the year.  

What has me tripped up this year is the fact that several of the dresses I made during 2020 sadly have yet to be worn.  When there is no occasion to dress up, it is difficult to justify making more such dresses.  I would like to think 2021 will become a year of parties, and dinner parties and cocktail parties, but this may be illusionary thinking.  Because everything still seems to be in limbo, I have resorted to the tried and true for much on my list.

These include: 

  • At least six blouses!  I know I posted last summer about “too many blouses,” but the fact is that I love to wear blouses, and as long as I keep finding blouse fabric I love, I will keep making blouses, as boring as that may seem.
  • Dresses for my granddaughters.  Although 2020’s Holiday/Christmas dresses were “scrubbed,” as they had no place to wear them, I already have fabric selected for these 2021 dresses.  I did, however, sew Christmas gifts for my girls in 2020, making American Girl doll clothes for one and this dress for the younger one:
I have to say my granddaughter looks adorable in this dress!
I found this finely woven cotton fabric at Britex Fabrics several years ago, and I was saving it for a special reason. The pink rick rack is vintage, all cotton, and the buttons are also vintage. The collar and cuffs are in a linen cotton blend.
  • Linen pants???  I rarely make pants, but I think I will attempt a pair this summer.
  • A skirt out of Liberty Lawn, to wear with a white blouse.
  • Two wool sheath dresses, about as fancy as I dare to get this year, with the hope that I’ll find a reason to wear them.
  • Two … aprons!  Why not?  They are fun to make and certainly useful. And I can use some excess fabric left over from past projects for these.
  • Whatever else strikes my fancy, which leaves a lot of options.  
From left to right: pink cotton for a blouse, Liberty Lawn for a skirt, Liberty Lawn for a blouse
From left to right: Boucle for I’m not sure what yet, Herringbone weave wool cashmere for a sheath dress, vintage Forstmann wool also for a sheath, vintage Viyella for a winter blouse, checked flannel, also for a winter blouse.

As always, I am planning to restrain from purchasing too many new fabrics, hoping instead to use  fabrics from my stored collection. (Wish me luck on that!)  Indeed, my first make, a “Jaron Shirt” made in support of fellow dressmaker, Andrea Birkan, who tragically lost her son last year, is constructed with two fabrics several years in my fabric closet.  Details on this shirt can be found on my Instagram page @fiftydresses.  

I will end this post with a postscript to my last post on a piece of vintage Forstmann wool (which, as noted above, will be one of my two sheath dresses in 2021.)  The story continues, as identical examples of the label accompanying my fabric have surfaced, all with a date from the late 1940s.  When I look at my wool, I have a difficult time envisioning it as being as early as the late ‘40s.  Although I have no reason to believe the label does not belong to the piece of wool I have, this discovery has initiated more questions than answers.  That is not unlike my expectations for 2021 sewing – it is a mystery whose ending has yet to be written. Whoever knew sewing could be so full of intrigue? 

24 Comments

Filed under Liberty cotton, Sewing for children, Sheath dresses, Uncategorized, vintage buttons, Vintage fabric, woolens