Category Archives: Gussets

Making a Parisian Jacket, Part 2 – and on to the Finish

Oh, lets’s just skip Part 2 and go right to the finish!  To be honest, a separate Part 2 was somehow lost in the midst of a flurry of sewing while I concentrated on “December Dresses” for my two granddaughters.  More on those another time.

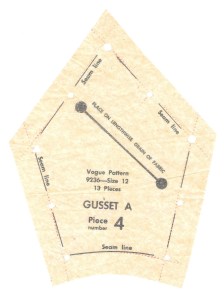
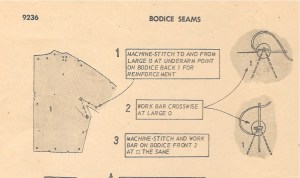
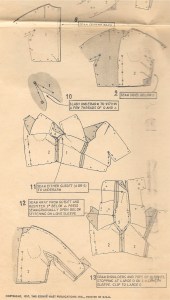
When I returned to my Parisian Jacket, I was almost ready to tackle the gussets.  Sewing the bottom curved seam of the gussets was easy to do on the machine.  But when it came to the other two seams, working in such tight angles, I did not even try to sew them on my machine.  I went right to hand sewing them, using a small tight backstitch, and I ended up with good results.

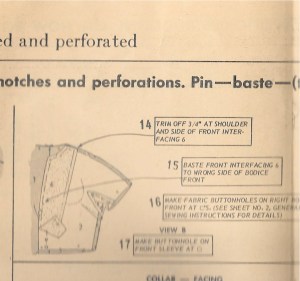
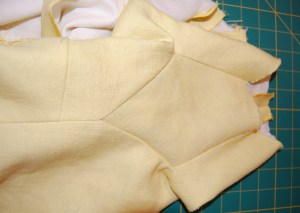
Having the gussets finished meant that the basic body of the jacket was together.  Then it was on to the collar and the front facings.  Following Susan Khalje’s video instructions, I was able to get a very precise finish to the collar.

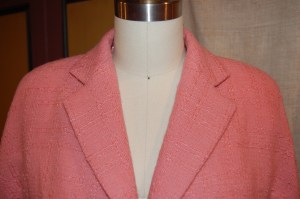
I had to be careful to match the weave of the fabric, up and down and across.

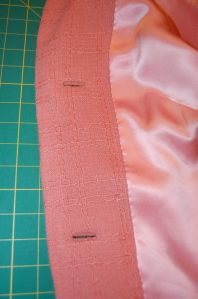
There are two bound buttonholes in the right front of the jacket, and this is where I deviated slightly from the order of construction that Susan was following.  Instead of partially sewing on the right front facing and then making the buttonholes, I did my buttonholes before I attached any part of the facing.  I felt like I had more control doing it this way.

The finish of the buttonhole on the ifacing.

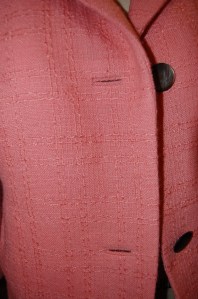
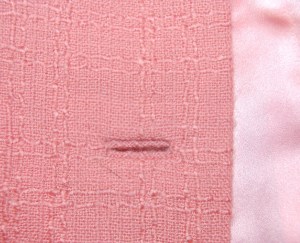
The finish of the buttonhole on the facing. (Please pardon the cat fur!)

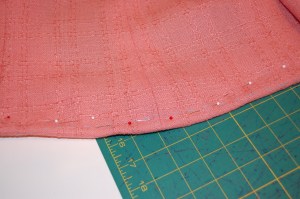
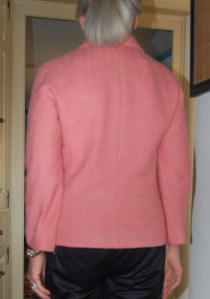
Whenever I have made a Classic French Jacket, I have added a slight curve to the back hem, and I find this to be very pleasing.  I decided to do the same with this jacket.  At the center back I marked the hemline at 5/8” below the marked hem, and then I gradually curved it up to the side point of the jacket.  It is quite subtle, but I think a nice addition.

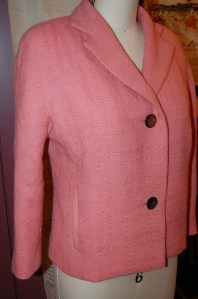
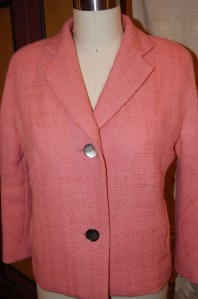
I went round and round with buttons for this jacket.  Ideally I would have loved to find some pink ones, but the pink of this vintage Linton fabric is really not a clear pink.  It is a bit “dusty” and finding buttons to match proved too big a task.  So I opted for these vintage mother-of-pearl gray buttons, which happen to have pink overtones to them.

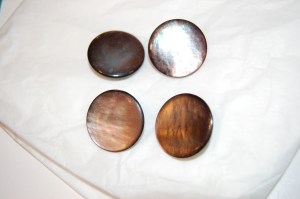
I expect to wear this jacket with gray quite a bit, so the gray buttons make sense to me.  I actually really like them now that they are on.

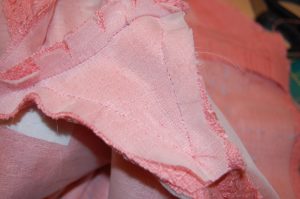
I chose a pink silk charmeuse from Emma One Sock Fabrics for my lining.  I would have loved to use a flowered silk, but the ‘see-through’ factor of the light pink wool prohibited that.  And actually the pink lining seems to add some vibrancy to the fashion fabric.  It makes a very pretty “inside”.

I sewed the lining in entirely by hand, which was an option. The front seams of the lining could also be machine stitched.

This was a very time-consuming project, even without making granddaughter dresses in the midst of it.  The video series is 13 parts long and Susan is extremely complete in her instructions.  I attribute my success with this jacket to three main facts:

  • I basted every seam before machine sewing them, even the seams in the lining.
  • Except for the bound buttonholes, I carefully followed Susan’s order of construction as she laid them out in her videos.
  • I viewed each lesson over and over to make sure I wasn’t missing anything.

There were many couture tips shared by Susan during the making of this jacket, but these four are ones I will use again and again:

  • Sew the sides of the pocket bags in by hand with a small fell-stitch rather than sewing them by machine. What a great finish this made.
  • Catch-stitch the upper curve of the pocket bags to the underlining of the jacket. This keeps them in place and prevents sagging of the bag inside the garment.
  • Use straight-of-grain silk organza strips to stabilize the on-bias cuffs of the bias sleeves. This keeps the lower edge of the sleeve from “growing” as bias is wont to do.
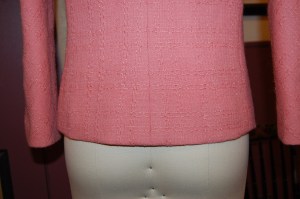
  • To add a center back pleat to the lining, which is necessary of course, place the back jacket pattern piece on the fold of your lining silk, set back from the edge by about one inch. (You will not have a center back seam in your lining with this method.)  The extra inch makes a natural pleat which can be secured at the neckline and at the waist or slightly below.

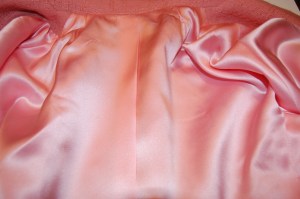
It may be a little difficult to see the center back pleat, as everything is so pink, but it is in the center of the photo.

I am already looking forward to making this jacket again.  I can visualize it in a vintage Moygashel linen – it would be beautiful for Spring and Summer and Fall.  I think this jacket may become as addictive to sew as a Classic French Jacket!


24 Comments

Filed under bound buttonholes, Buttons - choosing the right ones, couture construction, Gussets, Linings, Uncategorized, vintage buttons, Vintage fabric, woolens

Gazing at Gussets and Fashion Exhibits

We are almost halfway through the sewing year! Time for me to just keep plugging along, being grateful for any hours I can spend sewing – or dreaming about sewing. Lately it seems I have spent more time dreaming about it than actually accomplishing anything. But that’s not quite true. I have actually done a lot of sewing (I call it necessary sewing) – just not anything worth sharing. But that is about to change.

I am working on a yellow linen shirtdress, using this pattern:

I am making the short sleeve version - but a little shorter!

I am making the short sleeve version – but a little shorter!

I am really getting to be a fan of kimono sleeves. They were incredibly popular in the 1950s (and early ‘60s), and their construction varies according to the type of gusset used. The dress in this pattern has a gusset that forms part of the sleeve, itself.

Usually gussets are diamond shaped. However, the curved lower edge shows that this gusset incorporates part of the sleeve in it.

Usually gussets are diamond shaped. However, the curved lower edge shows that this gusset incorporates part of the sleeve in it.

The instructions for inserting the gusset are quite explicit and interesting, I think. The first step is to work a “bar” across the point on the bodice where the matching point of the gusset is placed. I have actually never seen this done, but it makes sense as it reinforces that stress point.

Gazing at Gussets 1st diagran

I also like the double stitching on the interior seams of the gusset as shown in this section:

Gazing at Gussets 2nd diagram

Here is how the finished short sleeve is diagrammed:

Gazing at Gussets 3rd diagram

And here are some photos of the finished gussets on my dress:

Gazing at Gussets

This photo clearly shows how the gusset becomes part of the underpart of the sleeve.

This photo clearly shows how the gusset becomes part of the under-section of the sleeve.

Here is an inside look. While the dress is underlined in a very light weight cotton/linen blend, I opted not to underline the gusset, in order to add to flexibility. I got this brilliant idea from Laura Mae of Lilacs and Lace sewing blog.

Here is an inside look. While the dress is underlined in a very light weight cotton/linen blend, I opted not to underline the gusset, in order to add to flexibility. I got this brilliant idea from Laura Mae of Lilacs and Lace sewing blog.

The seam you see at the top of this photo is the shoulder seam which runs down the length of the sleeve.

The seam you see at the top of this photo is the shoulder seam which runs down the length of the sleeve.

I managed to tear myself away from my sewing room for a few hours this week to go to see an exhibit at the Michener Museum in Doylestown, Pennsylvania (USA). Entitled Philadelphia In Style, the exhibit featured fashions either made, worn or purchased in Philadelphia, PA over the course of about 100 years (1880-1980).

Duskin - Exhibit title

All are part of the Robert and Penny Fox Historic Costume Collection at Drexel University in Philadelphia, a veritable treasure trove of designer, haute couture and ready-to-wear dresses, coats, ensembles, shoes, handbags, and accessories of all types. The Exhibit has special meaning for those of us with Philadelphia ties, but universal meaning for lovers of fine fashion anywhere.

Although the clothing on display was fascinating and, for the most part, lovely, it was the numerous fashion illustrations, framed and lined up one after the other, which really caught my attention. They had all been done in 1954 for a specialty ladies’ shop in Philadelphia, called Nan Duskin. The most amazing thing is that each one had a swatch of the intended fabric taped in the corner of each drawing. Here is a sampling:

Duskin sketch - purple dress

The buttons were still in question for this dress – note the line in the upper right side “buttons?”

Such a lovely coat! Note the fabric swatch, held in place with yellowing tape!

Such a lovely coat! Note the fabric swatch, held in place with yellowing tape!

So many of the illustrations were of dressmaker suits. This one is made in brown checked wool.

So many of the illustrations were of dressmaker suits. This one is made in brown checked wool.

I love the saucy pose in this sketch - and the posy perched on the shoulder!

I love the saucy pose in this sketch – and the posy perched on the shoulder!

One of my favorites: in red, of course!

One of my favorites: in red, of course!

Here are a couple of the fashions represented in the Exhibit:

This was called a Day Ensemble. It bears the table "Irene for Nan Duskin." This was Irene Lentz Gibbons, 1952-53, USA.

This was called a Day Ensemble. It bears the table “Irene for Nan Duskin.” (Irene Lentz Gibbons, 1952-53, USA)

This shirtwaist dress, Norman Norell for Trina-Norell, circa 1955, had finely done bound buttonholes. the fabric is s ilk and wool brocade.

This shirtwaist dress, Norman Norell for Trina-Norell, circa 1955, had finely done bound buttonholes. The fabric is silk and wool brocade.

The Exhibit did manage to include one of the most unattractive Chanel suits I think I have ever seen.

The Chanel suit on the left is shown with an ultra-suede shirtdress by Halston, on the right.

The Chanel suit on the left is shown with an ultra-suede shirtdress by Halston, on the right.

But it was still fascinating to look at the cuff detail:

Duskin Chanel suit detail

One of the most charming displays in the Exhibit was a collection of hat boxes from the stores in Philadelphia which were the purveyors of so many fine fashions over the decades.

Duskin - hat box display

As a lover of pretty boxes and bags, I found this vignette not only delightful, but also evocative of the thought and care inherent in buying and wearing beautiful fashions. They reminded me of the same little thrill I get when a piece of beautiful fabric which I have purchased shows up in the mail, elegantly presented in crisp tissue and tied with silky ribbons.   It makes it oh-so-easy to fall in love immediately!

23 Comments

Filed under bound buttonholes, Coco Chanel, Day dresses, Dressmaker suits, Fashion Exhibits, Gussets, kimono sleeves, Mid-Century style, Uncategorized, vintage Vogue patterns from the 1950s