Category Archives: Dressmaker details

A Tale of Two Dresses, Part 2

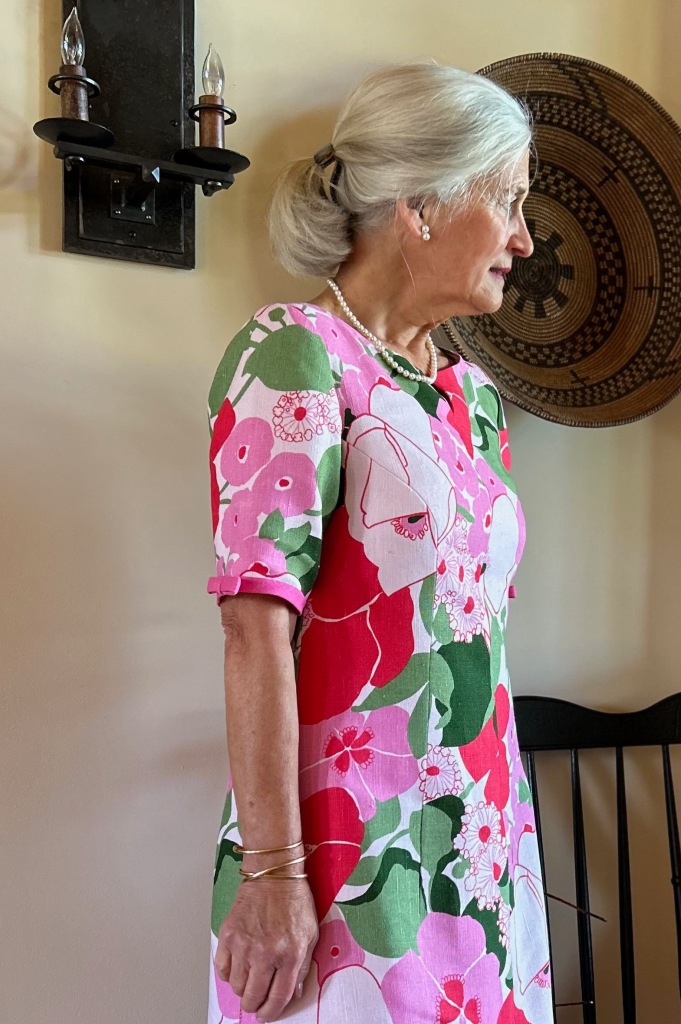
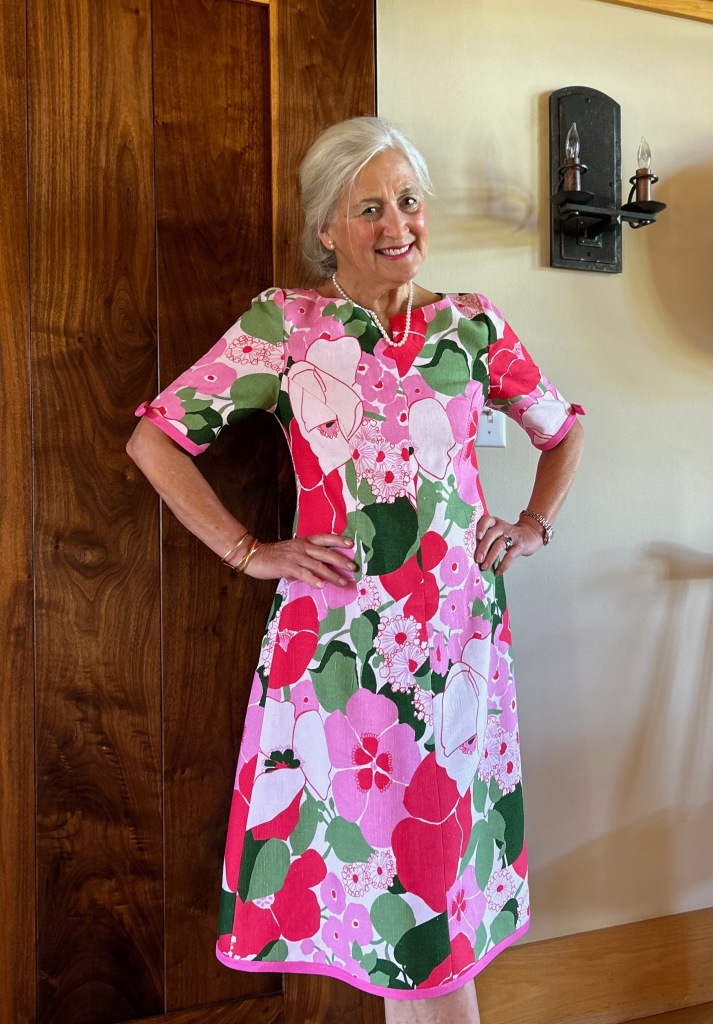
Whenever I am working with vintage fabric, it seems I either have more yardage than I need or, more frequently, less than I need.  I have learned over the years there is usually a way to work around having less fabric than I really need.  I just have to get creative.  And that’s what I did when I made this dress.

I quickly determined there was no way I could get the dress I wanted by placing the pattern on the lengthwise straight-of-grain.  The flare of the skirt, which I wanted to be mid-calf, precluded any notion of such a layout.  At 45” wide, I knew I could just get the dress length I wanted if I laid out the pattern on the cross-grain, from selvedge to selvedge.  Linen is a very stable fabric, so I was confident the cross-grain would work.  In addition, there were no directional limitations in the floral design of the fabric.  Barely fitting my pattern – from shoulder to hem – on the fabric from selvedge to selvedge, however, would leave no extra fabric to turn up for the hem – or even to face the hem.  I decided to worry about that later.  First I wanted to determine how I could get the four pieces for the dress and the two lengthened sleeves placed on the fabric, keeping in mind three important things:  1) although this was not a fabric to be matched per se, the all-over design of the fabric needed to be on the same plane in contiguous seams; 2) I wanted to space out the larger floral motifs so the dress would be balanced as best as possible (looking critically at the dress I made when I was 23, I clearly could have given this more thought!); and 3) I wanted to avoid large demonstrative blooms at the bust.  Then, and only then, would I worry about the hem.  
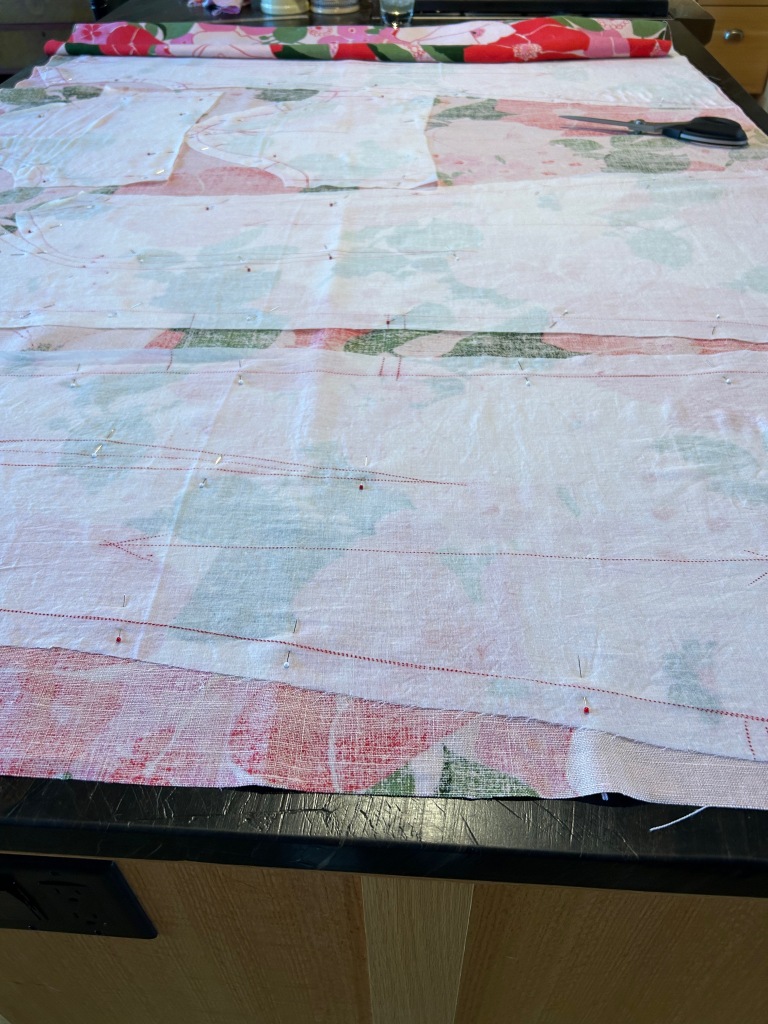
I transposed all the markings from my adjusted pattern onto the cotton batiste, then used those pieces as my pattern. I then basted the two layers together to be treated as one, before sewing any seams or darts.

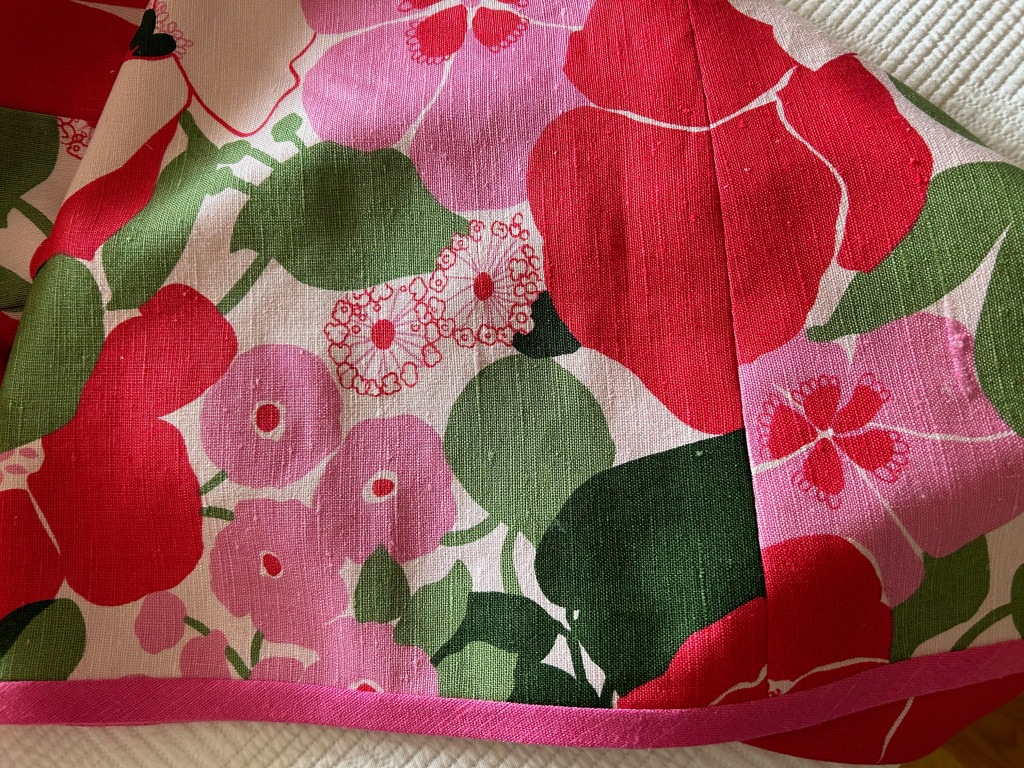
Once I was happy with this placement, I had a eureka moment when I knew I could accomplish two things with a simple bias trim made from the yardage of deep pink linen which coordinated nicely with the floral.  1) I could preserve the full 45” of cross-grain length by applying bias trim to the hem edge instead of turning it under, and I could do the same with the sleeves.  And 2) the trim would add interest to the dress, just as I had vaguely imagined.  (A quick aside here – I have ample yardage of the solid deep pink linen to make a coordinating coat at some point. Every dress needs a coat, right?) 

I underlined this dress in a very lightweight, pre-washed, cotton batiste, then I lined it in Bemberg rayon.  Moygashel linen washes beautifully, as does Bemberg lining, which is why I chose Bemberg over silk for this dress. I eliminated the neckline facing, choosing instead to bring the lining up to the edge of the neckline seam, then under-stitching it to secure that edge in place.  

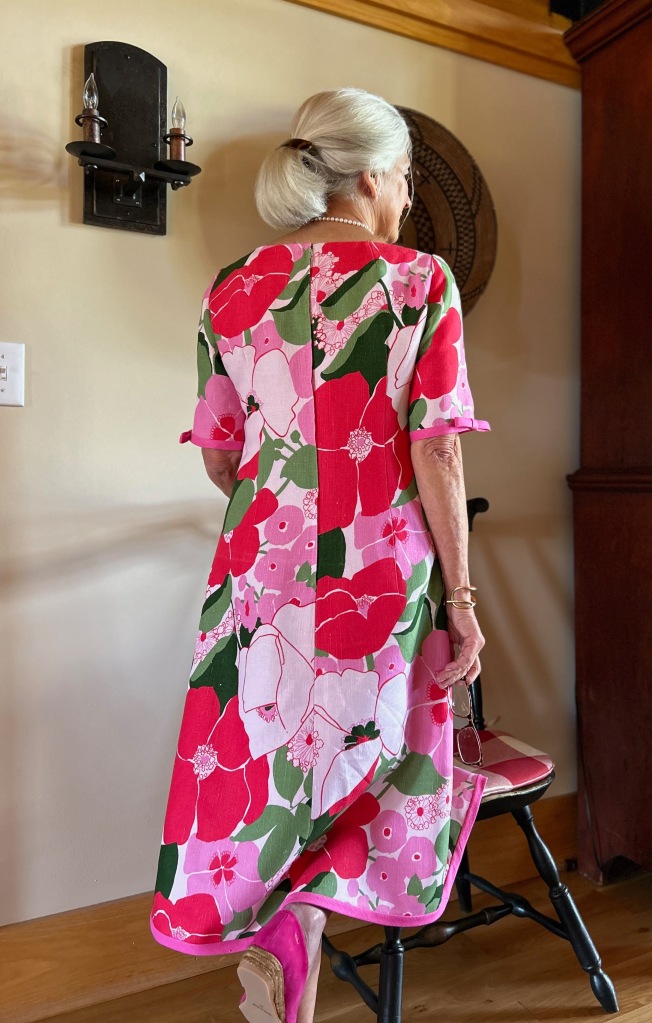
I chose to do a hand-picked, lapped zipper, an application which I think looks so lovely.  Interestingly, I hand-picked the zipper in the dress I made in 1973, although it is a centered application.  

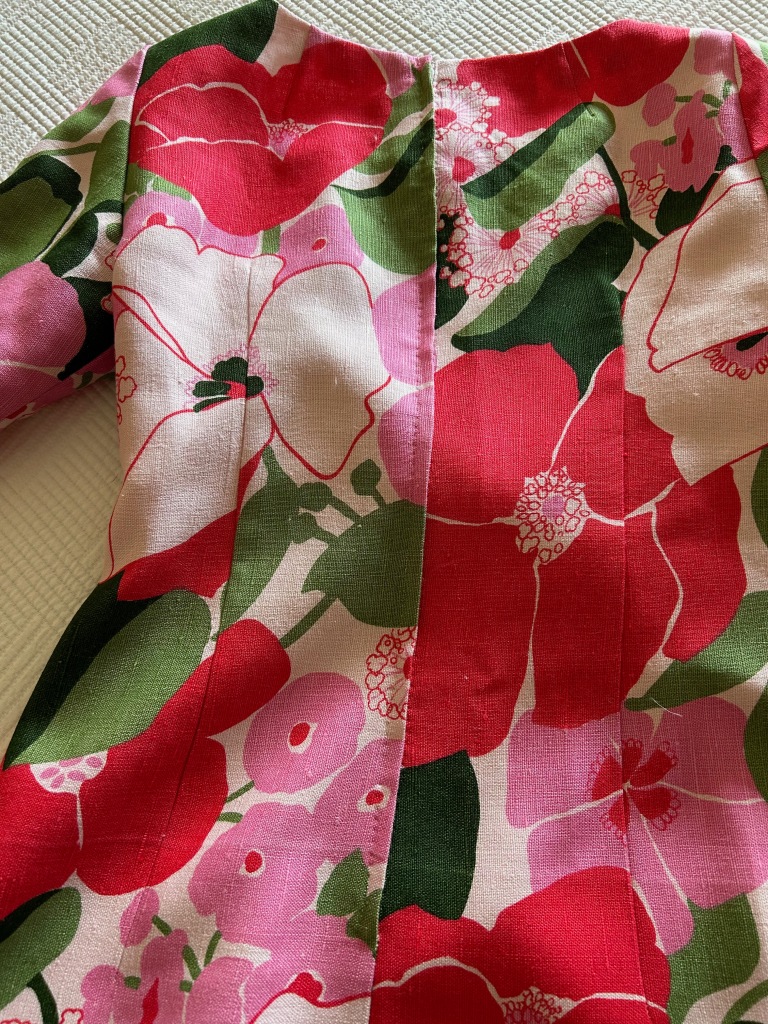
And here is a back view of the 1973 dress. The zipper is metal, which certainly is a telltale sign of a vintage dress.

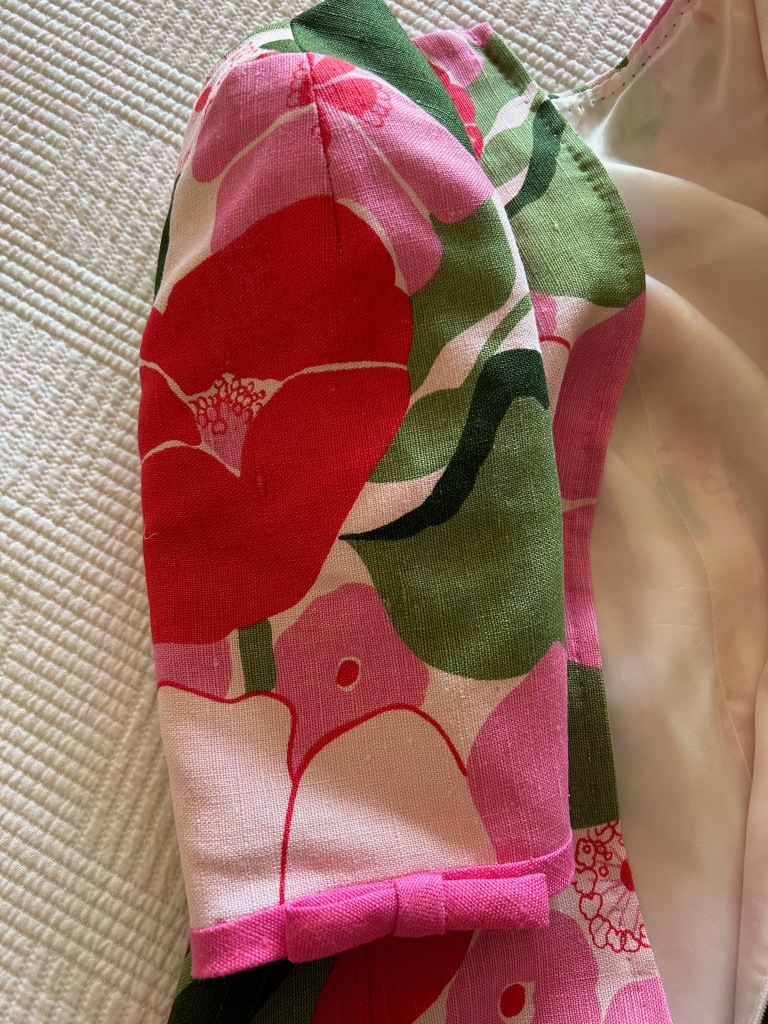
When it came time to apply the bias-cut trim to the hem and sleeves, I had to experiment around a bit.  I didn’t want it too wide, but it needed to be substantial enough to look like it was meant to be and not an afterthought or decision made in desperation!  I finally settled on an exposure of 1/2”.  

Now this is where it gets interesting.  A few weeks ago I saw a vintage dress on a Facebook/Meta post by Xtabay Vintage Clothing Boutique.  It is obviously Moygashel linen (I can tell by its weave and color), but what really caught my eye were the bias strips and low-profile bows adorning its sleeves.  I tucked this idea in the back of my mind for future consideration.  What I didn’t know was that the future was right around the corner!  Yes – I “borrowed” this idea and added a single bias-cut bow to each sleeve.  Somehow, it just seems to finish the dress.  

I never would have thought of adding a bow to each sleeve had I not seen this pretty vintage dress.

In this view, the princess seam which originates in a dart is visible. This is a nicely engineered, flattering pattern.

Well, you may have guessed by now the reason for making this dress this year.  I will wear it next week when my husband and I celebrate our 50th Wedding Anniversary.  I have changed a lot in those 50 years (and so has my husband!), but I still love pink in all its shades and I still love Moygashel linen (and I still love my husband, too!)  

49 Comments

Filed under Bows as design feature, couture construction, Dressmaker details, Fashion history, hand-sewn zippers, Hems, Linen, Linings, Mid-Century style, Moygashel linen, Sleeves, Summer sewing, Uncategorized, underlinings, Vintage fabric, vintage Vogue patterns from the 1970s

Completion – How Sweet It Is. 

It has been a slow start to the new sewing year of 2023.  Although I had anticipated the completion of my first project – this black jacket – to be a speedy endeavor, I anticipated incorrectly!  (Has anyone ever said fashion sewing can be very humbling?)

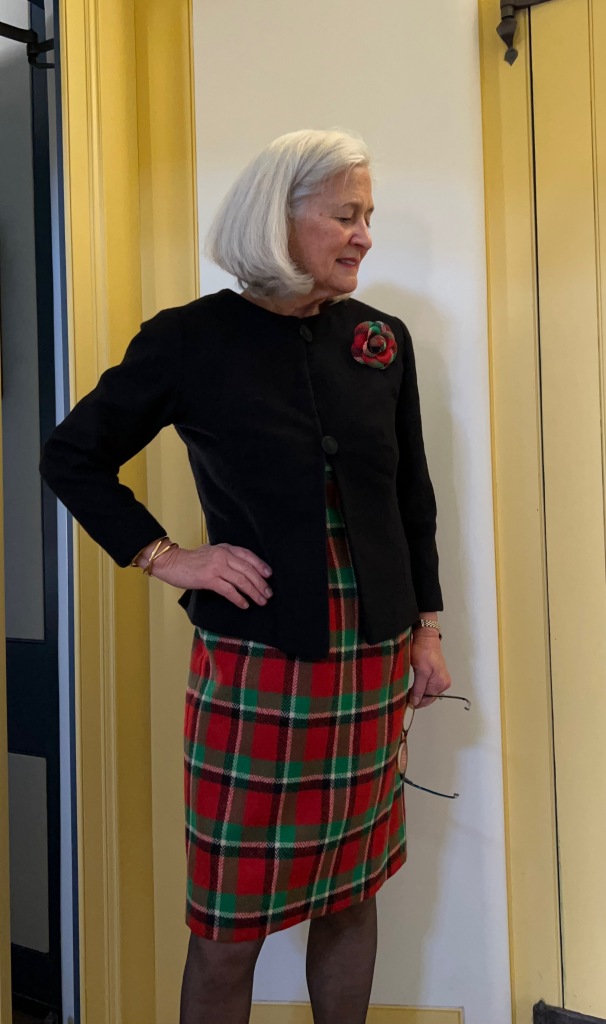
I was making this jacket to go specifically with a wool sheath dress I made two years ago – and also, hopefully, to pair with other dresses or skirts which might benefit from the addition of a somewhat dressy black jacket.  I had the pattern, and I had the fabric, a very soft light-weight cashmere (which I found a number of months ago at Farmhouse Fabrics.) 

I chose this jacket pattern primarily for its “split” center opening which would work well with the unusual center stripe woven into the wool to balance its uneven plaid.

I first needed to make a fitting muslin (toile) and I needed to determine what changes I would make to the original pattern.  That ended up being three items:

  • I changed the neckline to match the neckline of the sheath dress.
  • I added a dart to the top of each sleeve, using that method as a substitute for the running stitches normally used to facilitate the insertion of the sleeve into the armscye. I have used this alteration frequently as it seems to fit my shoulder anatomy well.
  • I shortened the sleeves from full-length to 7/8 length.  I did this as I enjoy wearing bracelets, thus giving them a little “breathing room.”  

Before I started making this jacket, I had the perception I would need to tie the sheath dress and the black jacket together in some way.  Without a shared element, I wasn’t so sure they would necessarily look like they were made for each other.  The only problem was, I had very little yardage remaining from the sheath dress, as I had made it from a limited piece of vintage wool.  What to do?  

Covered buttons would limit my ability to wear the jacket with other pieces, and besides, I thought they would look stark as the only two small embellishments on a very black jacket.  I did not have enough fabric left, even for a small neck scarf, so that idea never had a chance.  I’m not sure when it came to me, but in a eureka moment, I thought a fabric flower made from the vintage plaid would be just the thing to make this outfit work.  

I knew M & S Schmalberg Custom Fabric Flowers in New York City would be my best bet (or only bet) for having a matching flower made.  I wasn’t sure I had enough fabric even for that, but I contacted them, sent pictures and measurements of my scrap of wool, and they made it work!  

I chose a 3” camellia option for my flower.  Look what they did!

A few other details for the construction of the jacket: (1) I under-stitched the facing to control the front edges and neckline of the jacket.

(2) I used a black crepe de chine lining (and lots of extra light when I was sewing it in!) I should mention that I underlined the jacket with silk organza.

(3) The only bit of whimsy I added to the interior was to cover up the ends of the loops for the two buttons with two small jacquard ribbon pieces appliqued on.  No one will ever see these except for me, but I like them.

This is definitely a “dressmaker detail!”

(4) I covered the required snaps with the lining fabric.

I am so happy to have this jacket completed.  Most of my projects seem to take longer than they should, but that makes completing one just that much sweeter.  

.  

59 Comments

Filed under couture construction, Dressmaker details, Jackets, dressy, Loops for buttons, Mid-Century style, Uncategorized, vintage Vogue patterns from the 1960s, Vogue patterns, woolens

A Very Pink Coat, Part 3

Added Value….  There is a significant little entry in 101 Things I learned in Fashion School (Alfredo Cabrera with Matthew Frederick, Grand Central Publishing, New York, New York, 2010, page 40).  Although aimed at Ready-To-Wear customers and the designers who cater to them, it certainly is meaningful to those of us who sew our own fashions:  “Fashion customers often need to be convinced to buy a new garment that, in effect, they already own.  …  Value added details [my emphasis] are those that are inherently necessary to a garment but are executed in a novel or interesting way…”  thus making them attractive to potential customers.  

Well, not that I really need convincing to make another coat for myself, but I will freely admit it is the unique little details in a pattern (and gorgeous fabric, of course) which convince me I MUST make THIS coat, even though I might not really NEED it.  Such was the case with my very pink coat, which is now finished.  

Those details included 1) the three welt pockets with flaps, 2) the concealed front closure, 3) the  arrowhead detail accompanying the minimal top-stitching, 4) the sleeve tabs (okay, not really a necessary detail, but a very nice one!), and 5) the opportunity to add a little flash to the lining with edge-piping.

I’ll cover the sleeve tabs first since they were the detail in question in my last post. 

 As you can observe, I decided to leave them with the buttons facing forward.  Several comments left by readers (thank you – you know who you are and I am very appreciative!) got me thinking anew about the orientation of the tabs.  Then I had an aha moment when I realized that the one button which is visible on the front of the coat, at the neckline, might look a bit disconnected without its counterparts showing on the sleeves.  Decision made, with confidence!  However, I doubt I will ever look at a sleeve tab in quite the same way again. 

The three welt pockets with flaps are quite likely my favorite detail on this coat.  First of all, I like making them.  There is a certain feeling of empowerment, although slightly nerve-wracking, to cut those big slashes into the front of the coat and be confident it will all be okay. And this type of pocket is just so pretty when they are done.  In addition, while they are utilitarian, they also suggest refinement, elevating a simple car coat to a coat with some sophistication and flair. 

Here is the underside of one of those pockets, with the slash” clearly visible.
As you can see, I used lining fabric (Bemberg from Emma One Sock Fabrics) for the facing on the flaps. And here’s a fun fact – that small pocket on the right side is called a “ticket pocket,” small and shallow, perfect for a printed ticket. As printed tickets go the way of the dinosaurs, this little pocket may become obsolete – but I sincerely hope not. It adds so much to the visual pleasure of this coat and other similar garments.
A good view of the small “ticket pocket.”

I must have a certain penchant for concealed coat fronts.  This is the third one I have made and I can let you know there may be more to come (but not soon.)   As I mentioned in my last post, I was able to reduce the bulk of the closure by using my lining fabric for one layer of the buttonhole side of the front flap.  

I made three machine buttonholes for this part of the flap, which made everything lay flat and neat. 

The gray buttons – 6 of them, which is what I needed – were in my collection, so that was a happy find. They are 1950s’ vintage gray pearl, very appropriate indeed for this 1957 pattern.

Although this coat pattern called for some topstitching, it was minimal.  Just the sleeve tabs, the pocket flaps and the collar, plus the front detail on the right side.  I was unhappy with the machine topstitching I did at the front closure.  There was enough bulk from the wool and the facing and the fly front, that it interfered with the smoothness of the topstitching.  So I took it out.  Initially I was going to do without topstitching and the arrowhead detail, but it looked a bit plain and unfinished.  So I did my fallback to what I know works – topstitching by hand.  Because of the hand-worked arrowhead detail, I felt hand topstitching would not look out of place.  Of course, I had never done an embroidery arrowhead before, so I had to practice, practice practice  so it hopefully does not look amateurish.  

I purchased matching embroidery floss for the arrowhead detail and the hand top-stitching.

Finally, coat linings lend themselves so beautifully to that extra little treatment – a narrow edge piping.

  I deviated from my Vogue pattern to add this dressmaker detail, but I am sure they would have approved.  My Avoca wool scarf which is such a perfect complement to this coat inspired me to choose checked piping.  I “robbed” a small corner from some pink silk gingham (intended for a Spring coat, as mentioned previously here) to make my flat piping.  

I purchased the pink cashmere wool for this coat from Farmhouse Fabrics.

Well, there you have it.  My first major project of 2022 finished.  I am happy I chose pink for my theme this year as it has brightened up many a dark day in this troubled world of ours. 

24 Comments

Filed under Buttons - choosing the right ones, car coats, Coats, couture construction, Dressmaker details, Mid-Century style, piping, Scarves, Uncategorized, vintage buttons, vintage Vogue patterns from the 1950s, woolens

A Coat For Many Reasons

When I started planning this coat, I could not then have known the many reasons why I am now so happy to have made it.

The journey – and yes, it has been a journey – started with the fabric, offered for sale to me by a reader several years ago.  Simply the provenance of the fabric  – a piece of stamped Ernest Einiger wool, from one of the great mid-century American wool manufacturers, now sadly long gone – was reason enough to give it some extra thought.  I knew I had to wait for the right time to put pattern and scissors to it. When the Pantone Color of 2018 – “Ultraviolet” – an orchid shade of purple – was announced, I knew the time had arrived!

In the meantime, I had given it much thought and the more I looked at it, the more I thought I would be wise to get some construction advice on it.  Happily I was able to go to Baltimore in mid-April for one of Susan Khalje’s week-long Couture Sewing Schools, during which everyone works on their own project.  Usually one is expected to arrive with a pattern selected, and a marked muslin (toile) of her project ready for fitting.  This time was no different, which meant that all my thinking about the best pattern to use for this coat was ready to come to fruition.

Because the fabric is a very heavy coat-weight boucle, I originally looked for a pattern which either did not include buttons and buttonholes (traditionally more difficult to do well on a fabric of this weight), or had slot-seam buttonholes. I thought I had the perfect pattern in this Vogue from 1962. However, when I actually opened out the pattern pieces, I realized it was not going to work.  The kimono sleeves would surely produce drag lines in this heavy fabric, and a double layer of the wool in the shawl collar could be quite bulky.

Then I pulled out two more patterns which I thought were possibilities:

The single slot-seam buttonhole in the Mattli pattern was ideal, but all the intersecting seams could be a problem to do well, so I eliminated that one.  The simple lines of the Christian Dior design were lovely, but then there were more buttons, in addition to my evolving thought that this fabric would work well with a pattern which did not have such a narrow silhouette. It was then that I went to a pattern which I had already used:

View A with the longer sleeve for this coat, although I originally made it with the shorter sleeve here.

I love the simple lines of this coat and its well-turned collar, and I especially love my addition of a half belt to the silk coat I made.  I still wasn’t sure what I would/could do about buttons and buttonholes.  Advice from Susan would be very valuable!  As it turned out, she helped me determine that I could do bound buttonholes even on this very substantial wool.  Another fortuitous finding was that this pattern lent itself to showing off the interesting windowpane weave of the boucle, which became much more apparent the further away from it we got.

Other of Susan’s recommendations included:

1) Making the coat dress length rather than coat length.  The intensity of the color, used with this pattern, looks better in a shorter length.

2) Cutting the belt on the bias.  This was brilliant and gives a nice subtle focus to the back of the coat.  She also recommended that I line the belt with the silk charmeuse lining fabric rather than using the boucle .  It reduces bulk and makes the belt lay much more nicely.  I sewed one side of the belt by machine and then hand-stitched the other side, making for a nice crisp turn of the charmeuse to the underside.

My addition of a belt to this pattern is an excellent example of what is known as a “dressmaker detail.”

Here the bias cut of the belt is quite apparent.

The entire coat is underlined in silk organza, including the belt, shown here with one side sewn by machine.

And here is the silk charmeuse belt lining almost ready to be applied by hand.

3) Underlining the collar with charmeuse (again to reduce bulk) and then under-stitching the underside, to make it turn beautifully.

The collar on this pattern is beautifully designed to sit perfectly on the neck.

4) Clipping the long back center seam, even though it is on the straight of grain.  Clipping it reduces strain on that seam and allows a much more fluid movement of the back of the coat.  (I’m sorry I forgot to take a picture of this, but it is certainly not rocket science, just common sense.)

5) Tips for matching the woven windowpane design in the wool, the weave of which was difficult to see close-up.  Forked pins and a walking foot  helped to keep the layers – even basted ones – from shifting.

Other procedures I used to help “tame” this fabric were:  lots of judicious trimming of seams and corners; clipping, clipping and more clipping; lots of steam and pressing; lots of basting of seams.

I even trimmed the edges of the bound buttonholes to reduce bulk down the front of the coat. I am not completely happy with the buttonholes (which were difficult to do on this fabric), but once I finished them, they looked better than I thought they would.

I found these buttons in an Etsy store. From the 1960s, they are a nice fit with the fabric and the pattern. And I like their wobbly edges!

By the time I returned home from my class, I had the coat about half finished, but I felt completely confident in my ability to finish it competently.   Here are a few more details:

The sleeves feature a turned- back vent which is secured by a button through all layers.

I used the pockets for this version of the coat (which I had eliminated for my silk version.)

The belt is attached to the side seams just about an inch below the armhole. This placement allows it to fall right at the center back waist.

It is always rewarding to get to the point in the construction of a coat when you are ready to put the lining in.  And to make it just a little more fun, I added flat silk piping on the inside front facings – which will match one of the dresses (still to be made) I intend to wear with this coat:

I ended the piping at the shoulder seam on either side. (I see a basting thread which is peeking out from the piping!)

So my “coat for many reasons” allowed me 1) to use treasured fabric which had been in my collection for a few years; 2) to take advantage of the focus of this beautiful purple color during the year of  “Ultraviolet;” 3) to use a coat pattern which I really wanted to use again after making it once; and 4) to have experience in working – successfully – with such a heavyweight wool.

But the most important reason?  I need another coat. I always need another coat.

33 Comments

Filed under Buttons - choosing the right ones, Coats, Dressmaker details, Mid-Century style, piping, Uncategorized, vintage buttons, Vintage fabric, vintage Vogue patterns from the 1960s, woolens

Just for the Chill of It

Autumn is a delightful season here in the northeastern part of the United States. One can tell it is on its way when the warm days quickly take on an evening chill once the sun slips below the horizon. It is the time of year when a light coat or sweater is a necessity, especially with a sleeveless dress.

With this scenario, and a September wedding to attend, what better excuse did I need, to make a coat to go with this dress?

The Year of Magical Sewing

If you follow my blog then you probably already know this was my intention all along, when I made the dress two years ago. But it took a while to find the right coordinating fabric for a coat. I was looking for something between a coral and a pink. While the silk taffeta I found at Britex Fabrics looks more like a deep persimmon color when photographed, the fuchsia pink warp is very apparent when being worn.

Taffeta coat - swatch

Once I decided the Jo Mattli-designed coat, part of the original dress pattern, was too voluminous, I went to another pattern. I wanted to keep the “intention” of the original coat, but have it more streamlined.

The "original" coat designed by Jo Mattli.

The “original” coat designed by Jo Mattli.

Taffeta coat - %22too scimpy%22

The coat pattern I settled on.

Somehow along the way, in making my muslin, I got the idea to add a curved belt to the back of the coat. I knew I had used a coat pattern several years ago with a curved belt back detail, so I went through my pattern collection to retrieve this:

This is a 1957 pattern, but look at the belt shown on the back of the envelope, below.

This is a 1957 pattern, but look at the belt shown on the back of the envelope, below.

taffeta-coat-belt-pattern-thumbnail

The belt is only shown in view A.

It took a couple of tries with the muslin to get the placement and angling of the belt correct, but once I did, I knew it was a winner. Dressmaker details like this always give me a thrill!

I anchored the belt in the side seams right under the bust darts.

I anchored the belt in the side seams right under the bust darts.

Just for the Chill of it

The curve of the belt needed to fall at my waistline.

The curve of the belt needed to fall at my waistline.

One of the things I like about this pattern is the two-part sleeve with a center seam. I think this design is always flattering to the shoulder. Here are the constructed sleeves:

Just for the Chill of it

That center seam also provides the opportunity for a faux vent, and since I just happened to have three buttons, which I thought would be perfect for the coat, I happily included vents, as the pattern dictated:

Just for the Chill of It

A small, cylindrical, crystal button!

A small, cylindrical, crystal button!

Although I originally thought I would leave the coat “closure-less,” that third button kept calling to me. While I did not want to have a single bound buttonhole in the center of the chest, I thought a button loop might do the trick. If I didn’t like it, I could remove it fairly easily from the front facing seam.

Just for the Chill of it

I also decided to add a loop at the neck, with a plain flat button under the collar. This way, I could close the collar if I chose to do so.

I pad-stitched the collar, but forgot to take a picture. Pad-stitching is like magic in how it makes the collar roll properly!

I pad-stitched the collar, but forgot to take a picture. Pad-stitching is like magic in how it makes the collar roll properly!

I have to say, I think the coat looks equally good any way it is worn: with the single button at the bust line closed, with both buttons secured and with neither of the buttons secured.

I chose not to add the optional pockets to this coat, but if I make it again in a less formal fabric, I would absolutely include them.

Once I got to the lining, I had to decide if I wanted to add the flat piping detail which I like so much. Of all the bias silk ribbon I have on hand, the only one which looked good was deep pink. Because of that, it doesn’t show contrast all that well, but I still like the subtle finishing look it gives to the lining.

Just for the Chill of it

Just for the Chill of it

Here, by the way, is the coat before I inserted the lining:

I underlined the entire coat with silk organza and added "cigarette" sleeve headings.

I underlined the entire coat with silk organza and added “cigarette” sleeve headings.

I love a center back seam!

I love a center back seam!

I used some vintage silk buttonhole twist to tack the center back fold in the lining at the neck and at the waistline.

Just for the Chill of it

There is no question that the dress and the coat go together once the lining shows!

There is no question that the dress and the coat go together once the lining shows!

Just for the Chill of it

I love that the lining peeks out from the sleeves when I am wearing the coat.

I love that the lining peeks out from the sleeves when I am wearing the coat.

taffeta-coat-full-copy

I was delighted when the photographer at the wedding wanted to take my picture because he "liked my outfit so much." (This is not that photo...)

I was delighted when the photographer at the wedding wanted to take my picture because he “liked my outfit so much.” (This is not that photo…)

Here with my husband - with a coordinating tie, no less (not planned, but makes for a great photo!)

Here with my husband – with a coordinating tie, no less (not planned, but makes for a great photo!)

It may seem a bit frivolous to make a coat like this, knowing that it will not be worn all that often – although I do have two other dress-weight silks in my collection which would look fairly stunning paired with this coat!  However,  it really is the perfect weight and look for an elegant, but chilly, evening out – and it was so much fun to make.

38 Comments

Filed under Buttons - choosing the right ones, Coats, Cocktail dresses, couture construction, Dressmaker coats, Dressmaker details, Linings, Mid-Century style, piping, sewing in silk, Silk taffeta, Uncategorized, vintage buttons, vintage Vogue patterns from the 1960s

What Color is Your Lining?

Linings seem to be coming out of the (fabric) closet and finally getting the recognition they deserve! I have been thinking a lot about linings lately, as I have been working on a coat, the lining for which was its inspiration.

I made a cocktail dress out of the blue fabric and purchased enough to use as the lining for a coordinating coat.

I made a cocktail dress out of the blue fabric and purchased enough extra yardage to use for the lining of a coordinating coat.

As luck would have it, the current issue of Threads Magazine has an article on techniques to achieving “A Smoother Jacket Lining,” which states “the secret is installing it by hand.” I always appreciate an illustrated step-by-step approach to techniques such as this, and this article by Daryl Lancaster does not disappoint. While I am well versed in sewing in linings by hand, it is always good to read a refresher article such as this. (Obviously, the alternative to sewing in a lining by hand is to bag the lining, effectively sewing the lining in by machine.) I also always seem to gather one helpful tip, such as “Easy access to the armhole seam: Reach through the openings at the front hem to support the sleeve lining while you’re hand-sewing the armhole seams.” But what I really liked about this article was the section on “Fabric Guidelines.” In a nutshell, the author lists them as: “a low-friction surface; a supple hand; opacity; durability; and design compatibility.”

Design compatibility! This means, according to the author: “The lining should complement the garment. It can match or contrast. Lining offers the opportunity to subtly show the wearer’s creativity.” EXACTLY!

Many of us, I think, grew up or learned to sew with the idea that linings should match the color of the outer garment as closely as possible. And while that is still appropriate in many instances, there is also a case to be made for linings of contrasting or coordinating colors, and/or figured designs. In fact, I believe a lining has the potential to turn your garment from ho-hum into tres chic.

One of the best examples of the power of a lining is the classic little French jacket.   Pictured here are the two I have made for myself (with two more planned.) Imagine the one on the left being lined in a plain black or red charmeuse, and the one on the right lined in a solid light brown. Neither would be nearly as attractive even though the lining does not show when the jacket is being worn. As it turned out, I made a sheath dress, which matches the lining of the red jacket, and a blouse to match the lining of the jacket on the right. This makes the lining an integral part of the all-over design of the ensemble.

What color is your lining?

Likewise, this Pucci silk sat in my fabric collection for a few years until I found the right pattern for it. Then I became obsessed with somehow working out a way to line the jacket and make the dress out of the scant existing yardage I had.

Defying the passage of years

An inside look at the jacket with its matching lining.

An inside look at the jacket with its matching lining.

The nice thing about this jacket is that it does not have to be paired with the dress, looking equally as nice with a plain pink skirt. Which leads me into the next thought: sometimes it is more appropriate for your lining to be subtle in order to make your garment more versatile. When I made a linen coat last year, I would have loved to use a deep pink lining silk to match the linen dress I knew I would be wearing with it. I chose, instead, to match the lavender of the coat, making it easier to wear with other dresses or pants, which might not have any pink in them. To make it a little extra special, however, I added flat silk piping to the front edges of the lining. Because coats come off and on, and sometimes find themselves flung over chair arms, this little detail is often seen by more than just the wearer.

Fitting finish

Then there are the linings which truly are only seen by the person wearing the garment – you or I. Is it worth the time and/or expense to create a special lining in something like this? Every situation should be evaluated on its own merits, but I believe this is where the privilege of being your own dressmaker is in full flower. Why not add a little detail or use a beautiful, contrasting color to coordinate with your fashion fabric?

I used a gray Bemberg lining for this dress, but accented the neck edge with green piping. Obviously, no one sees this but me!

I used a gray Bemberg lining for this dress, but accented the neck edge with green piping. Obviously, no one sees this but me!

Here is the dress with its hidden lining detail.

Here is the dress with its hidden lining detail.

Who would guess that under this dress is . . .

And who would guess that under this dress is . . .

. . . this lining?

. . . this lining?

In sewing (as in life) it is often the hidden treasures or small gestures which add depth and enjoyment to the process and product. May your hidden or not-so-hidden linings be beautiful every time!

12 Comments

Filed under Dressmaker details, Linings, piping, Uncategorized

The Evolution of a Suit Dress – Part 3: Finished Jacket

It is a fairly well-known fact that making a classic French “Chanel-like” jacket takes about (or at least!) 70 dedicated hours of sewing time. I did not keep track of the hours I spent on my Jo Mattli-designed jacket, but I am guessing that it rivals – in time spent sewing – both of the classic French jackets I have made. However, I am not complaining. I would commit to it all over again. And just think – I still have to make the coordinating dress for this jacket!

Mattli jacket But it is finished, and happily so. One of the true joys of sewing is the ability it gives us to make some stylistic changes, add embellishments if desired, and use our heads to determine what works and what doesn’t work for the fabric we are using and the intended usage of our garments. While I did not make any stylistic changes to this jacket, I did add my own “dressmaker details” while stitching my way through this project. But first a few more regular details, picking up where I left off in my last post.

1) To finish the underside of the bound buttonholes, I used organza patches. I have started using this method all the time, as it makes such a neat, fool-proof finish.

The silk organza patch is sewn onto the right side.  After cutting and clipping the corners - carefully! - you turn the organza and you have a perfectly finished opening to back up to your bound buttonhole.  then it is easy to sew the two sides together very neatly.

The silk organza patch is sewn onto the right side. After cutting and clipping the corners – carefully! – you turn the organza and you have a perfectly finished opening to back up to your bound buttonhole. Then it is easy to sew the two sides together very neatly.

2) Even though the entire jacket is underlined with silk organza, I added another layer of silk organza “interfacing” to the hemline, as directed in the pattern instructions.

Mattli jacket

I always like to baste the hem along the bottom edge to stabilize it until the jacket is complete.

I always like to baste the hem along the bottom edge to stabilize it until the jacket is complete.

3) I used black “cigarette” which I purchase from Susan Khalje’s store for the sleeve headings. I doubled and graduated the two layers to achieve the correct amount of sleeve–cap cushioning. Unfortunately, no photos were able to pick up the details in this – too much black and navy blue and not enough contrast!

This is what the "cigarette" looks like.

This is what the “cigarette” looks like.

One of the interesting construction details in this design is the notched collar. Most notched collars are seamed at the “notch,”,joining the upper collar and the front facing and forming a “V”.

This diagram from The Vogue Sewing Book. c. 1970, Butterick Division, New York, New York, shows a classic notched collar.

This diagram from The Vogue Sewing Book. c. 1970, Butterick Division, New York, New York, shows a classic notched collar.

However, the collar in this Mattli design is formed by extensions of the front facing, with a center back seam on the upper-collar portion of the facings.   Hopefully these photos will explain better than words can:

You can see there is no seam at the "notch."

You can see there is no seam at the “notch.”

Here is the seam at the back upper collar.

Here is the seam at the back upper collar.

While I was contemplating the lining for the jacket, I thought it would add just a really special touch if I did a interior bias piping to set off the lining where it joins the jacket along the front edges and around the neck. Normally this is made out of silk, but I did not have any light-weight silk which was the correct color of red. However, I did find some scraps left over from a red wool challis maternity dress I made for myself over 34 years ago. (Yes, you read that correctly!) Very light in weight – and the exact color I needed – made it the perfect fabric for this detail.

I cut a bias strip one inch in width and folded it in half.  I guess this proves it pays to save scraps!?

I cut a bias strip one inch in width and folded it in half. I guess this proves it pays to save scraps!?

This is such an easy flourish to do, and it adds such a professional touch.  Adding this flat “piping” is quickly becoming a standard for me when I make jackets or coats. Once you have your bias strip cut, folded in half and pressed, all you need to do is baste it in place along the line where the lining will be hand-stitched to the jacket interior.

The bias "piping" basted in place.

The bias “piping” basted in place. Click on the photo to see it close-up.

And here’s what the finished lining looks like:

Mattli jacket

Here is the back neck edge.

Here is the back neck edge.

I really like this extra flourish.

I really like this extra flourish.

Now – true confessions!  After top-stitching the sleeve edges, the collar and most of one front, I decided I did not like it.  I thought it detracted from the windowpane of the fabric, so I took it all out.  NO top-stitching – for me – on this jacket!

Finally, I made a small change to the back hem of the jacket. Can you figure out what it is? (A previous photo of the jacket back will also give you a clue.)

Mattli jacket I used a trick I learned from my French Jacket class with Susan Khalje: I added a slight curve to the hem and lengthened it by about a half-inch, graduating it back to the prescribed hemline at the side back seams. I love this graceful detail. I believe it will be especially effective when it is paired with the dress. (This photo also shows that all the hours I spent on the layout, making sure I had matched the plaid, was time well spent!)

Speaking of the dress (and matching more plaid) . . .   I never imagined I wouldn’t have this entire ensemble completed by about now. So – it looks like I’ll still be sewing on wool when Spring arrives. Hopefully by the time Spring departs I will have moved on to something more seasonal!

26 Comments

Filed under bound buttonholes, couture construction, Dressmaker details, piping, Suit dresses, Uncategorized, underlinings, vintage Vogue Designer patterns, vintage Vogue patterns from the 1970s, woolens

Defying the passage of years?

Throughout the 1950s, copyright dates appeared on all Vogue patterns (or, at least that has been my observation). Copyright dates appear on some of the patterns from 1960-‘62, but after that, they are non-existent. It is always a thrill when I find a reference to, or picture of, a pattern, which I own or am working on, in one of The Conde Nast Publications, Inc. magazines or other printed materials. It is one sure way to date an otherwise undated vintage Vogue pattern.

So – you can imagine my delight when a small, 8-page Vogue Pattern Fashion News from February 1965 – which I recently purchased – featured the Emilio Pucci dress and jacket which has been my sewing focus for the past several weeks.

On the cover of this small "flyer", which was available for pick-up wherever Vogue patterns were sold, is the reference to fashion from Florence - as in Pucci's Florence!

On the cover of this small “flyer”, which was available for pick-up wherever Vogue patterns were sold, is the reference to fashion from Florence – as in Pucci’s Florence!

And here is the sketch of "my" Pucci pattern.

And here is the sketch of “my” Pucci pattern.

The brief caption gives an apt description of the Pucci pattern:

Pucci pattern - fashion news caption

And – I did indeed wear this dress (and jacket) to an “important party” just last weekend – to a beautiful wedding in Center City Philadelphia.


(This photo was not taken at the wedding...)

(This photo was not taken at the wedding…)

I was working diligently all last week to finish the jacket. Here are the details on what was transpiring in my sewing room:

First, I can tell you I was delighted that the pieced sleeve linings worked just as I had hoped they would. Here is the jacket turned inside out, showing the piecing on the lower sleeves.

Defyng the passage of years

Inside out, a back view.

Inside out, a back view.

And here is a photo inside the jacket, looking towards one sleeve, which shows that the piecing does not show! Hurray. I honestly don’t think anyone seeing the jacket slung over a chair is ever going to suspect that the Pucci lining fabric does not extend all the way down the sleeves.

Defying the passage of years

I also had the idea to add a narrow, bias, flat piping to the edge of the lining down the fronts and around the neckline. I found a turquoise silk in my fabric closet which seemed to keep with my “theme” of the turquoise under-stitching on the interior of the dress. This is one of those “dressmaker details” which just makes me happy.

Defying the passage of years

Another thing that makes me happy are the buttons! I picked out specific scraps of the silk, which featured designs I wanted to emphasize on the buttons. I sent them off to Pat Mahoney in Lodi, California, who returned them made into 1¼ inch buttons – flat and beautiful!

This is the button I chose for the top of the jacket.

This is the button I chose for the top of the jacket.  Notice the slot-seam-buttonhole.

The middle button - I couldn't resist featuring the Emilio signature on this one.

The middle button – I couldn’t resist featuring the Emilio signature on this one.

And the lower button.

And the lower button.

I decided to have two extra buttons made in case I wanted to add them to the sleeves.   And – add them, I did. I like the extra subtle  attention they bring to the jacket. (Another dressmaker detail – specifically, an added embellishment.)

Defying the passage of years

Defying the passage of years

I had the jacket finished when I suddenly remembered that a Vogue label had come with the pattern. Of course, I was delighted to sew it in place.

Defying the passage of years

Defying the passage of years

Defying the passage of years
 Defyng the passage of years

Defying the passage of years

There is something about using a pattern from 1965 that seems quite amazing to me. Yes, it is simple math, but think about this: 1965 was 49 years ago!   Is anyone who sees me in this dress and jacket going to think that it is sewn from a 49-year-old pattern? Somehow I doubt it. I think my secret is safe.


28 Comments

Filed under Buttons - choosing the right ones, couture construction, Dressmaker details, sewing in silk, Slot-seam buttonholes, The Conde Nast Publications, Uncategorized, vintage Vogue Designer patterns, vintage Vogue patterns from the 1960s

Presently Preferring Pucci

Once I get into a project, especially one that has some complicated decisions or construction to it, I tend to think about it during many of my non-sewing hours. (I wonder if other sewers/dressmakers do that?) Now that I have finished my Pucci dress, I’ll be spending both sewing and non-sewing hours on the jacket.

First, however, some details about the dress are in order.

The dress is finished!

The dress is finished!

There are a few design aspects of this dress which set it apart from a simple A-line or sheath dress.  Notable to me is the effect that the curved front yoke makes on the bustline. It gives it more definition than it would have with just darts.

If you look closely, you can see the yoke seam.

If you look closely, you can see the yoke seam.

The back yoke adds some “surprise” interest by being split in the middle. In addition, the back of the dress would not be quite so clean looking if the zipper were placed in the center back below the yoke. Its location on the side seam is one of those hallmarks of a carefully planned Designer pattern.

The "open" yoke on the back of the dress.

The “open” yoke on the back of the dress.

I made some changes to the dress, based on the muslin. My six alterations are:

1) I decided to incorporate curved armholes into the two back yoke sections. On a younger person, the more revealing back arm would be fine, but I was not so comfortable with it!  Please see the photo above.

2) I took out some of the A-line from the dress. I wouldn’t say I actually “pegged” it, as I left a slight taper, but the effect is now one of a straighter skirt, which I think is a bit more “current.”

A sdie view shows this alteration best.

A side view shows this alteration best.

3) Taking out some of the taper meant I had to give myself a bit more ease in the skirt, so I left a slit at the center back.

The center back slit at the hem line.

The center back slit at the hem line.

4) I added two small darts to the back sides at the waist, which adds some definition to it.

5) I lowered the neckline to accommodate a particular necklace that I want to wear with this outfit. Isn’t it just lovely that sewing allows us the ability to make these kind of custom alterations?

6) The pattern called for a hook and eye at the center back neck. I decided to add a loop and small button instead, although I added an interior hook and eye to help the back neck lay flat.  Adding this button and loop can definitely be called a “dressmaker detail”.

The button is one I have had in my button box for decades!  Its faceted surface seemed perfect for this dress.

The button is one I have had in my button box for decades! Its faceted surface seemed perfect for this dress.

Of course I underlined the dress with silk organza.

Preferring Pucci

This back view also shows the extended armhole line.

This back view also shows the extended armhole line.

And this side view shows how the front yoke adds definition to the bustline.

And this side view shows how the front yoke adds definition to the bustline.

Then I lined the dress in black crepe de chine, and under-stitched the neckline and armhole seams with turquoise silk buttonhole twist, just for fun.

The dress turned inside out.

The dress turned inside out.

Under-stitchibng in turquoise. No one will ever see it, but I love what it adds!

Under-stitching in turquoise. No one will ever see it, but I love what it adds!  Click on the photo for a close-up view.

So – that’s it!

Now here’s a phenomenon that seems to happen to me frequently. I’ll be using a mid-century designer pattern for a project, and I’ll come across a current magazine or newspaper article, which in one way or another relates to what I am sewing or planning to sew. So it was this past weekend, when I was catching up with reading the April WSJ. The Wall Street Journal Magazine, delivered the weekend before. Right there on page 84 was an article on Laudomia Pucci, Emilio’s daughter, entitled: Fortress of Fashion. It is a fascinating account of her commitment to preserve the “fashion legacy” of her father, by reinventing an ancestral estate in Tuscany into an accessible-and-preservation-minded archives. On view are fabrics and fashions, and “already Pucci has hosted several educational events… Two groups of students … have come to study sewing and print design…[would not this be wonderful?! – my addition].  Laudomia is hoping to extend the educational activities to international fashion schools for longer visits.”   Her goal is to encourage the “next generation … to find inspiration for innovative fashion.” Now this is a place where a Preference for Pucci is definitely a way of life!


26 Comments

Filed under Buttons - choosing the right ones, couture construction, Dressmaker details, sewing in silk, side-placed zippers, Uncategorized, underlinings, vintage Vogue Designer patterns, vintage Vogue patterns from the 1960s, Vogue patterns

The Return of the Ladylike Suit

It seems I just can’t get way from that word – ladylike.  Just as I was finishing the jacket to my emerald green silk suit, the weekend Wall Street Journal arrived with this article in the Off Duty – Style & Fashion section:  “Gran Larceny – Fashion’s latest rebellion is co-opting looks from grandma’s closet.”

This photo, copyright The Wall Street Journal, is the lead photo for the article.

This photo, copyright The Wall Street Journal, is the lead photo for the article.

To quote from this article by Alexa Brazilian:

“Is conservative the new radical?    The fashion world certainly seems to think  so  . . .    Designers are reimaging soignée staples for spring and summer – skirt suits, twin sets, below-the-knee dresses, kitten heels and frame bags – that appear anything but moth-eaten.

“ ‘A young girl now doesn’t want to dress like her mother; she finds her grandmother much cooler,’ said Nina Ricci creative director Peter Copping, who designed skirt suits inspired by his own nana.  ‘She wore little smart tweedy suits.  I always had a romantic notion of that.’ “

And then later in the article is this statement by Christopher Kane (which I might frame and put on the wall in my sewing room!):  “Ladylike is the ultimate sexiness,” said the designer.  “It’s clean, elegant and in control.  The famous saying, ‘It’s the quiet ones you need to watch,’ definitely applies to this style.”

Well, I won’t necessarily feel radical or even sexy when I wear my new green skirt suit, but I do believe it is an example of that ladylike style of the early 1960s — which actually makes sense since the pattern is indigenous to that decade.

This is the pattern from the 1960s I used for my suit.

This is the pattern from the 1960s I used for my suit.

Finally finished!

And here is the suit finally finished.

I make a few changes to the design once I made the muslin for it.  First, I added two tapering darts to the back.  It was supposed to have a boxy feel to it, but I felt a little narrower silhouette would be more flattering to me.  I also lengthened the jacket by about 1 and ½ inches.

The jacket is still "boxy" but less so with the added darts.

The jacket is still “boxy” but less so with the added darts.

I decided to make the sleeves below elbow length, so I added another inch and ½ to them.  Then I had to narrow them a bit as well to make them look proportional.

Now to the fun part:  the two dressmaker details I added.  In an earlier post, I already showed the turquoise silk lining fabric I chose.  Once I had such a dramatic contrast in the works, I thought I’d push the envelope a bit farther.  I found silk bias ribbon in a lovely periwinkle color and used it to add an edge detail to the lining in the body of the jacket.

Here is the bias silk ribbon attached to the edge of the lining.

Here is the bias silk ribbon attached to the edge of the lining…  Click on the photos to see them up close.

DSC_0804

… and one more picture of it.

This was so much fun to do and made attaching the lining to the jacket very easy, as all I had to do was “hand-stitch in the ditch” where the silk ribbon and the lining fabric were sewn together.

Here is what the finished edge looks like.

Here is what the finished edge looks like.

When I found the gold buttons for the jacket, I immediately knew that adding buttons to the sleeves would make it all look more complete.

The gold buttons added to the sleeves and another view of the lining (and the back of the bound buttonholes).

The gold buttons added to the sleeves and another view of the lining (and the back of the bound buttonholes).

And here is a close-up of the larger buttons for the front of the jacket, with their bound buttonholes.

And here is a close-up of the larger buttons for the front of the jacket, with their bound buttonholes.

The last thing I did was attach the label to the inside front of the jacket.

Emerald green suit

The silk shell I am wearing is a RTW one!  I purchased it last Spring and now have something with which to wear it!

The silk shell I am wearing is a RTW one. I purchased it last Spring and now have something with which to wear it!

Another view, without jacket.

Another view, with jacket over my shoulder.

When I found this emerald green silk matka online last Fall at Waechter’s Fine Fabrics, I envisioned a skirt suit – or dressmaker suit, as this type of dressy suit is also called – but I had not progressed beyond that in my planning.  Well, now this new grandmother is feeling pretty fortunate that, not only did I grow up with the styles from the 1960s, but they are making me feel quite fashionable now that I am in my 60s!

17 Comments

Filed under Buttons - choosing the right ones, Dressmaker details, Dressmaker suits, sewing in silk, Uncategorized, vintage Vogue patterns from the 1960s, Vogue patterns