Category Archives: Vogue patterns

And Now I Match My Chair, Part 1

It all started with a chair.  Well, maybe not.  My yearning for a coat made from a western-style blanket actually started inside the Pendleton Store in Jackson, Wyoming. For those of you unfamiliar with Pendleton Woolen Mills, here’s the (abbreviated) scoop on this great American company. 

 An English weaver by the name of Thomas Kay made his way to Oregon in 1863. (Think about that for a minute!)  His descendants, the Bishop family, built upon the weaving foundation Kay established and started Pendleton Woolen Mills in Pendleton, Oregon in 1909. In its first decade, the company produced colorfully patterned blankets and robes for local Native American tribes, thereby setting a brand distinction for the company. In 1916, Pendleton introduced the Glacier National Park blanket, the start of a wide-ranging series of National Park products. (New blankets and designs are still being added to this line today.) In 1924 the company introduced its first line of apparel – men’s woolen shirts – followed over the coming decades by women’s apparel and expanded offerings in apparel, home furnishings and of course, blankets. At the heart of the product lines is a commitment to American craftsmanship, the embrace of Native American design, and pride in its family ownership over six generations. Their products are available in their retail stores, on the web, and by printed catalog.  

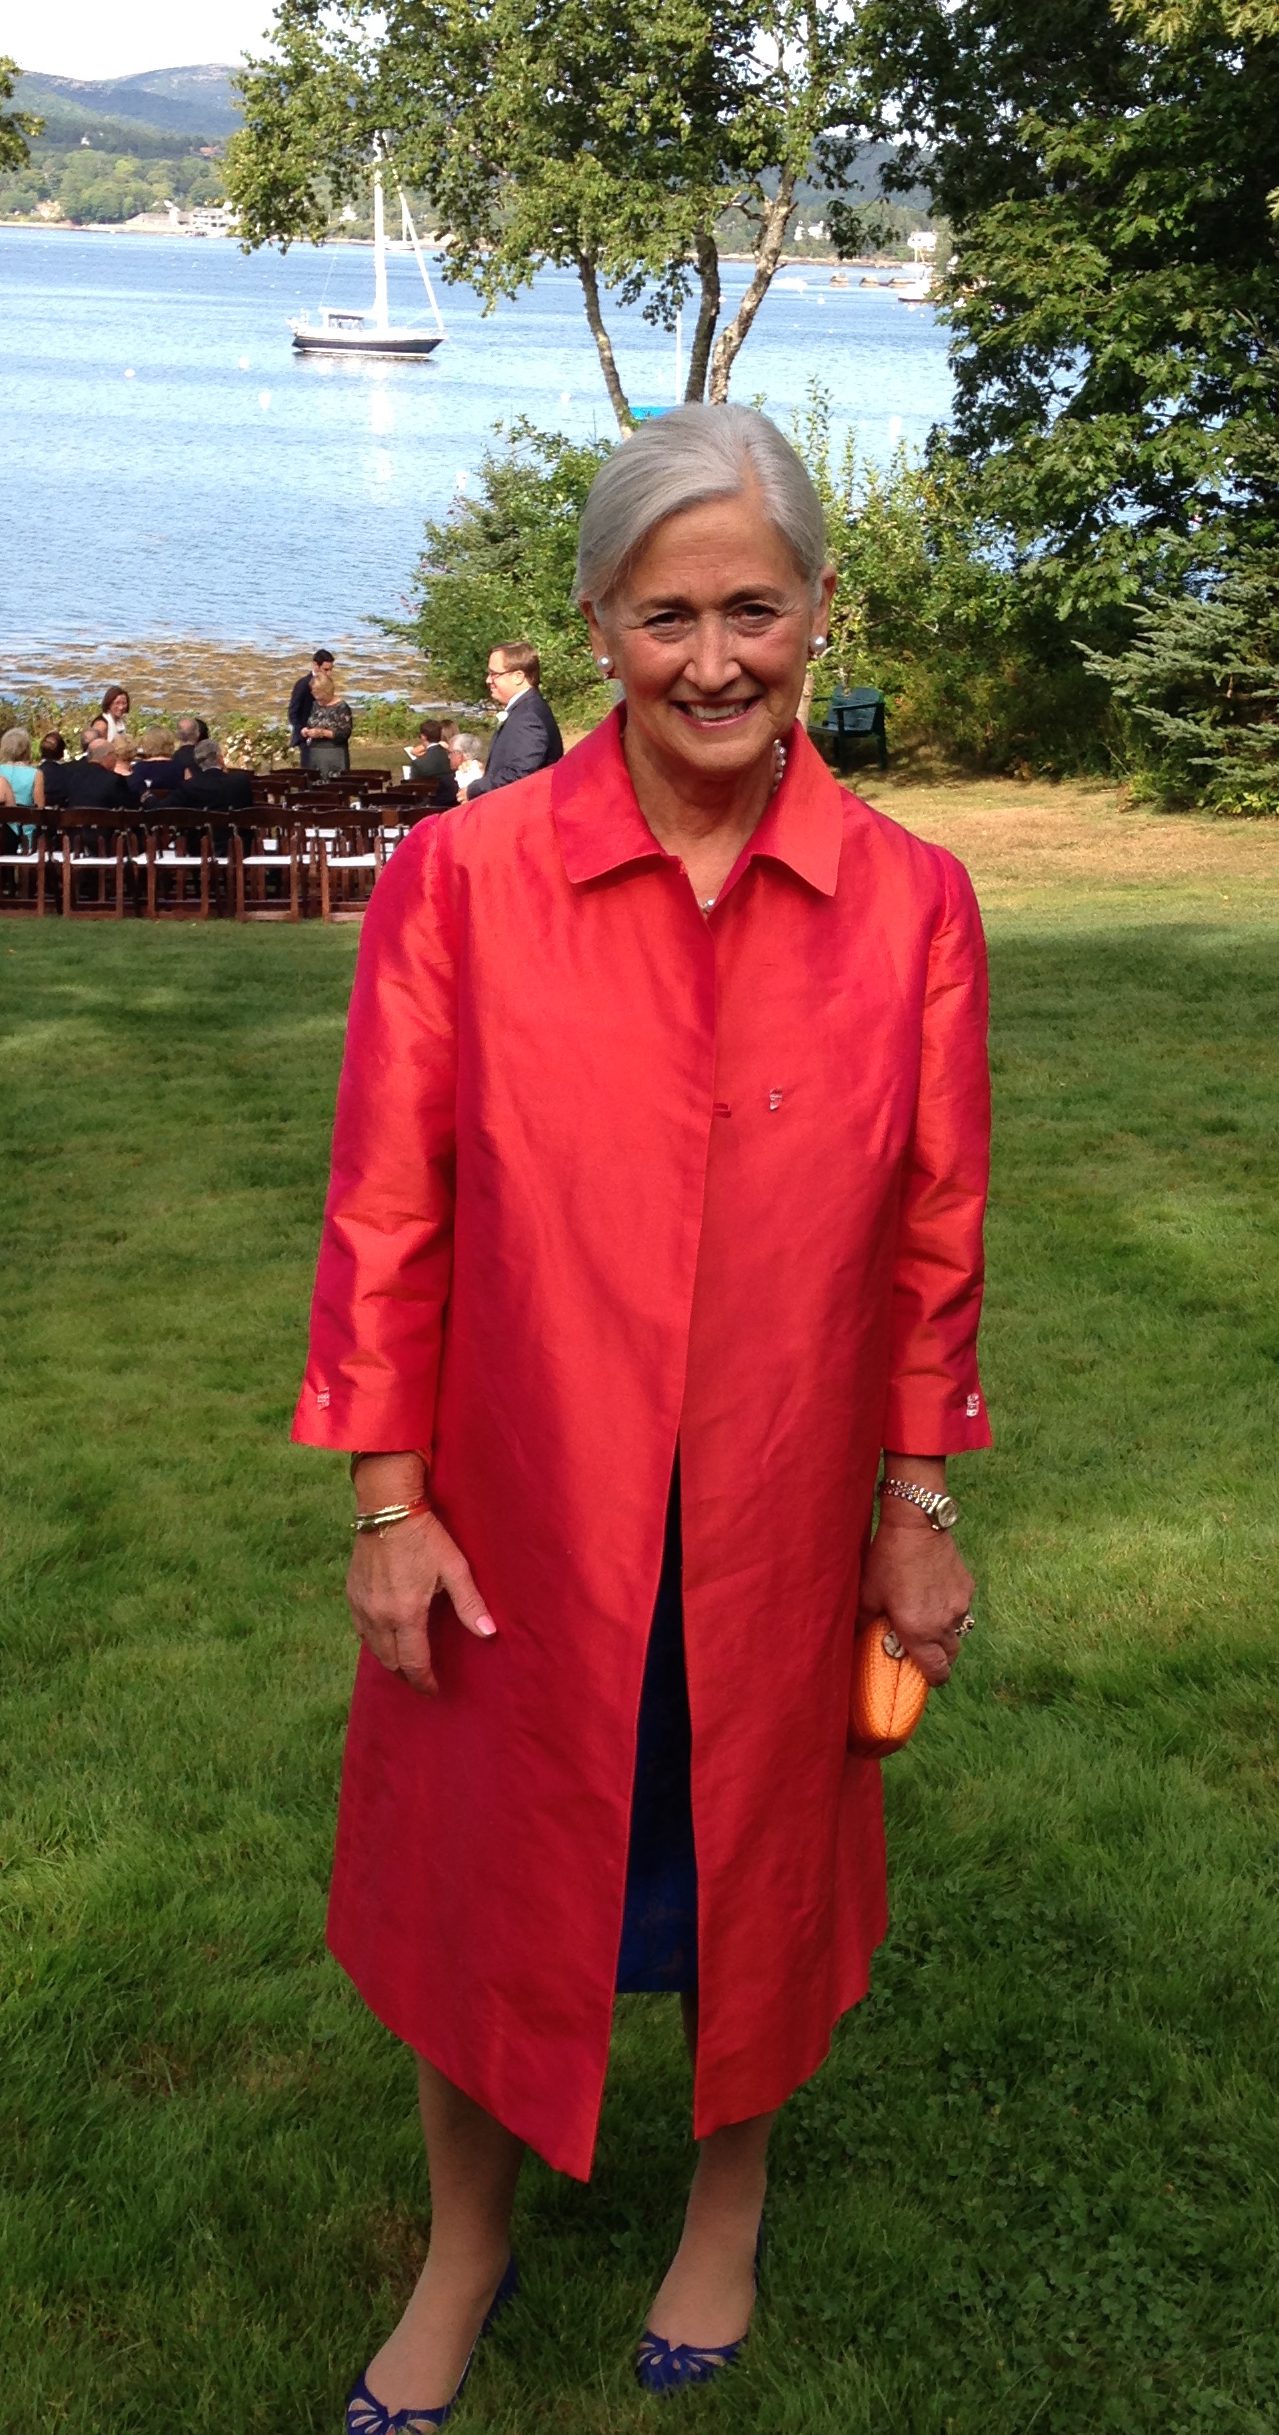
Back to the Pendleton Store in Jackson, Wyoming. Their women’s offerings always showcase several coats, jackets, and ponchos made from Native American inspired blankets (and made in the USA, for extra good measure). They are gorgeous and distinctive and classic. So much so, that a few years ago my daughter purchased one (with a little $ help from Mom.)

This is the Pendleton coat my daughter purchased; photo is from the web.

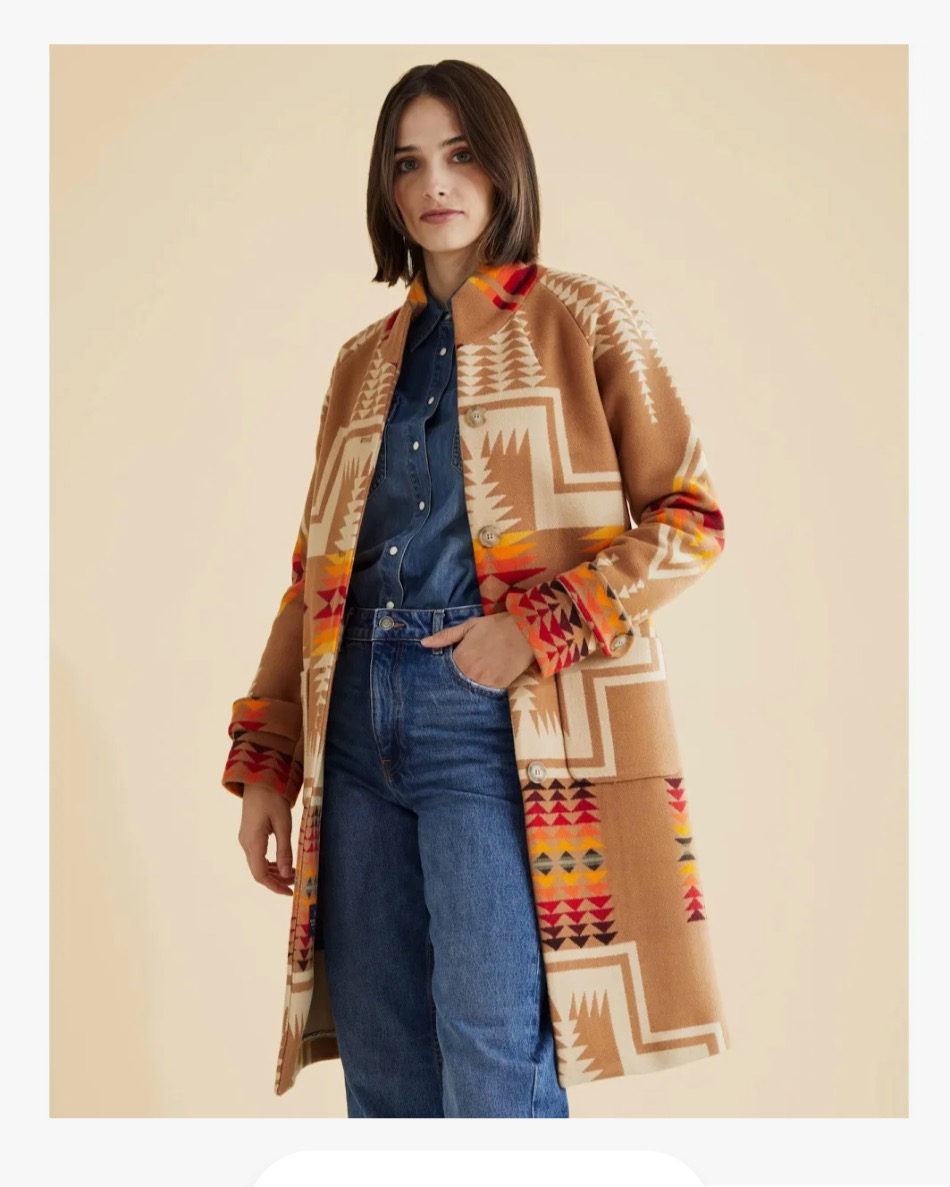
She already had a stunning Pendleton wool poncho, a gift from her husband. As we all know, one can never have too much outerwear, right? Well, all this American craftsmanship and design and head-turning apparel of course started me looking at Pendleton blankets-turned-coats from the viewpoint of one who sews – and one who thinks “I could make one of those!”

The seed was planted, waiting for germination.  

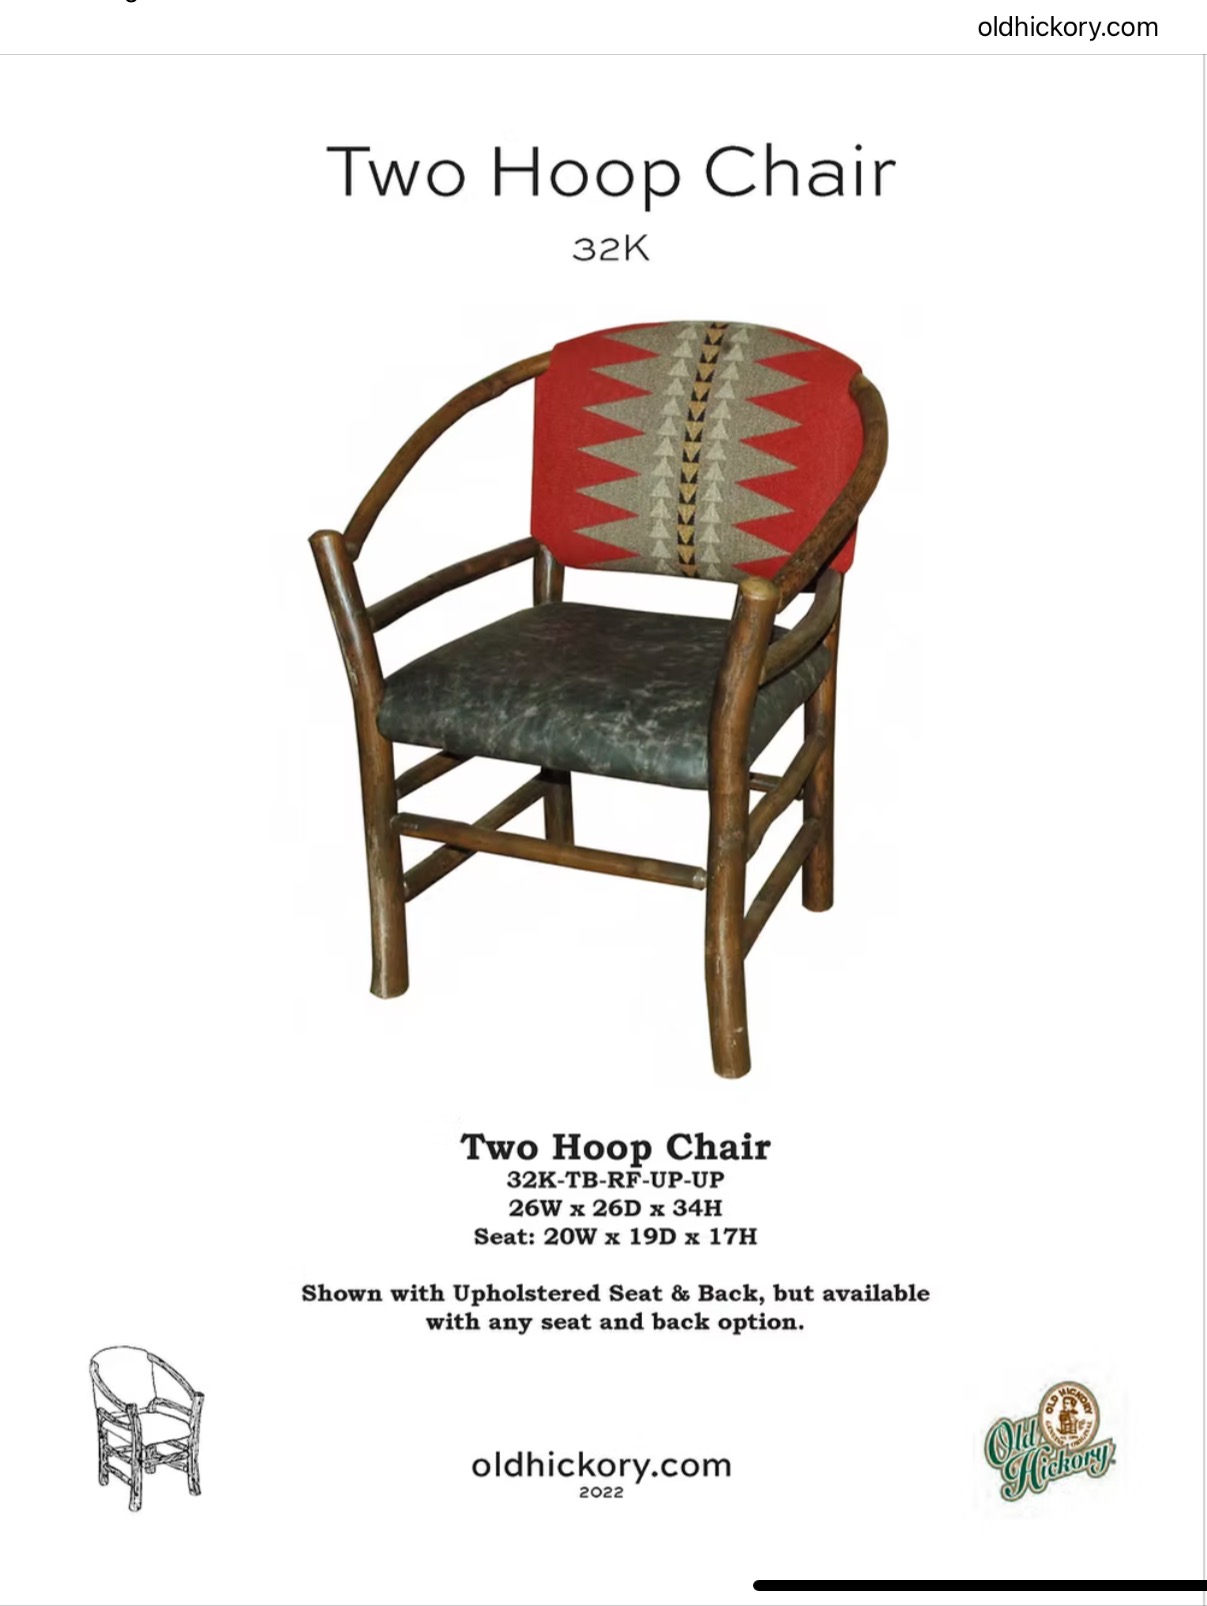
With my existing sewing queue already groaning under its own weight, I deferred action on this idea indefinitely. And then, in late August of 2025, I found an Old Hickory small hoop chair (another great American company known for its craftsmanship) in a consignment store.

This is the Old Hickory chair I purchased from HOME AGAIN, a consignment store in Jackson, Wyoming. I was not a fan of the “bucking bronco” motif on the seat back.

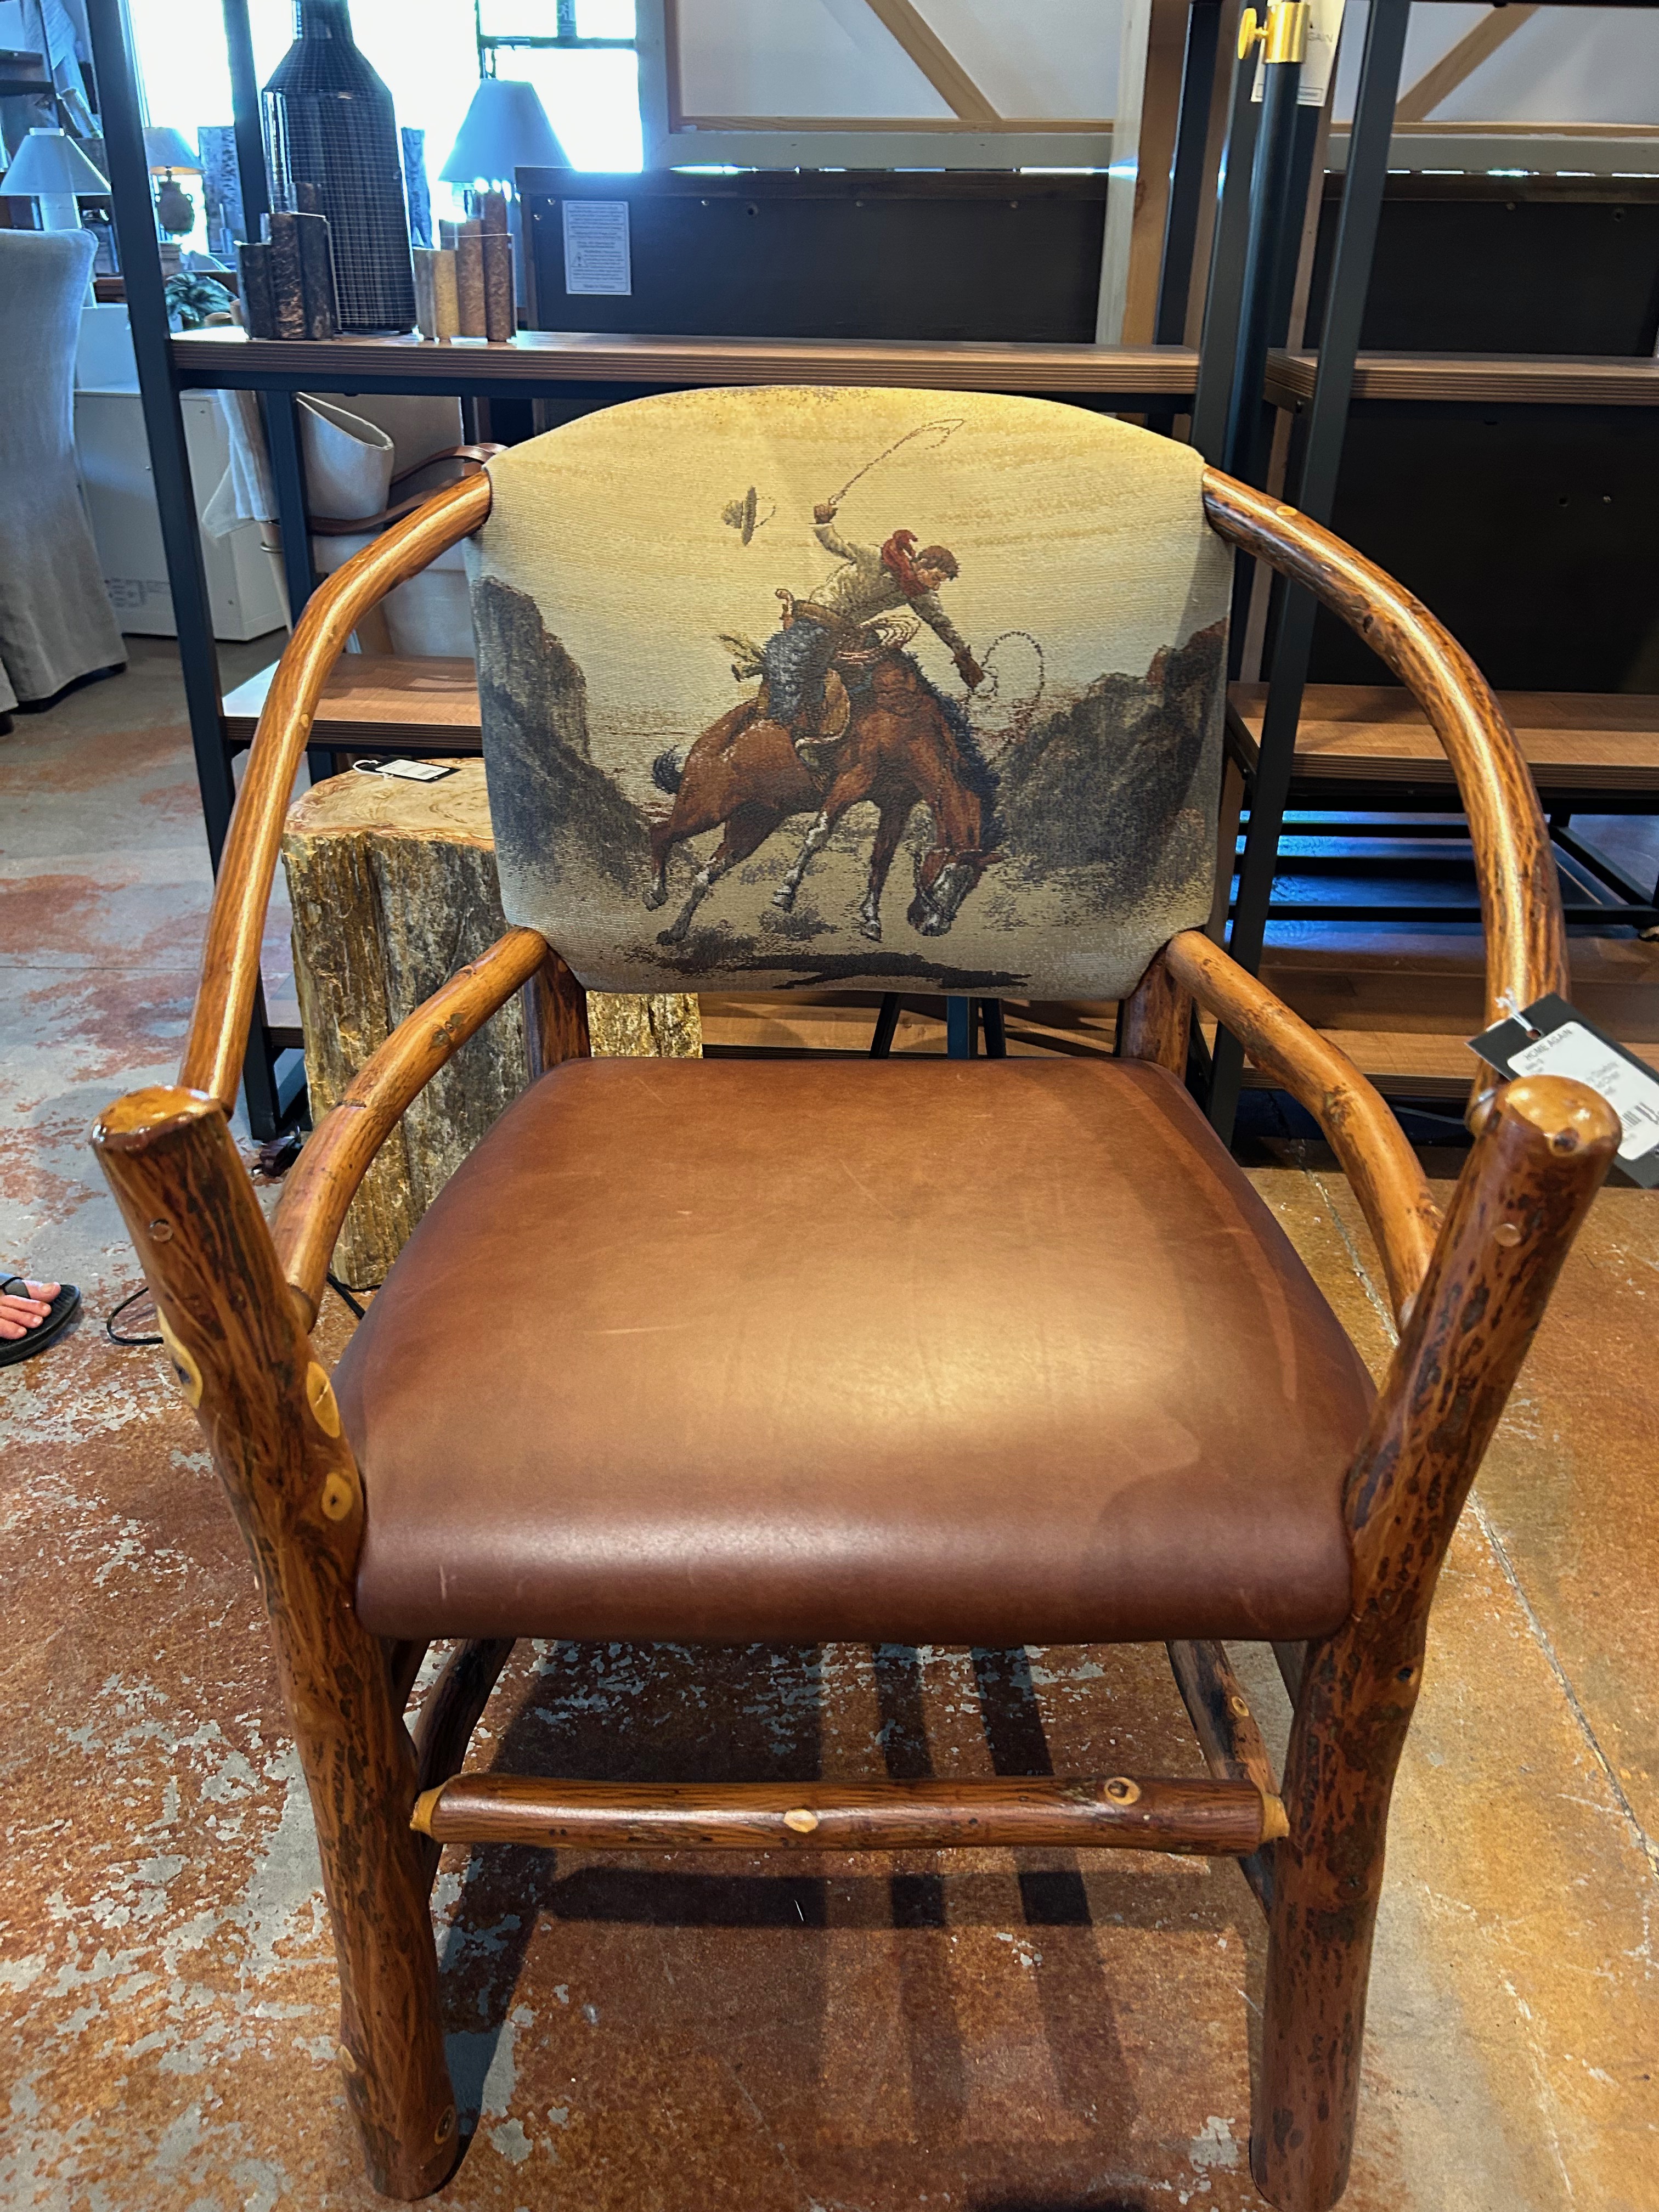
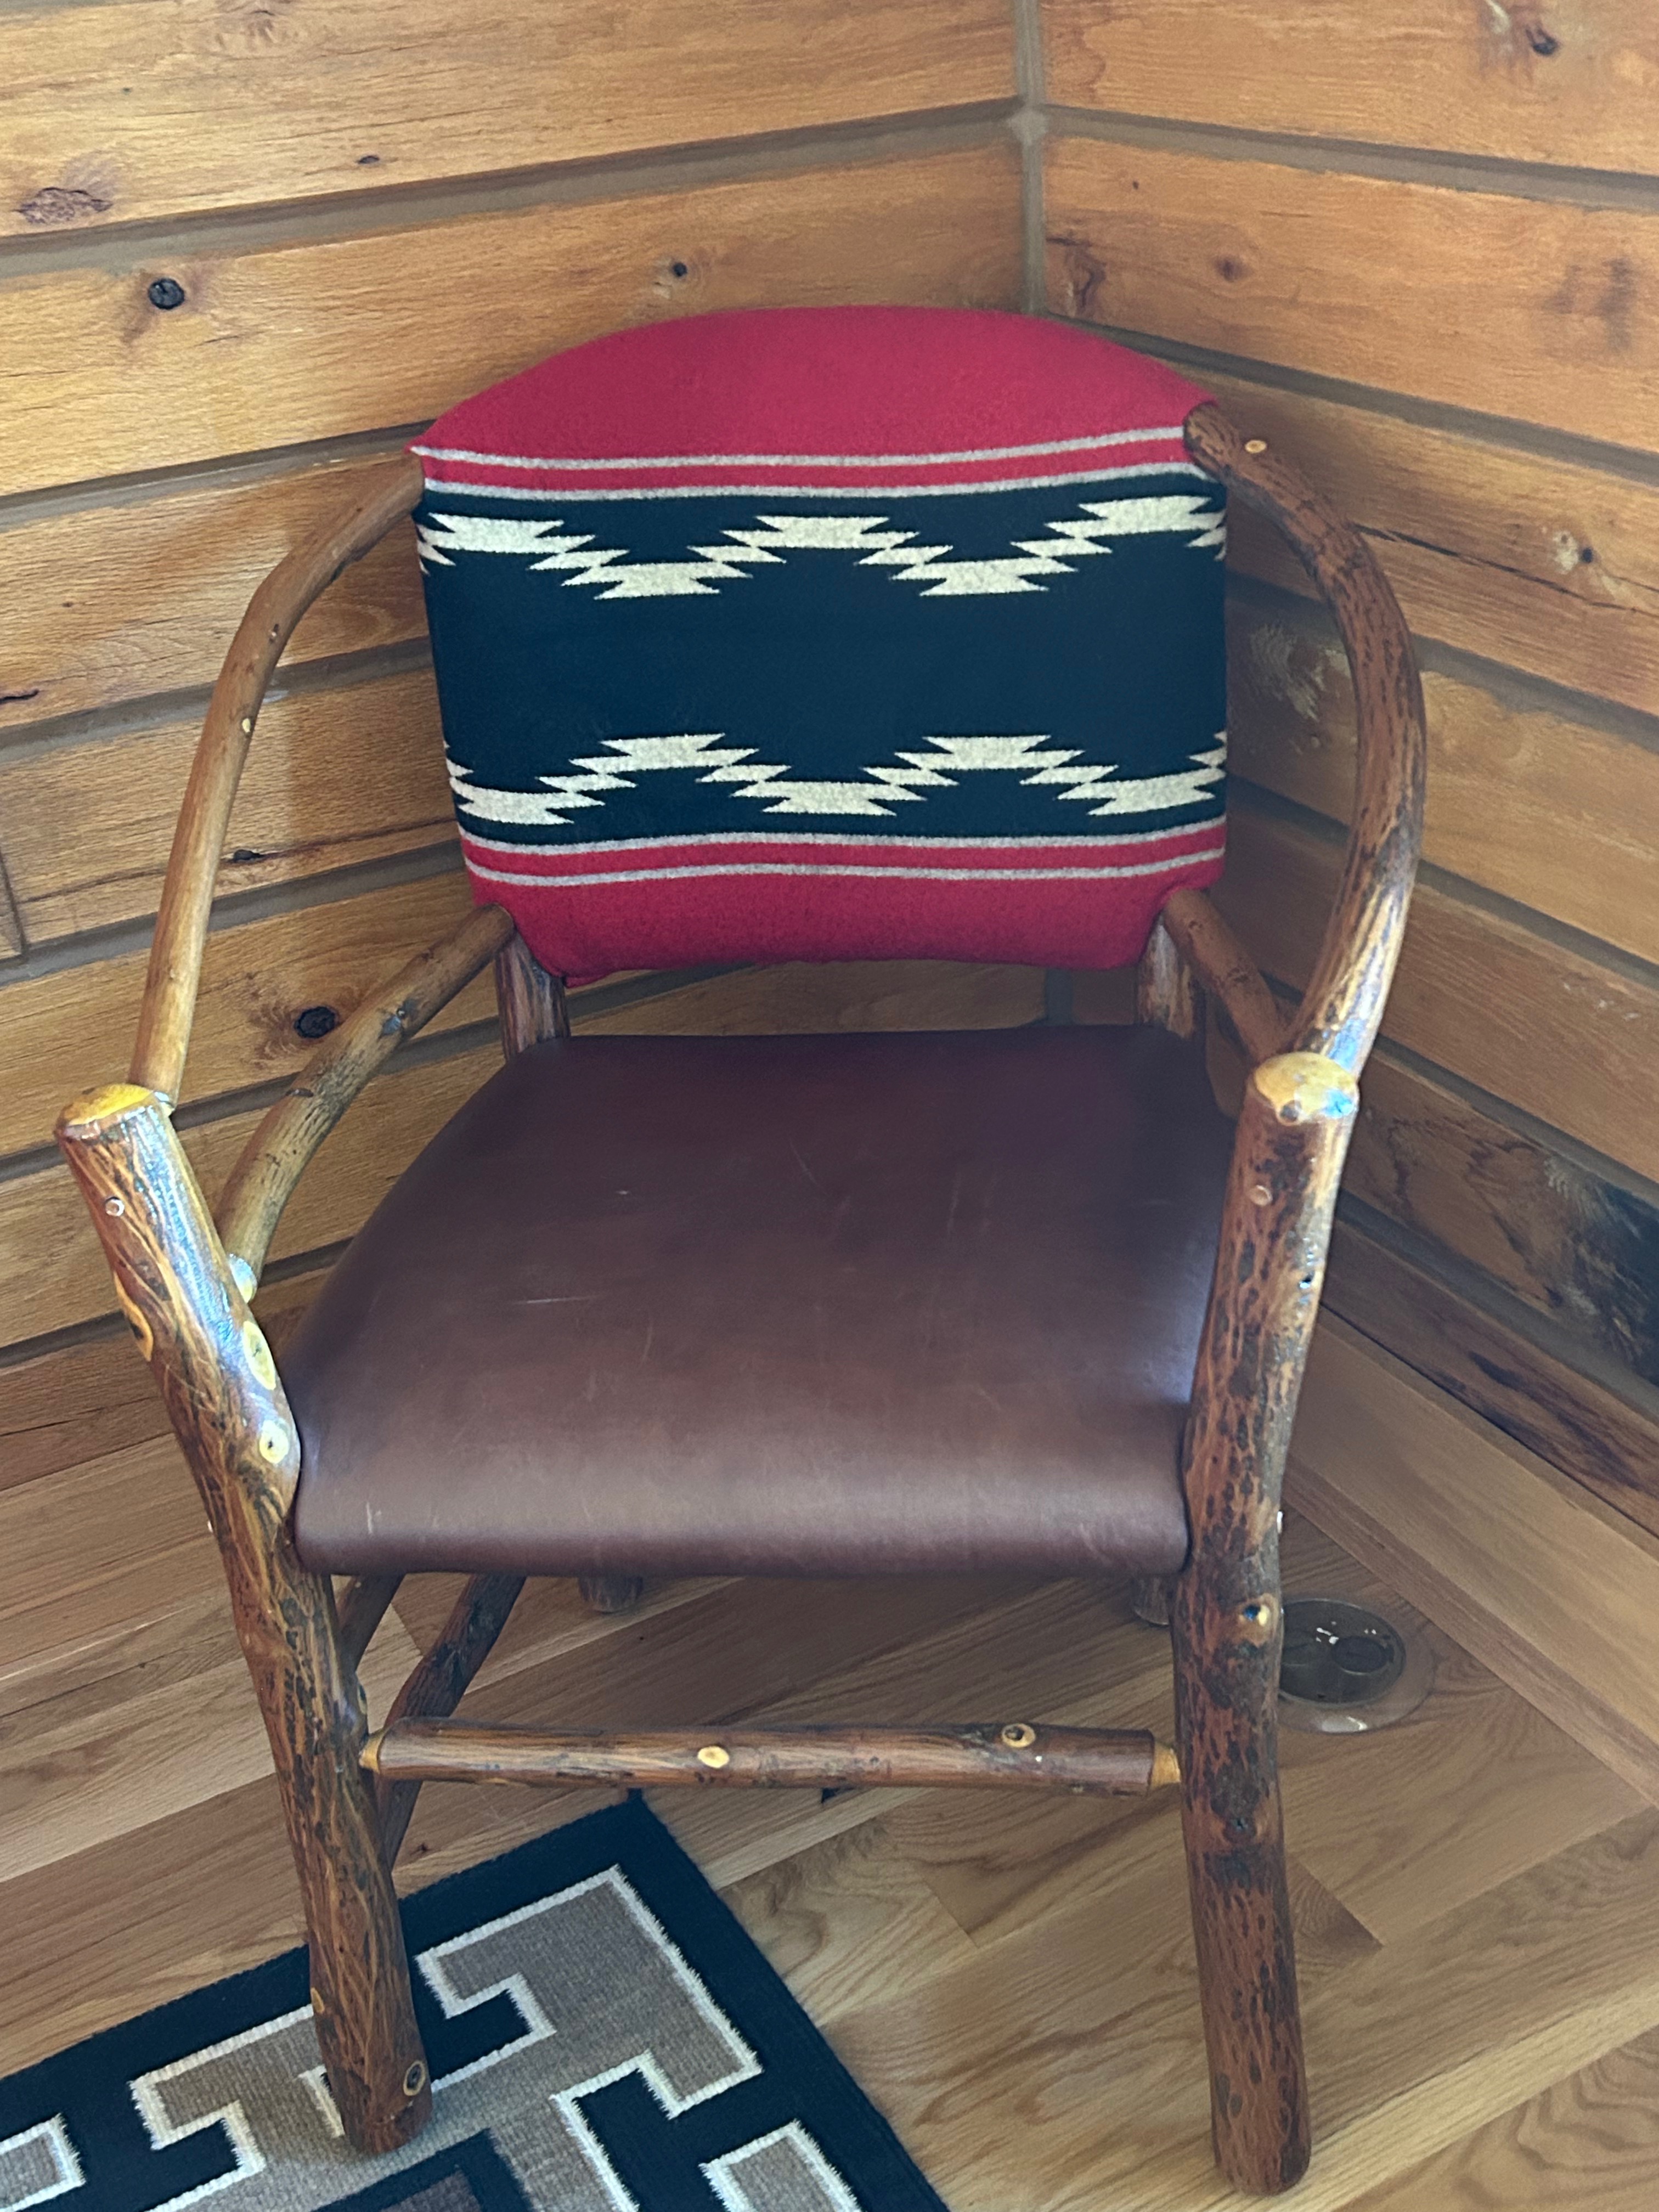
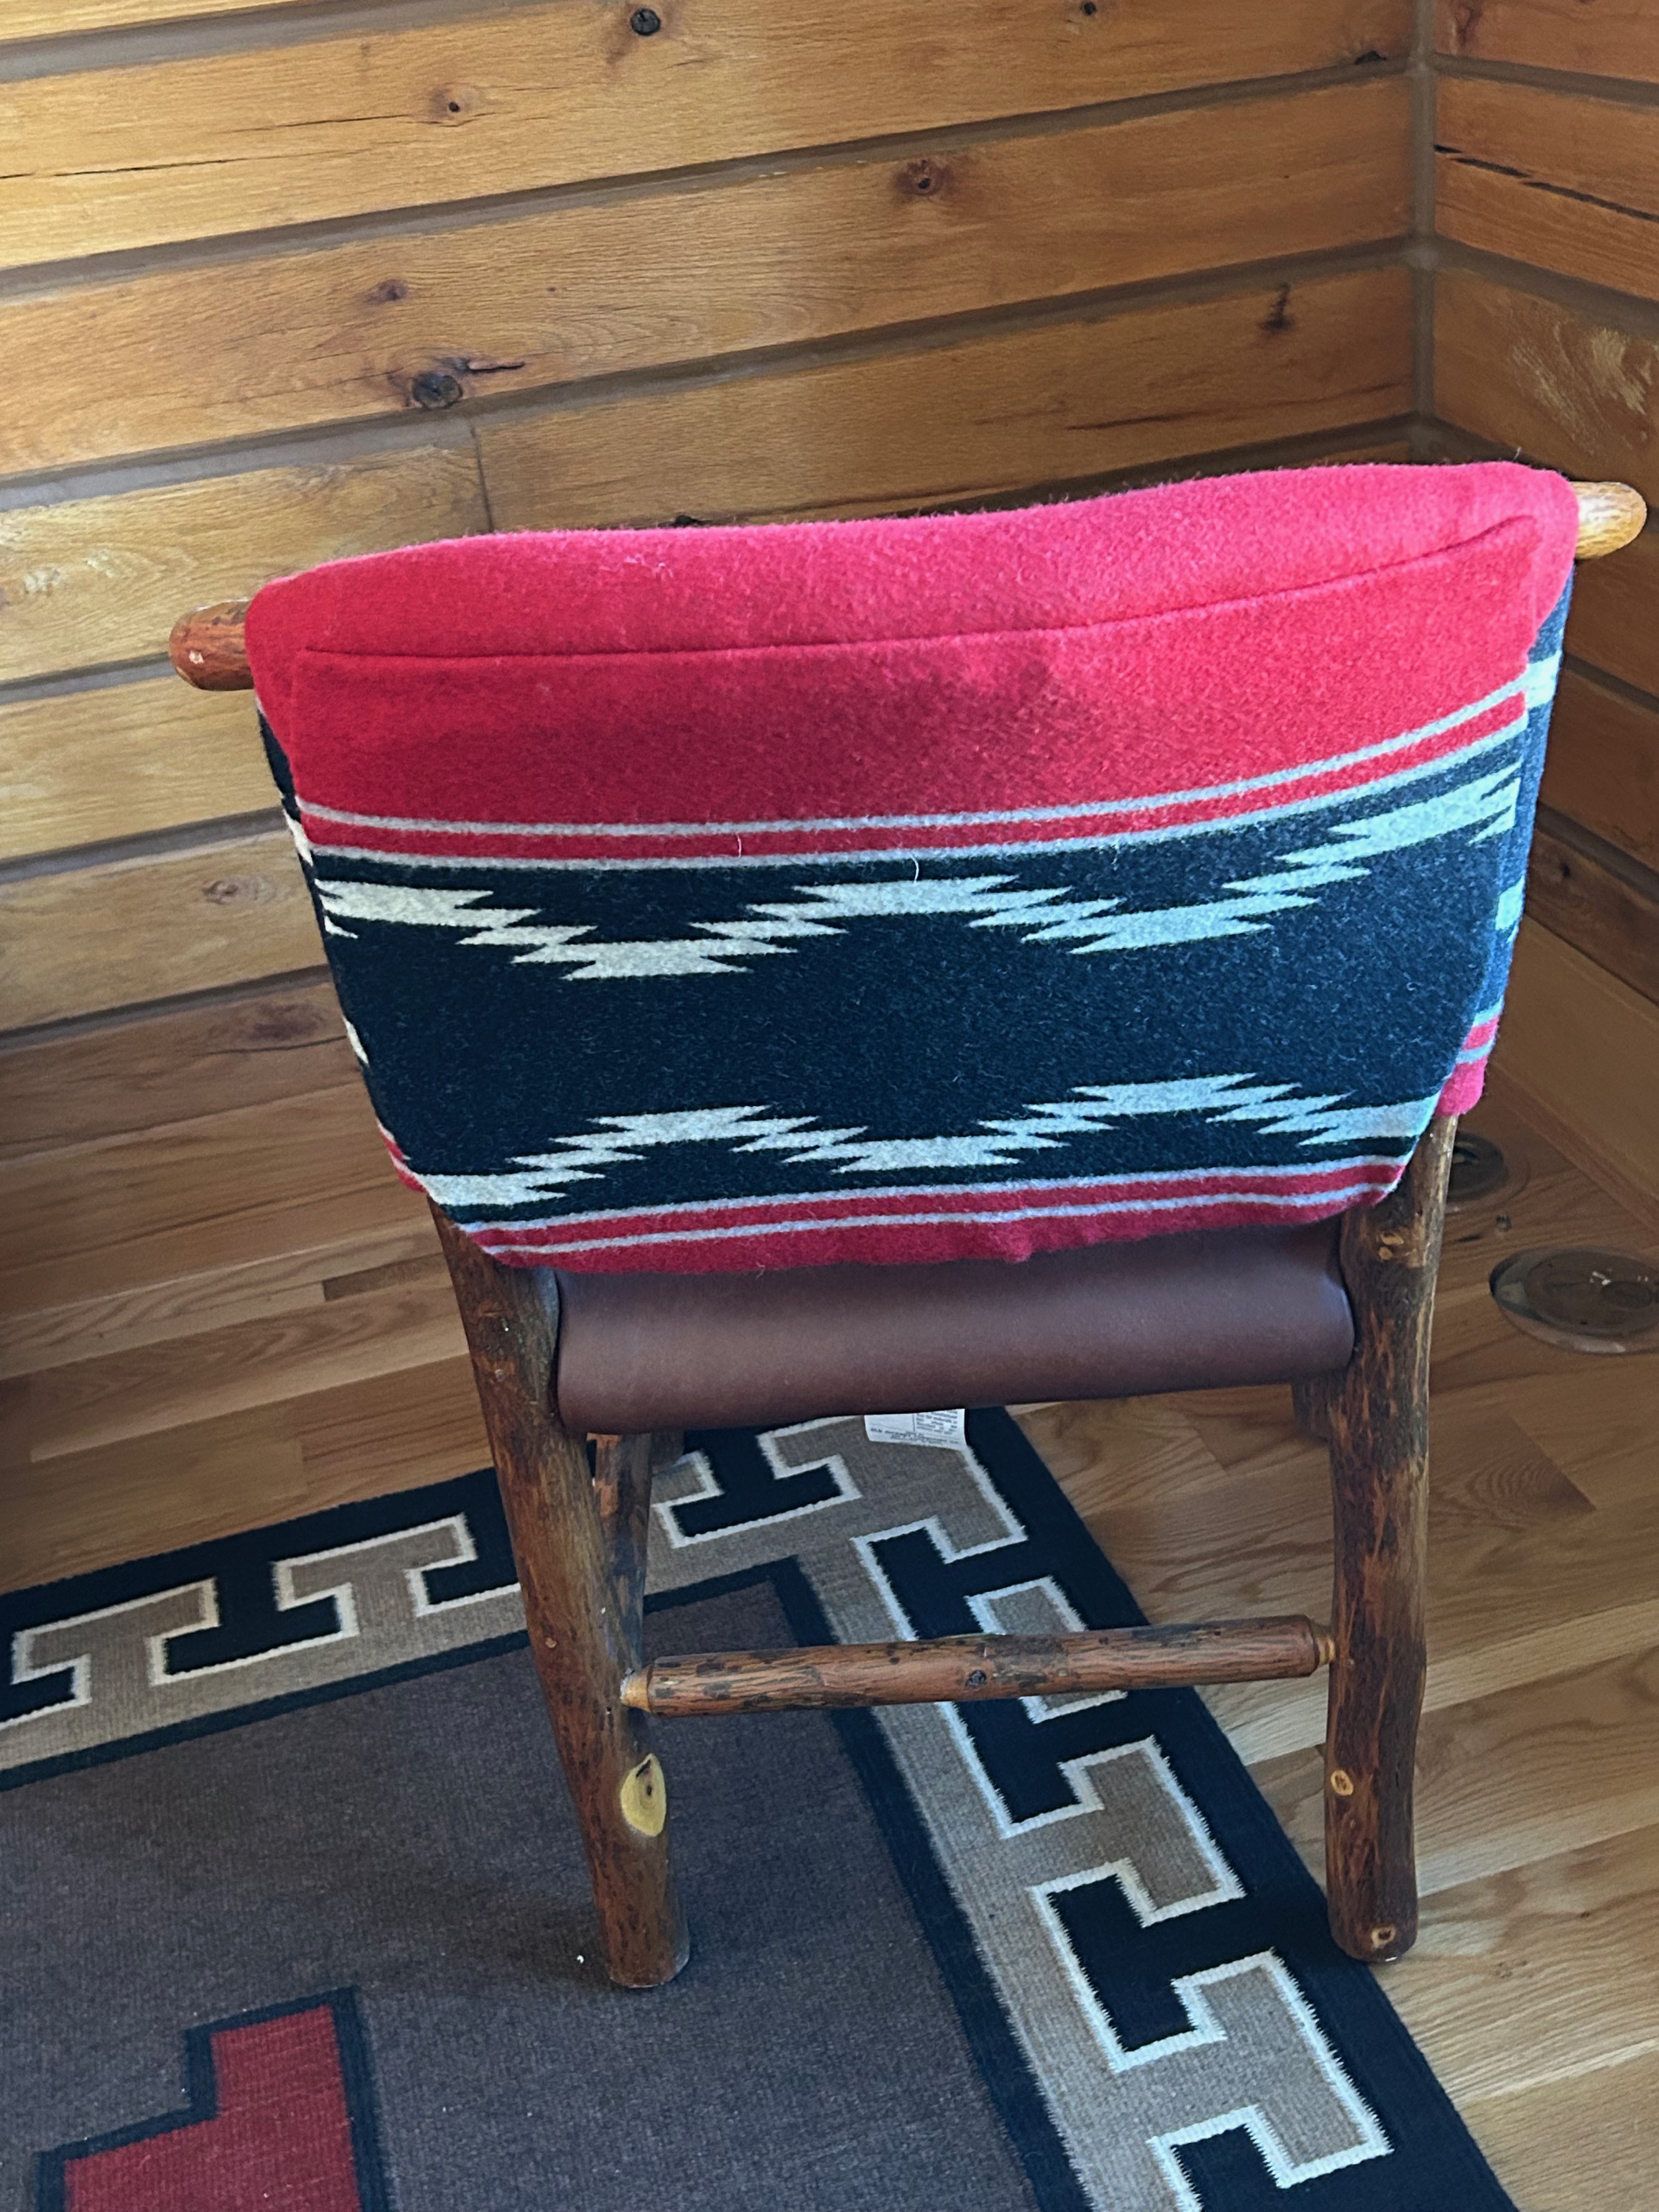
I purchased the chair with the knowledge I would need to change the upholstery on the seat back. (The seat is covered in leather, which is perfect for our household which includes two cats prone to some scratching.)

I was already familiar with examples of Old Hickory hoop chairs upholstered in Pendleton blanket wools, as shown here:

Screenshot

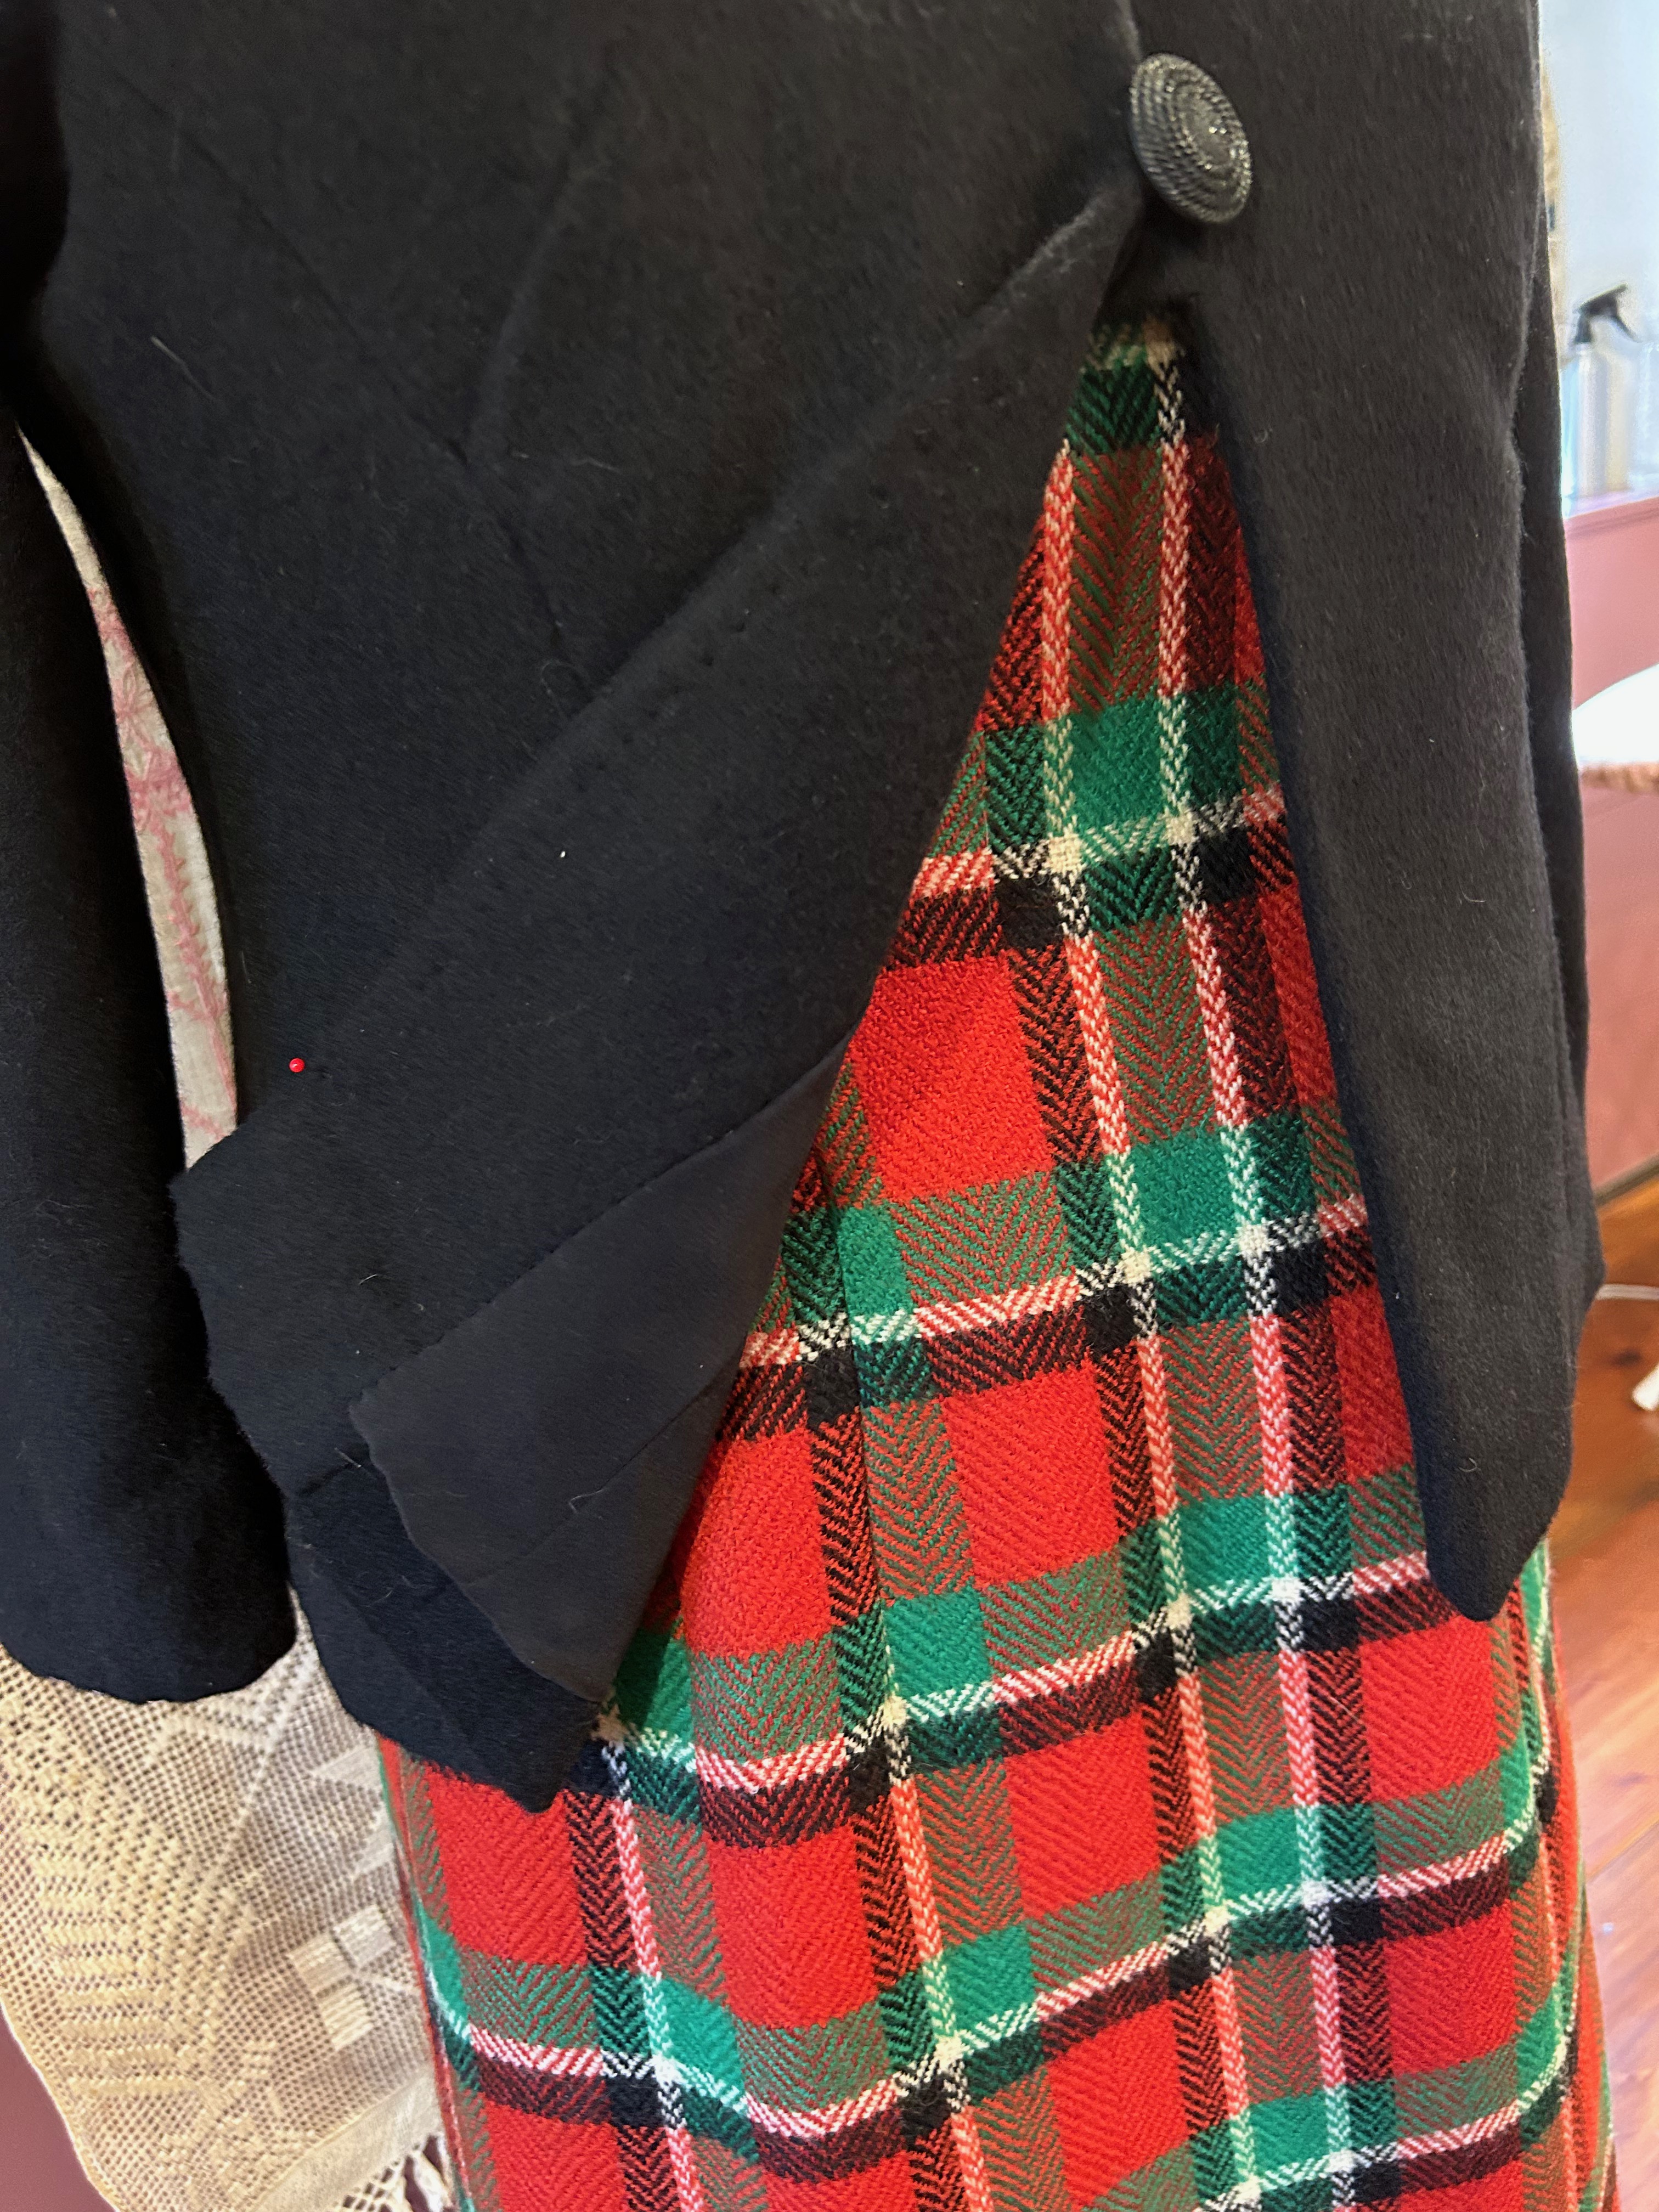
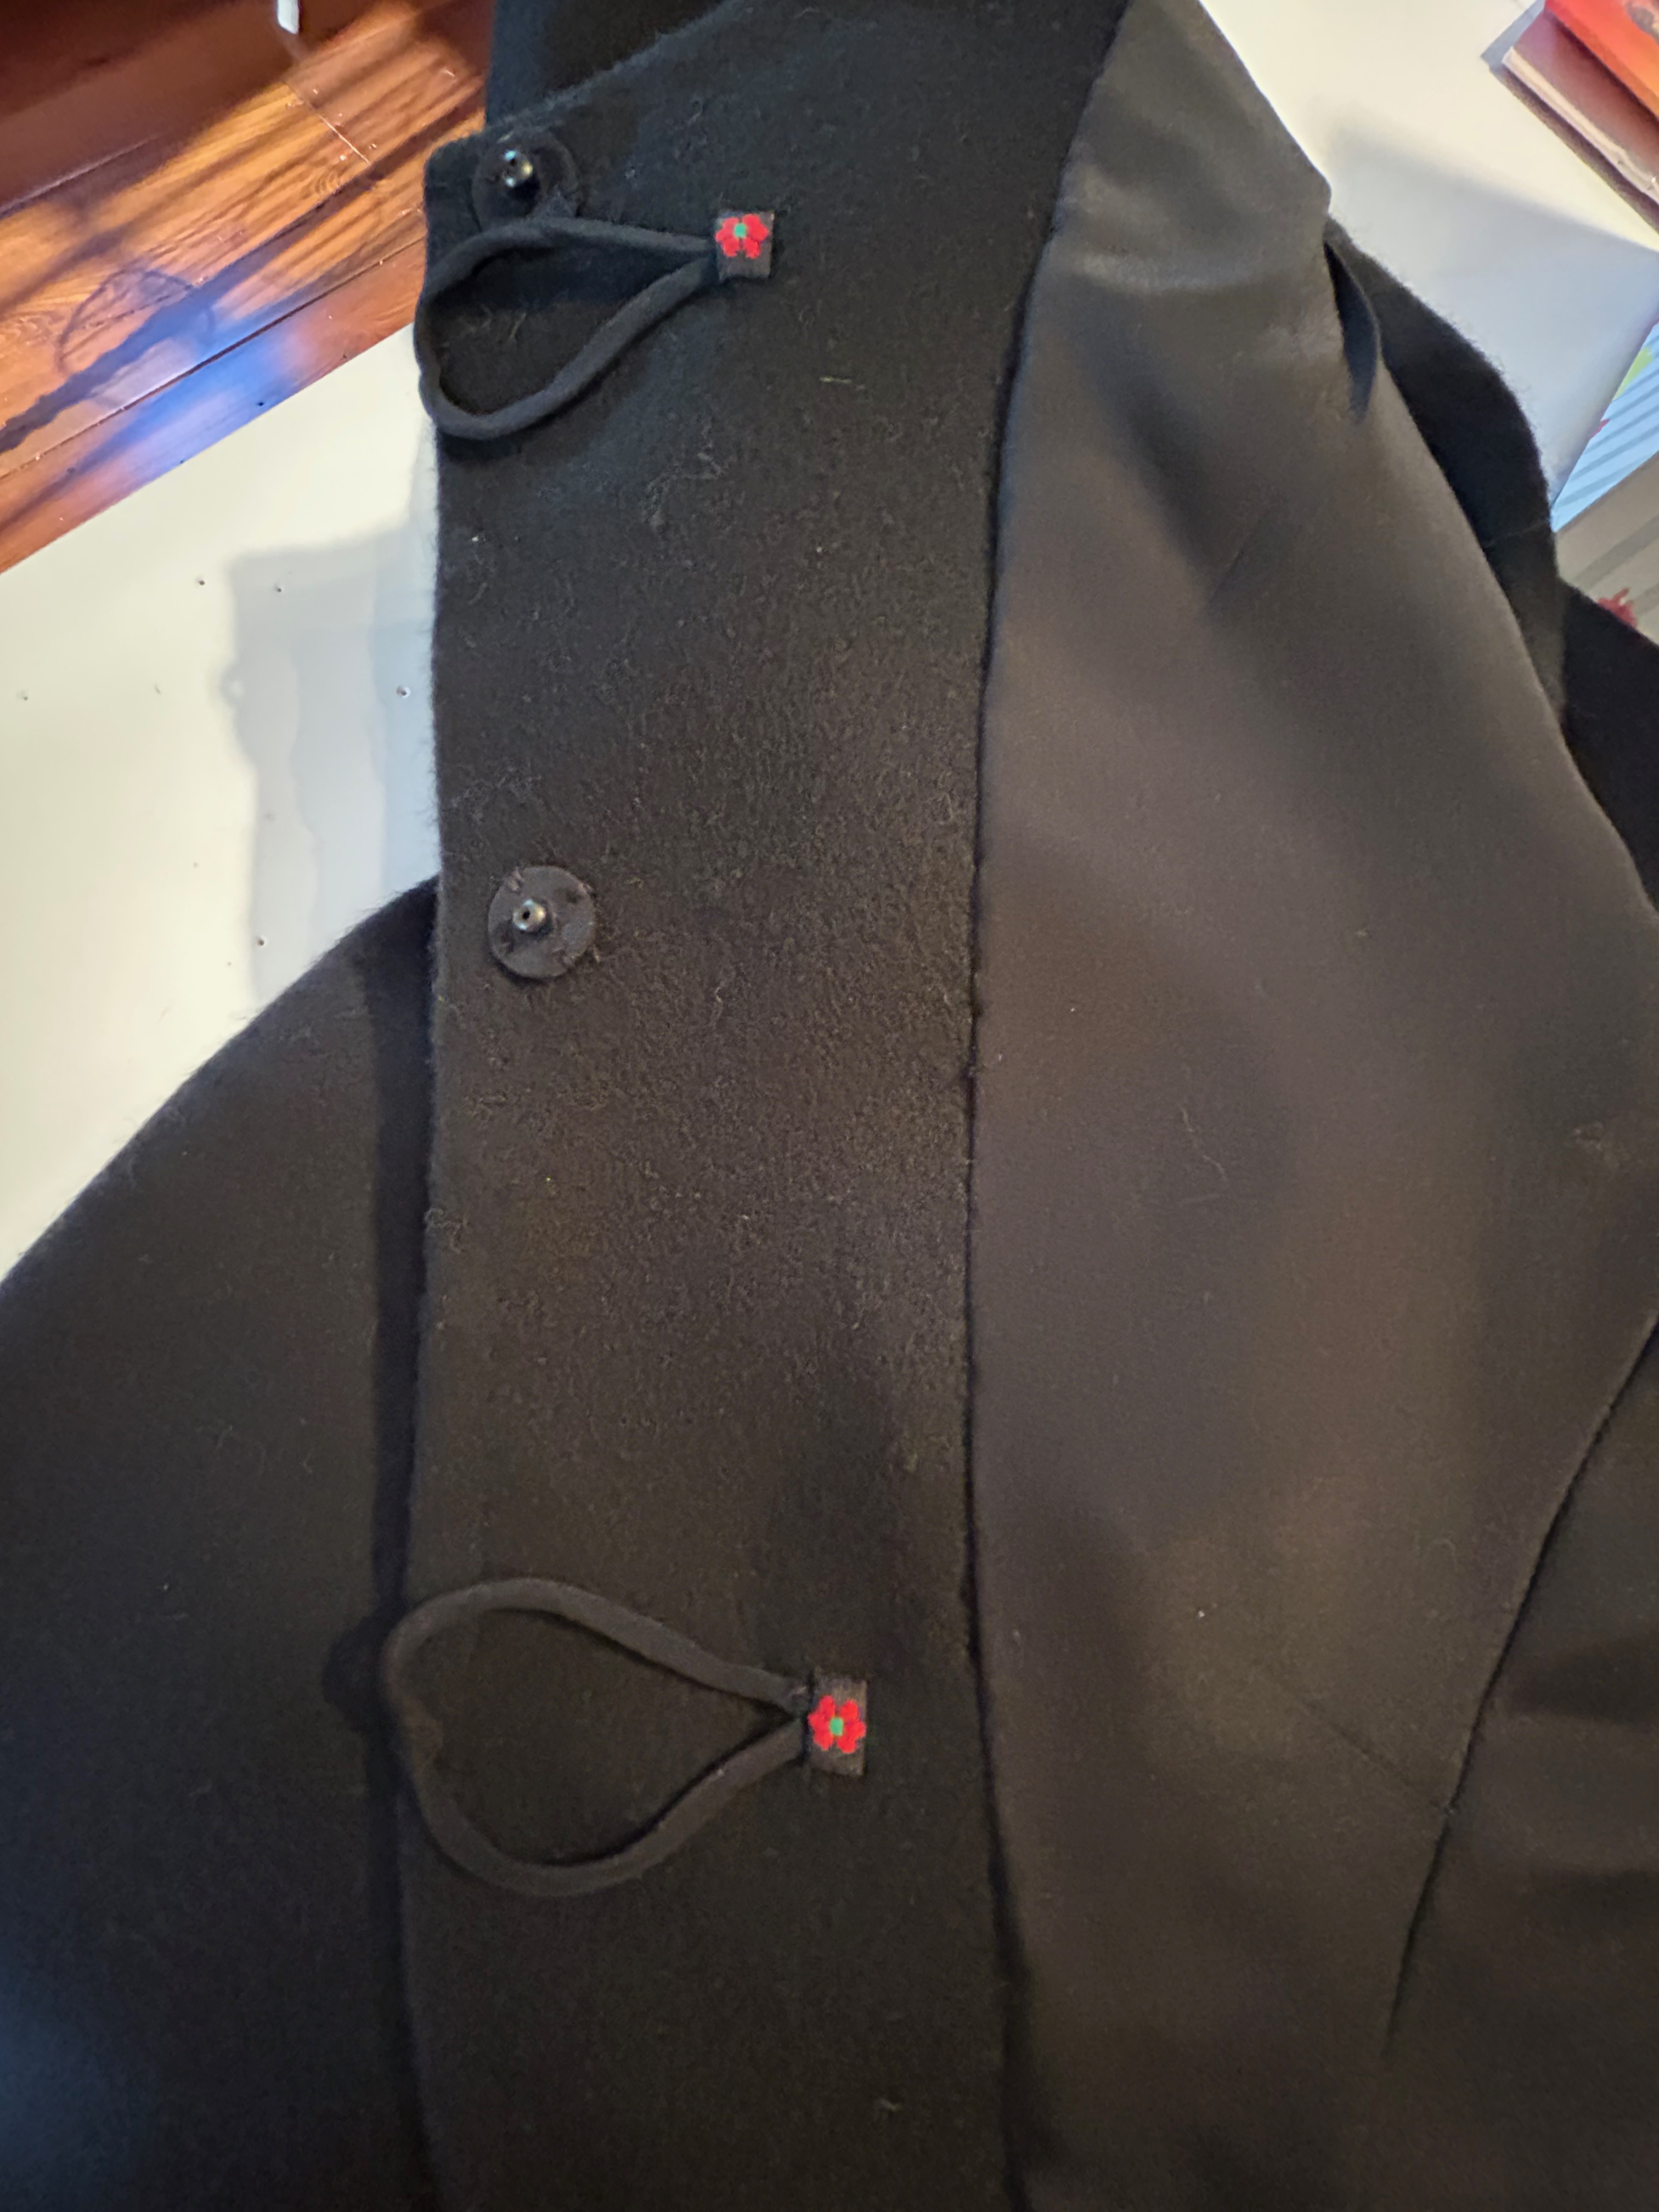
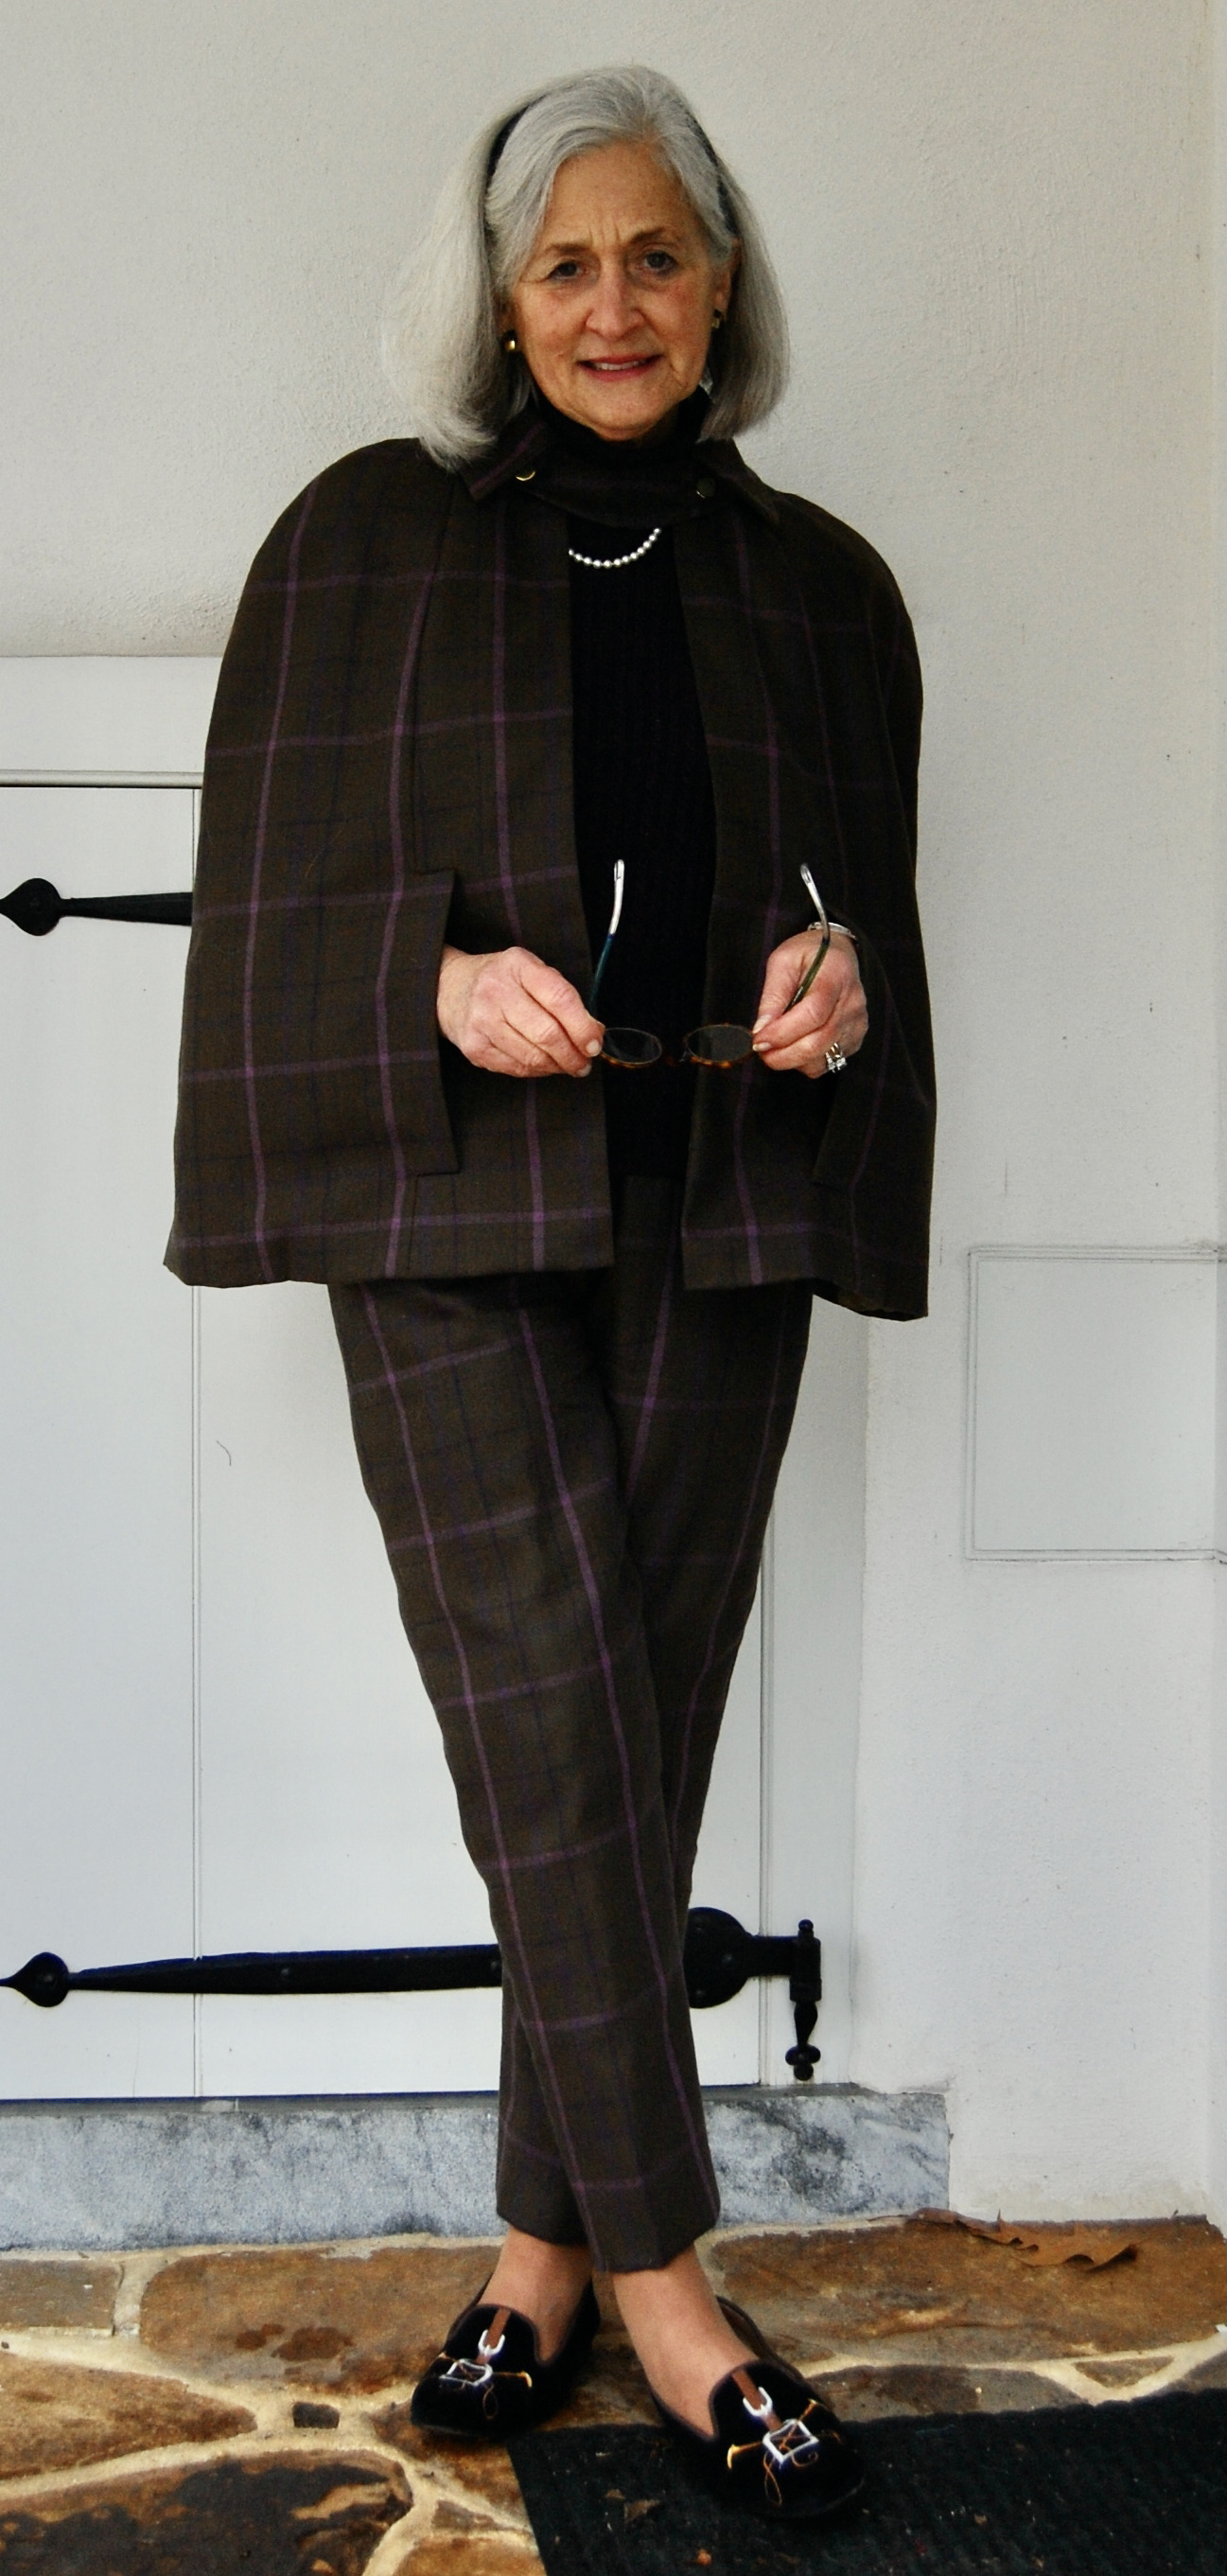
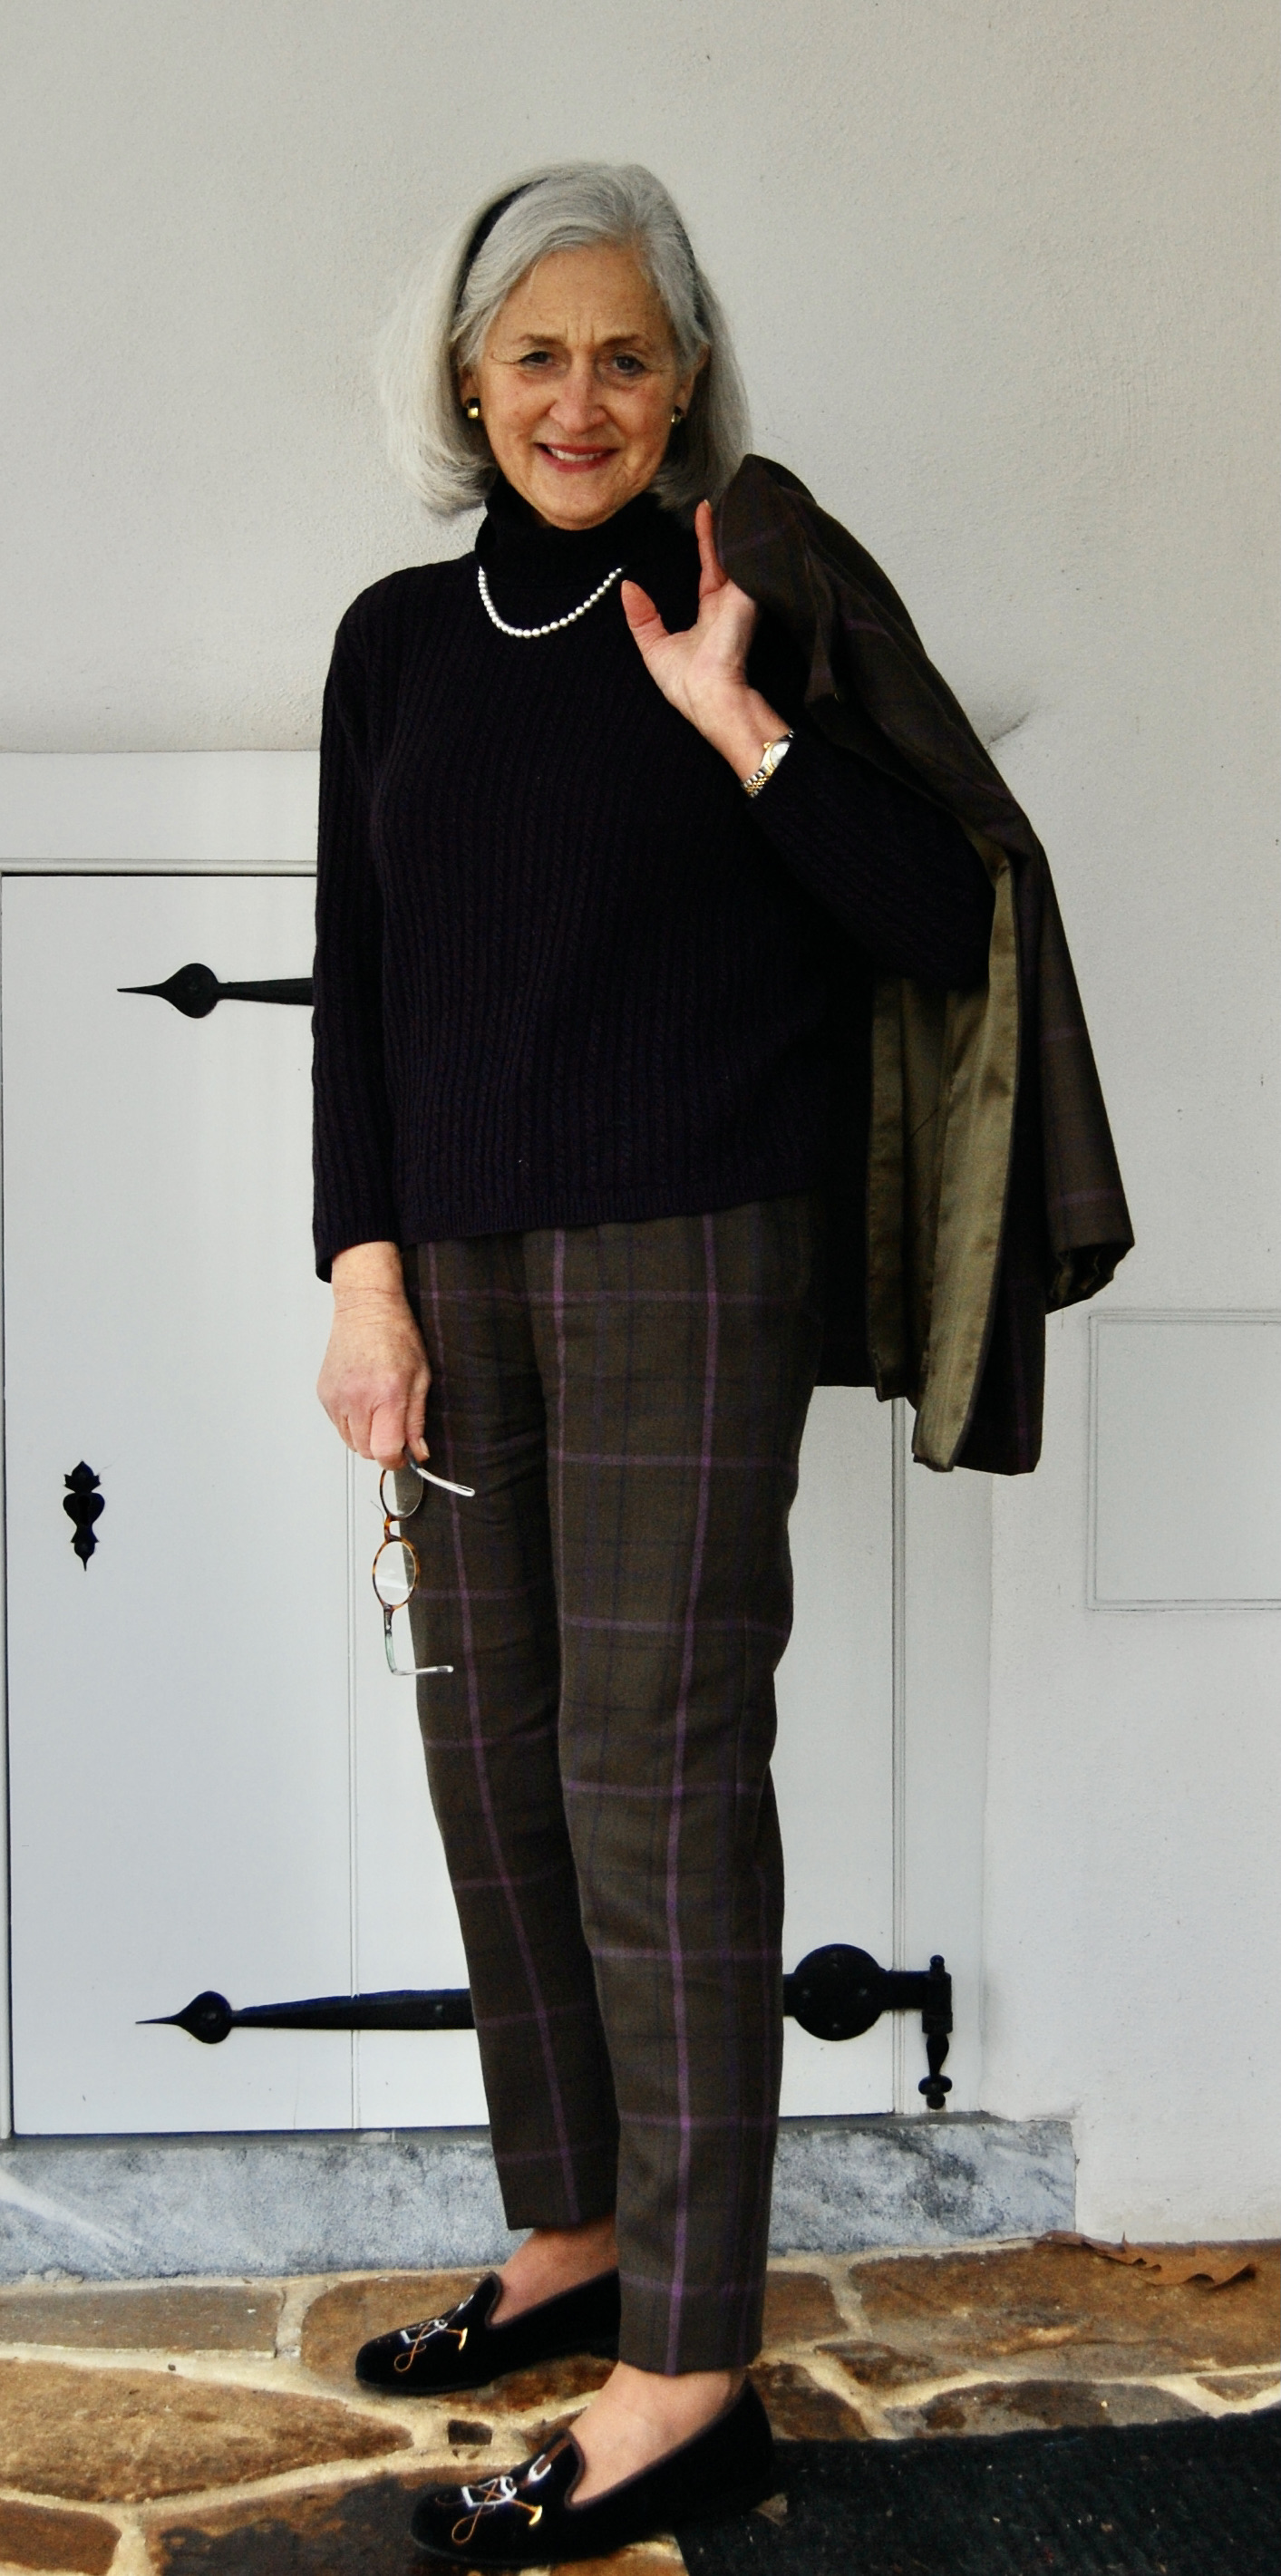
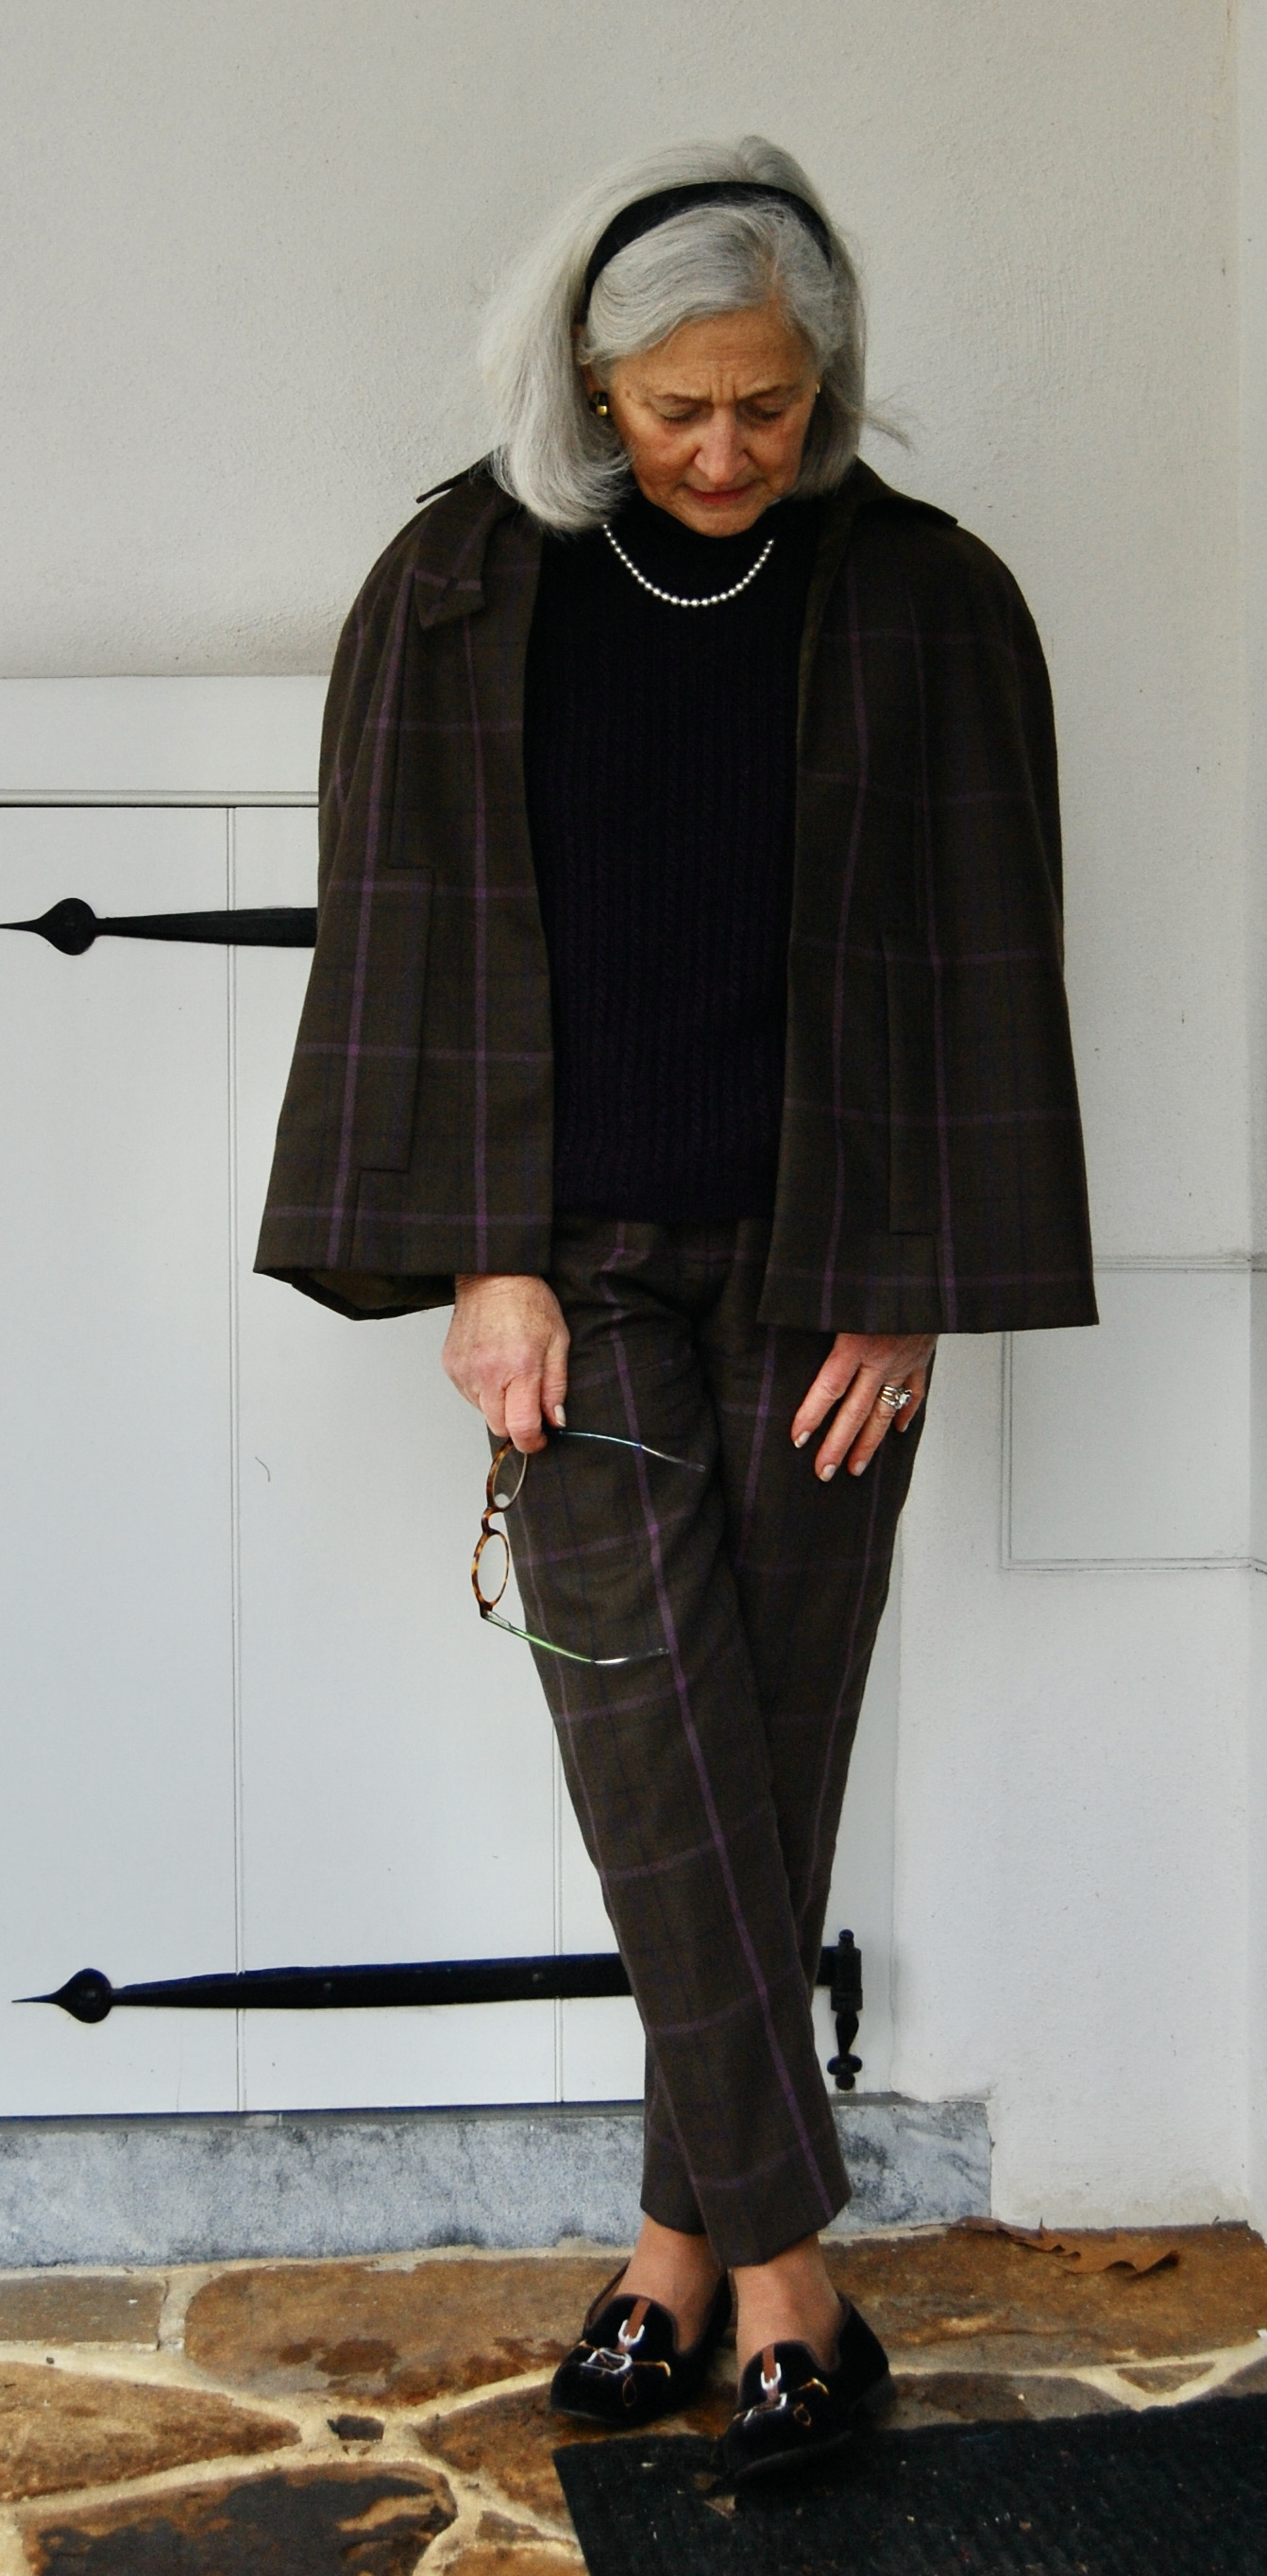
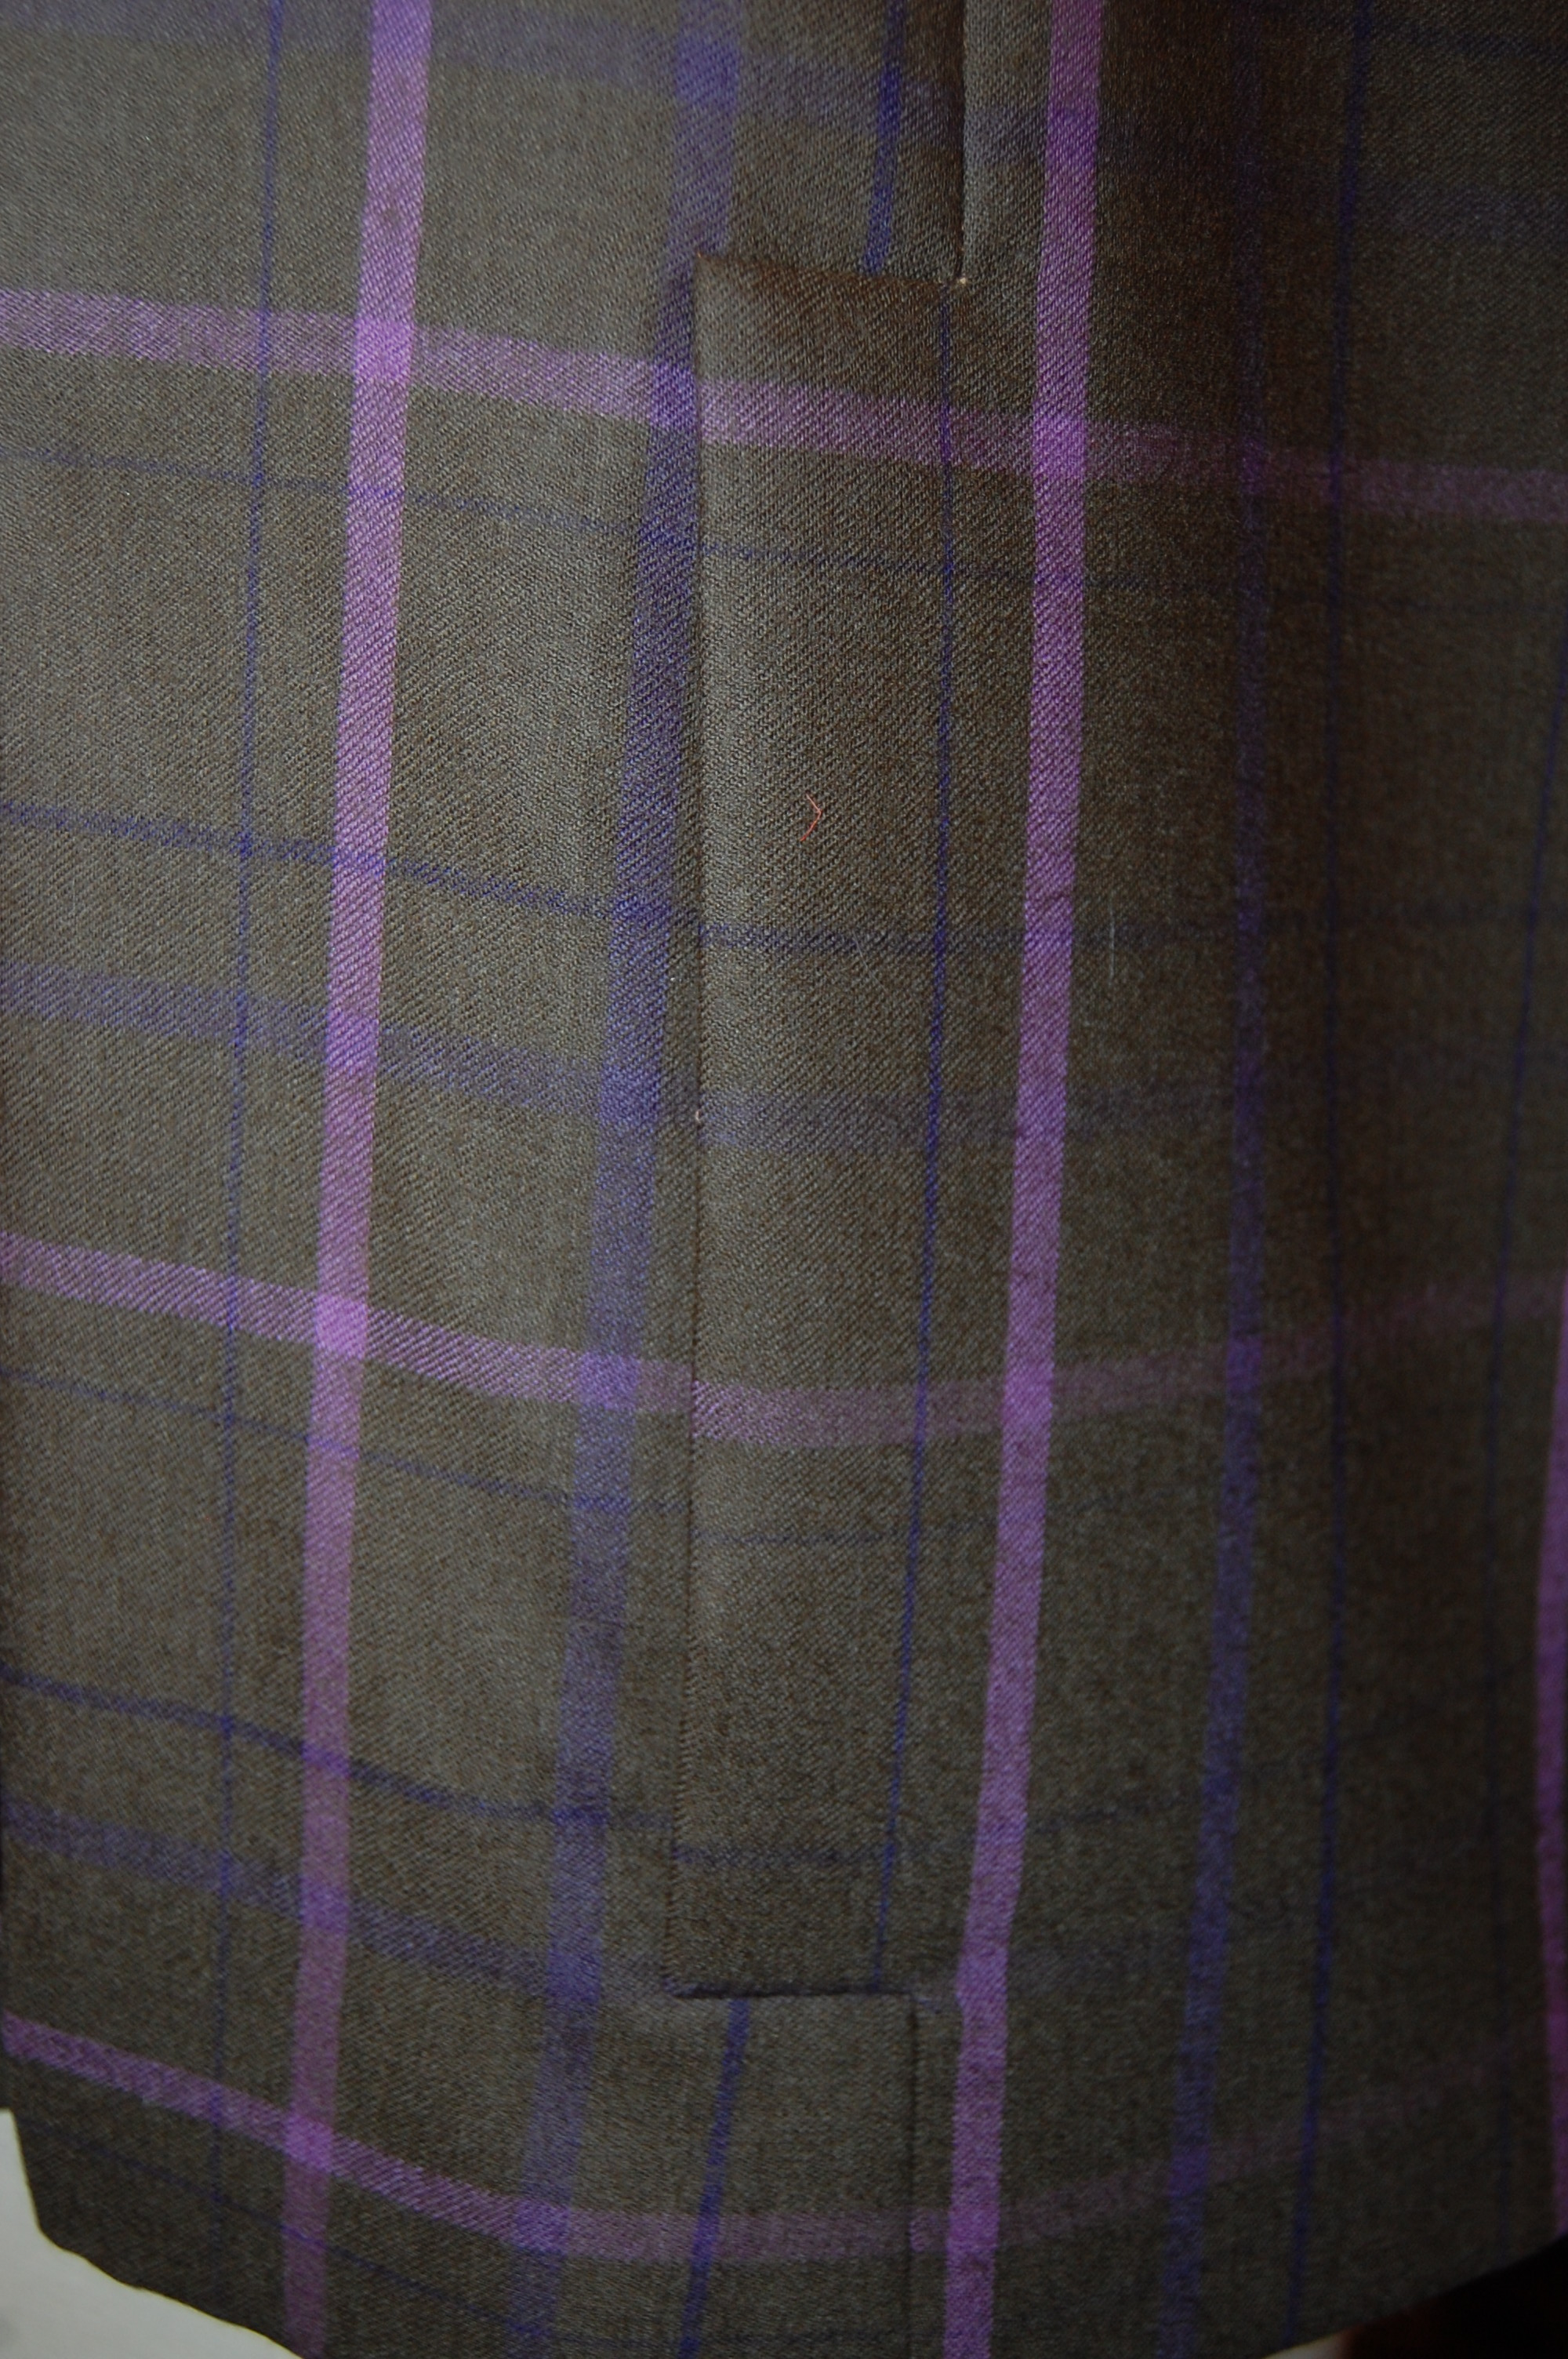
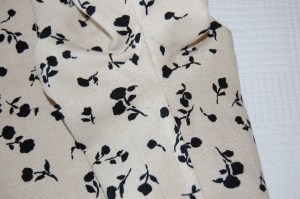
Of course, the wheels started turning in my head, and I made a stop at the Pendleton store to look at blankets. One jumped out at me for its colors and design. 

This is an image from the Pendleton website.

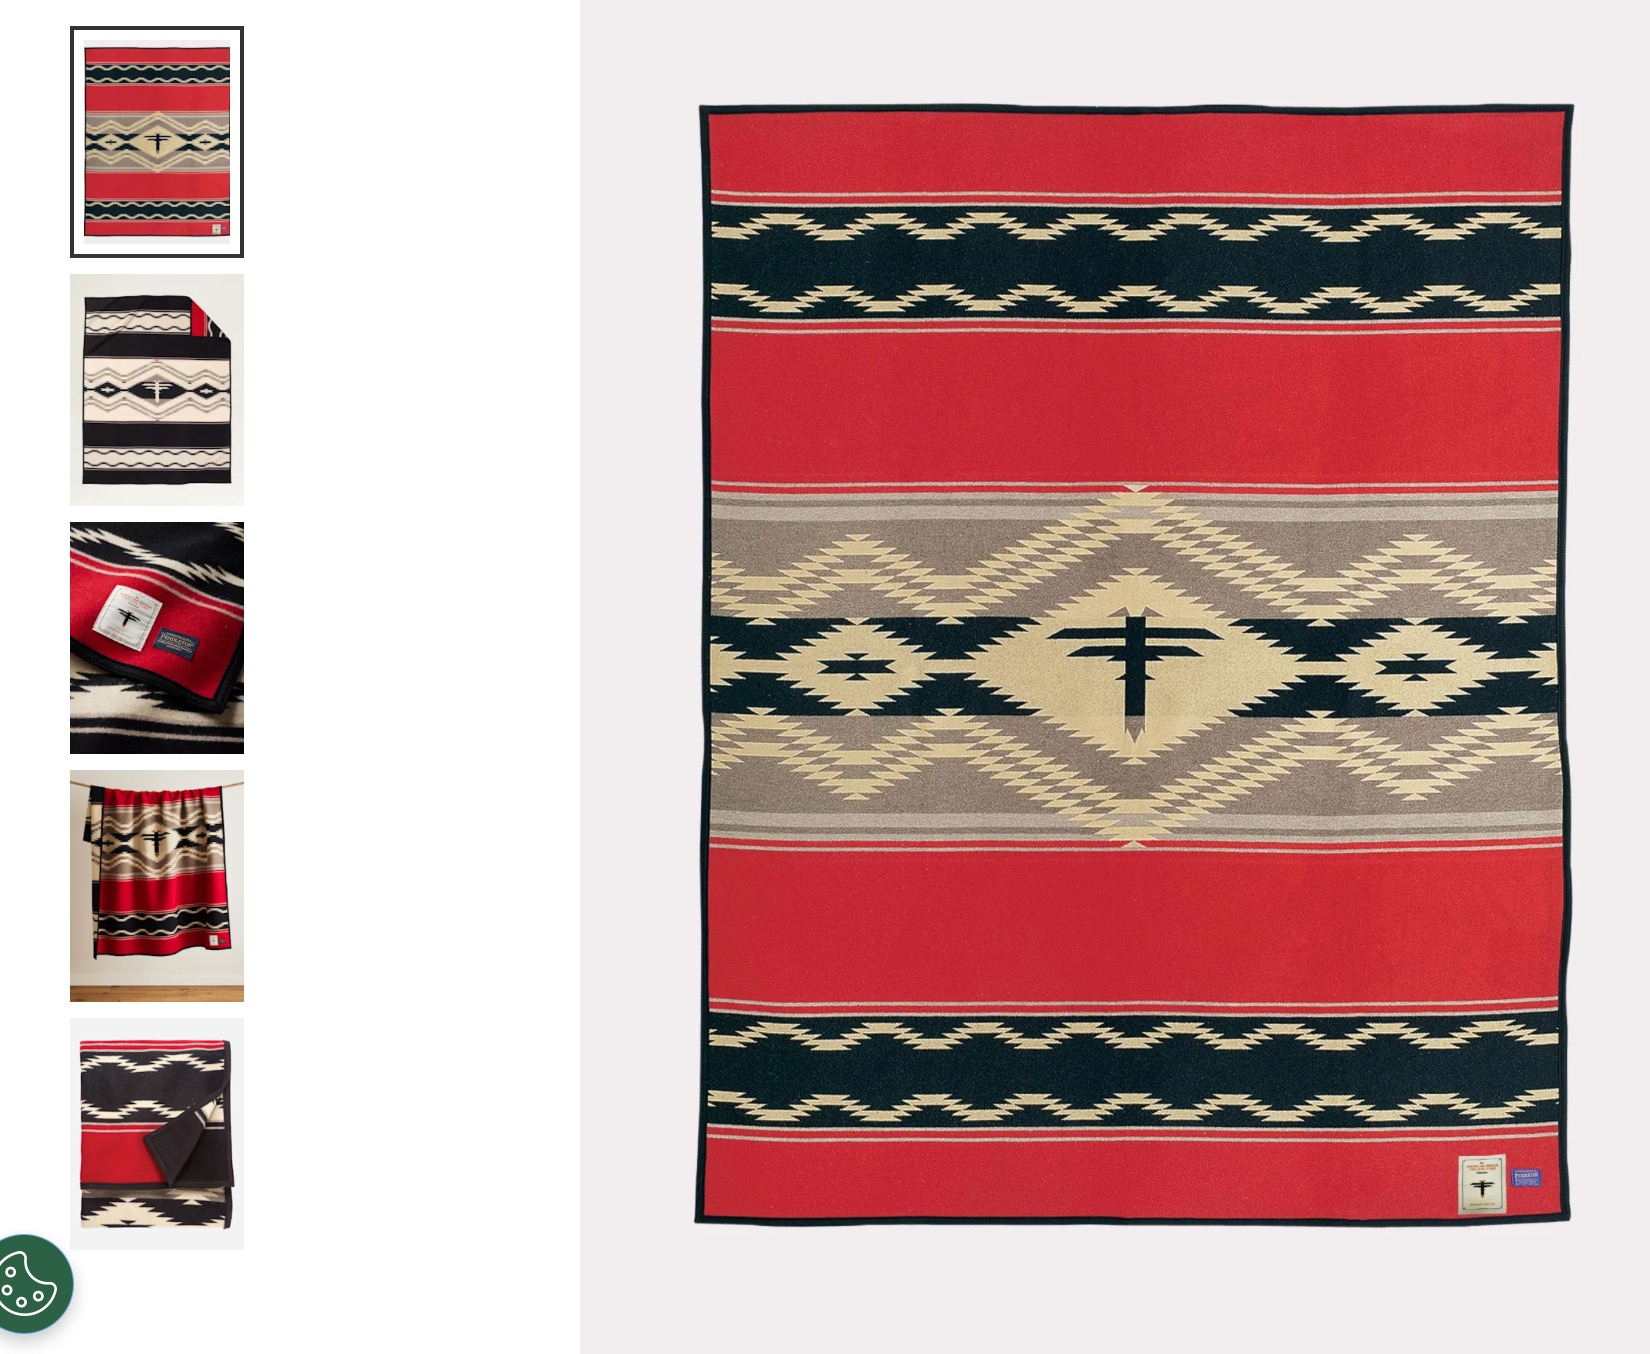
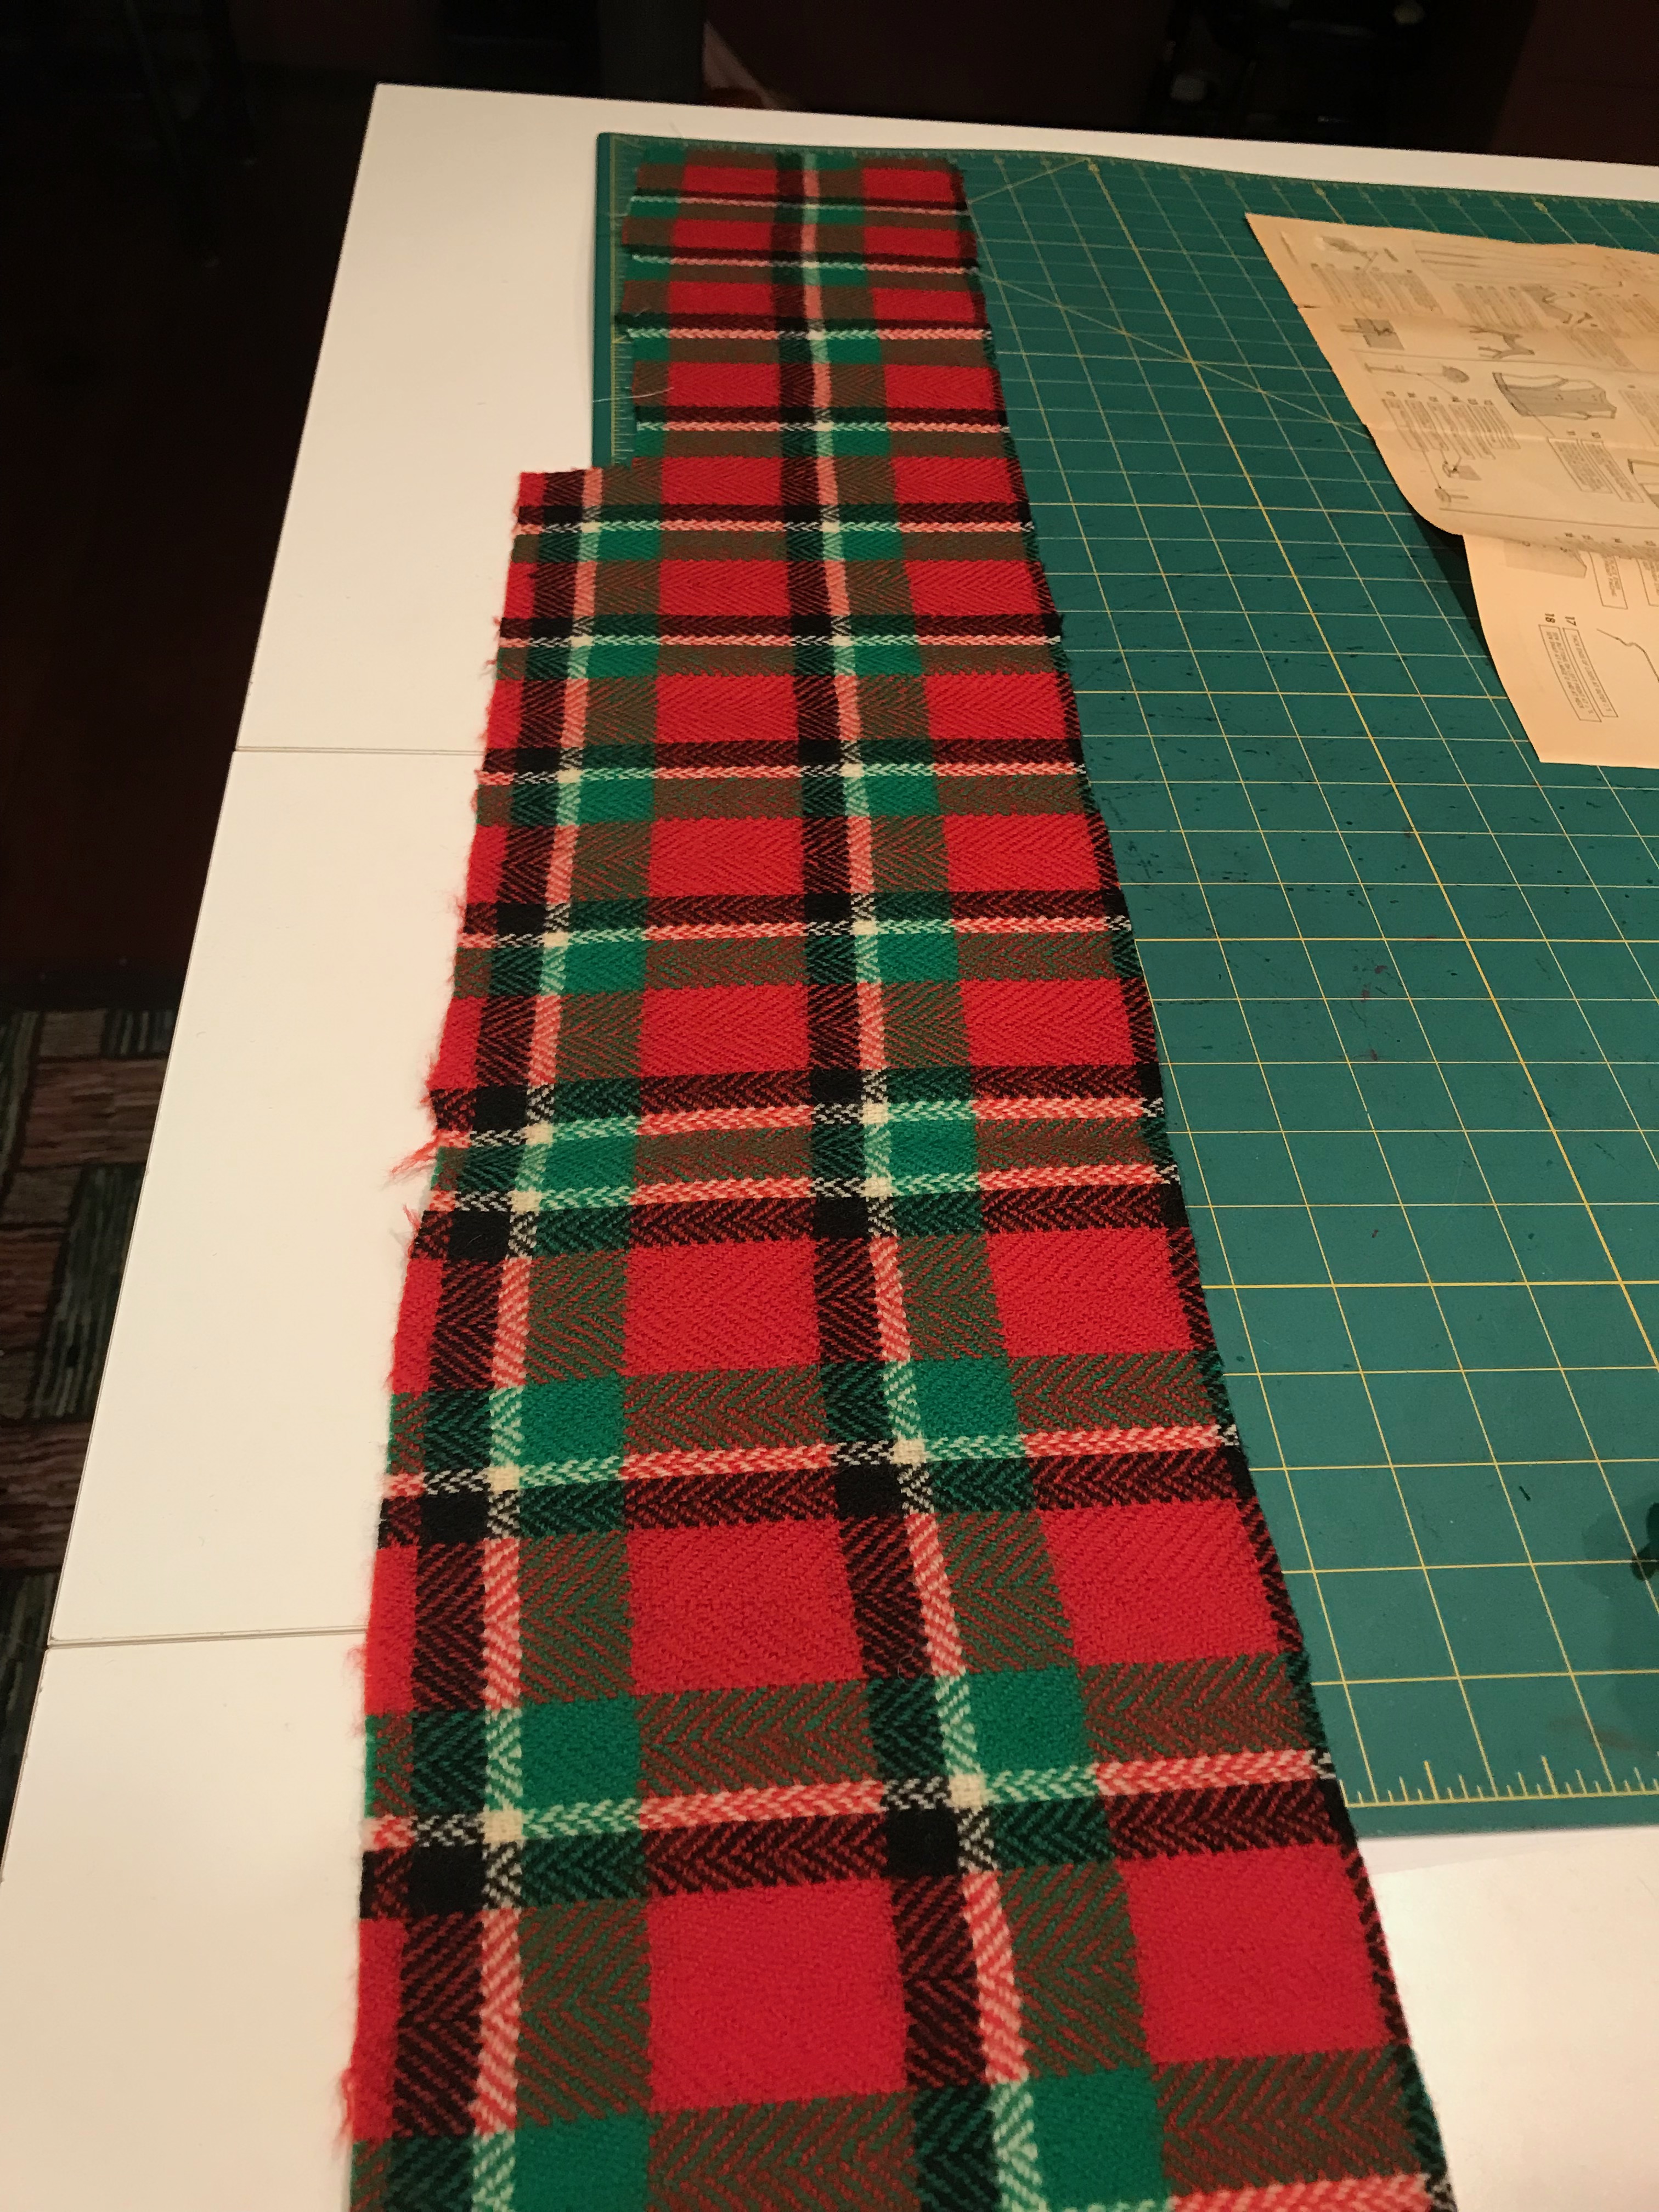
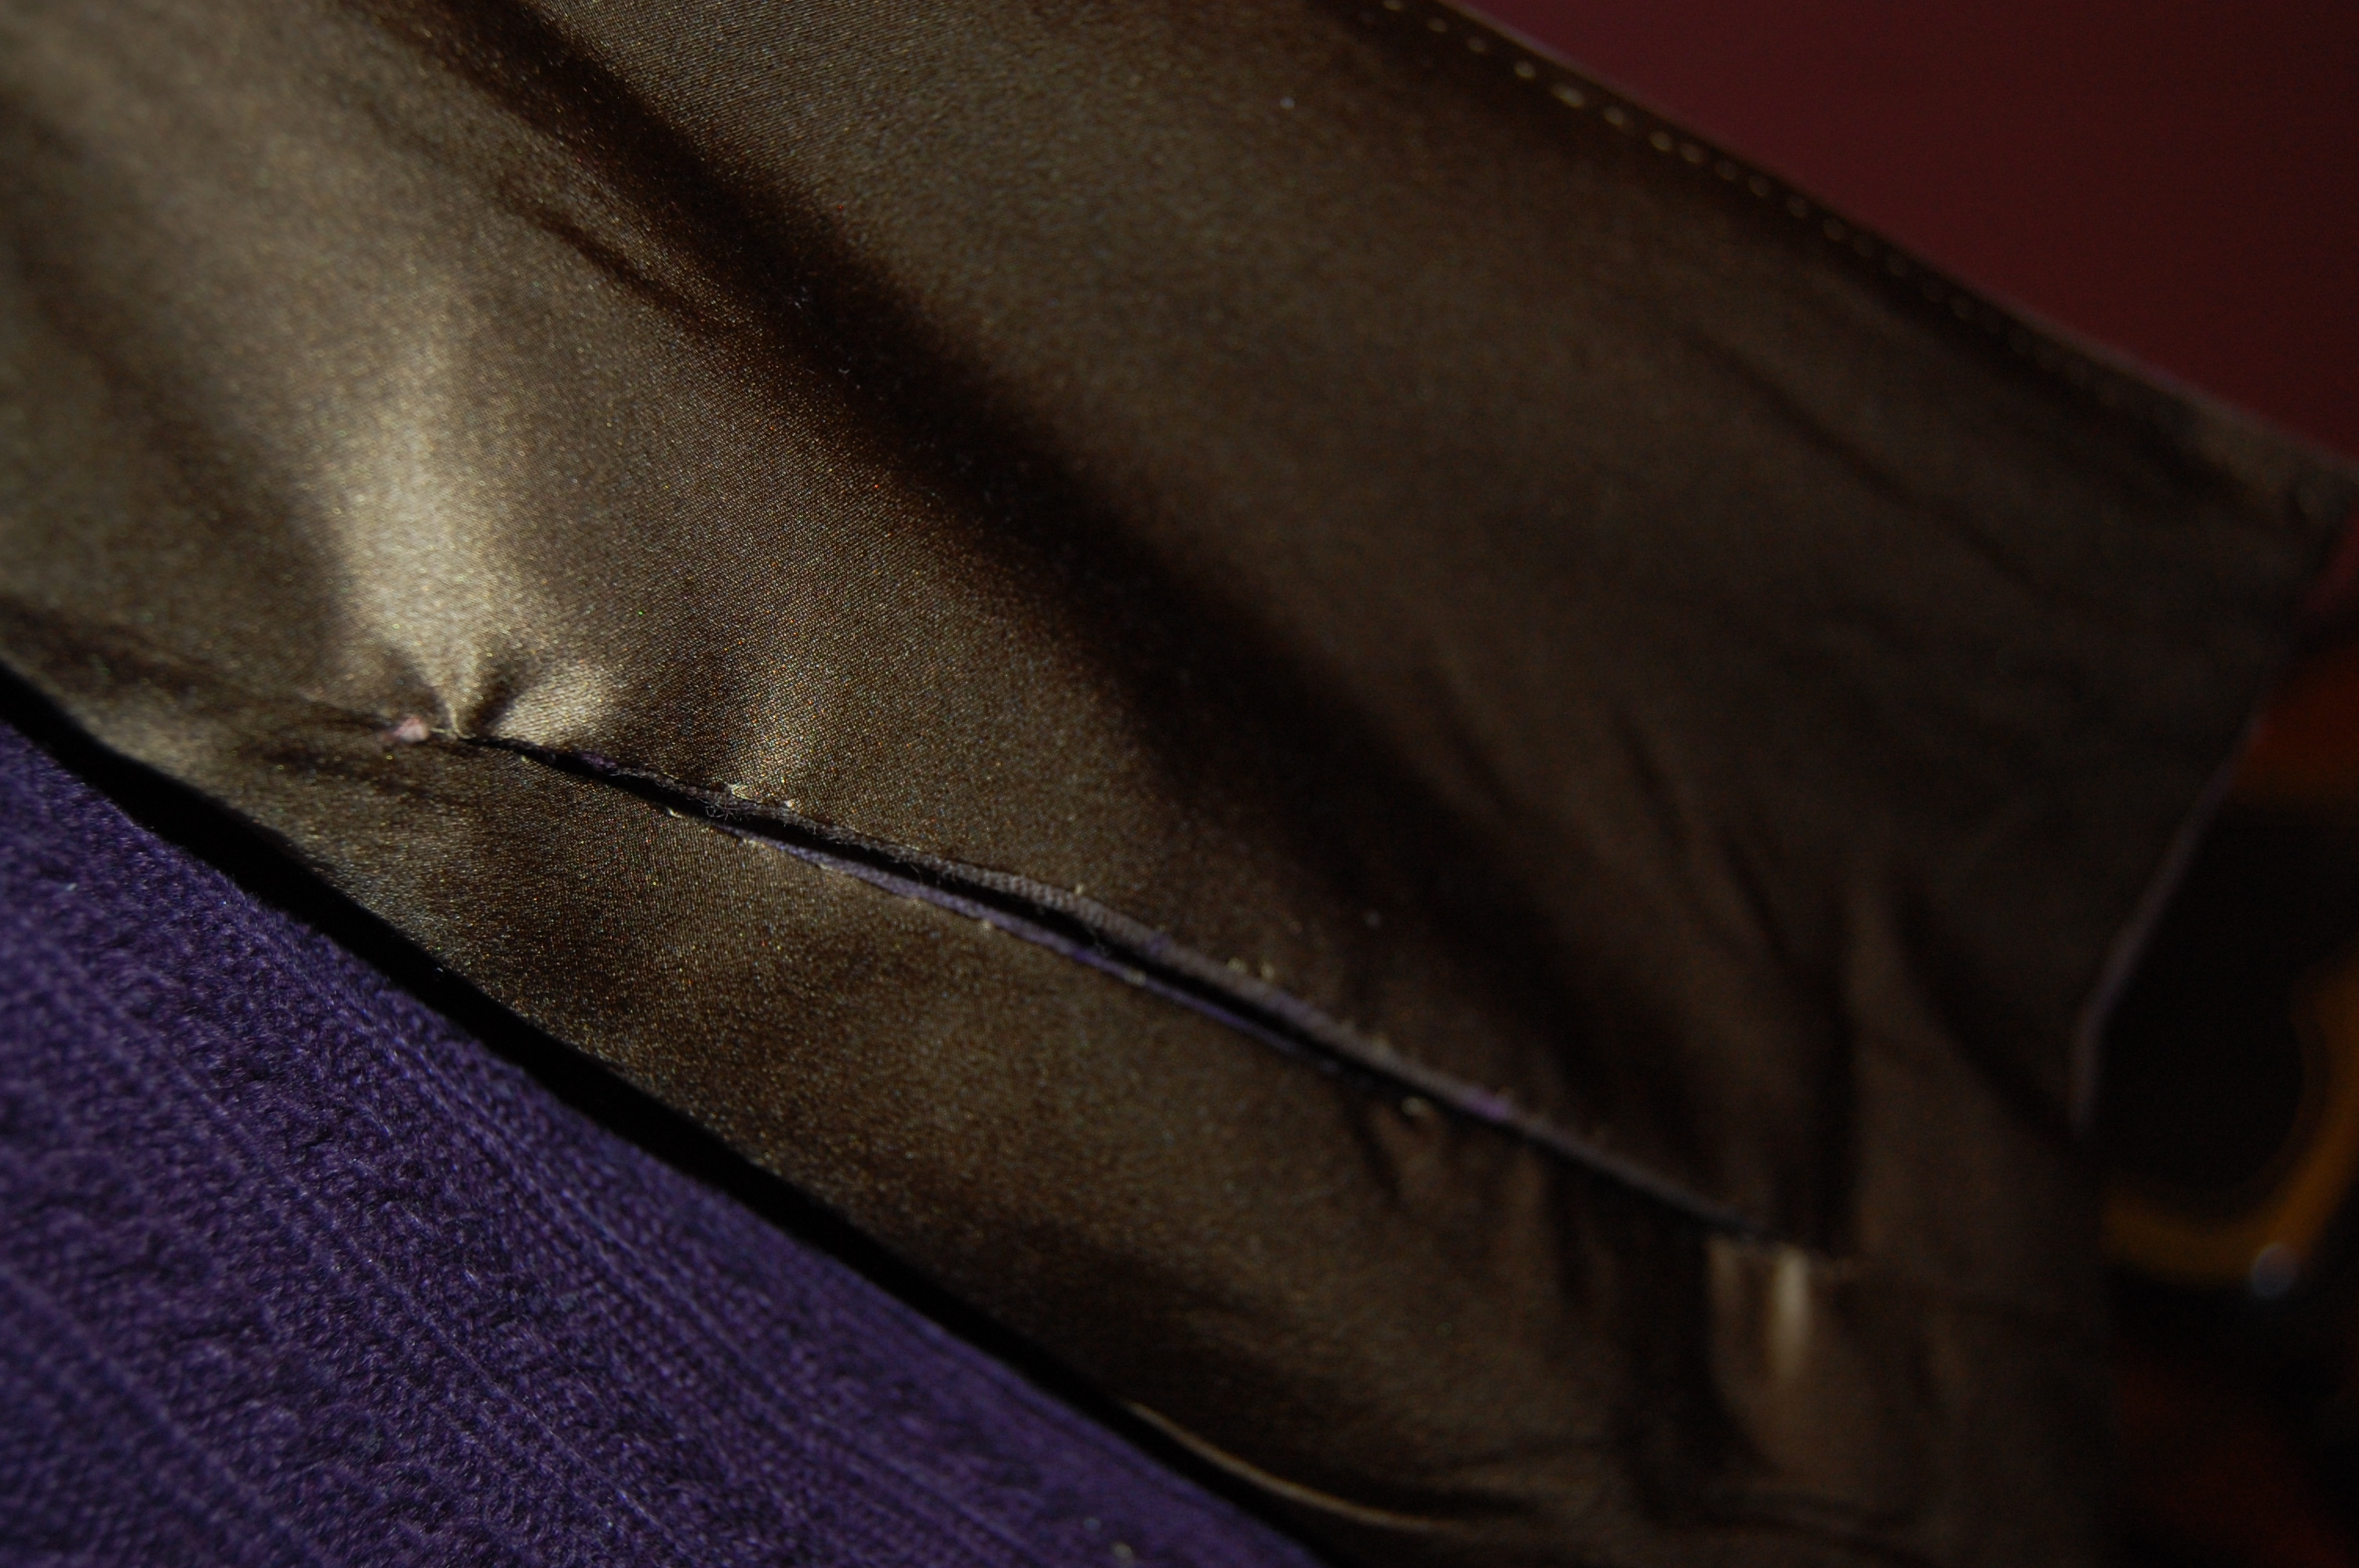
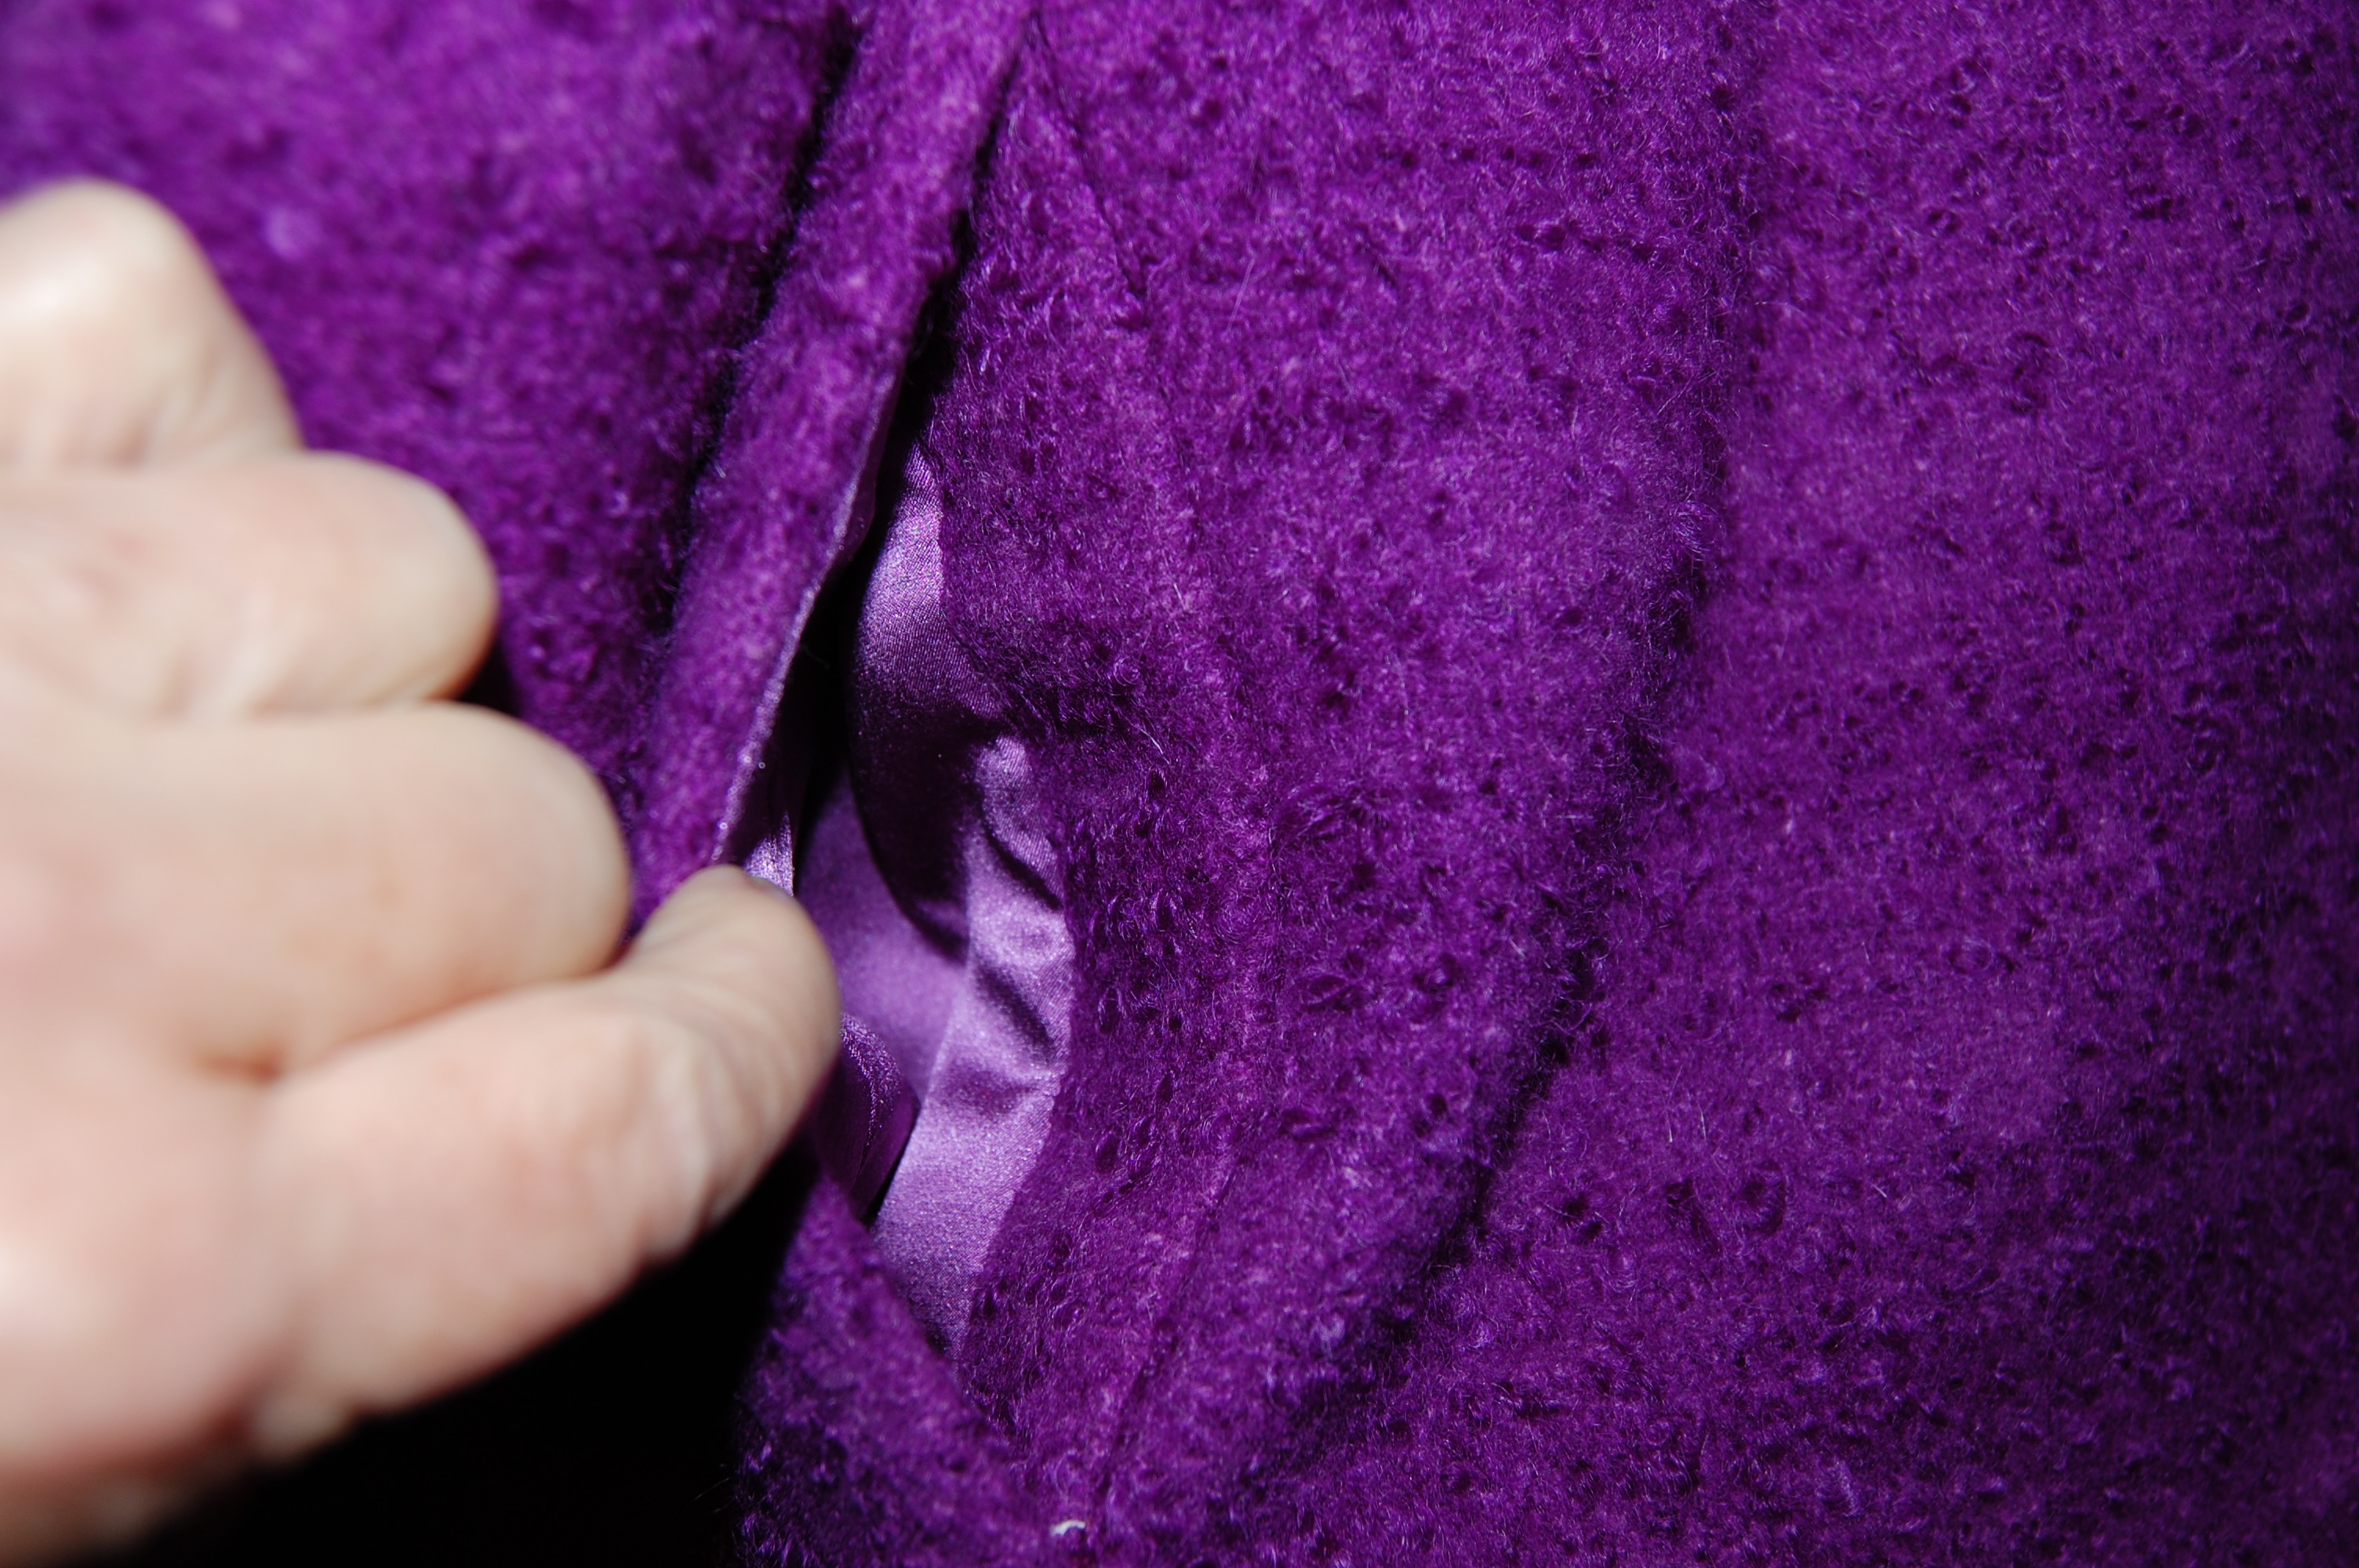
Could I possibly get two projects out of one twin sized blanket (the only size produced in this design)?  The chair seat back AND a jacket? I thought so but it would be tight – and a gamble at the price point.  Not one to shy away from a sewing challenge, I purchased the blanket. This was either going to be a very expensive upholstered seat back OR a “twofer” bargain which would give me both a new look for my chair and a one-of-a-kind jacket. I figured I would know my fate sometime over the course of the next several months.

The first step was to get the chair and the blanket to an upholsterer, which I did.  Relinquishing the blanket to him, I explained my intention of making a jacket out of the leftover wool. He looked at me dubiously. 

“I sew a lot,” I explained. 

He still looked at me dubiously. I talked with him about the layout for the seat back.  I hoped, I said to hm, that he could just take from one end of the blanket, leaving about two thirds of it intact?  He nodded in understanding. He said he would do what he could. I’m sure he thought I was crazy.

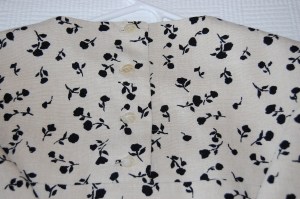
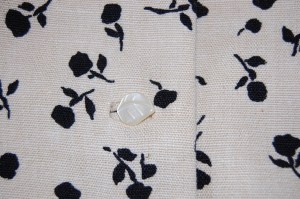
The upholsterer is a busy guy, so it took several weeks before the chair was ready.  But when he returned it to me, not only did it look terrific, but the remainder of the blanket was about the length I thought it would be. I was hopeful.

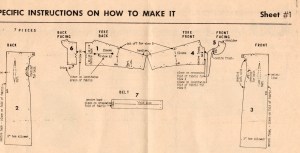
By now it was October, very close to the time when we depart our summer home in Wyoming and head back to Pennsylvania, a time when all sewing comes to a screeching halt as I pack and organize and clean.  The timing turned out to be perfect, however, as most of my vintage patterns were in Pennsylvania – and I needed to look for a jacket pattern for my project.  

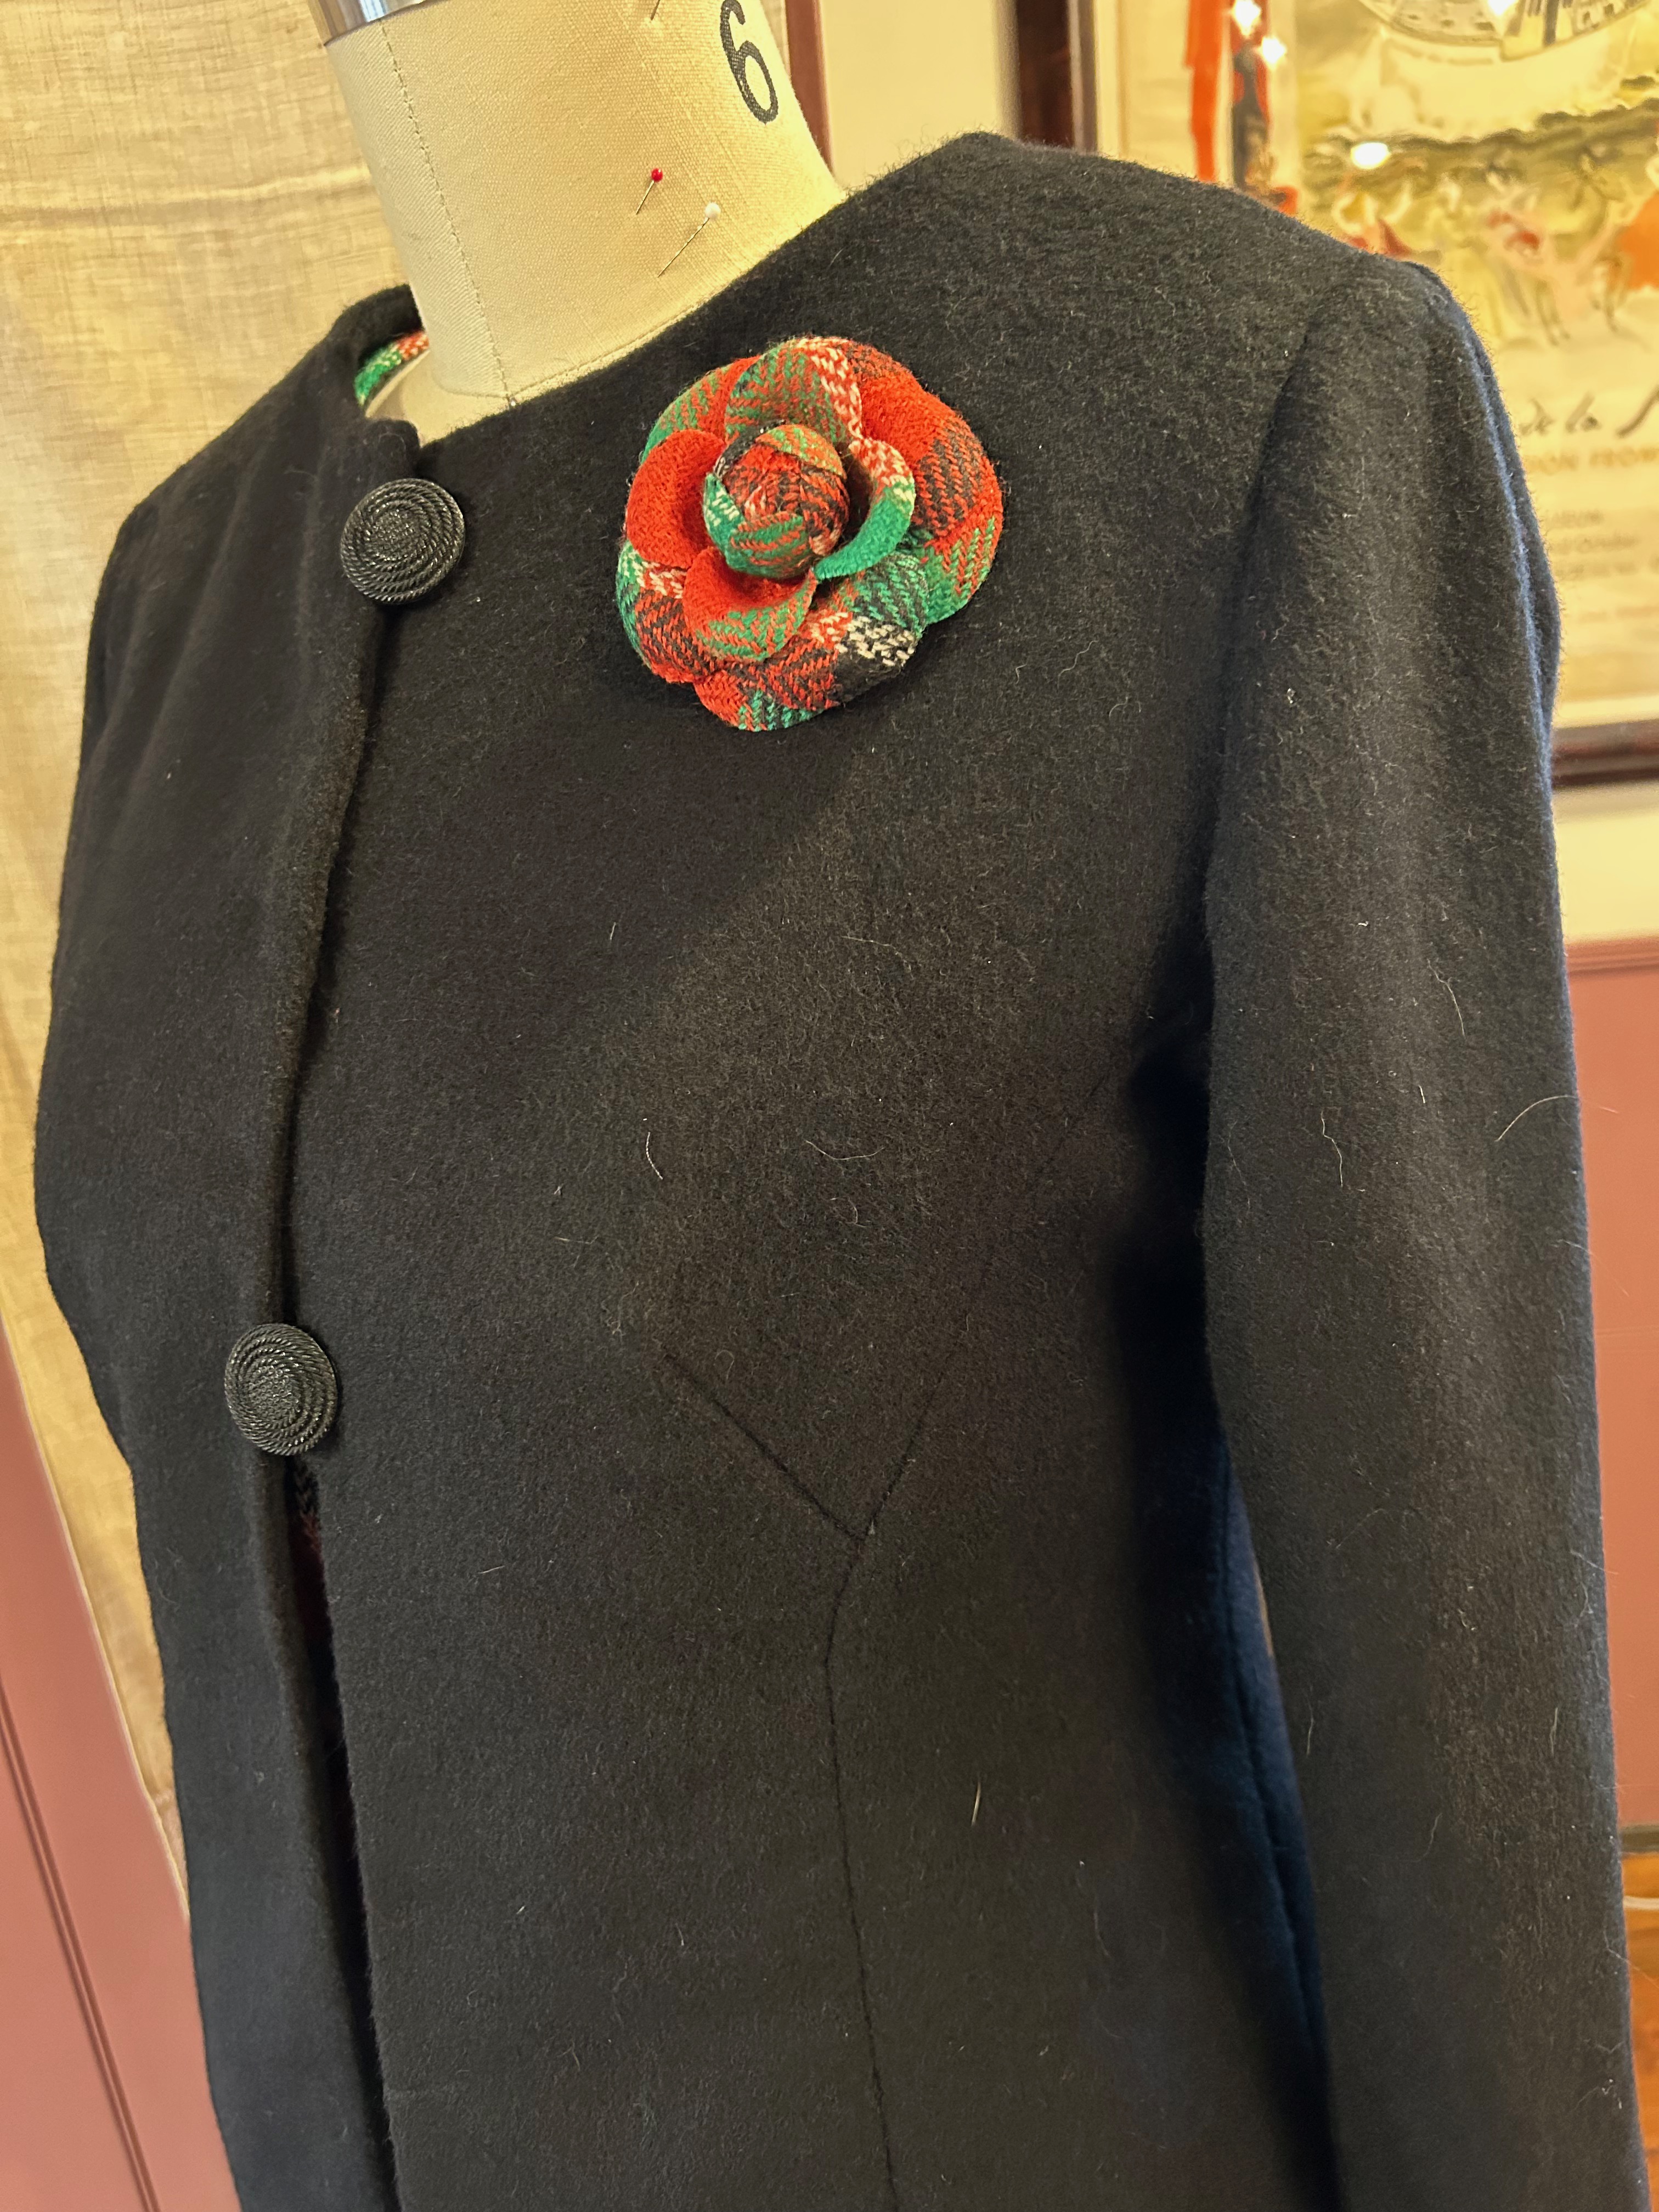
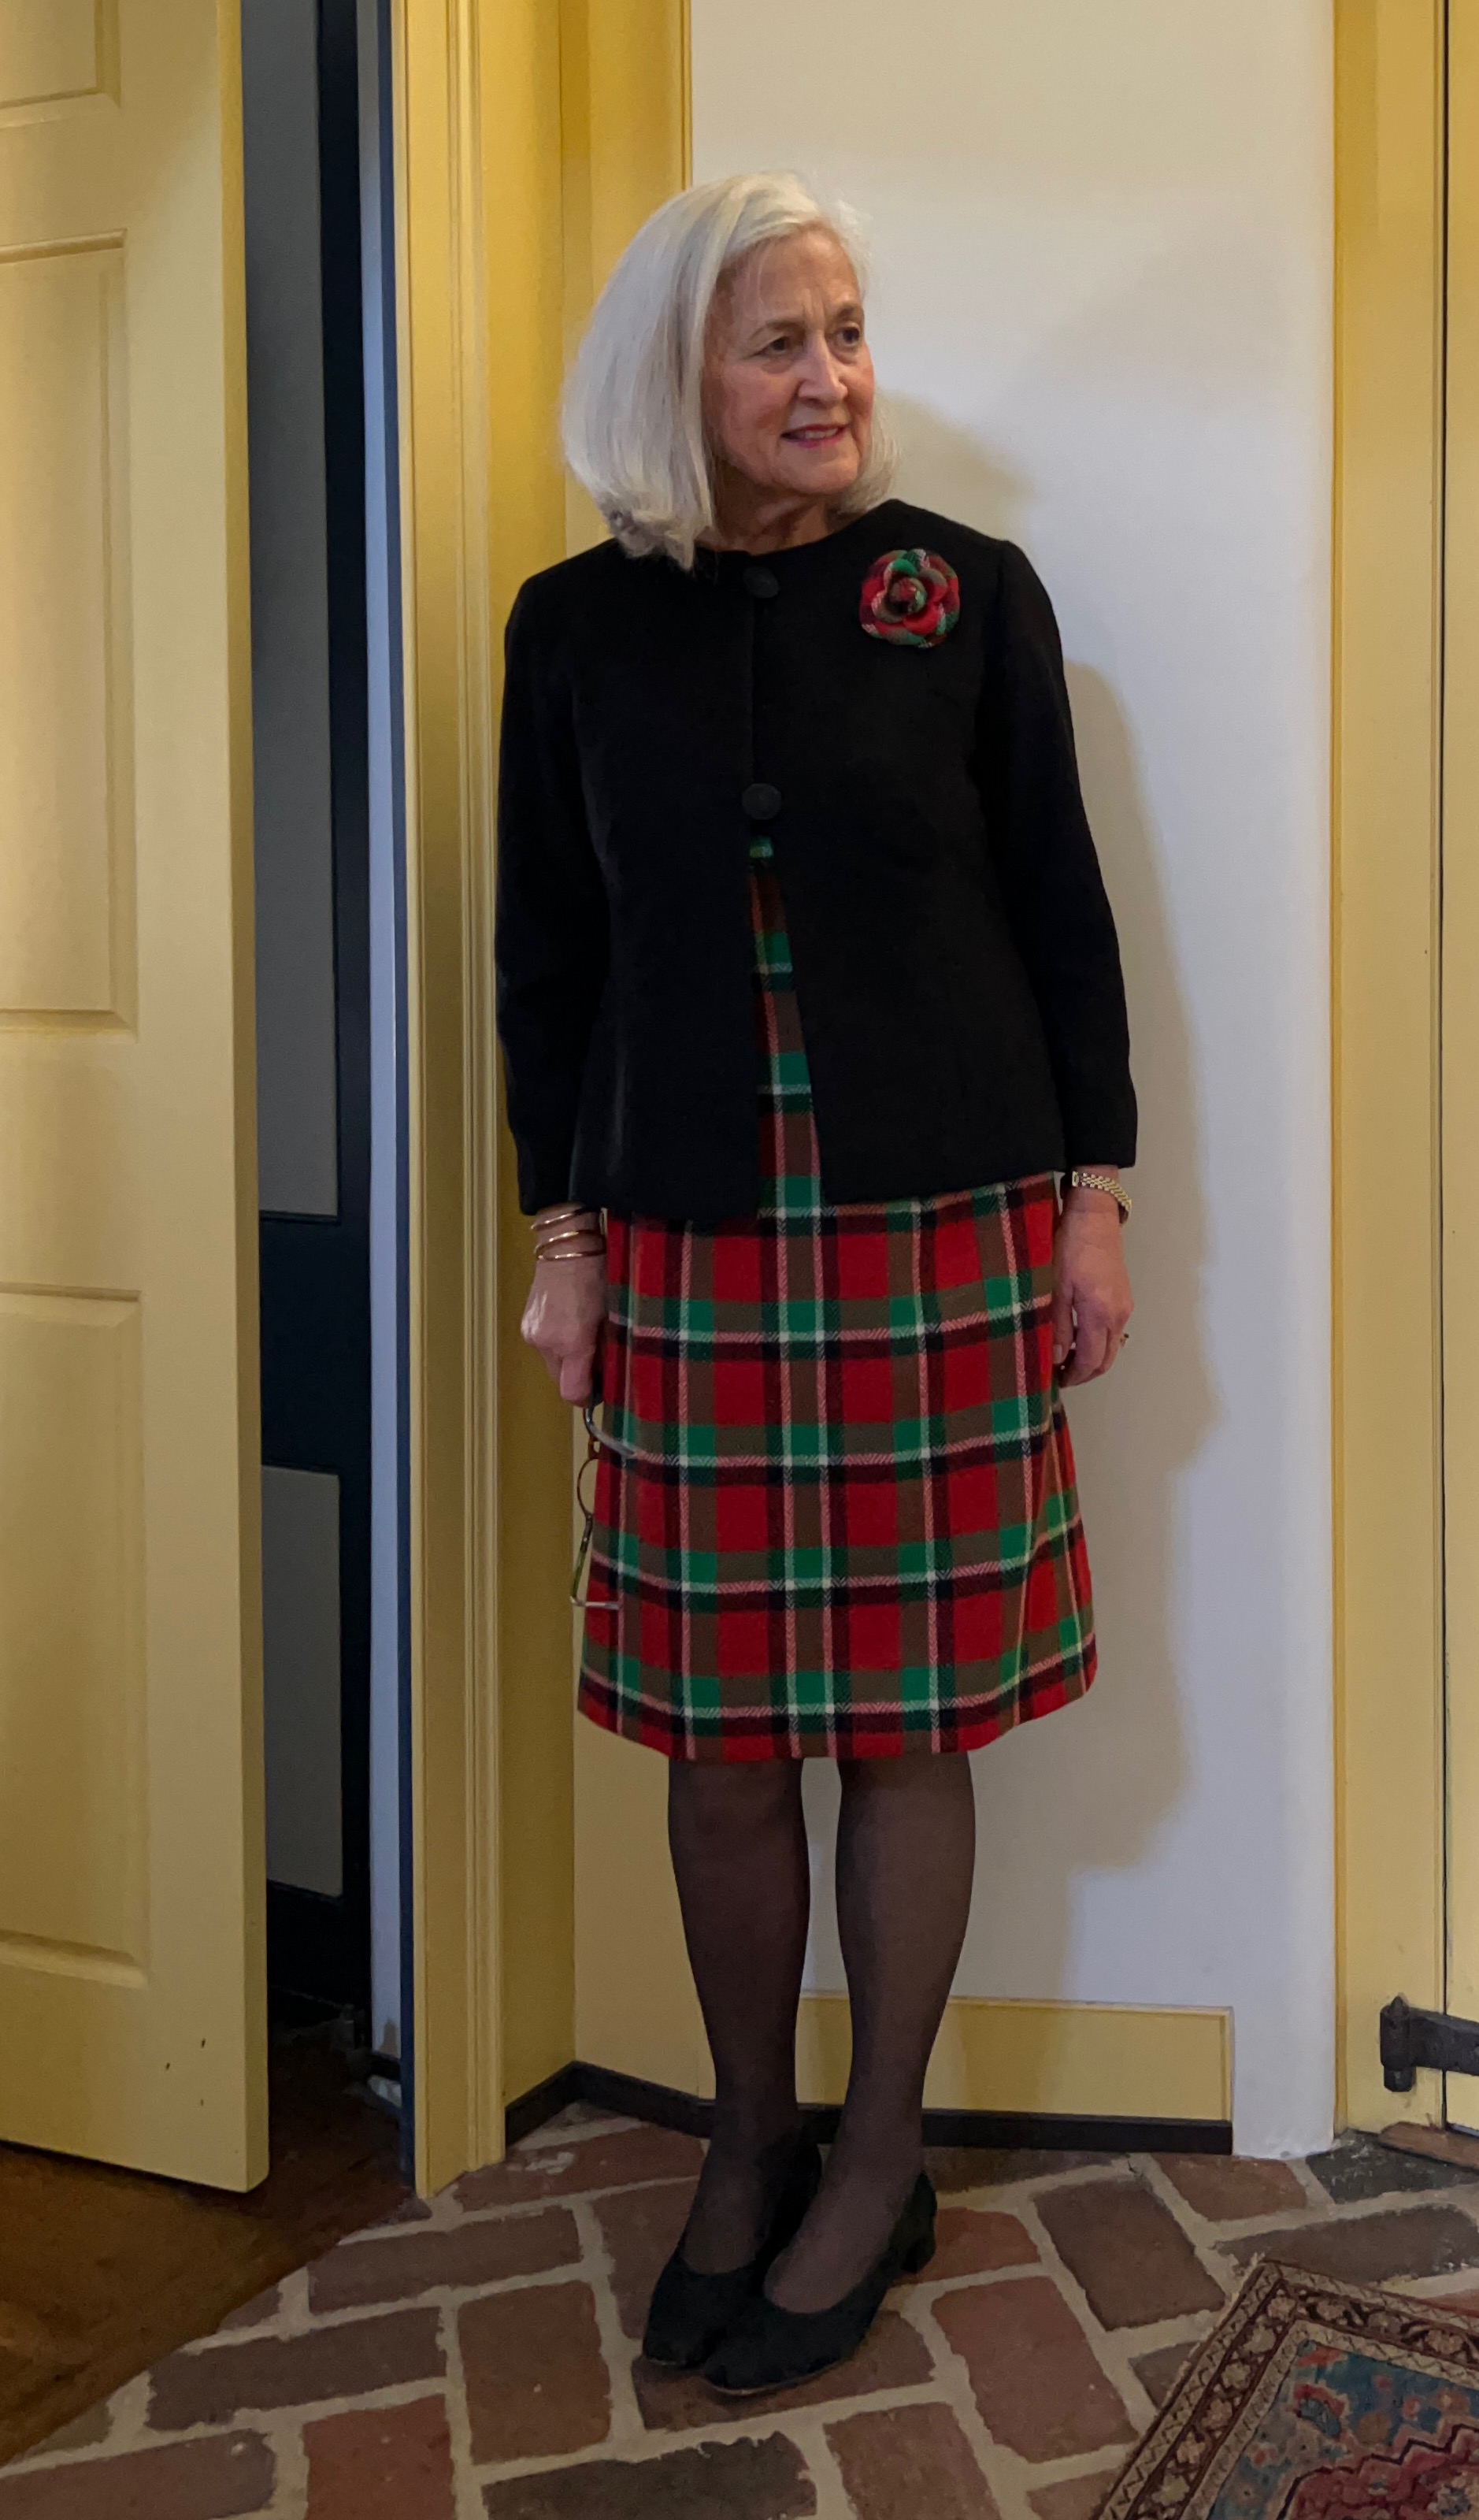
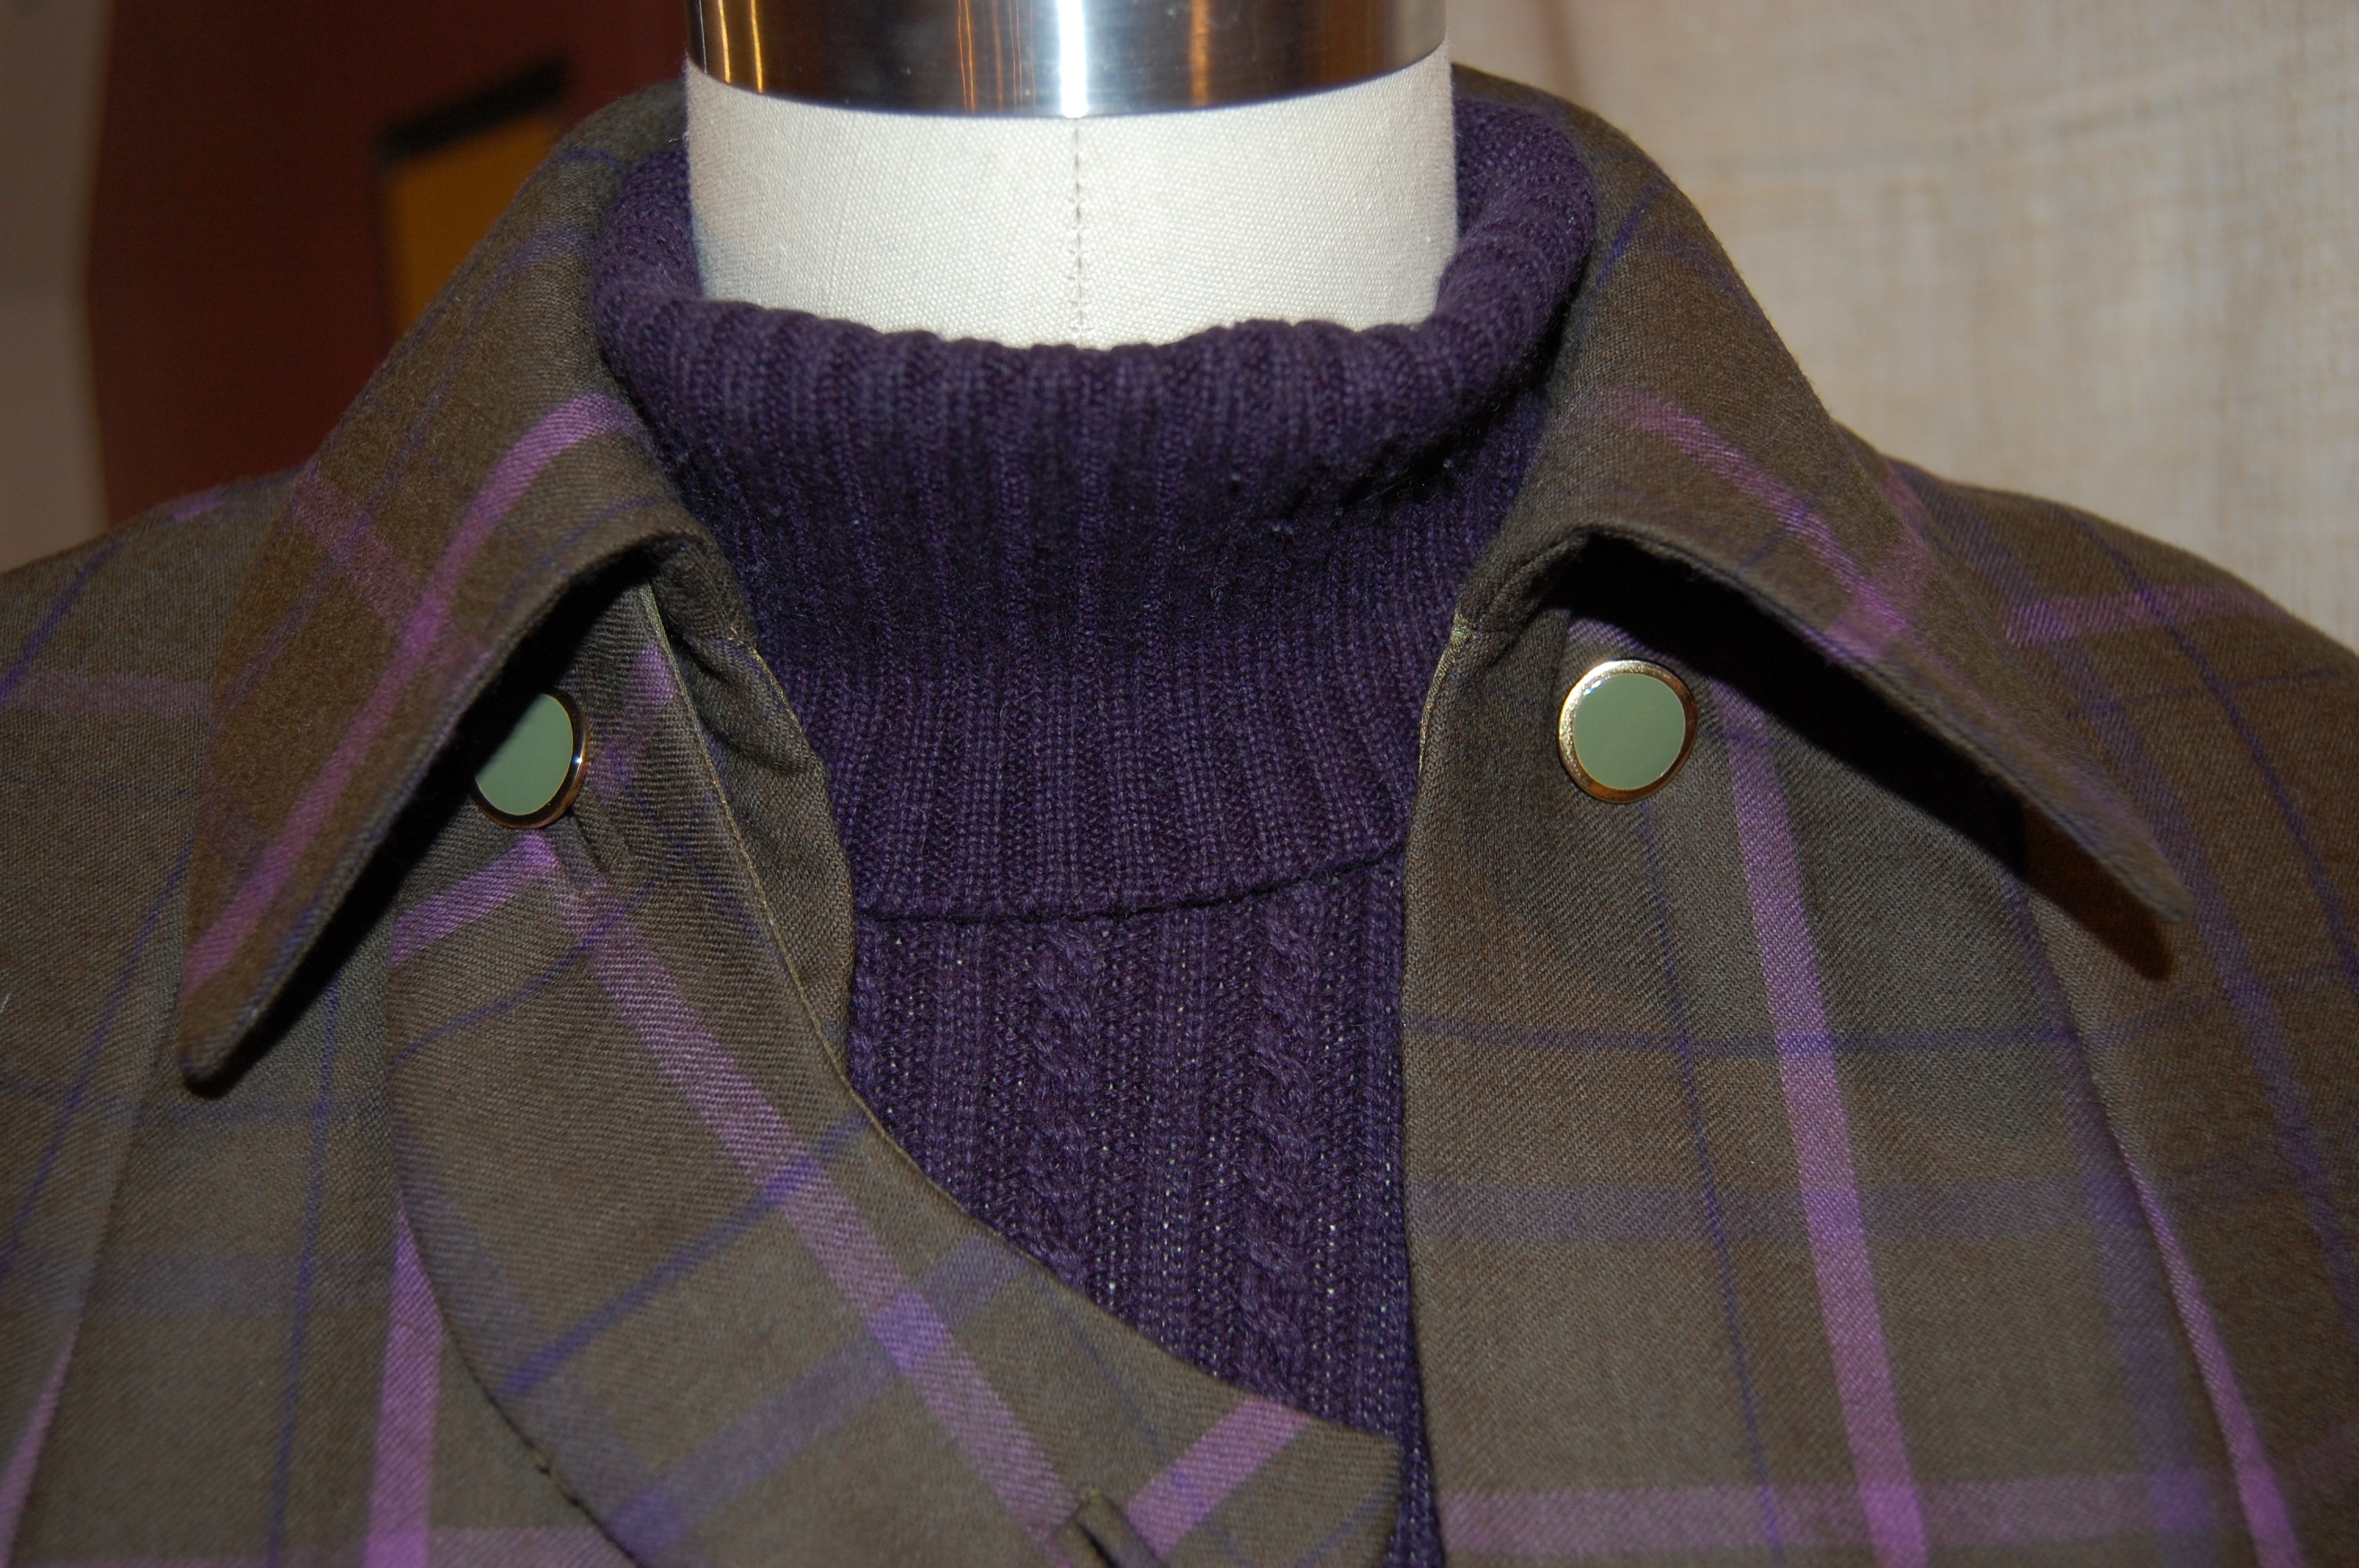
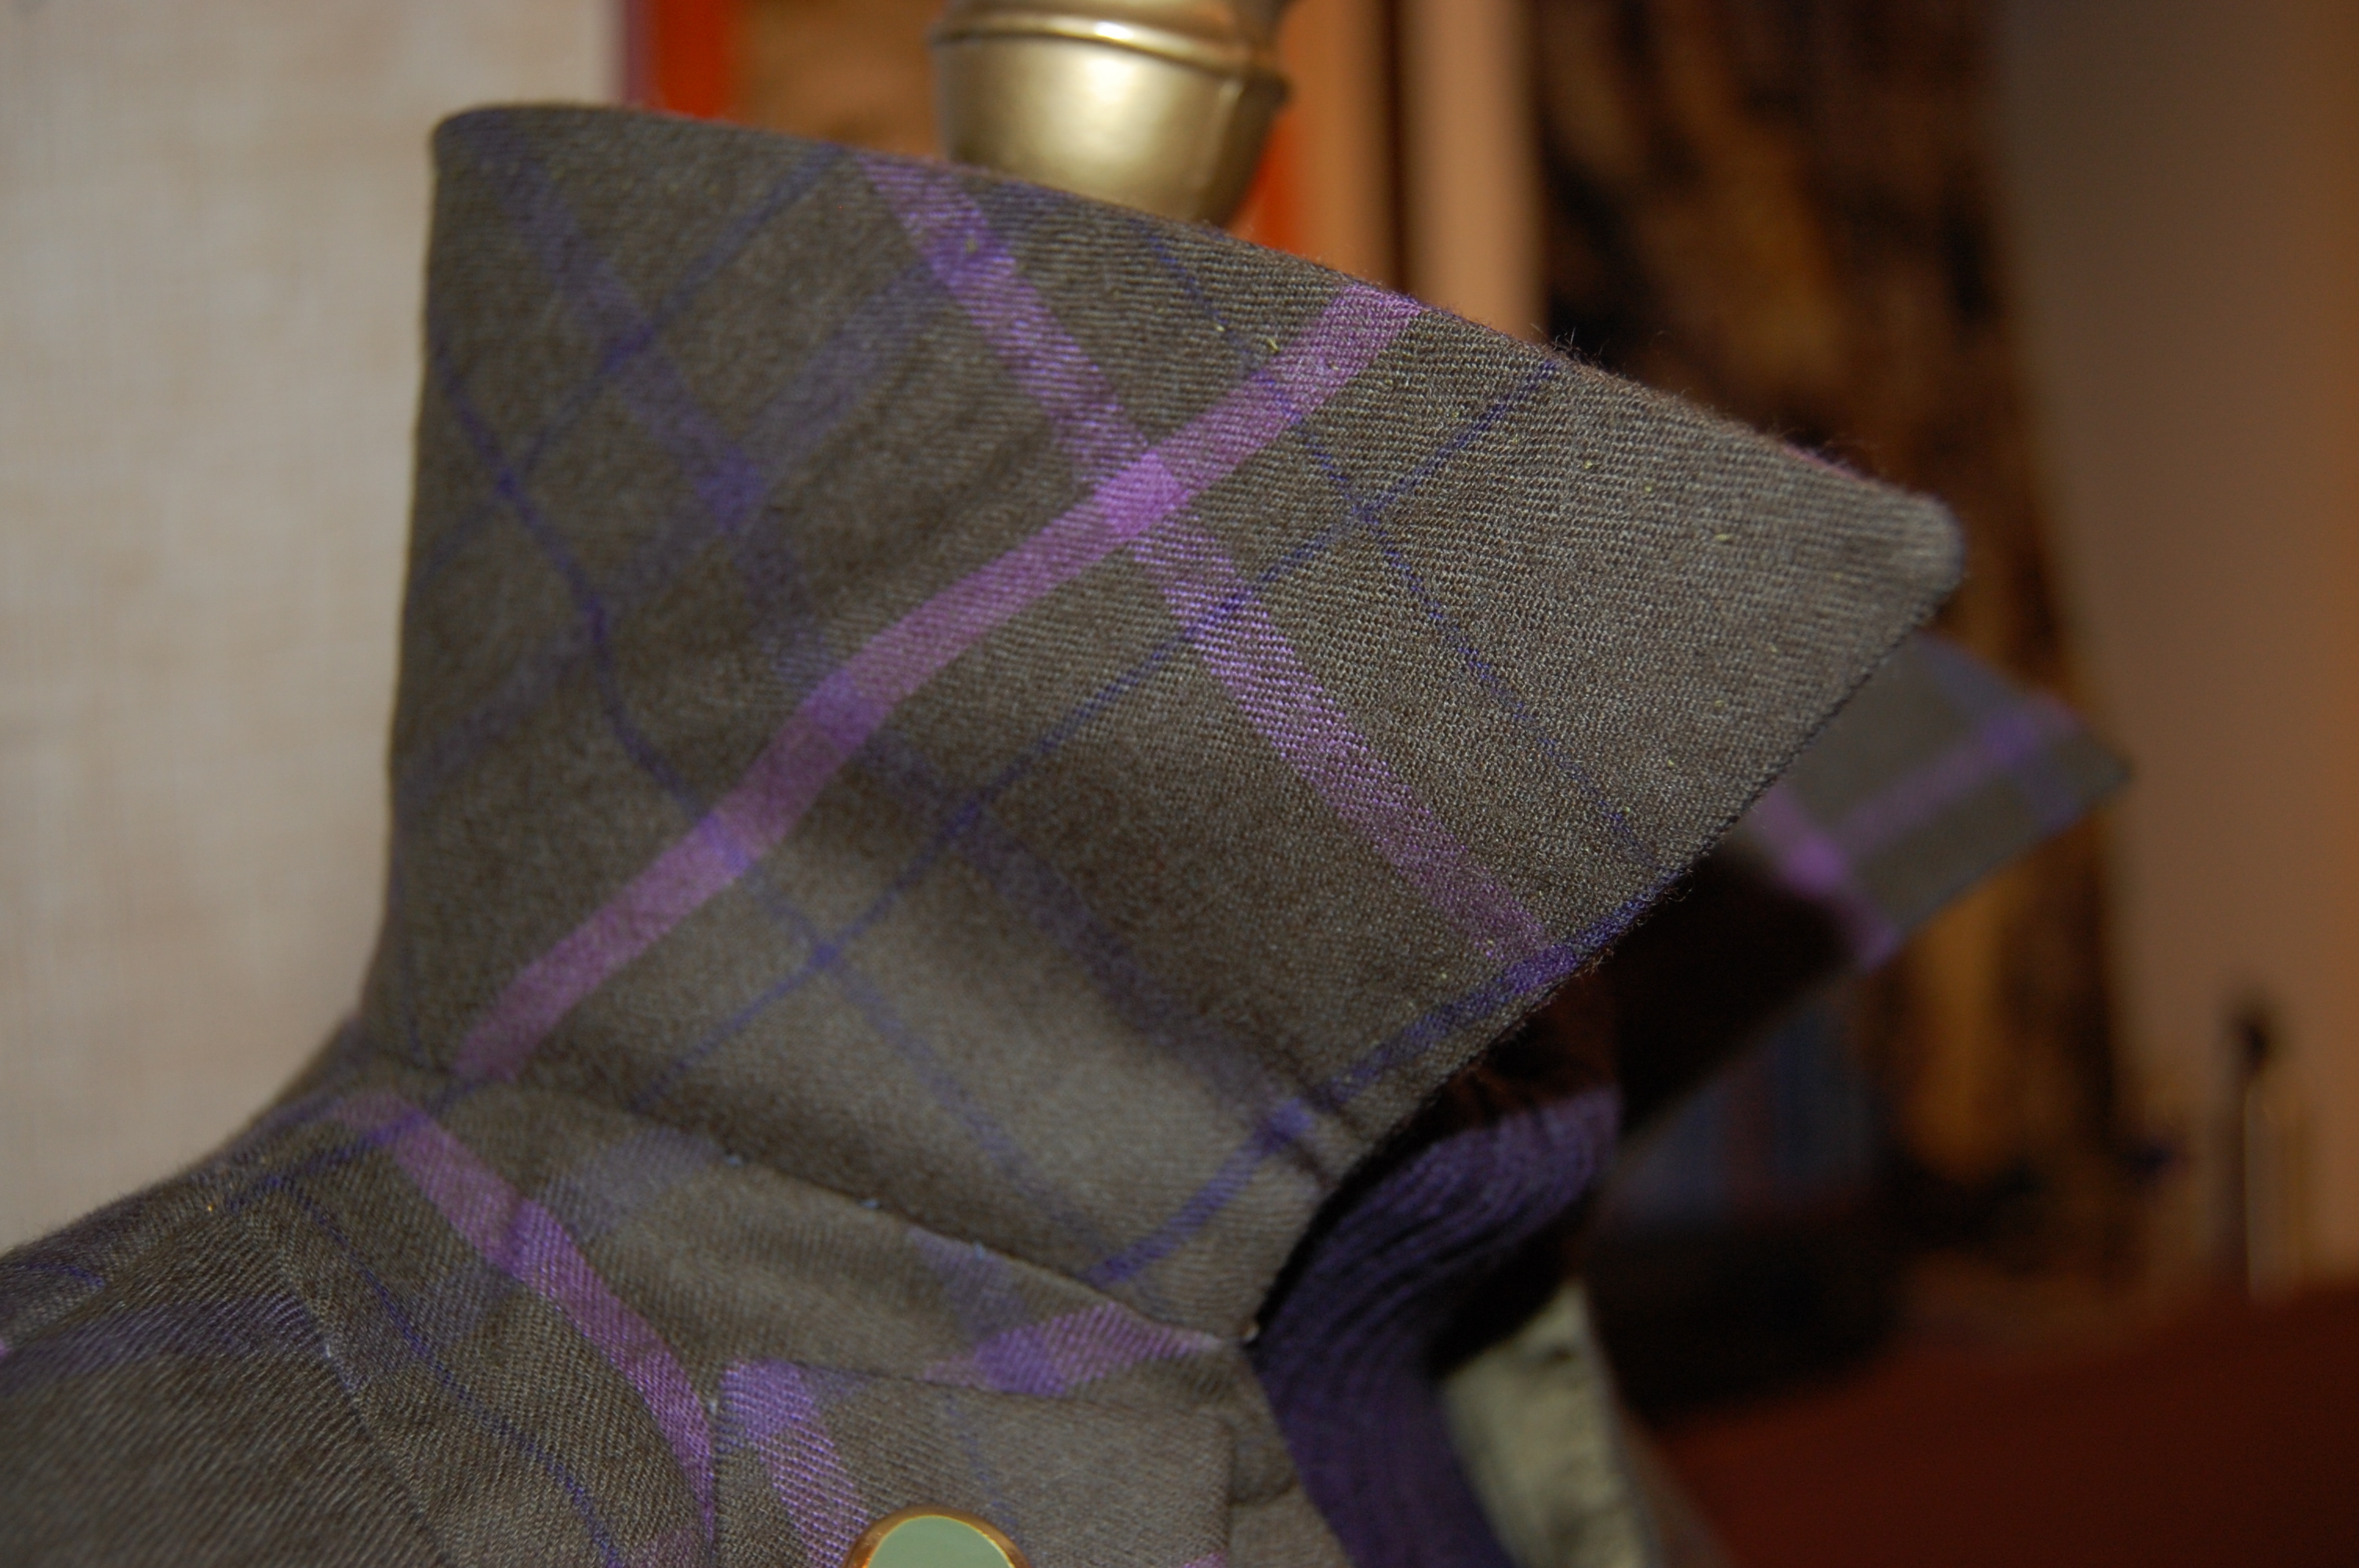
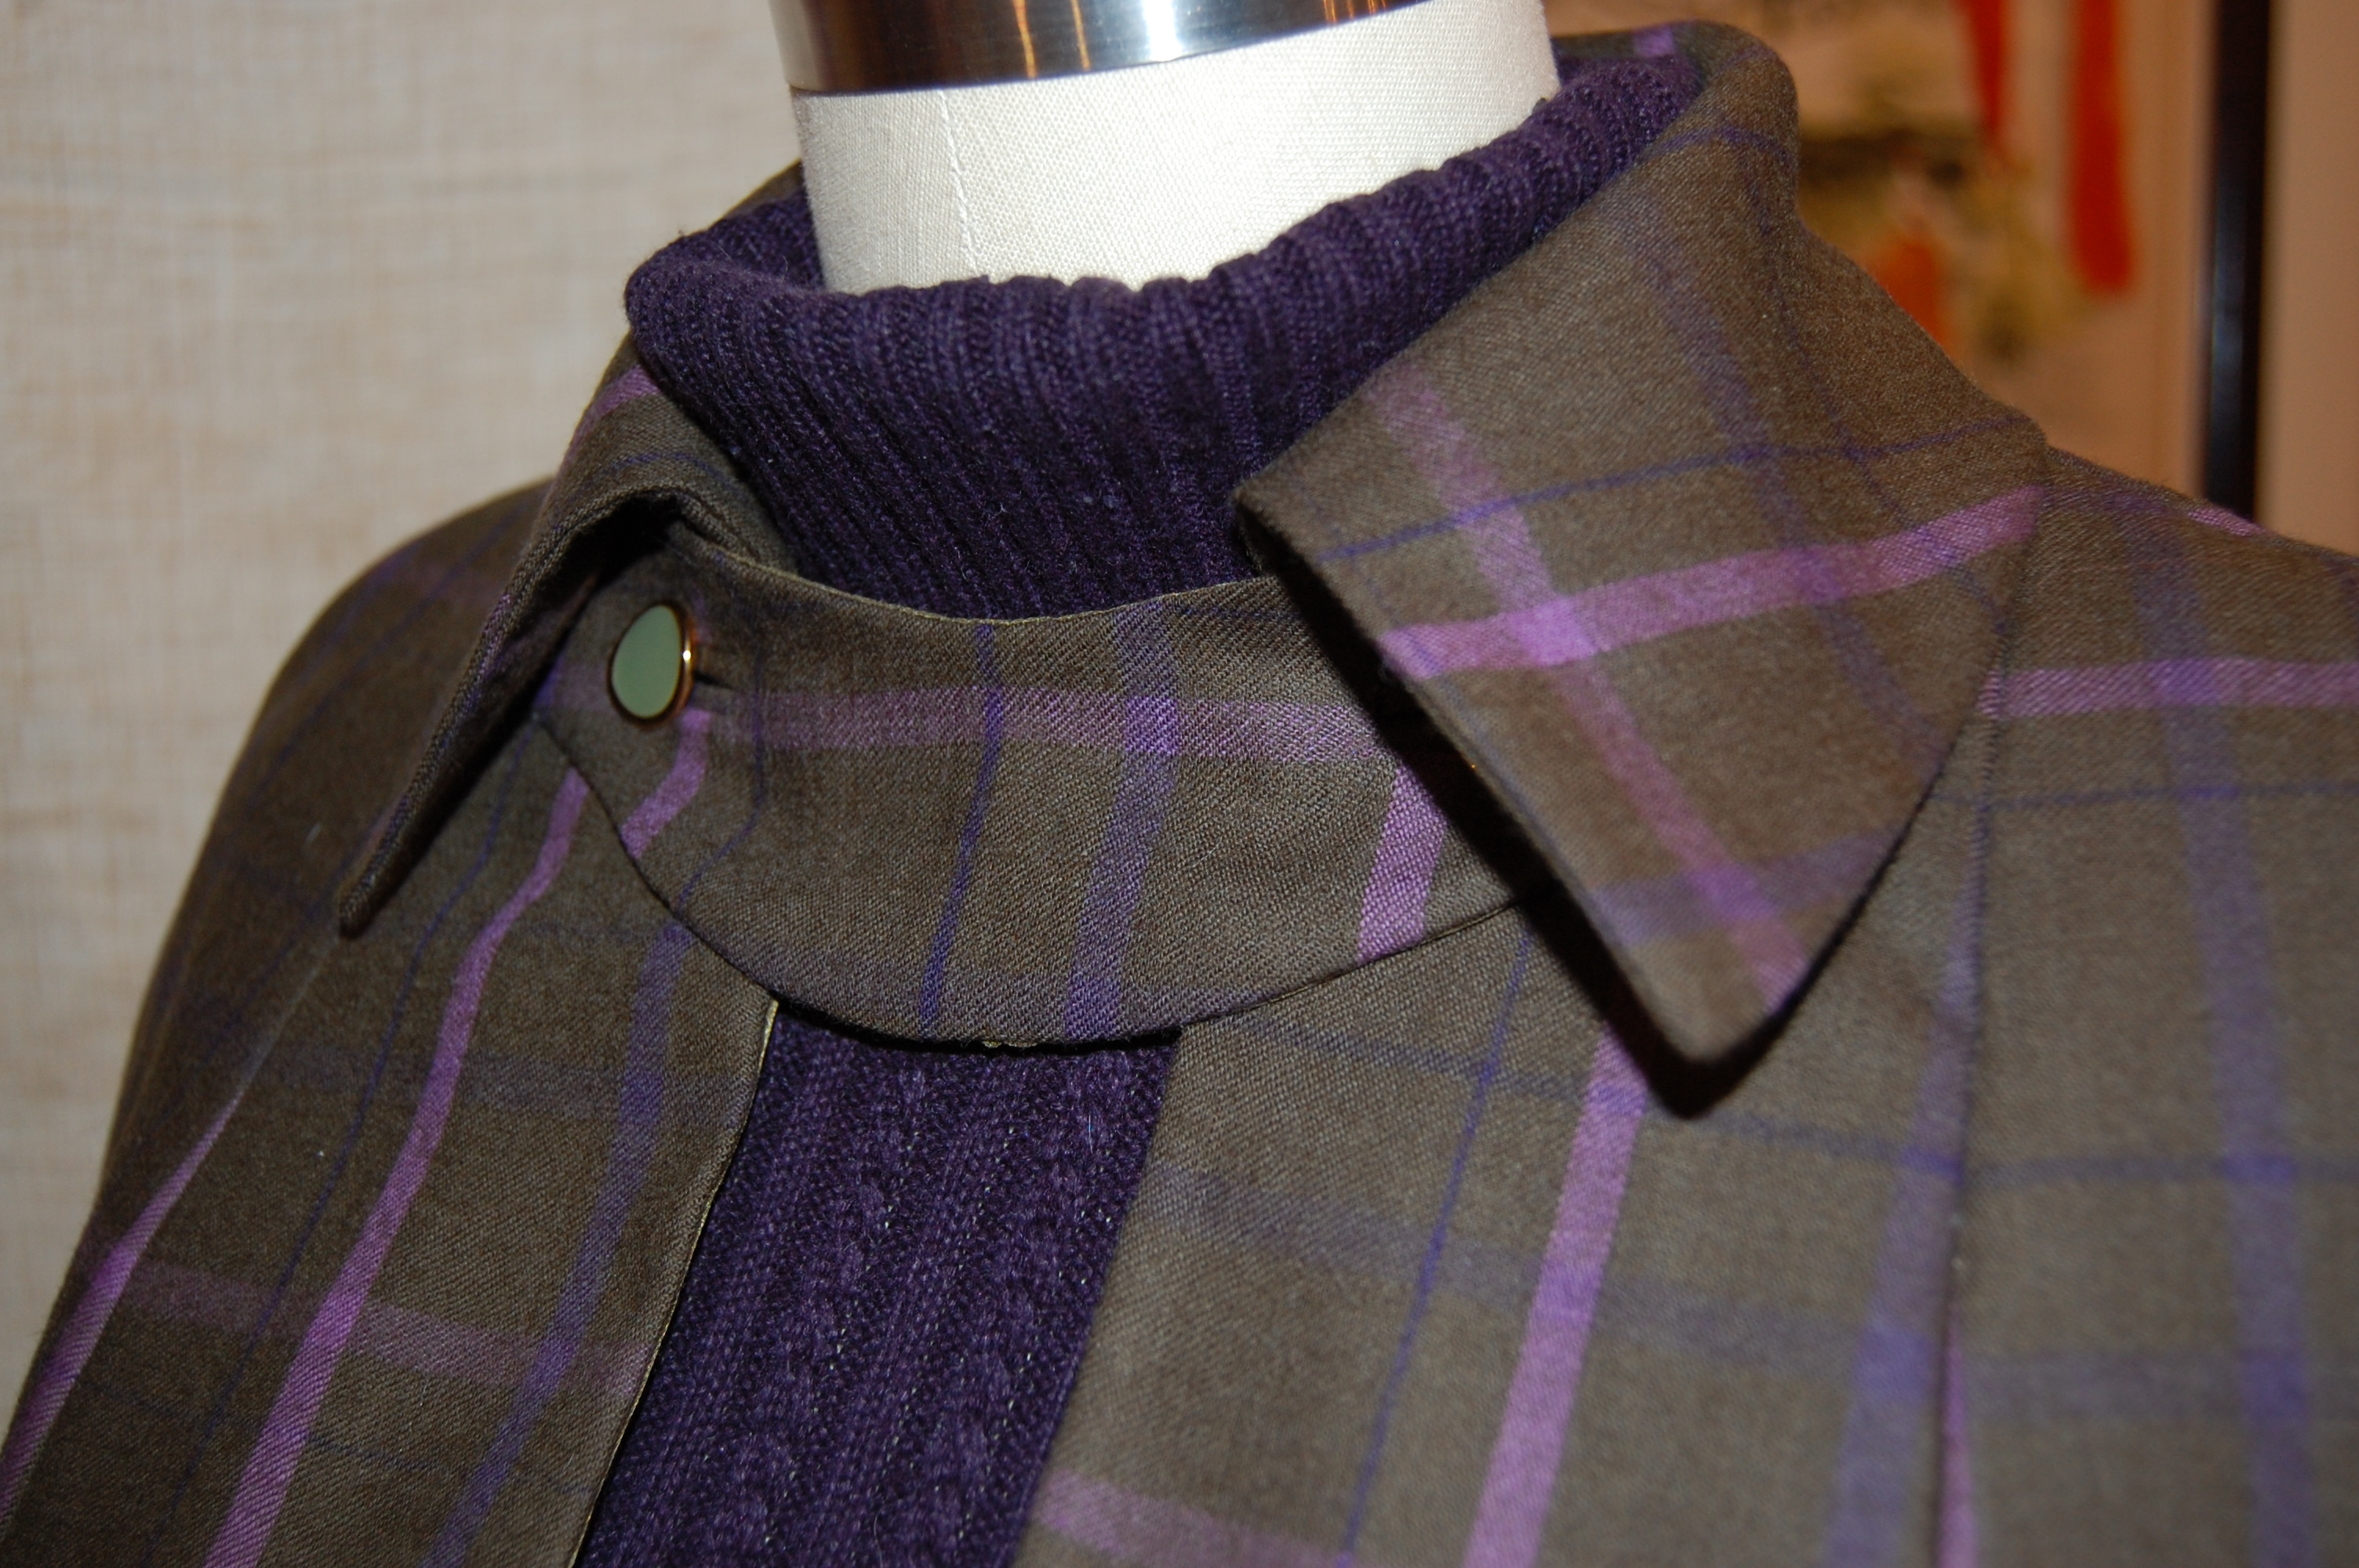
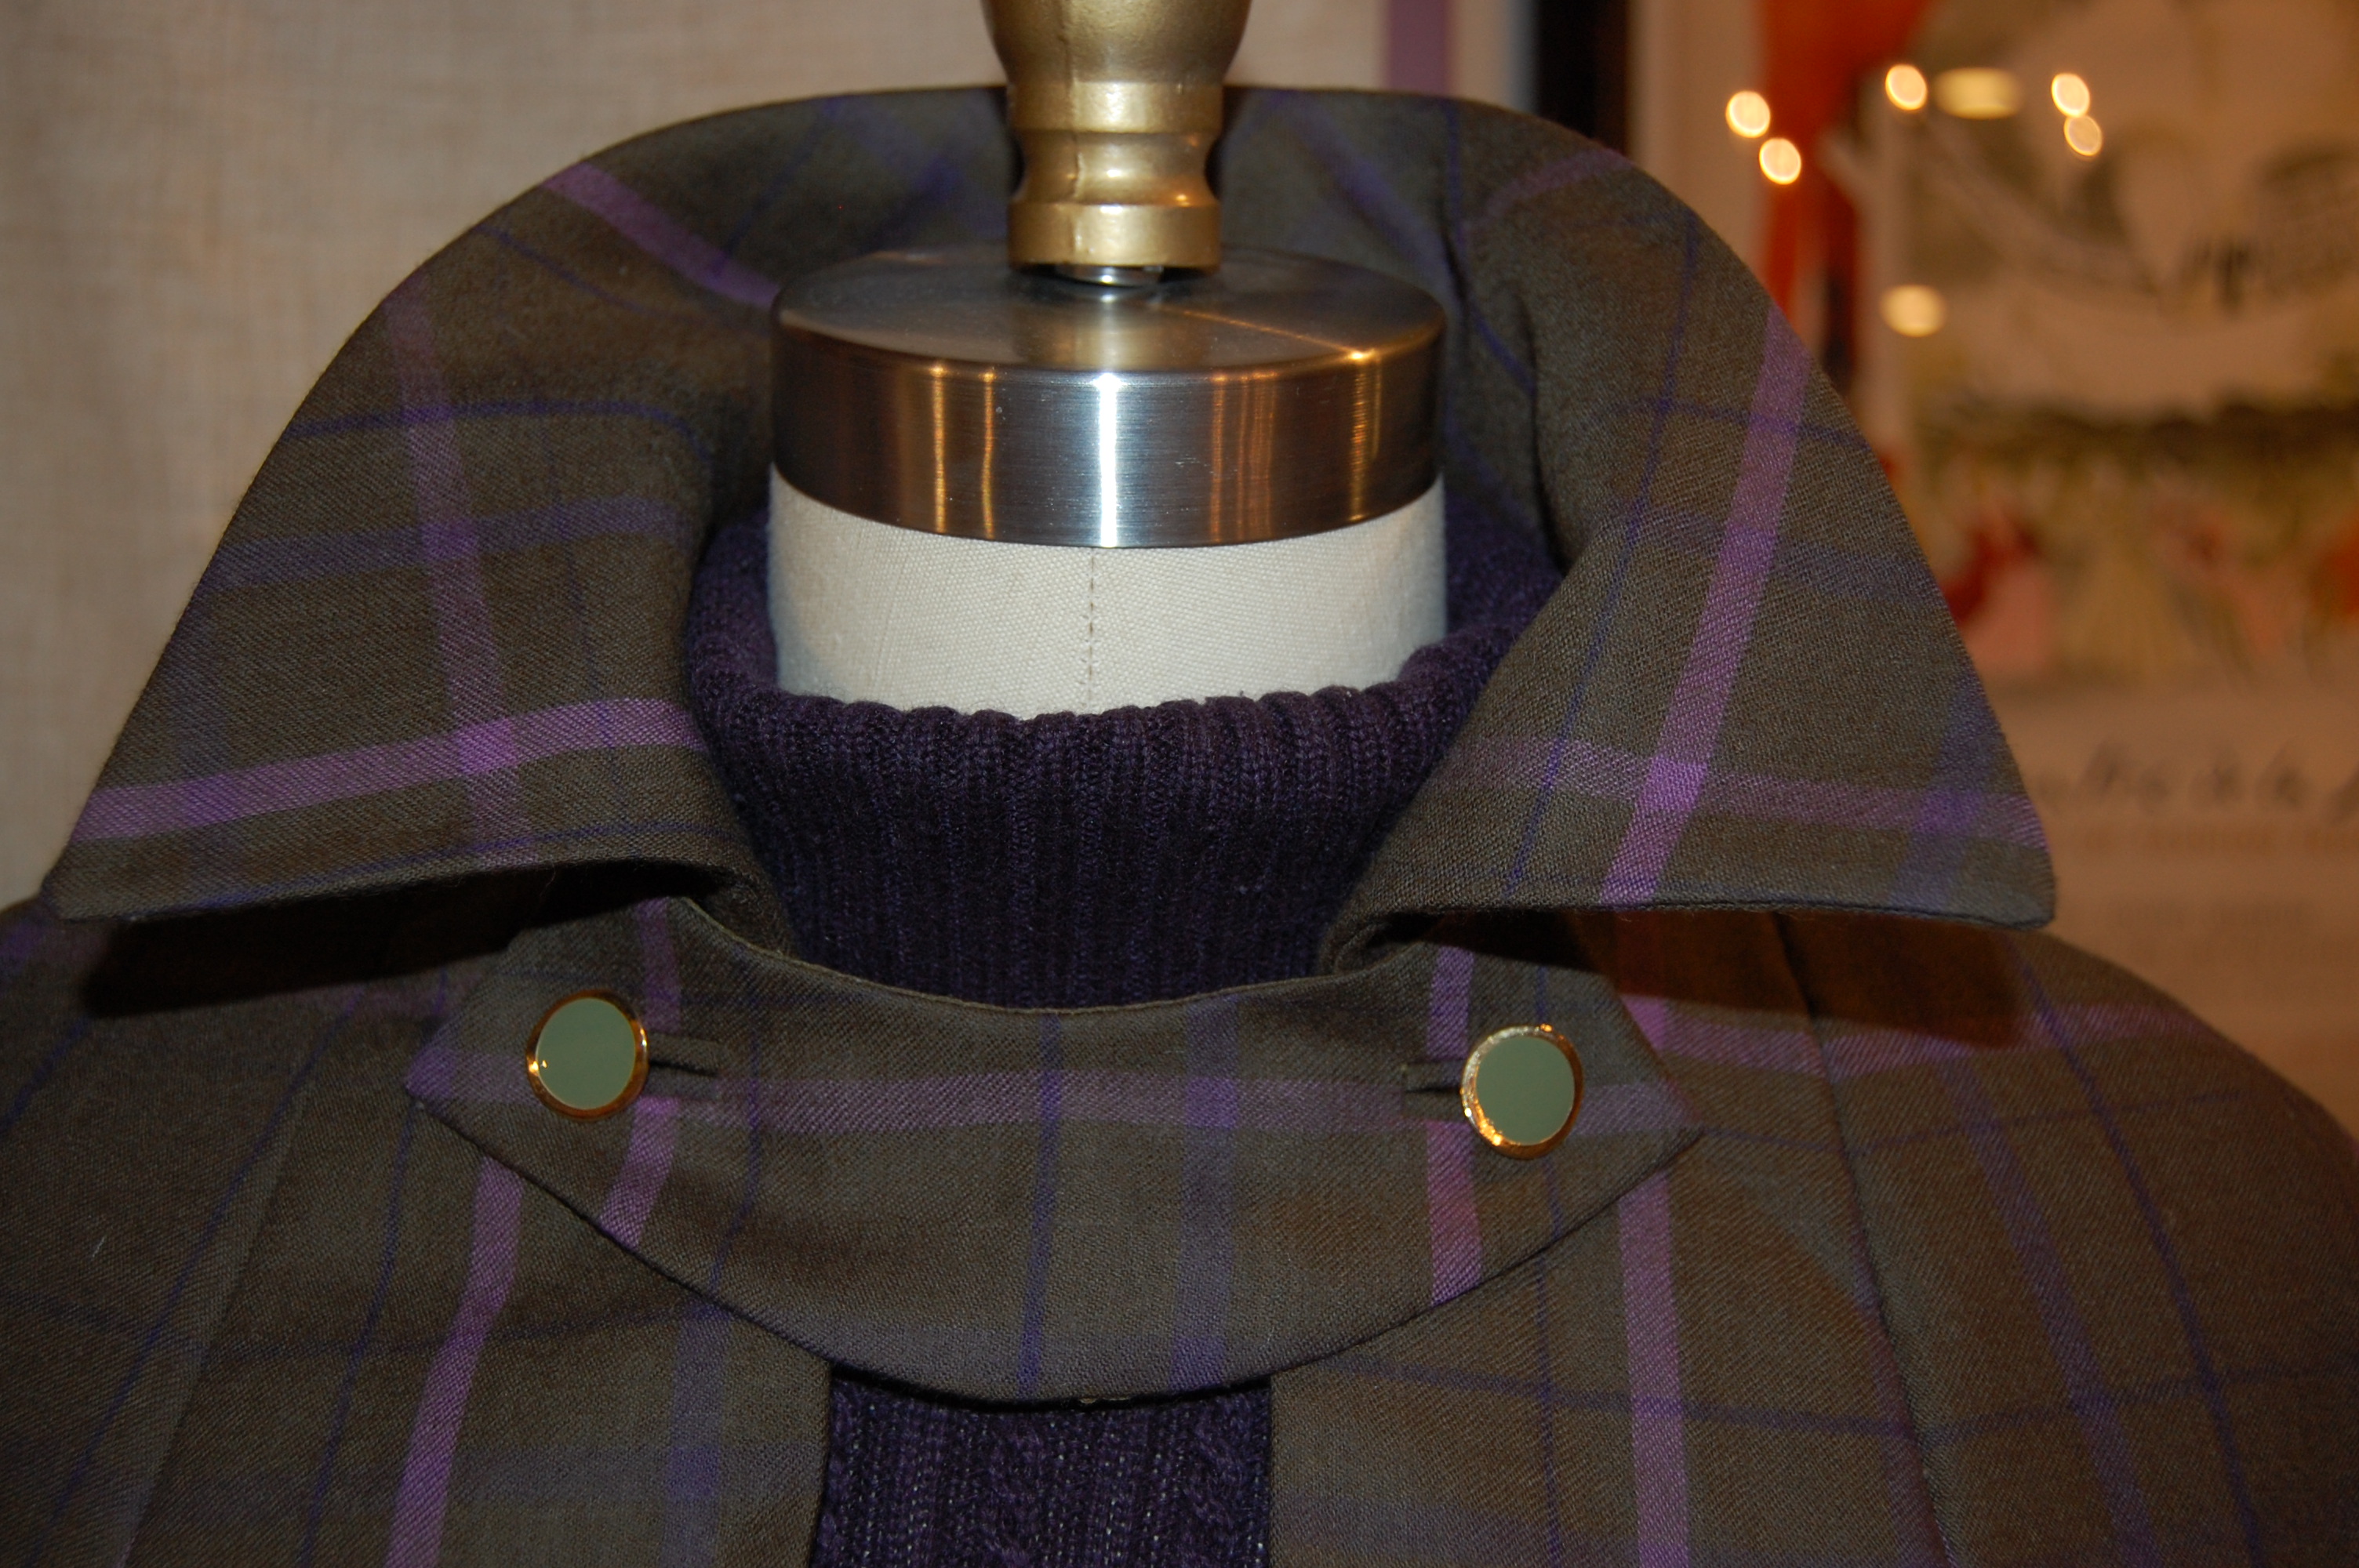
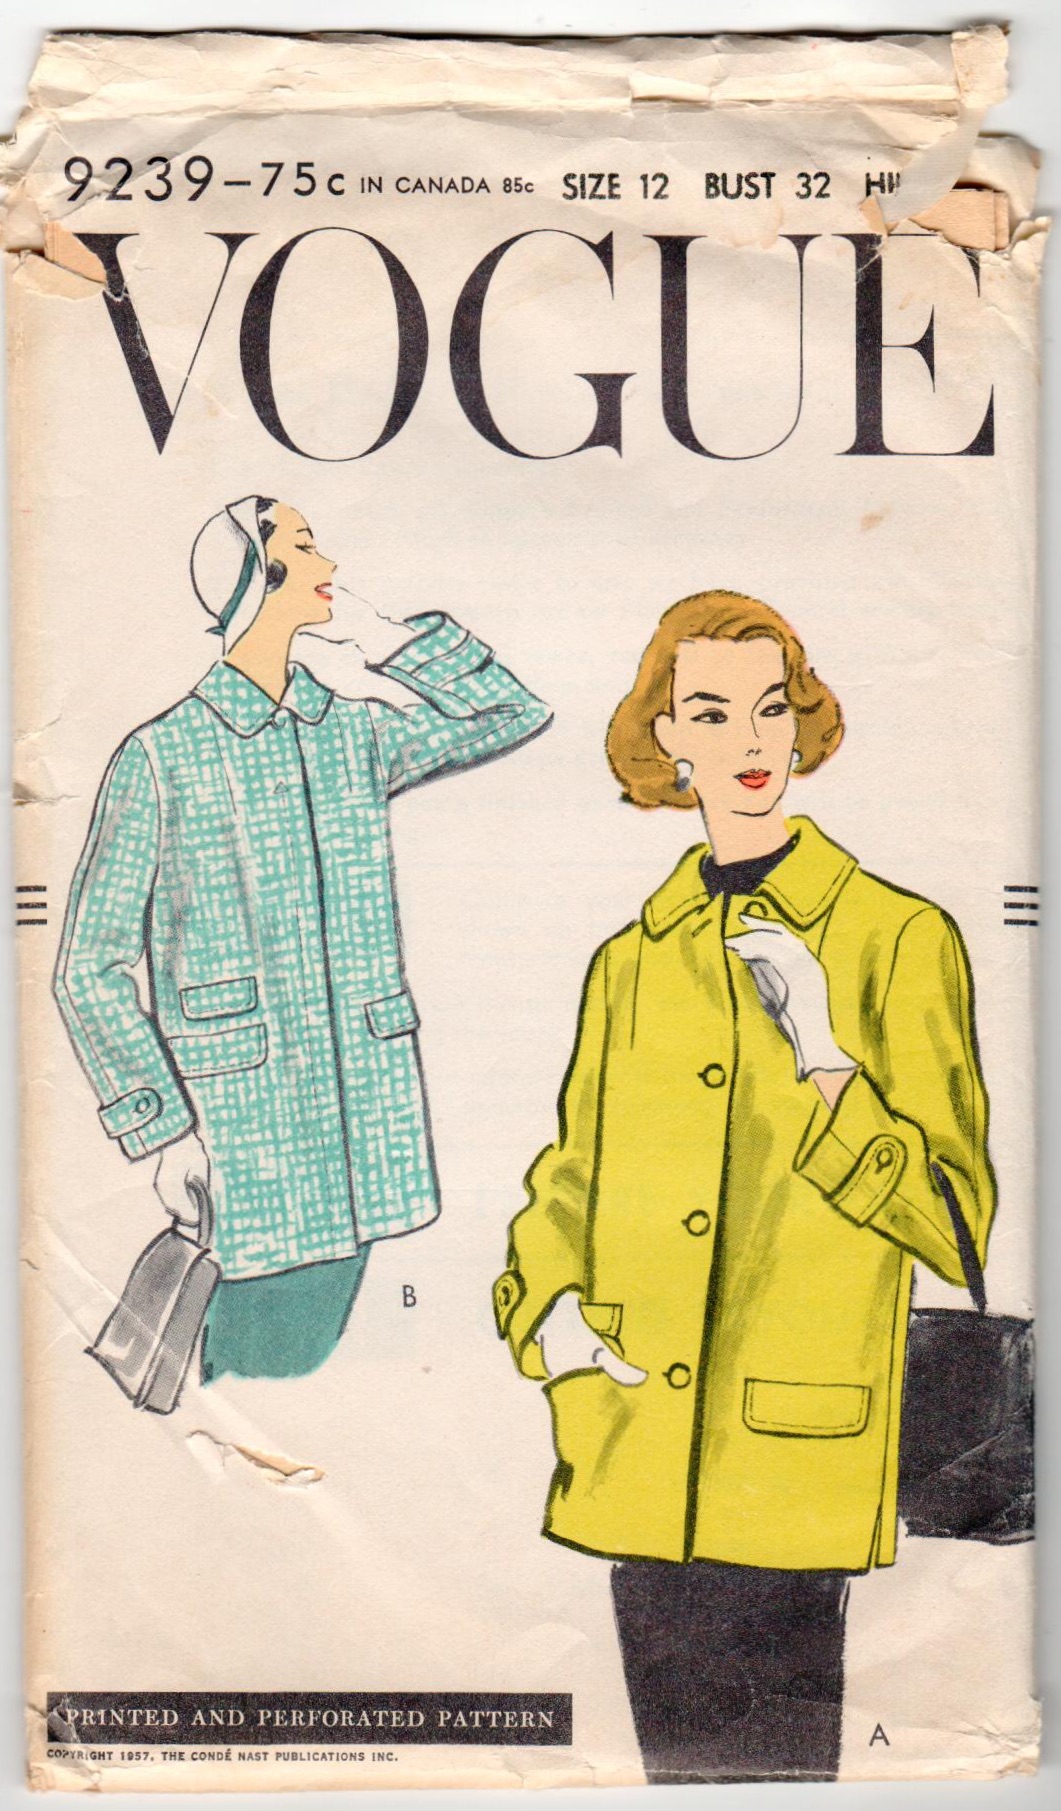
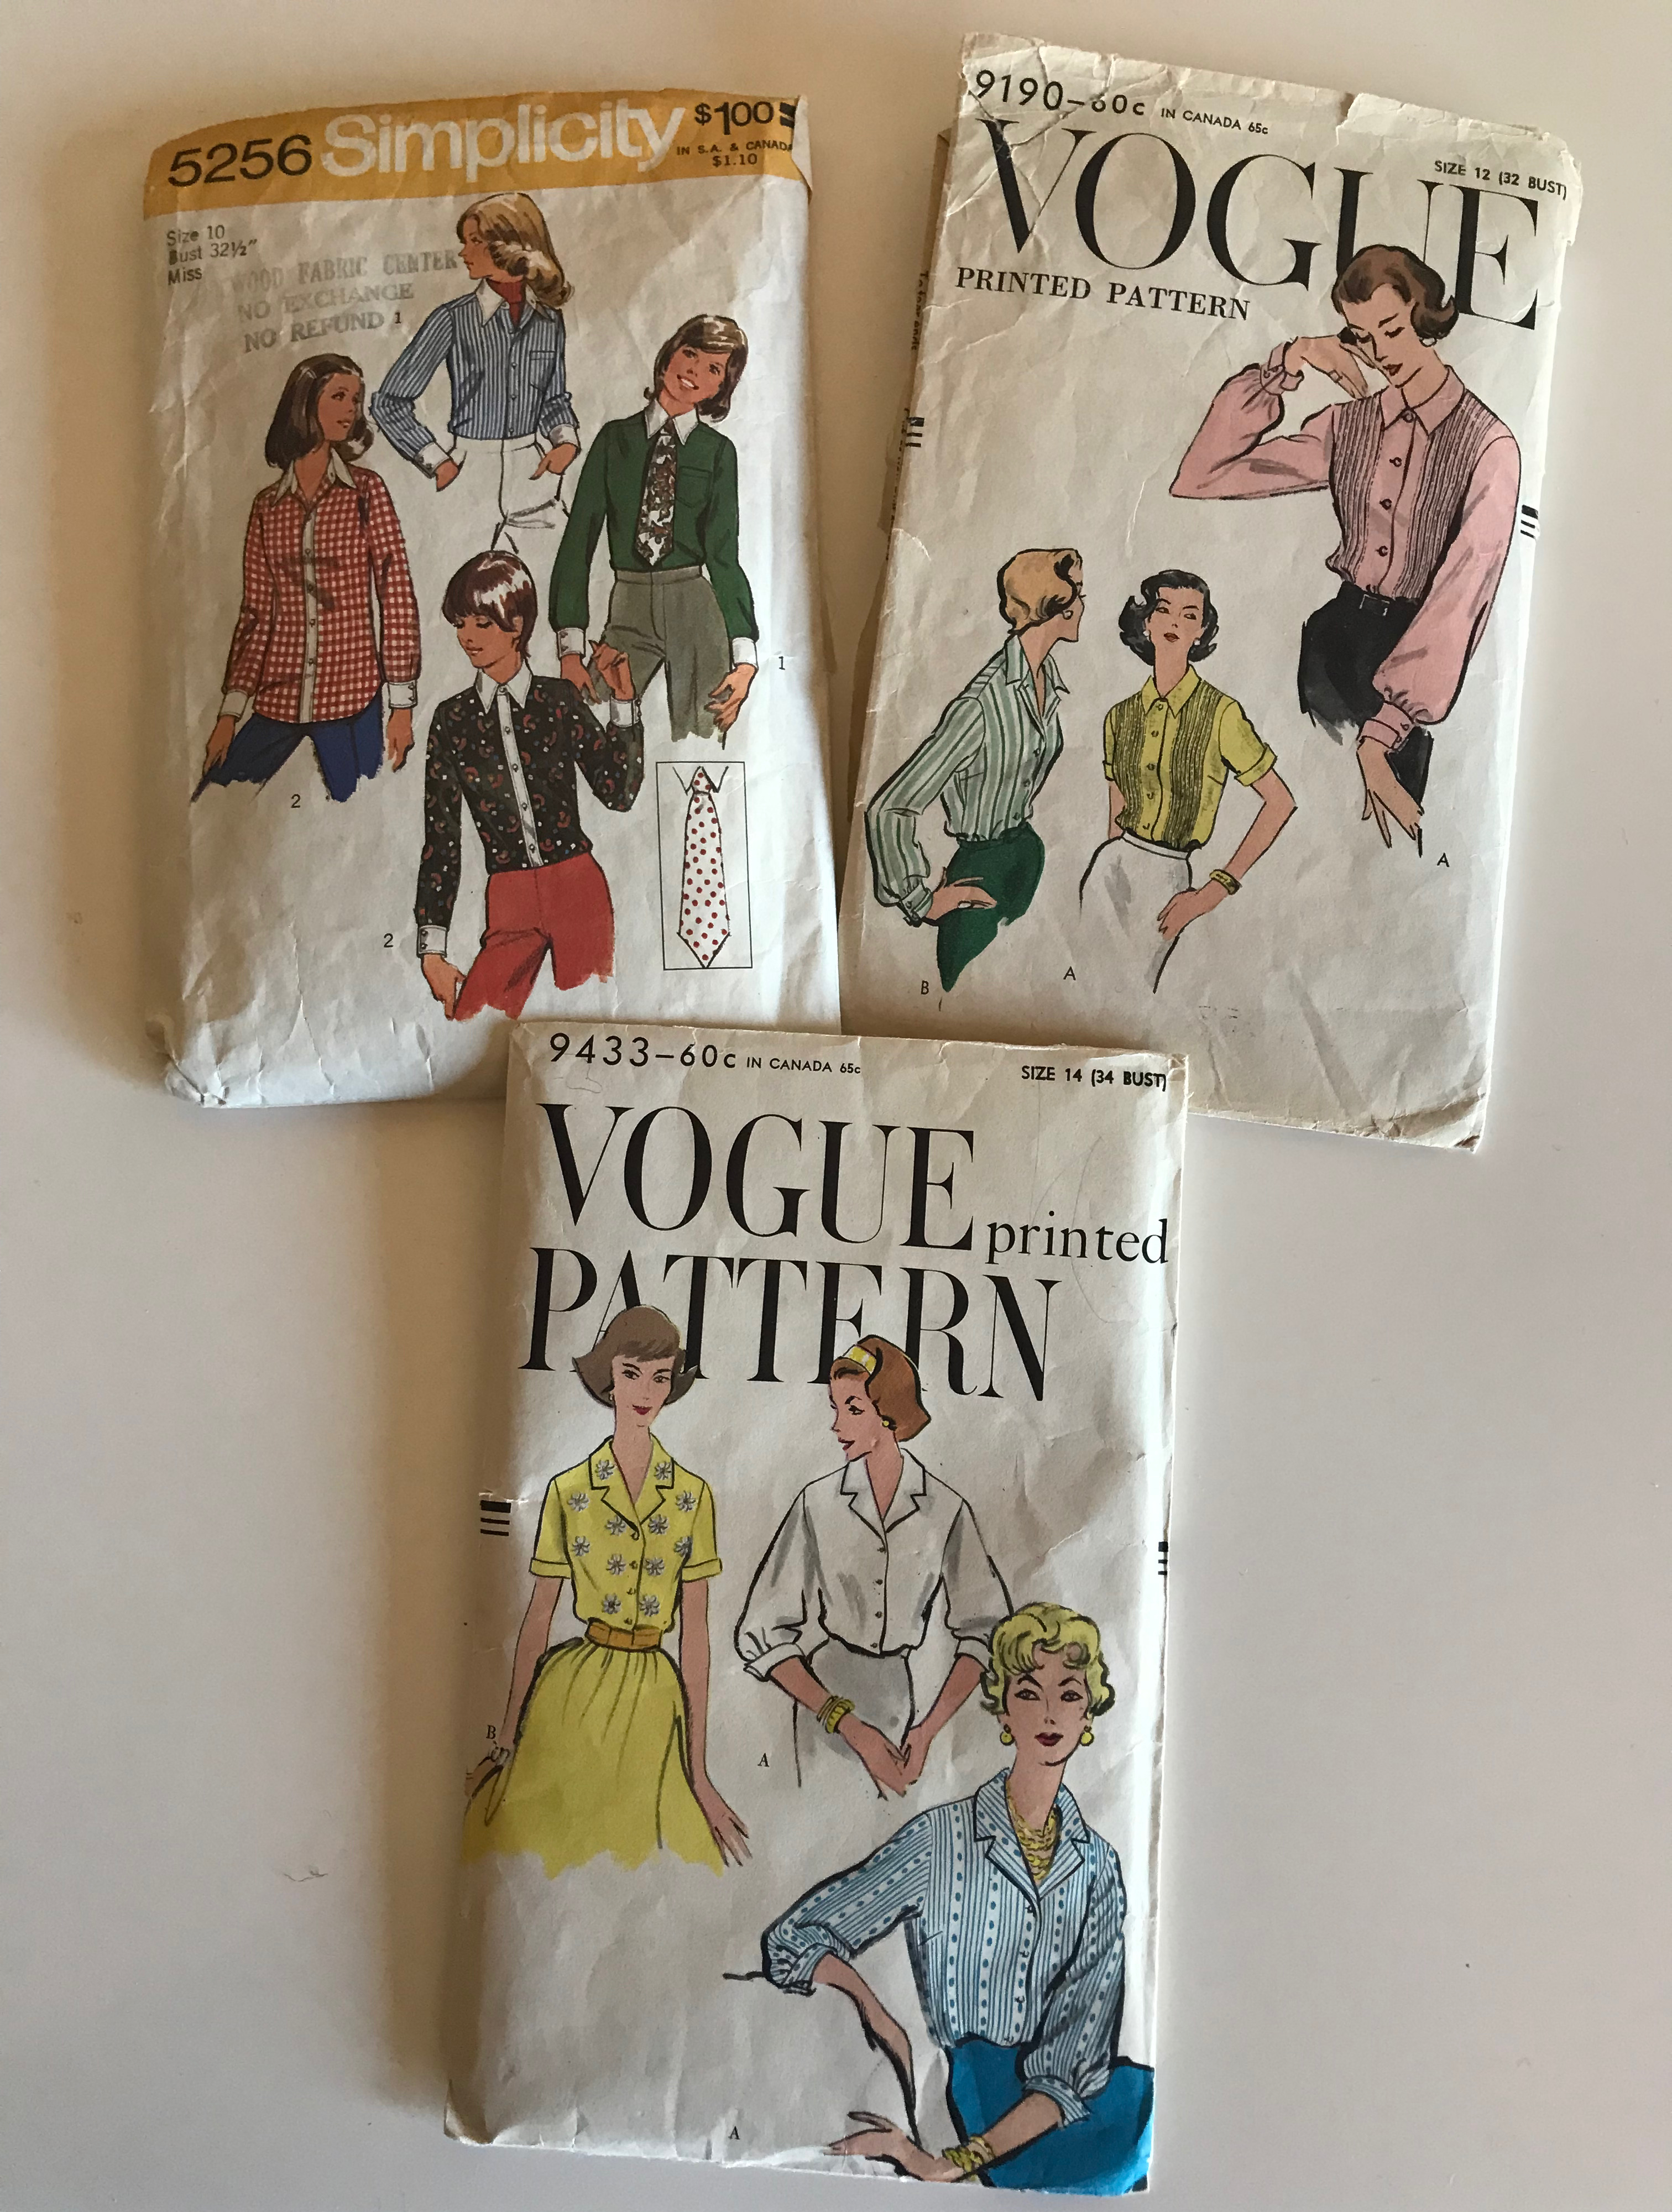
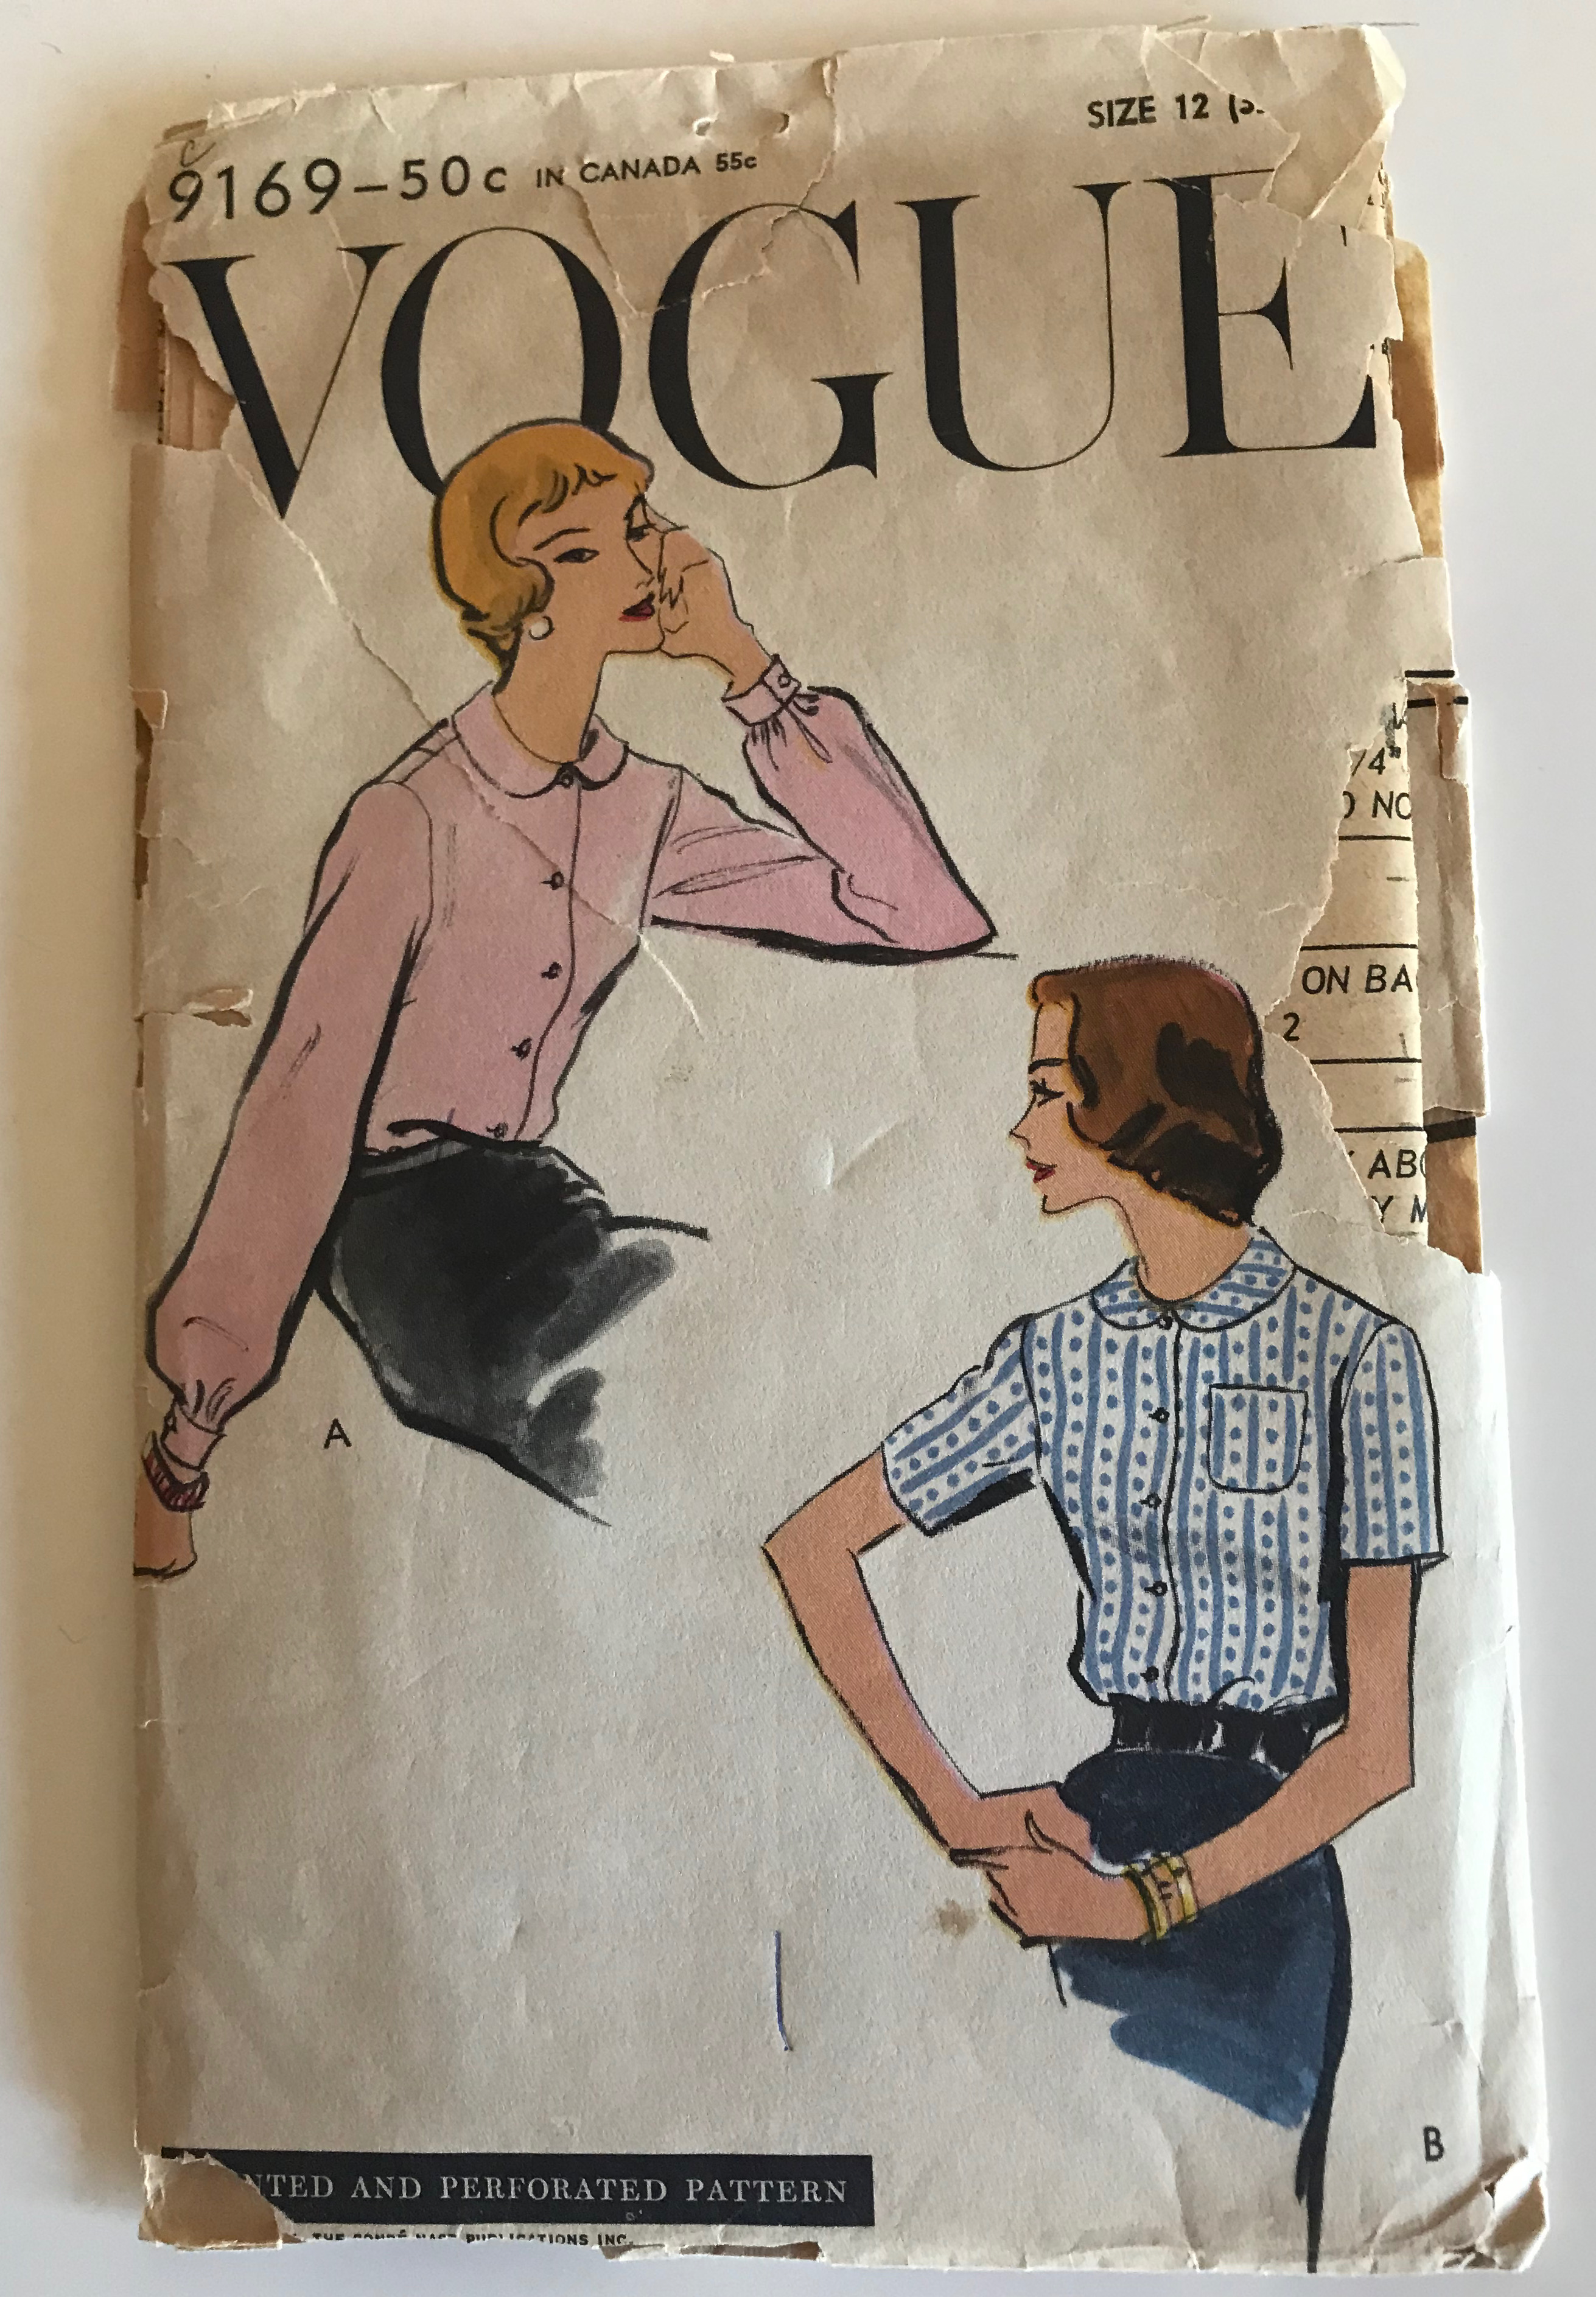
I knew any pattern I selected had to be one with fairly simple lines and adaptable to being unlined. Pendleton blankets are beautifully heavy and warm, perfect for cozy sleeping.  Made into coats and jackets they are also heavy and warm, but better suited to styles with few darts, notches and complex seaming. Luckily I had a pattern in my collection, dated 1959, which appeared to be perfect – with a shaw collar, raglan sleeves, and 2 long darts descending from the shoulder to the bust.  

From the pattern instruction sheet: minimal pattern pieces were perfect for this project. Of course, I cut off the “hood” for my jacket, and as it turned out, I did not add patch pockets. More about that in Part 2.

I was on my way to my very own Pendleton jacket. At least that was what I hoped! 

To be continued…

23 Comments

Filed under Blankets and doll blankets, Buttons - choosing the right ones, car coats, Pendleton Woolen Mills, Uncategorized, vintage buttons, vintage Vogue patterns from the 1950s, Vogue patterns, woolens

Going Around in Circles

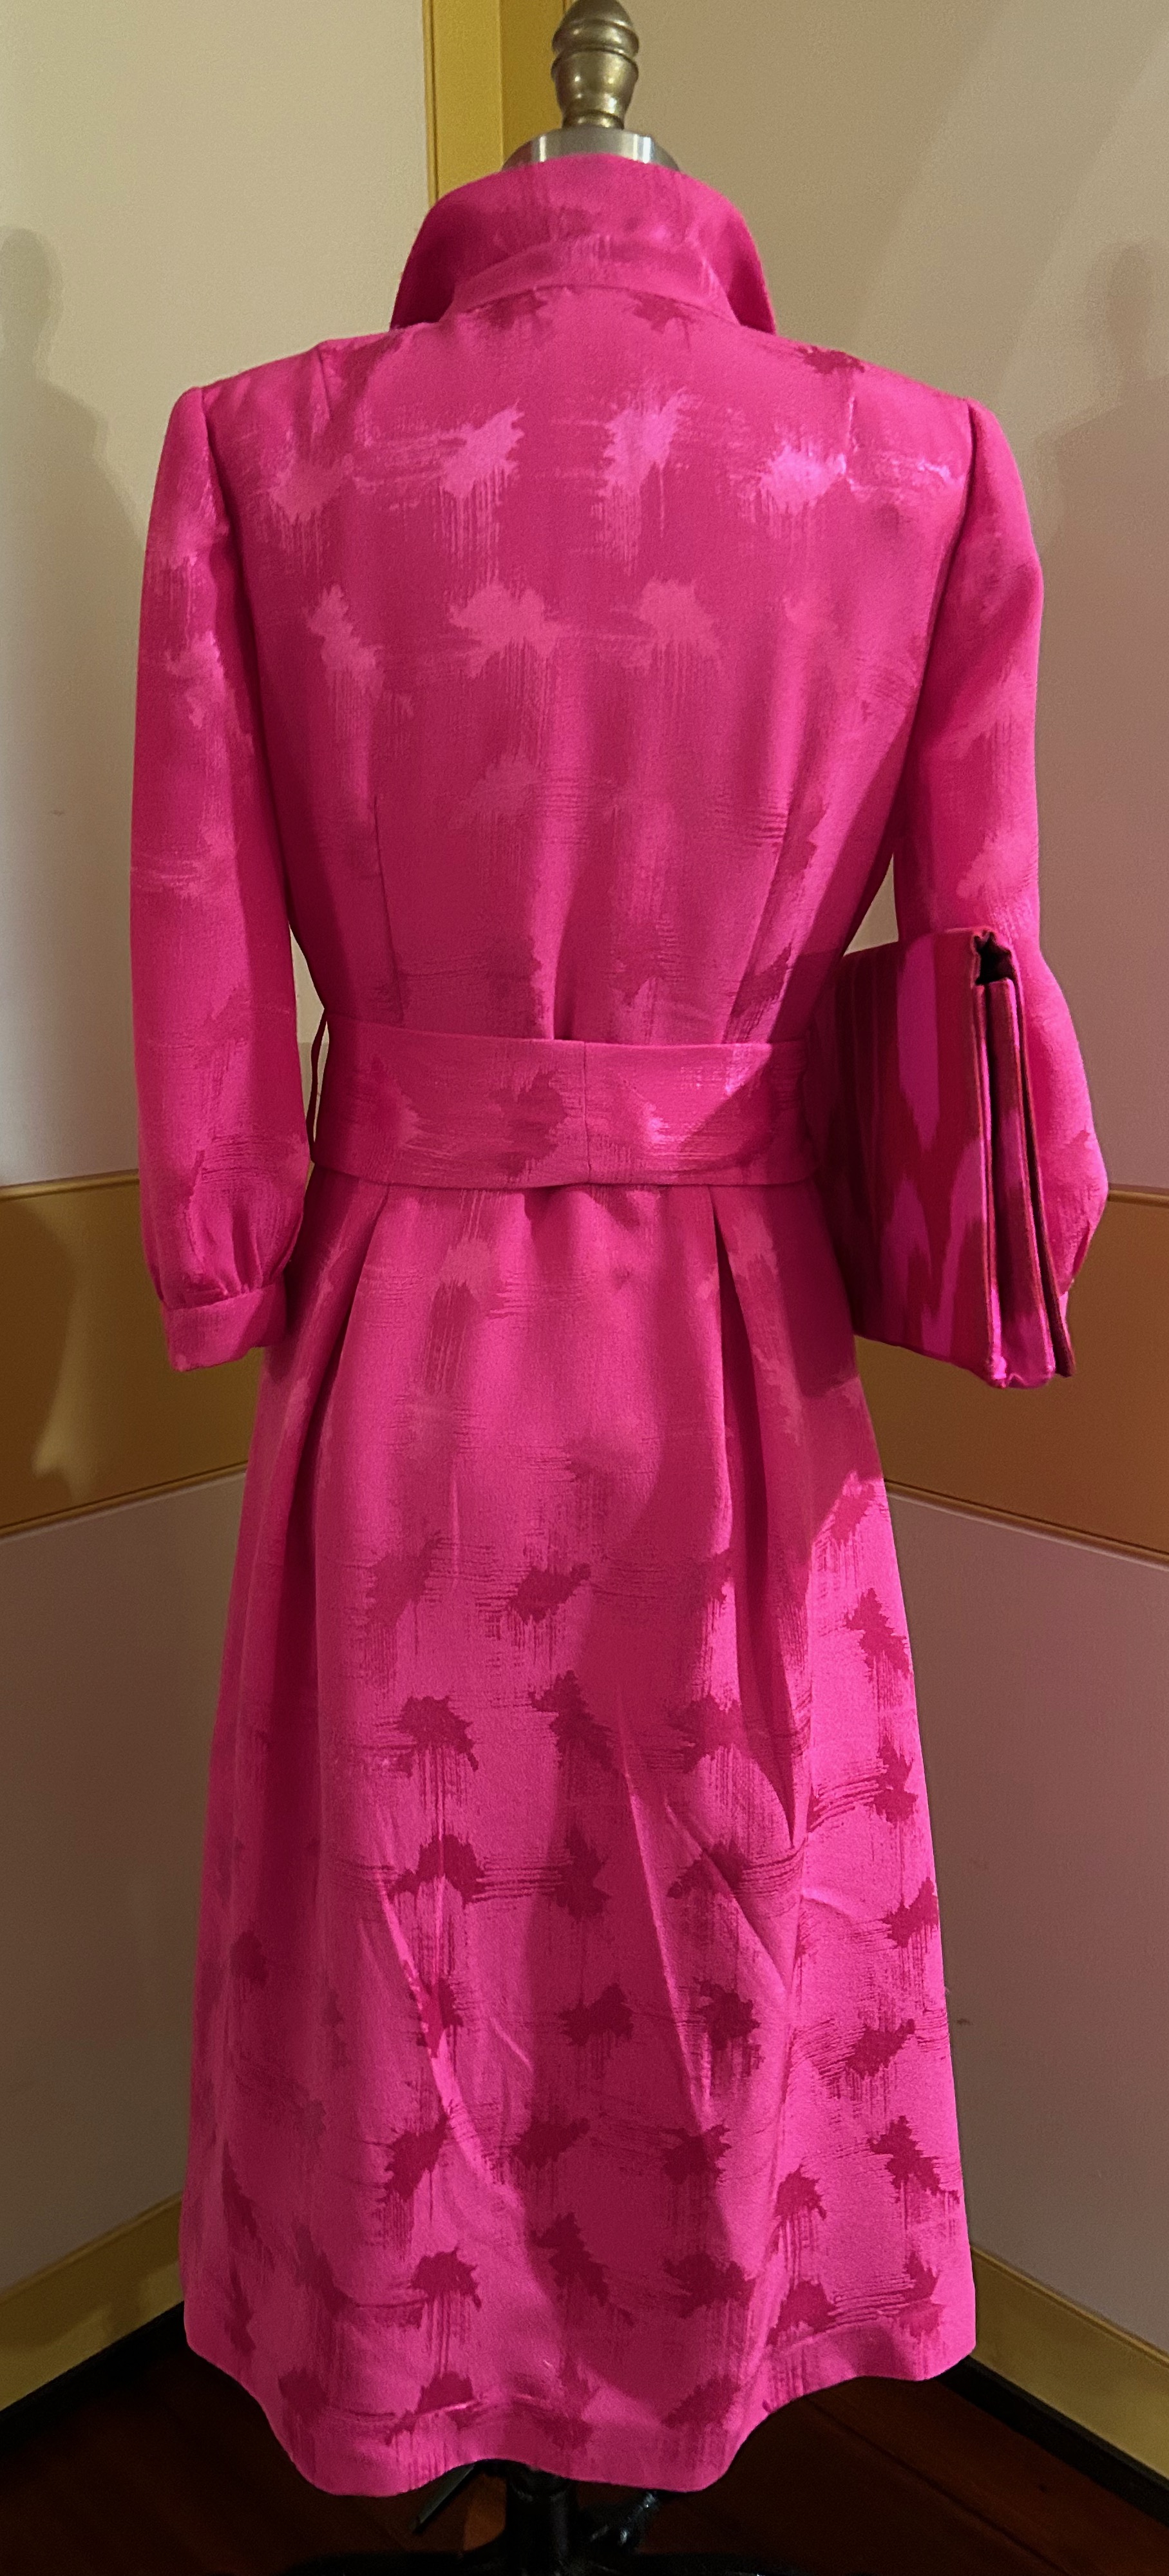
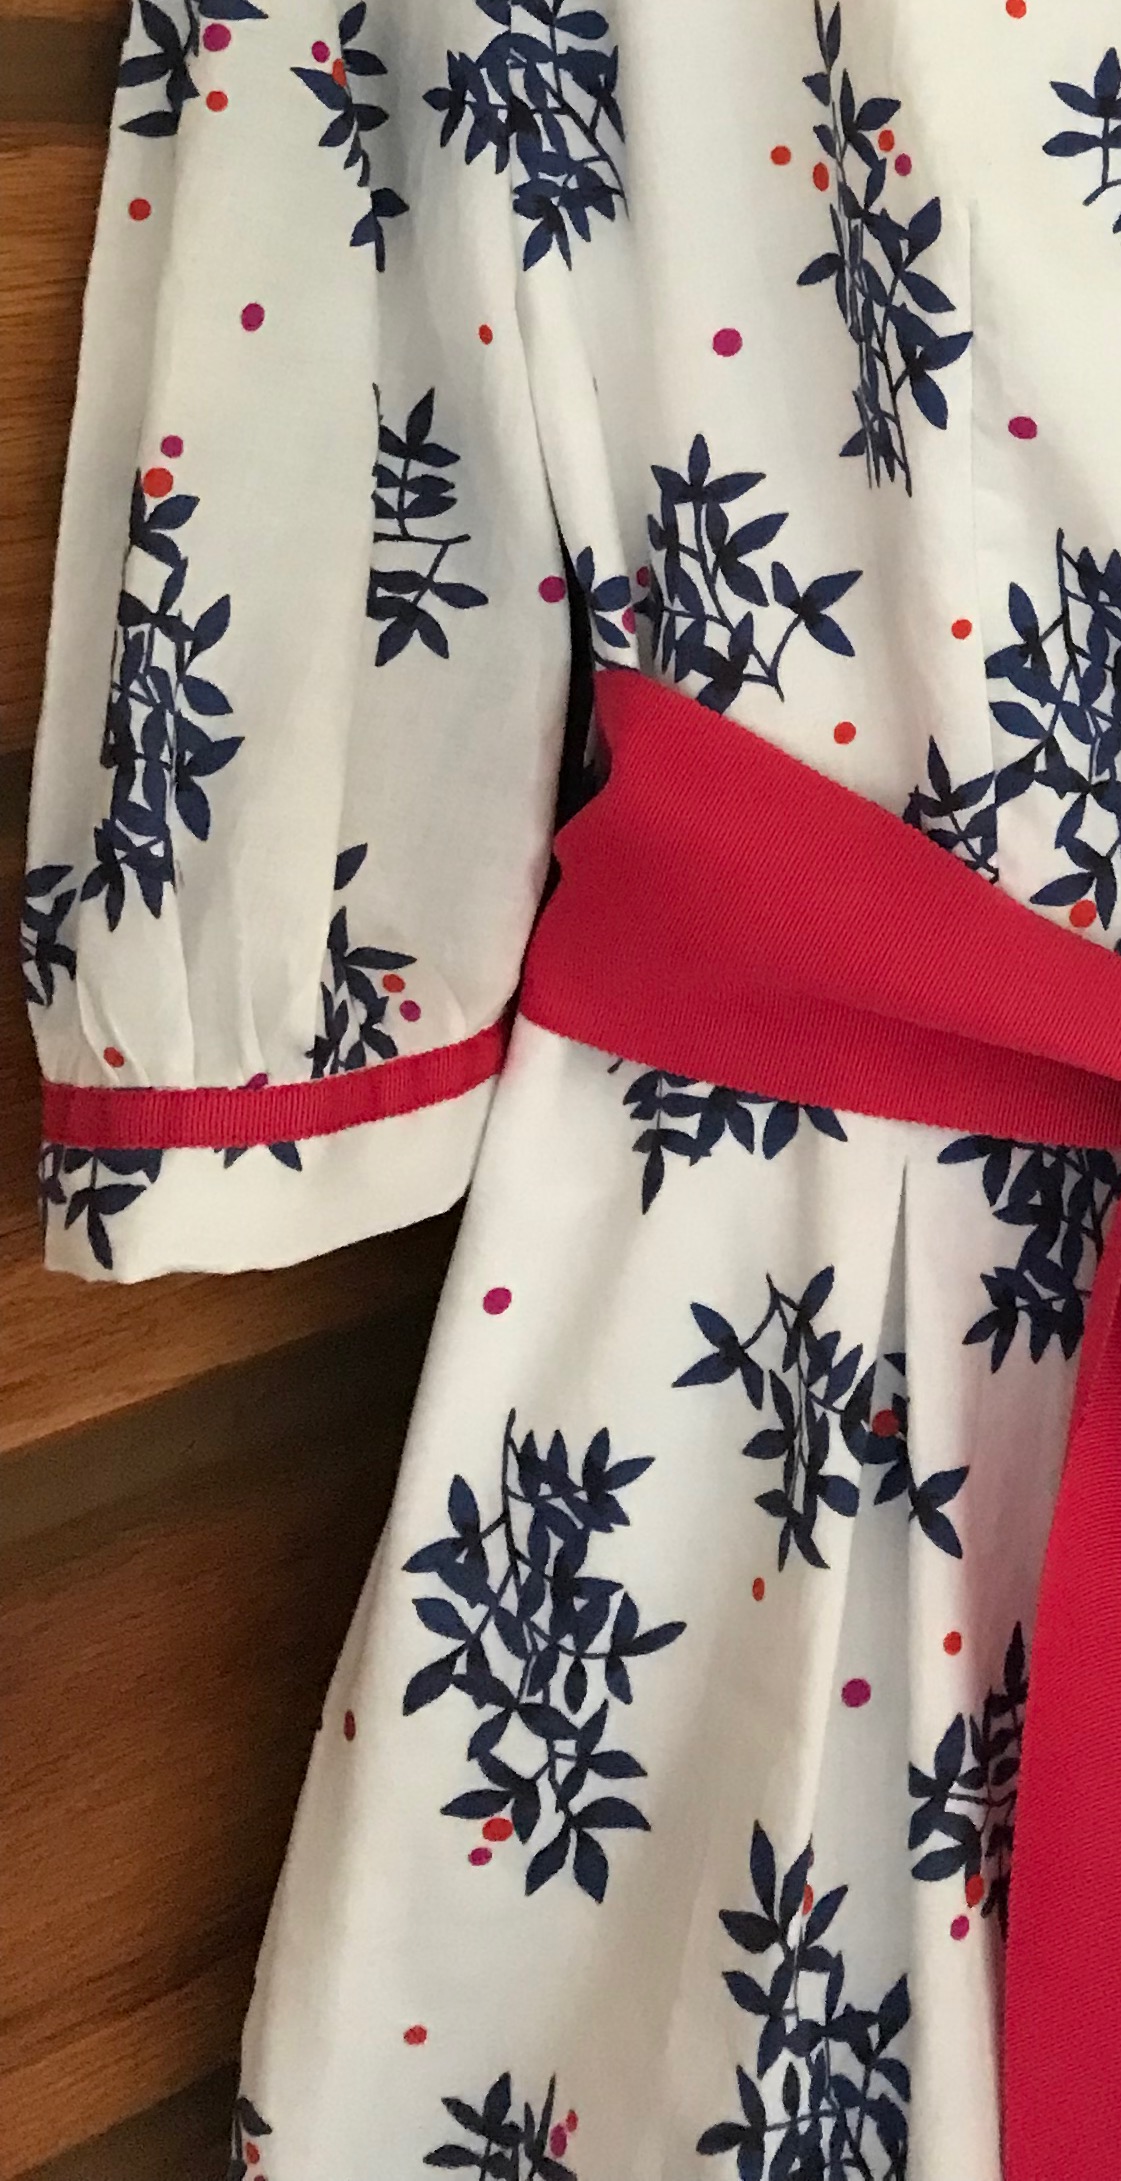
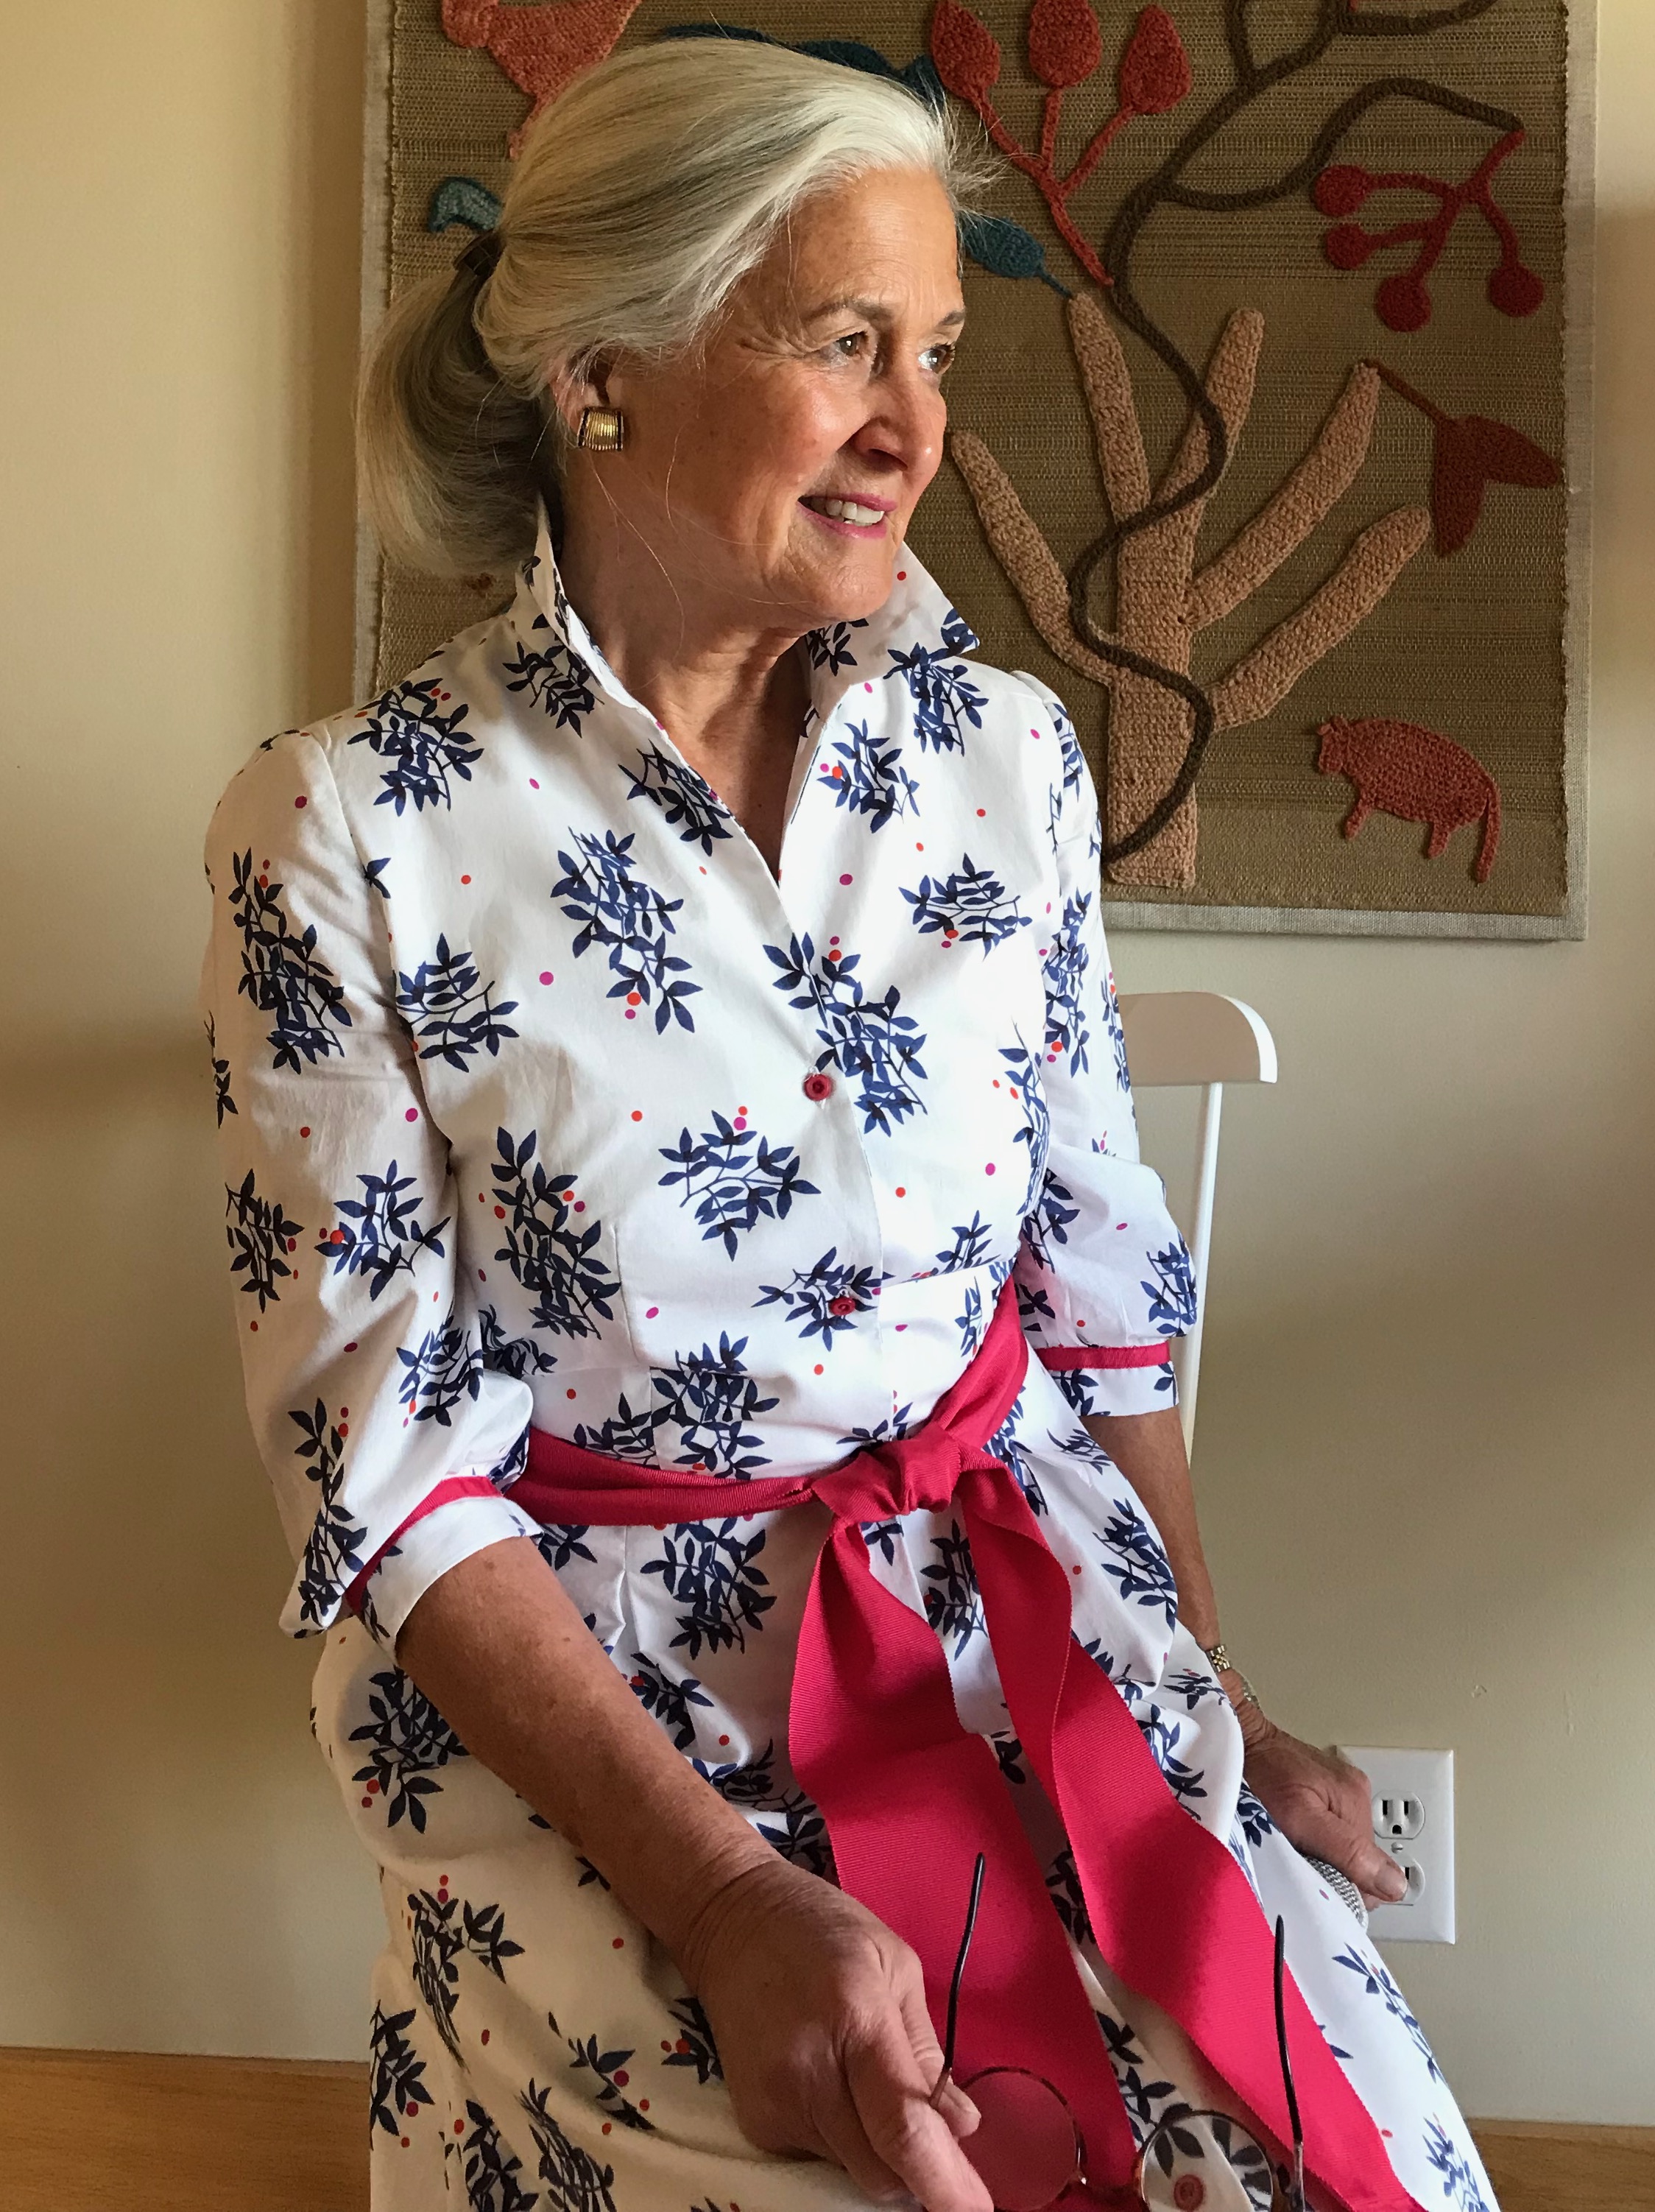
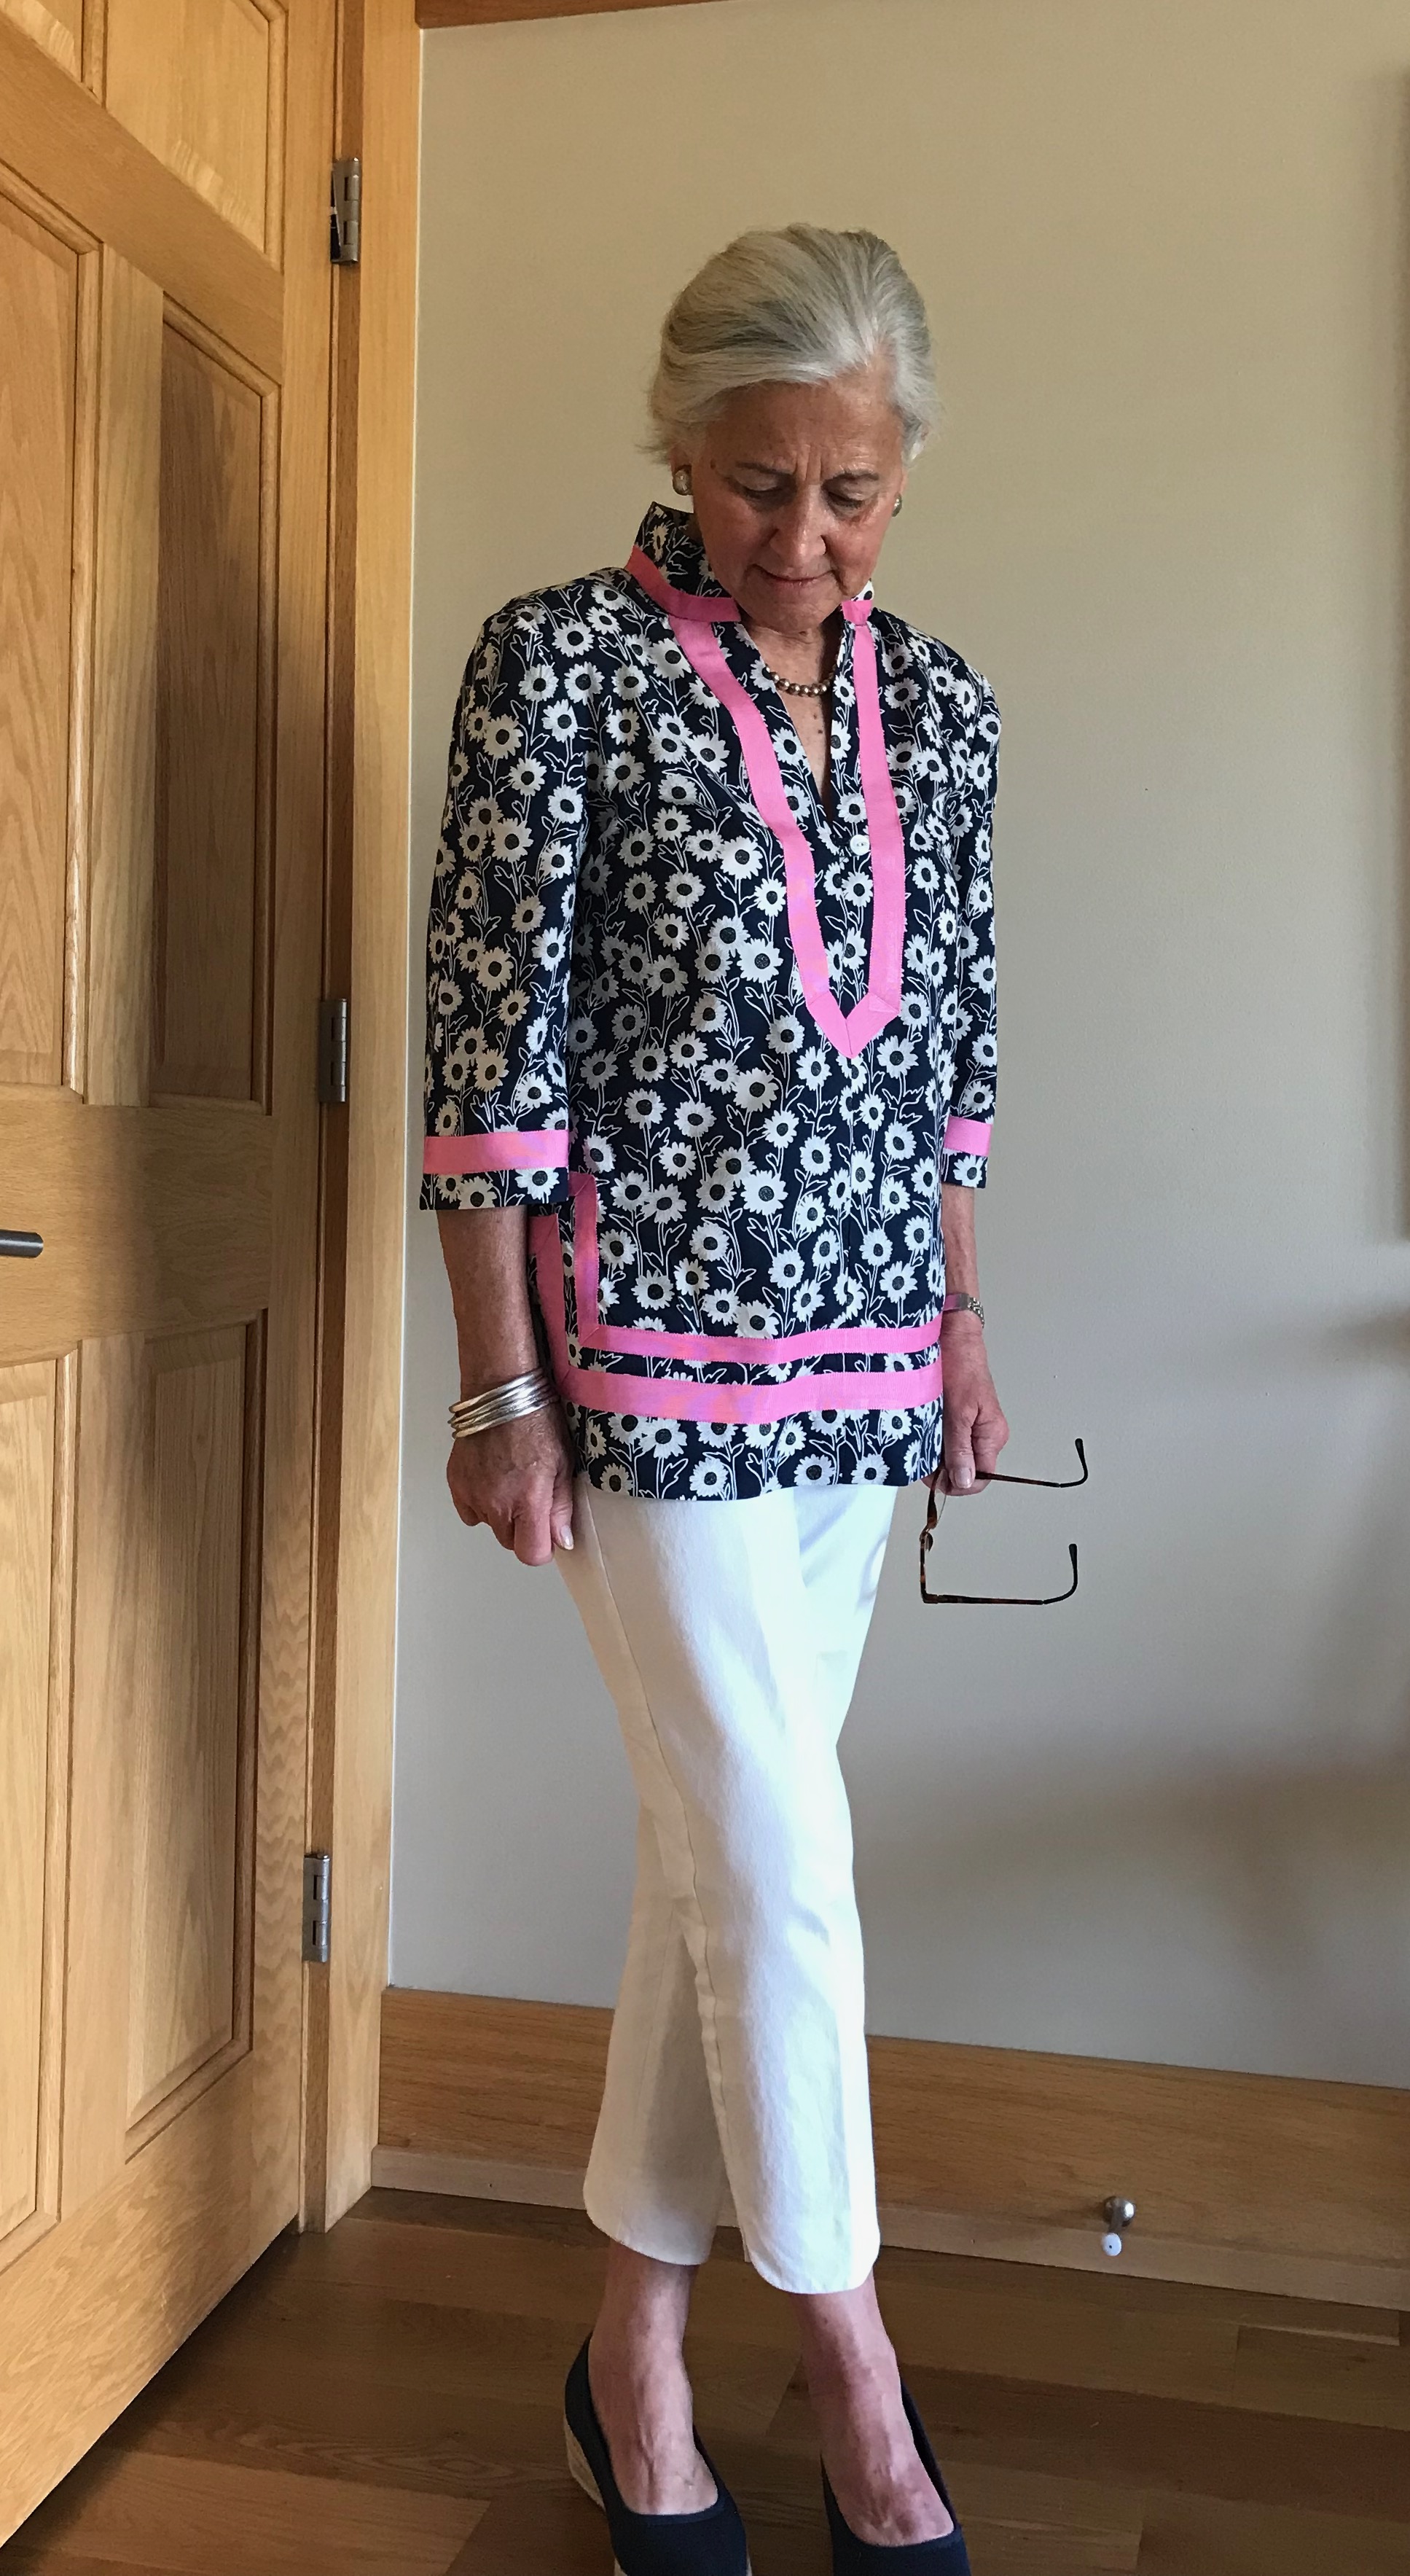
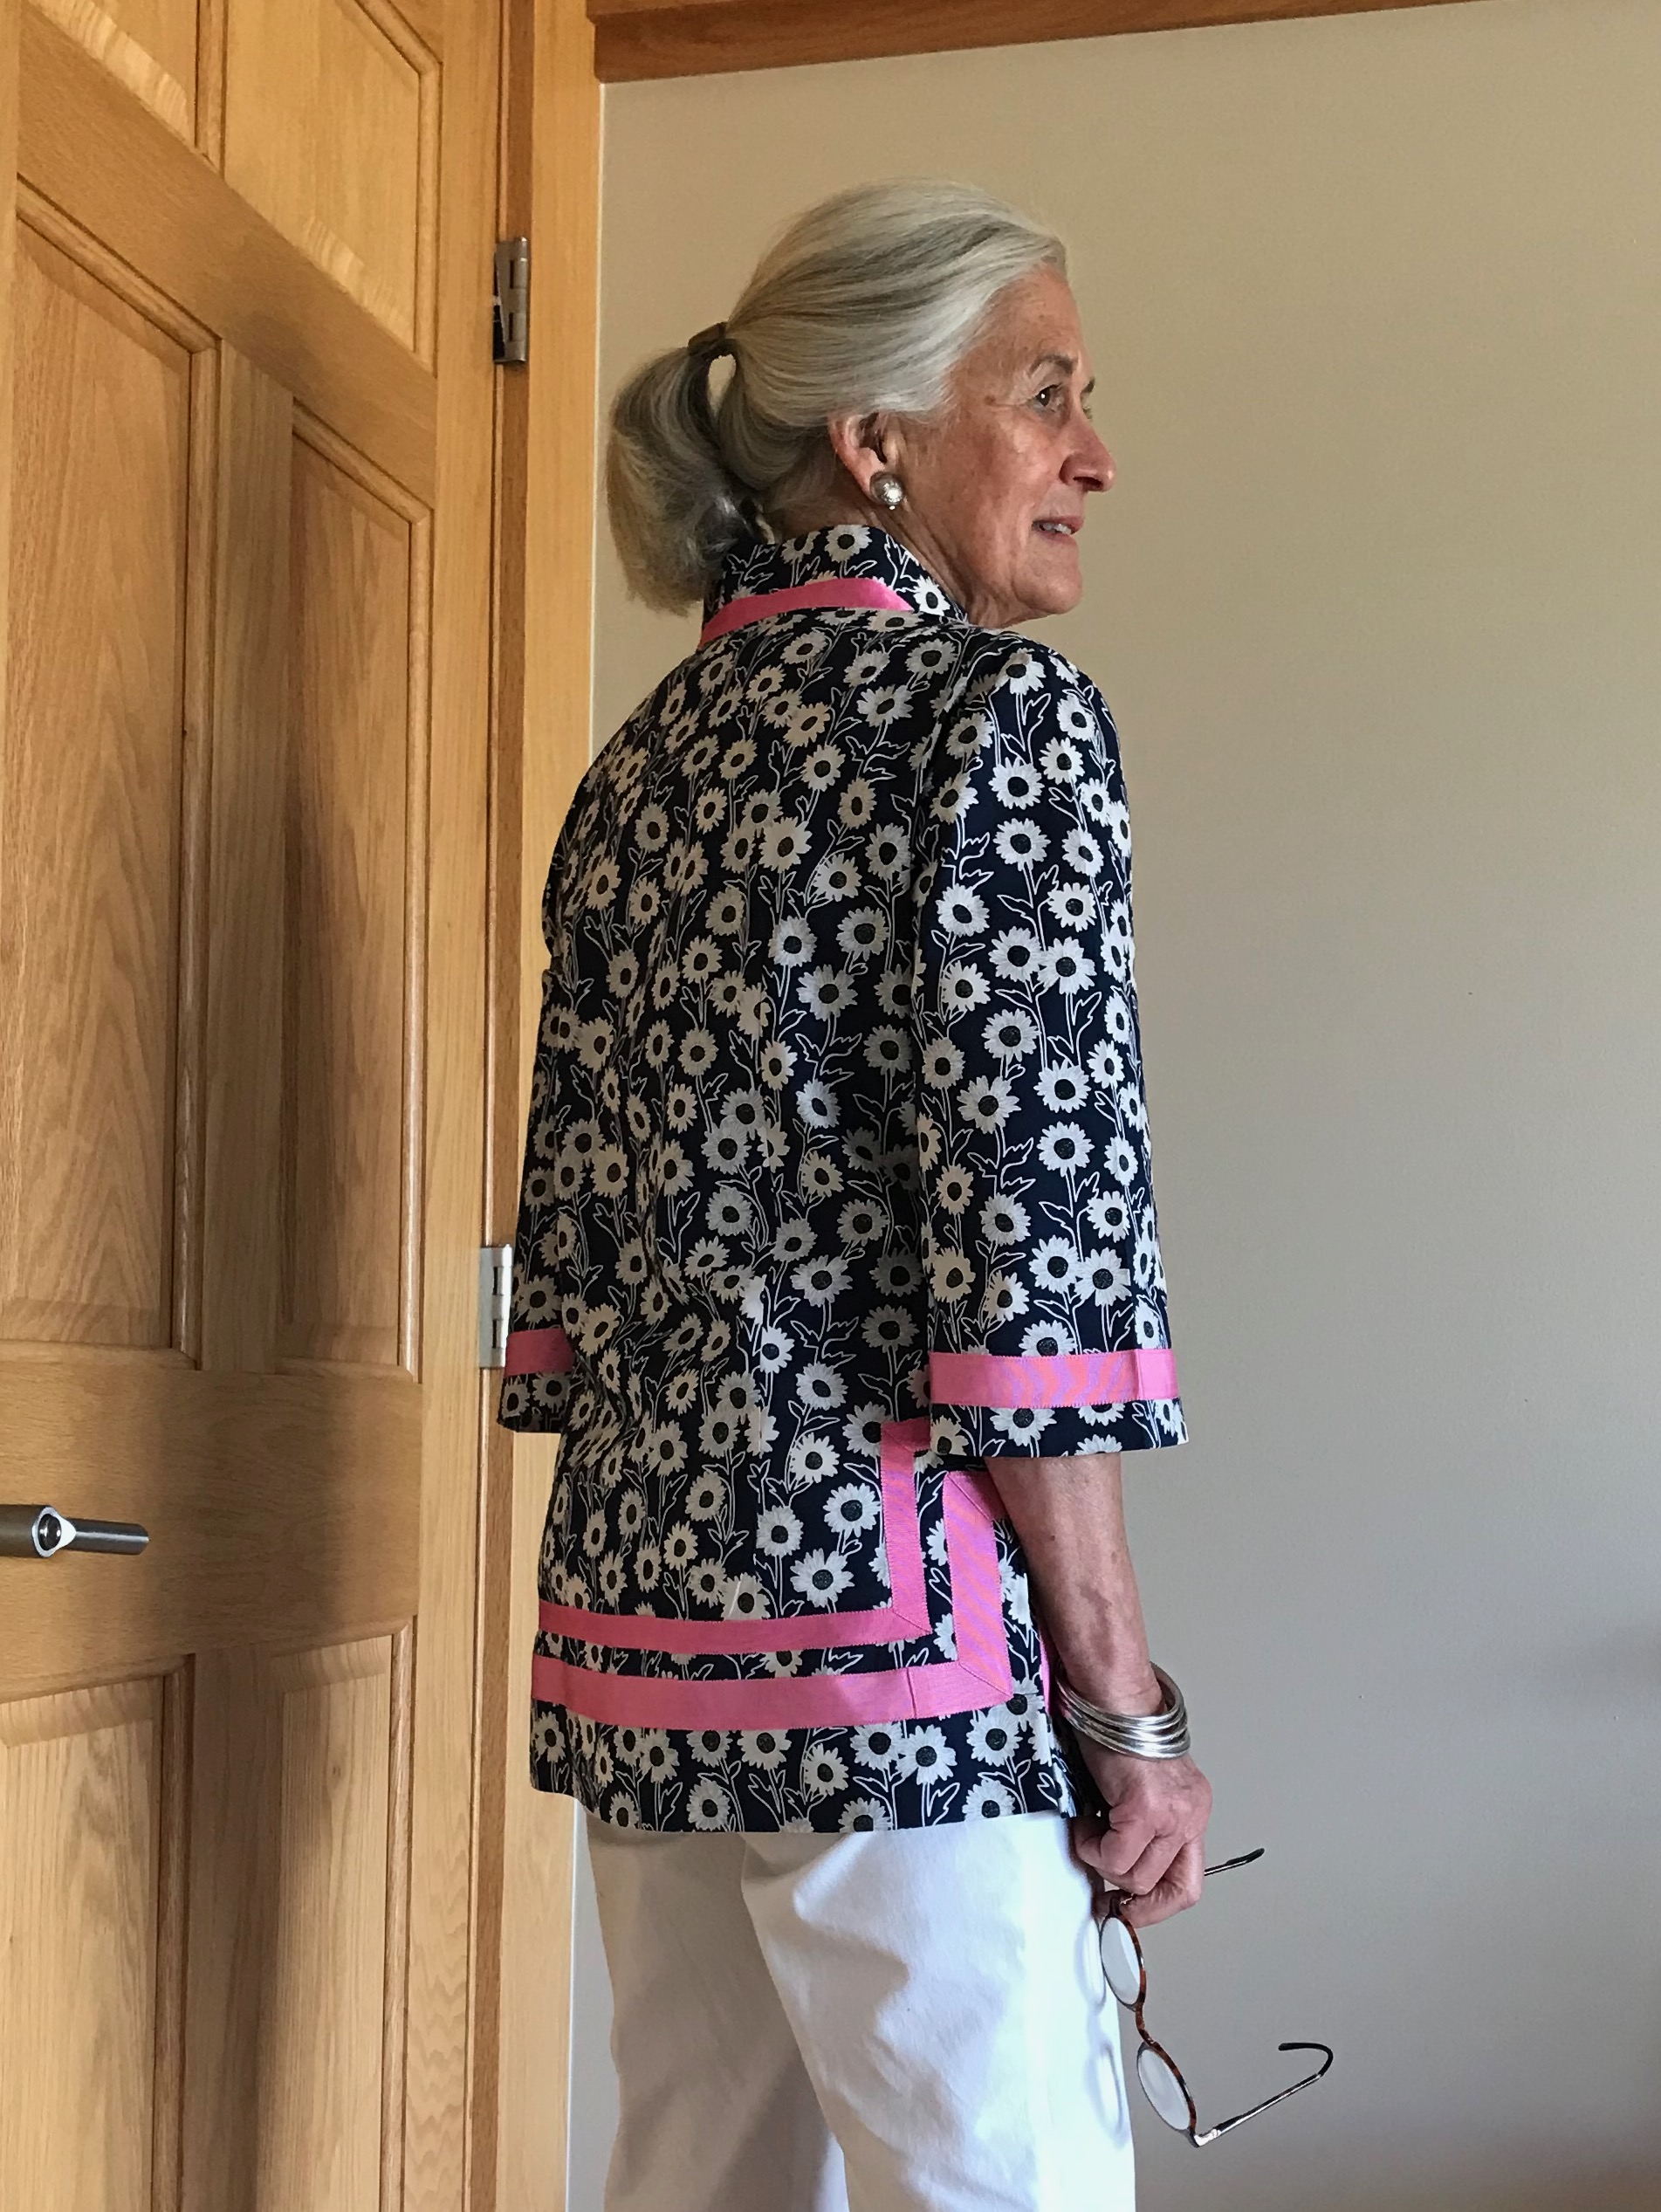
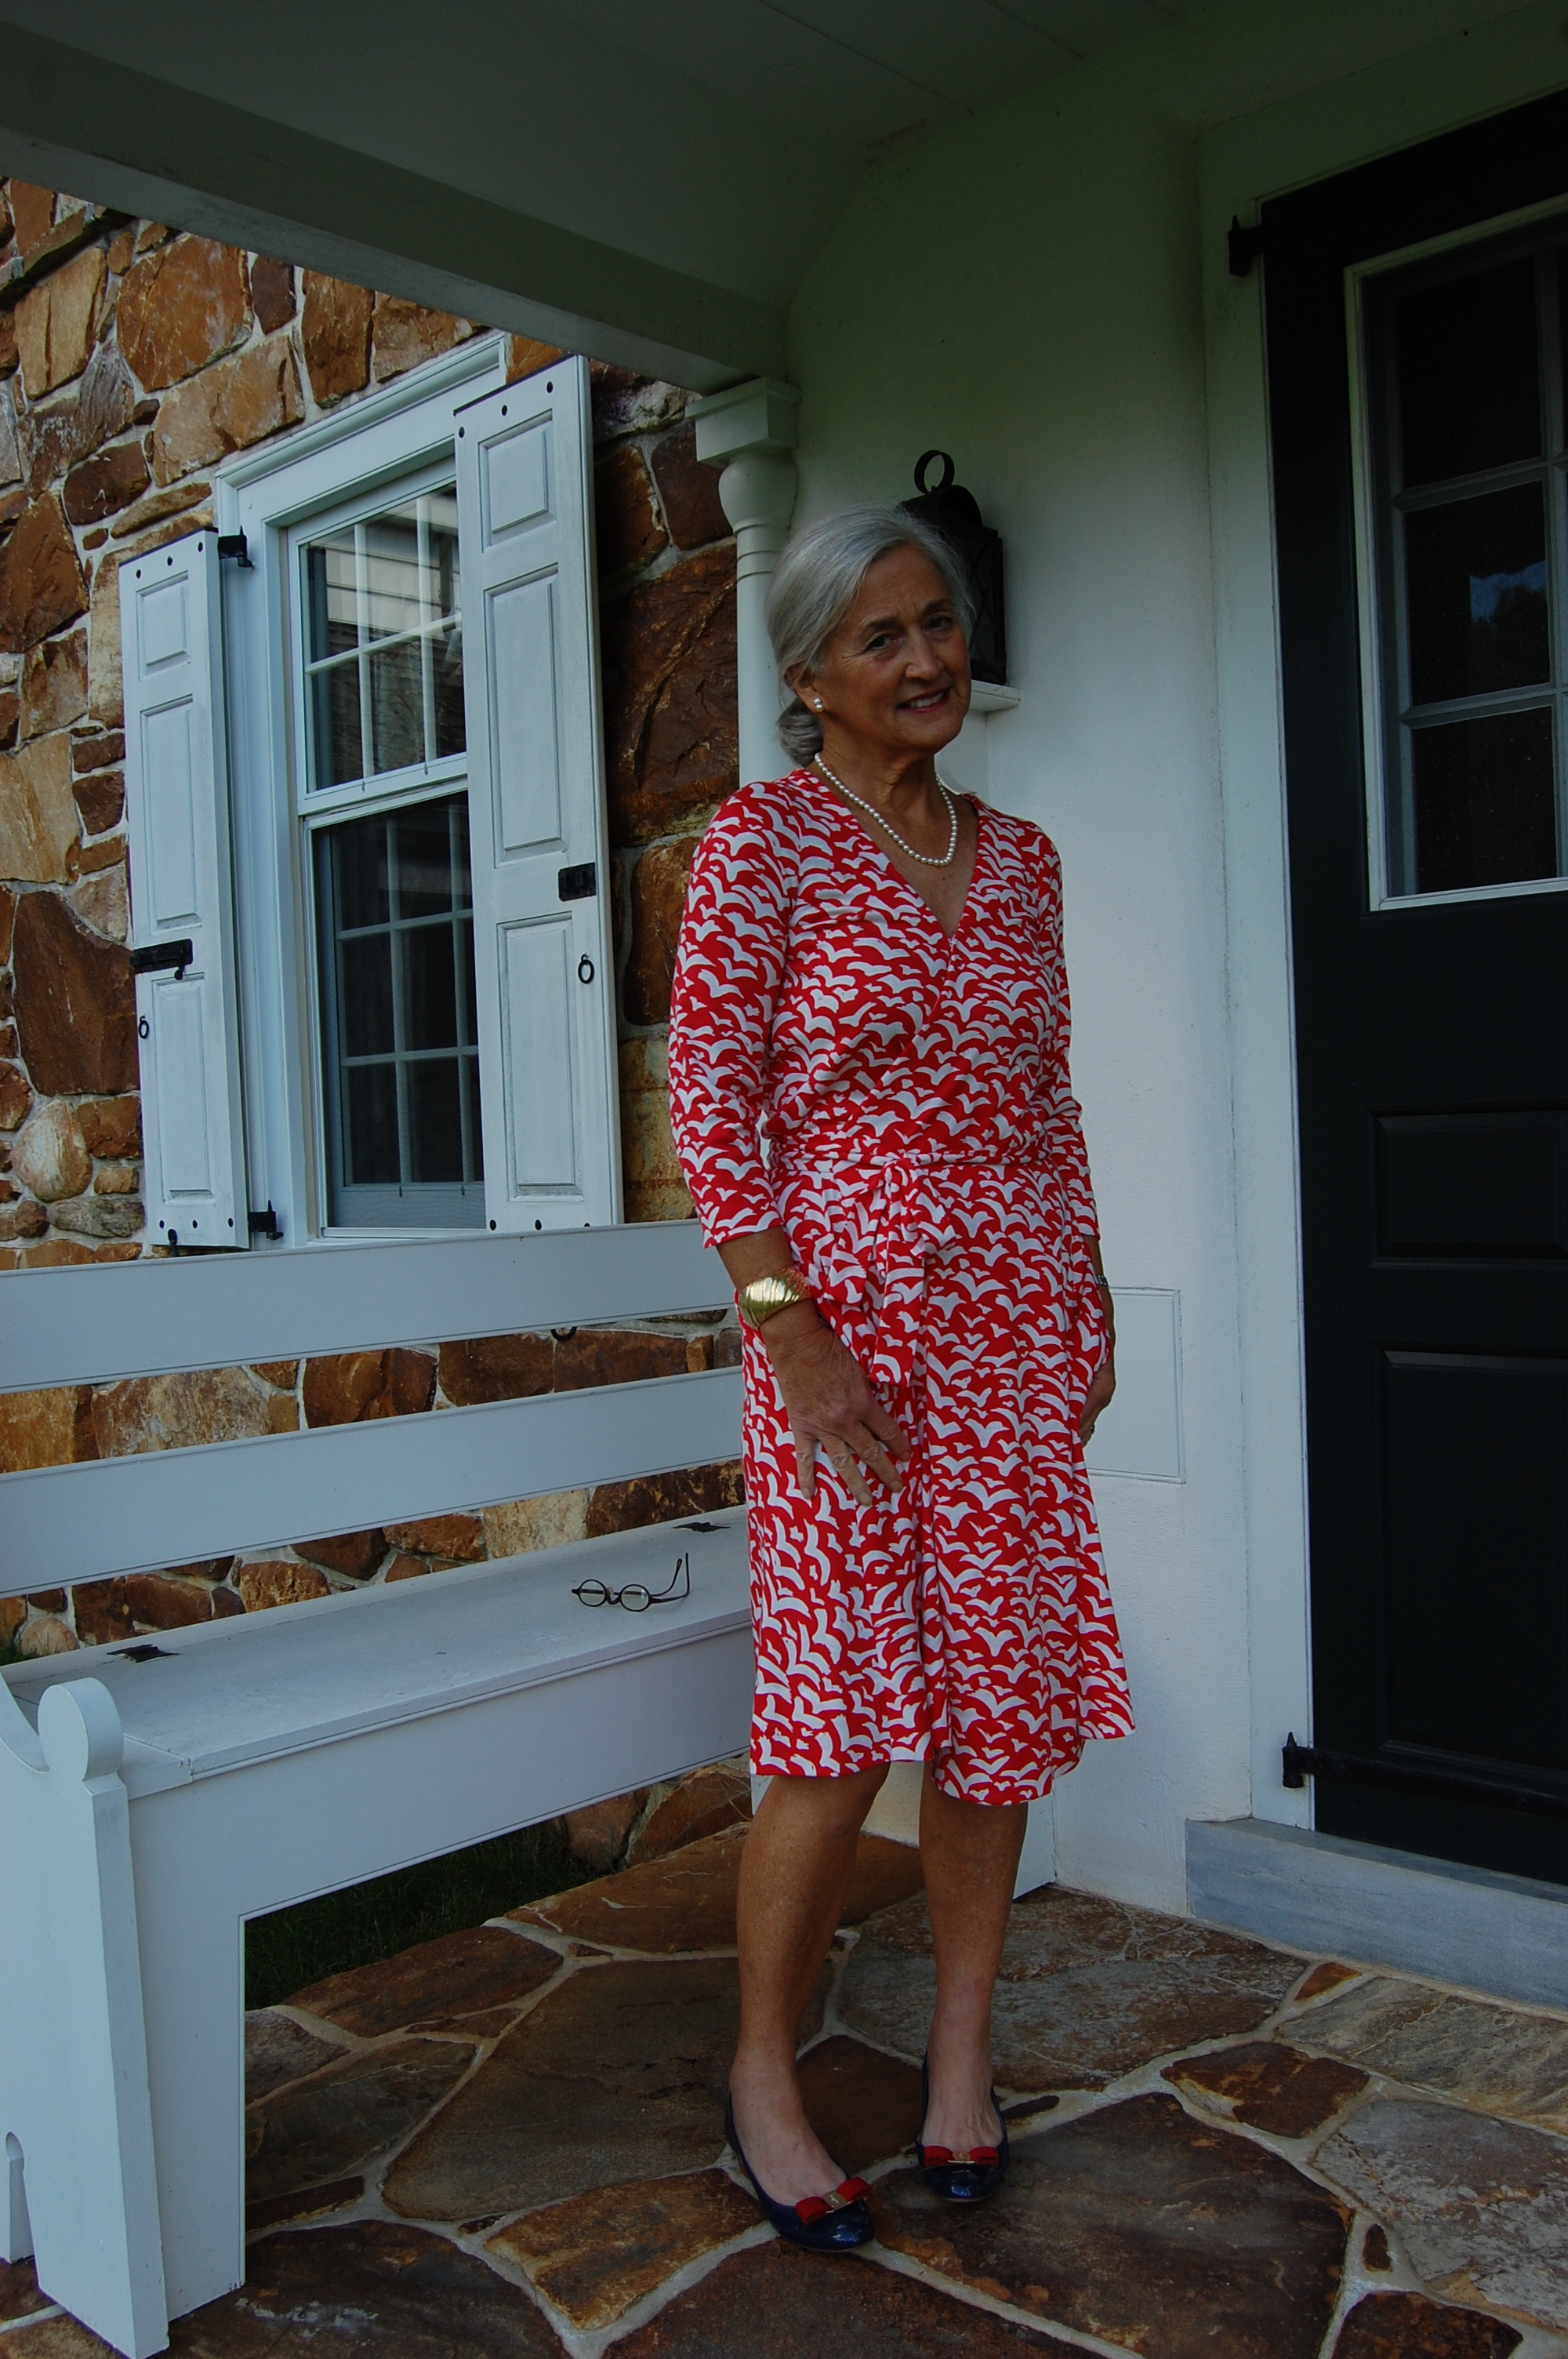
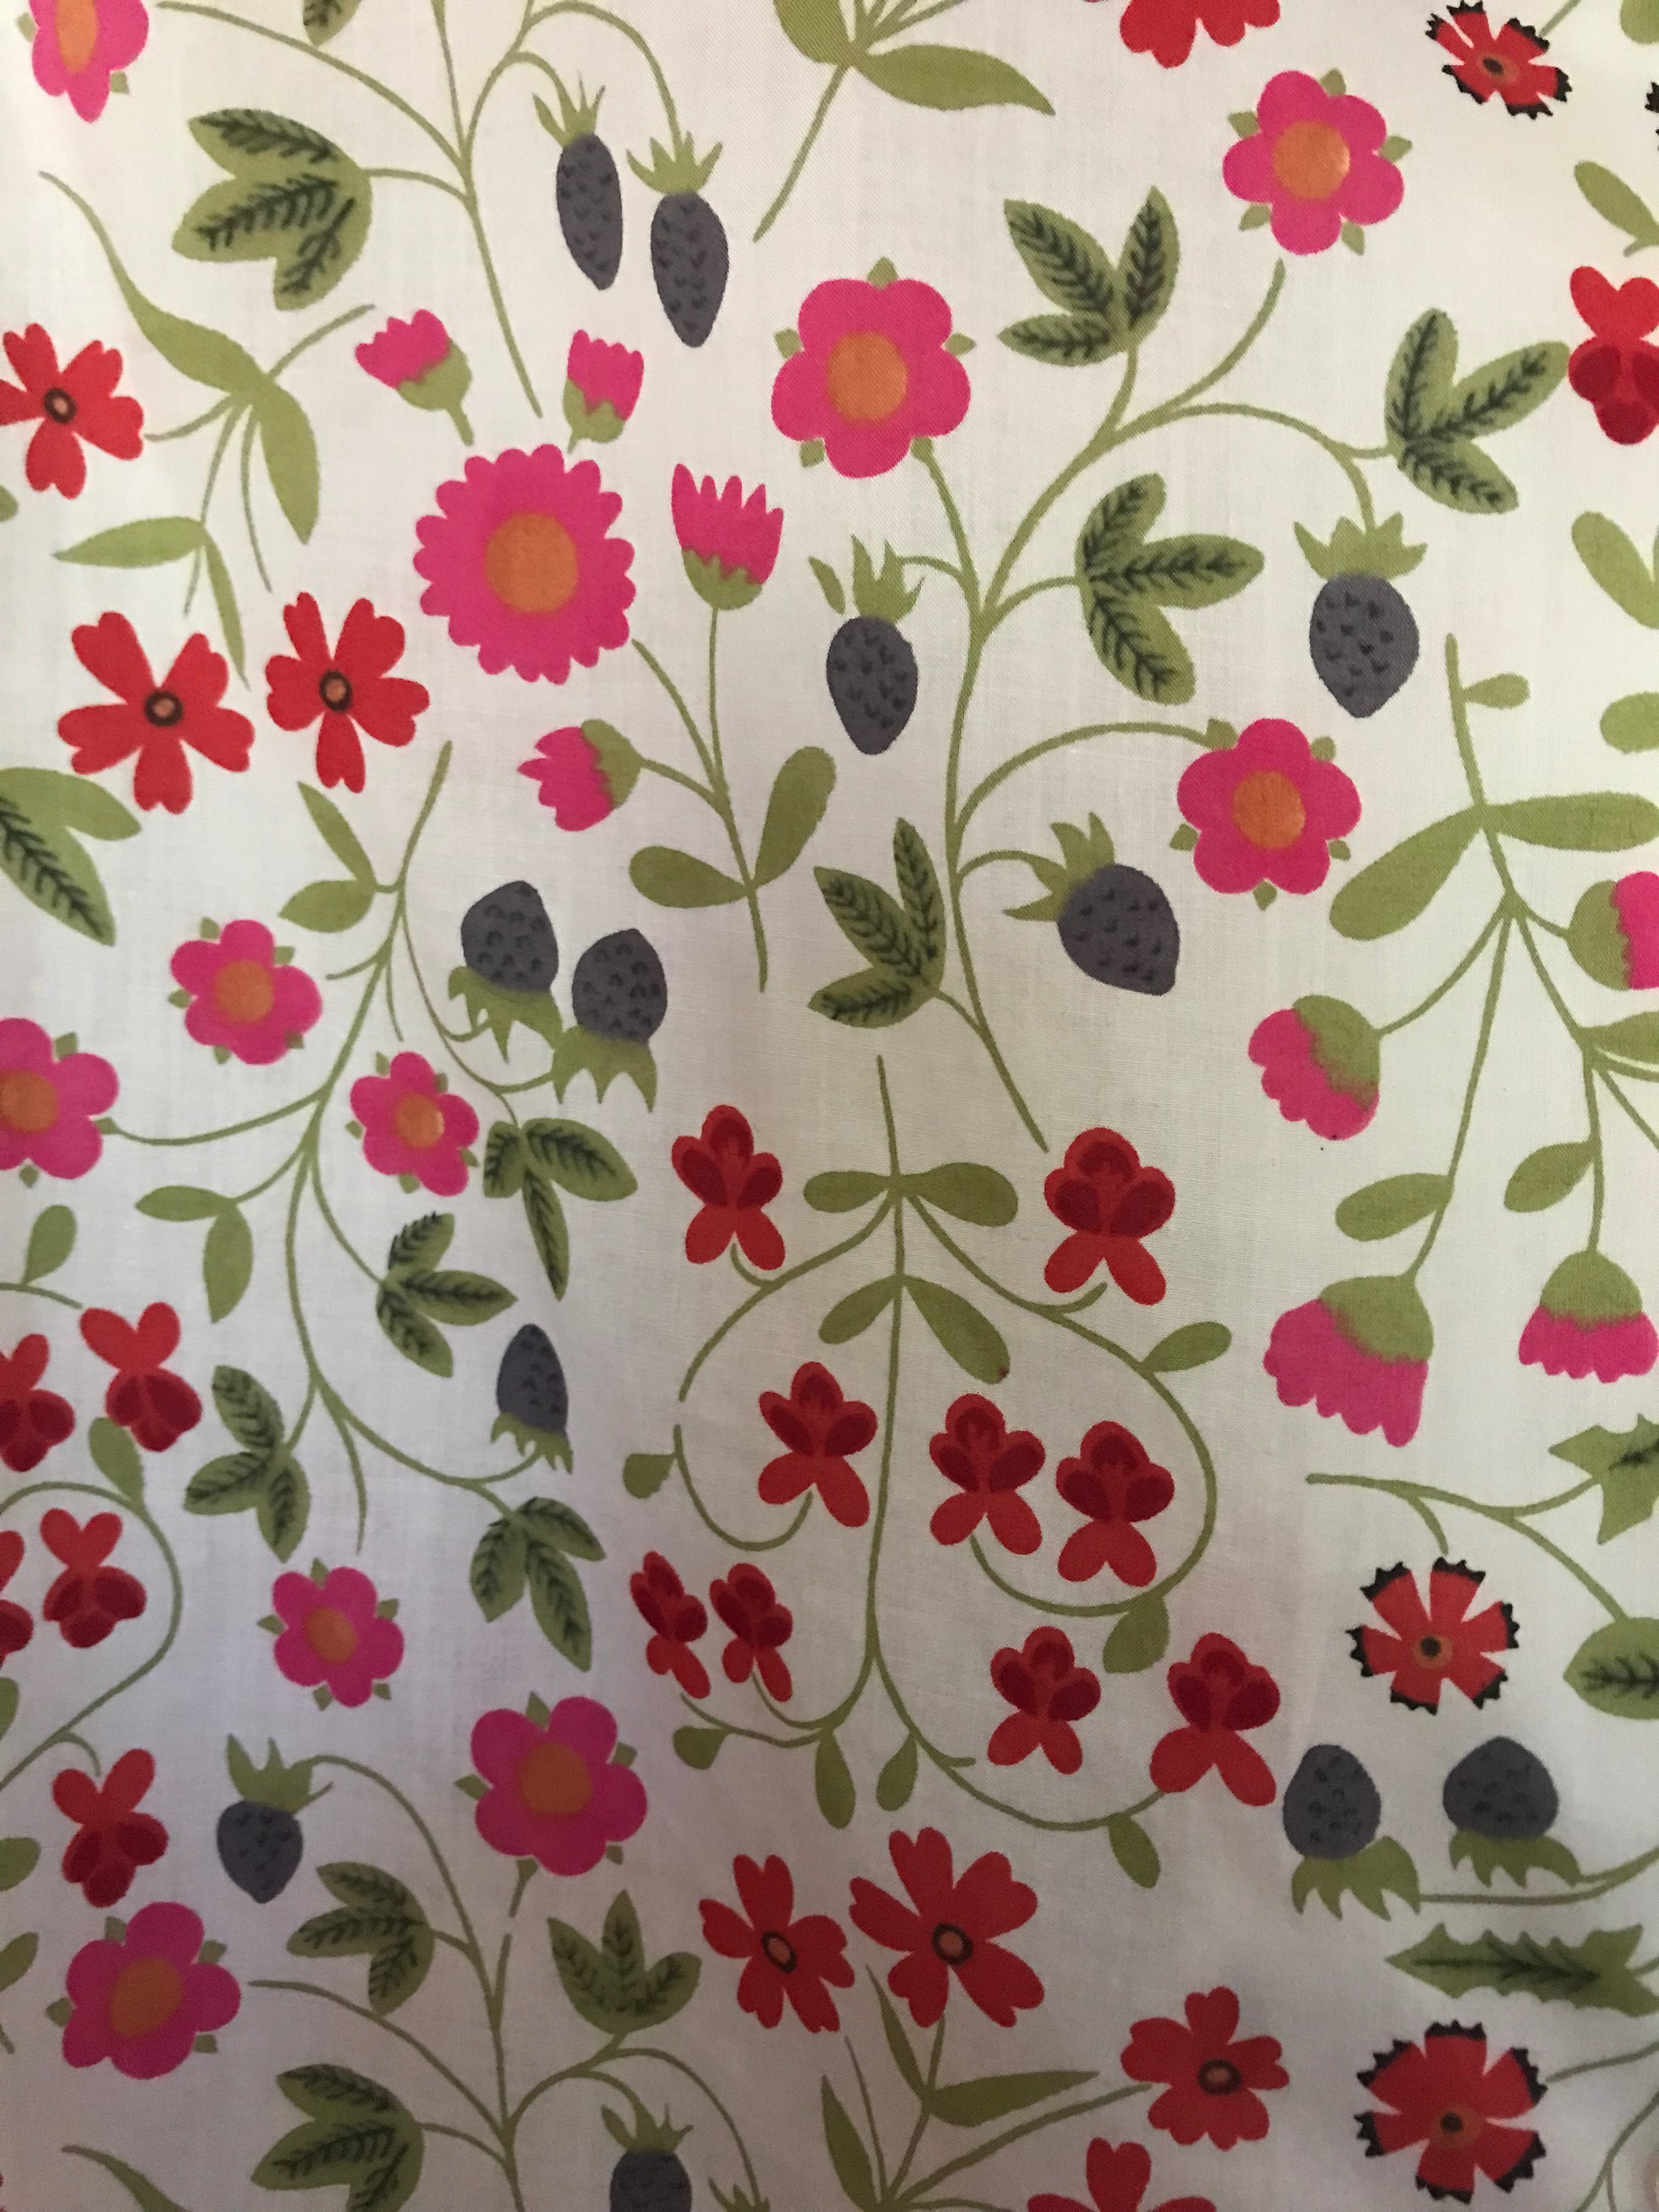
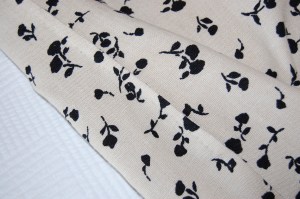
When I purchased this sateen, jacquard-woven fabric from Mendel Goldberg a couple of years ago, I wasn’t sure what it would eventually become.  It had a wide repeat to the design (which is something to consider when you know you are facing considerable matching of the design), but it was a lovely 60” wide.  I bought just 2 yards (it was expensive) and hoped I would have enough fabric to finagle something.  

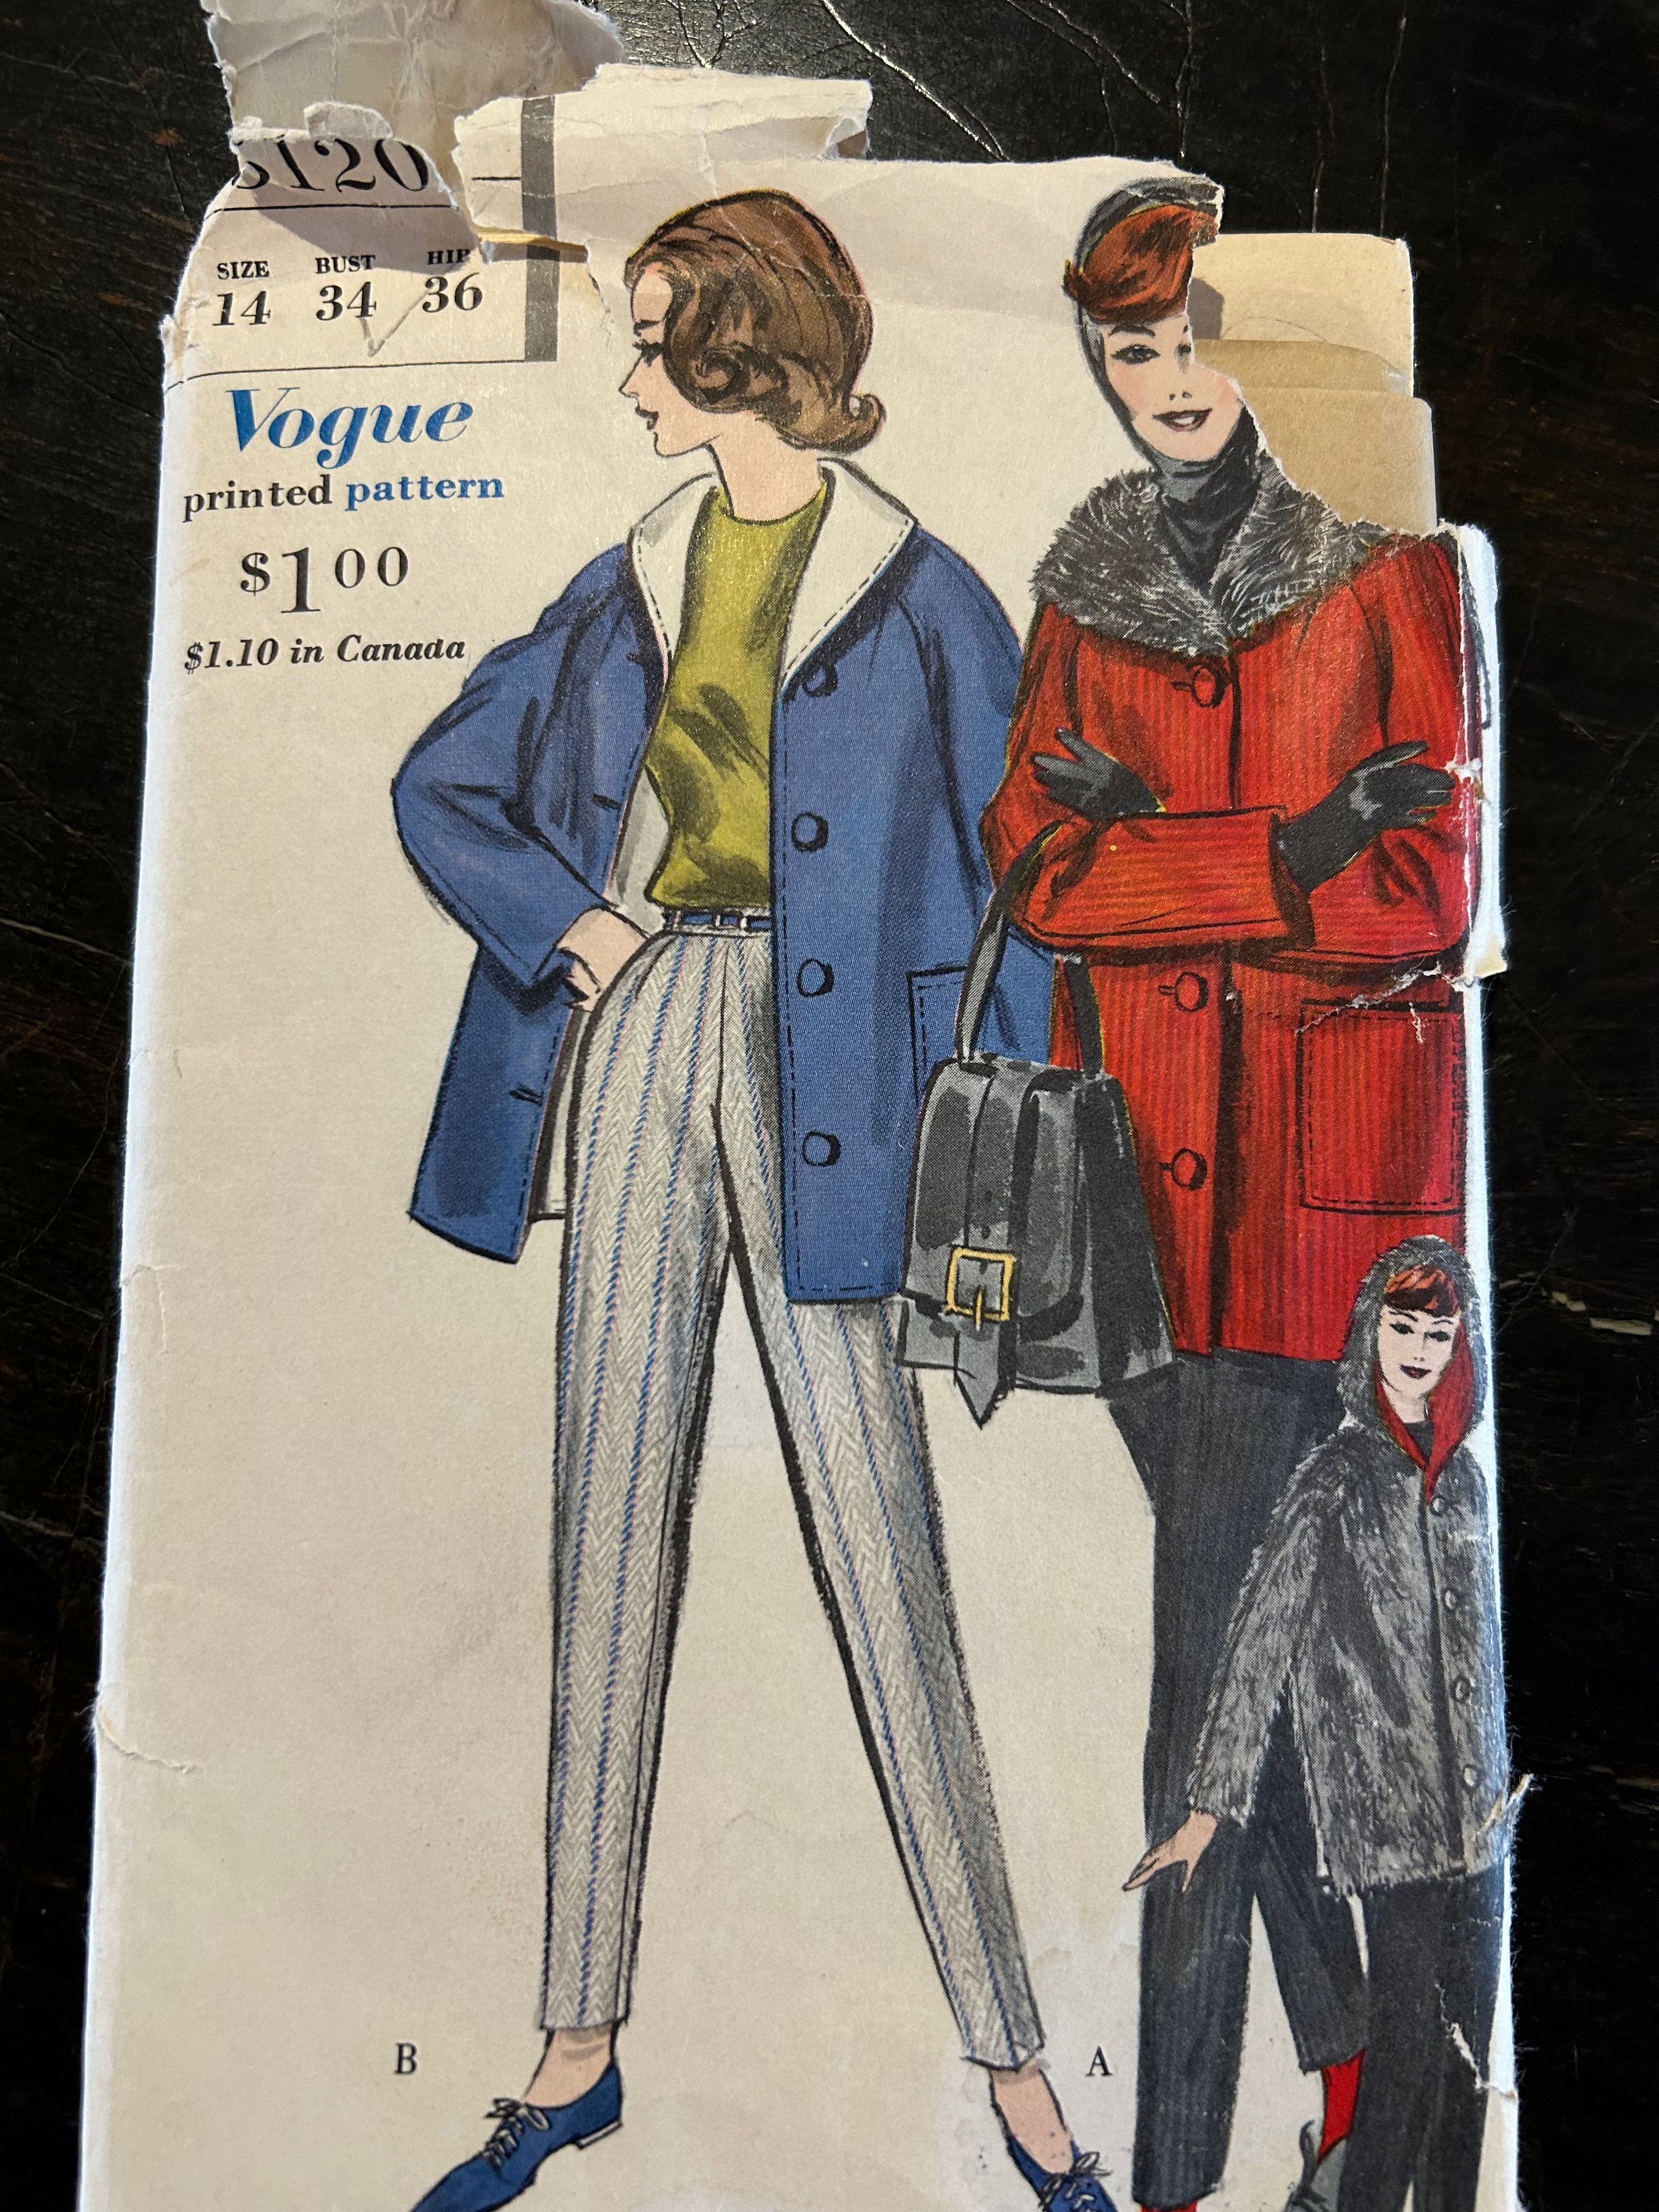
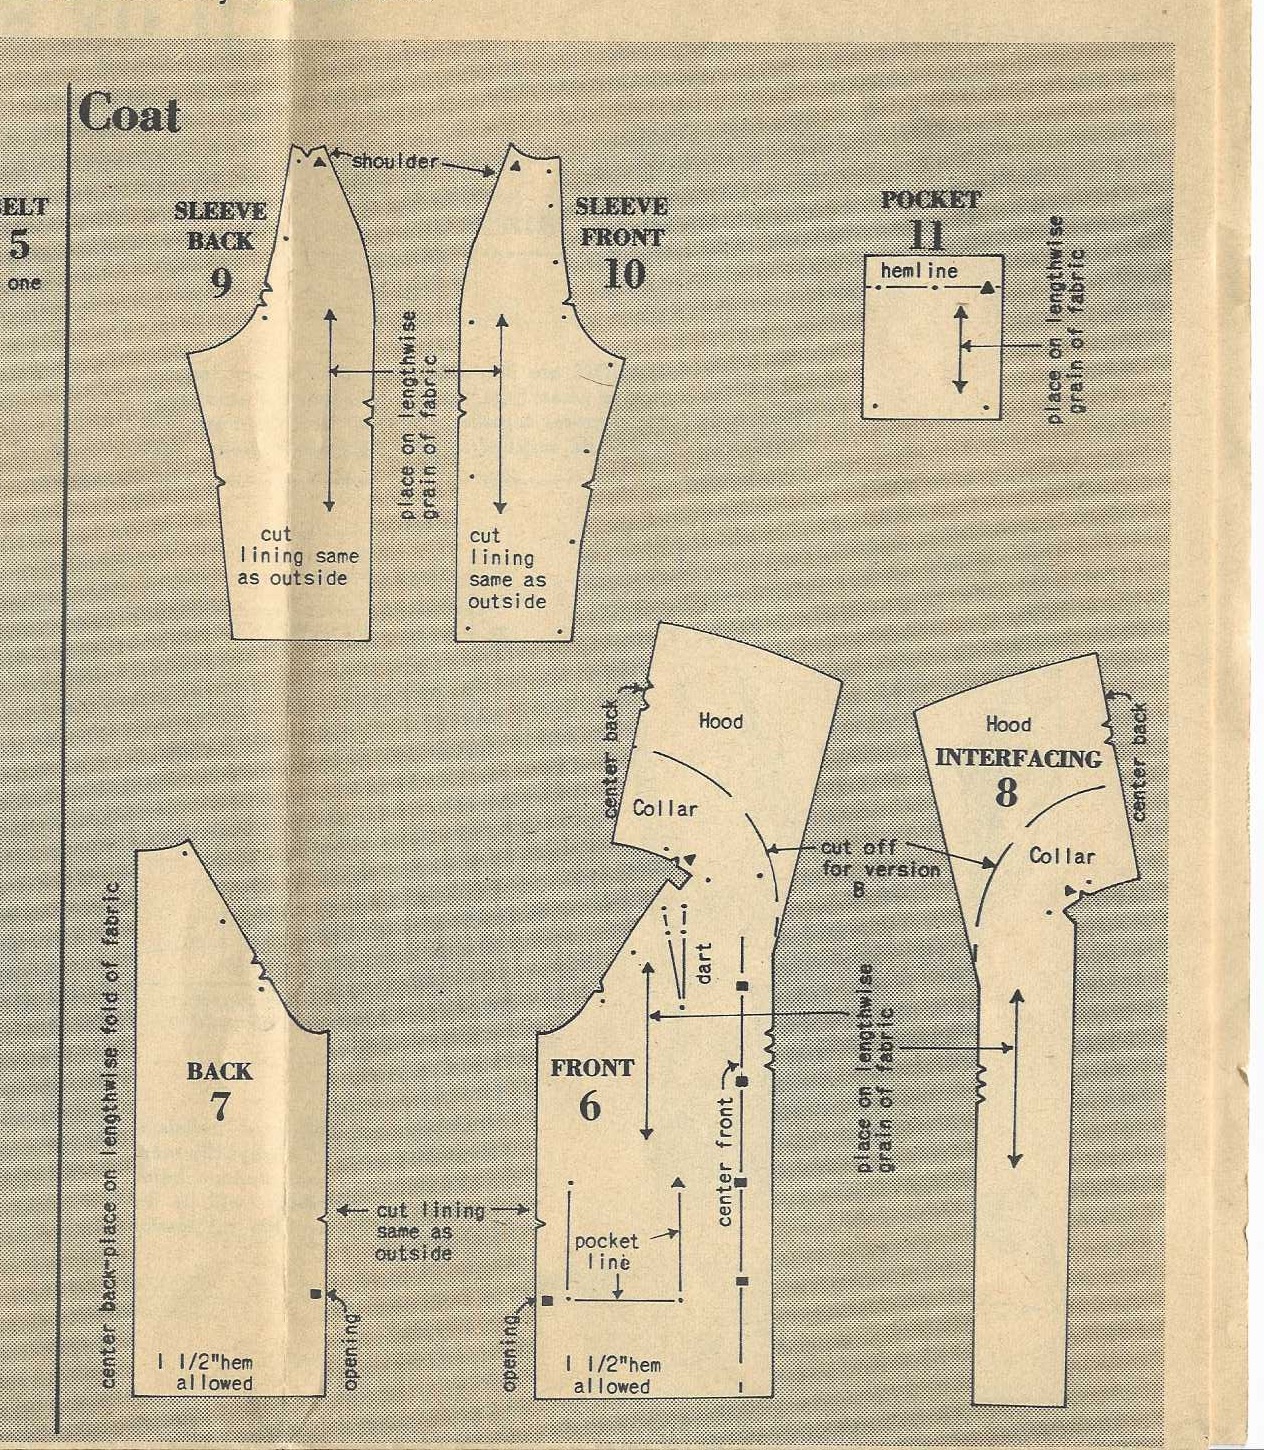
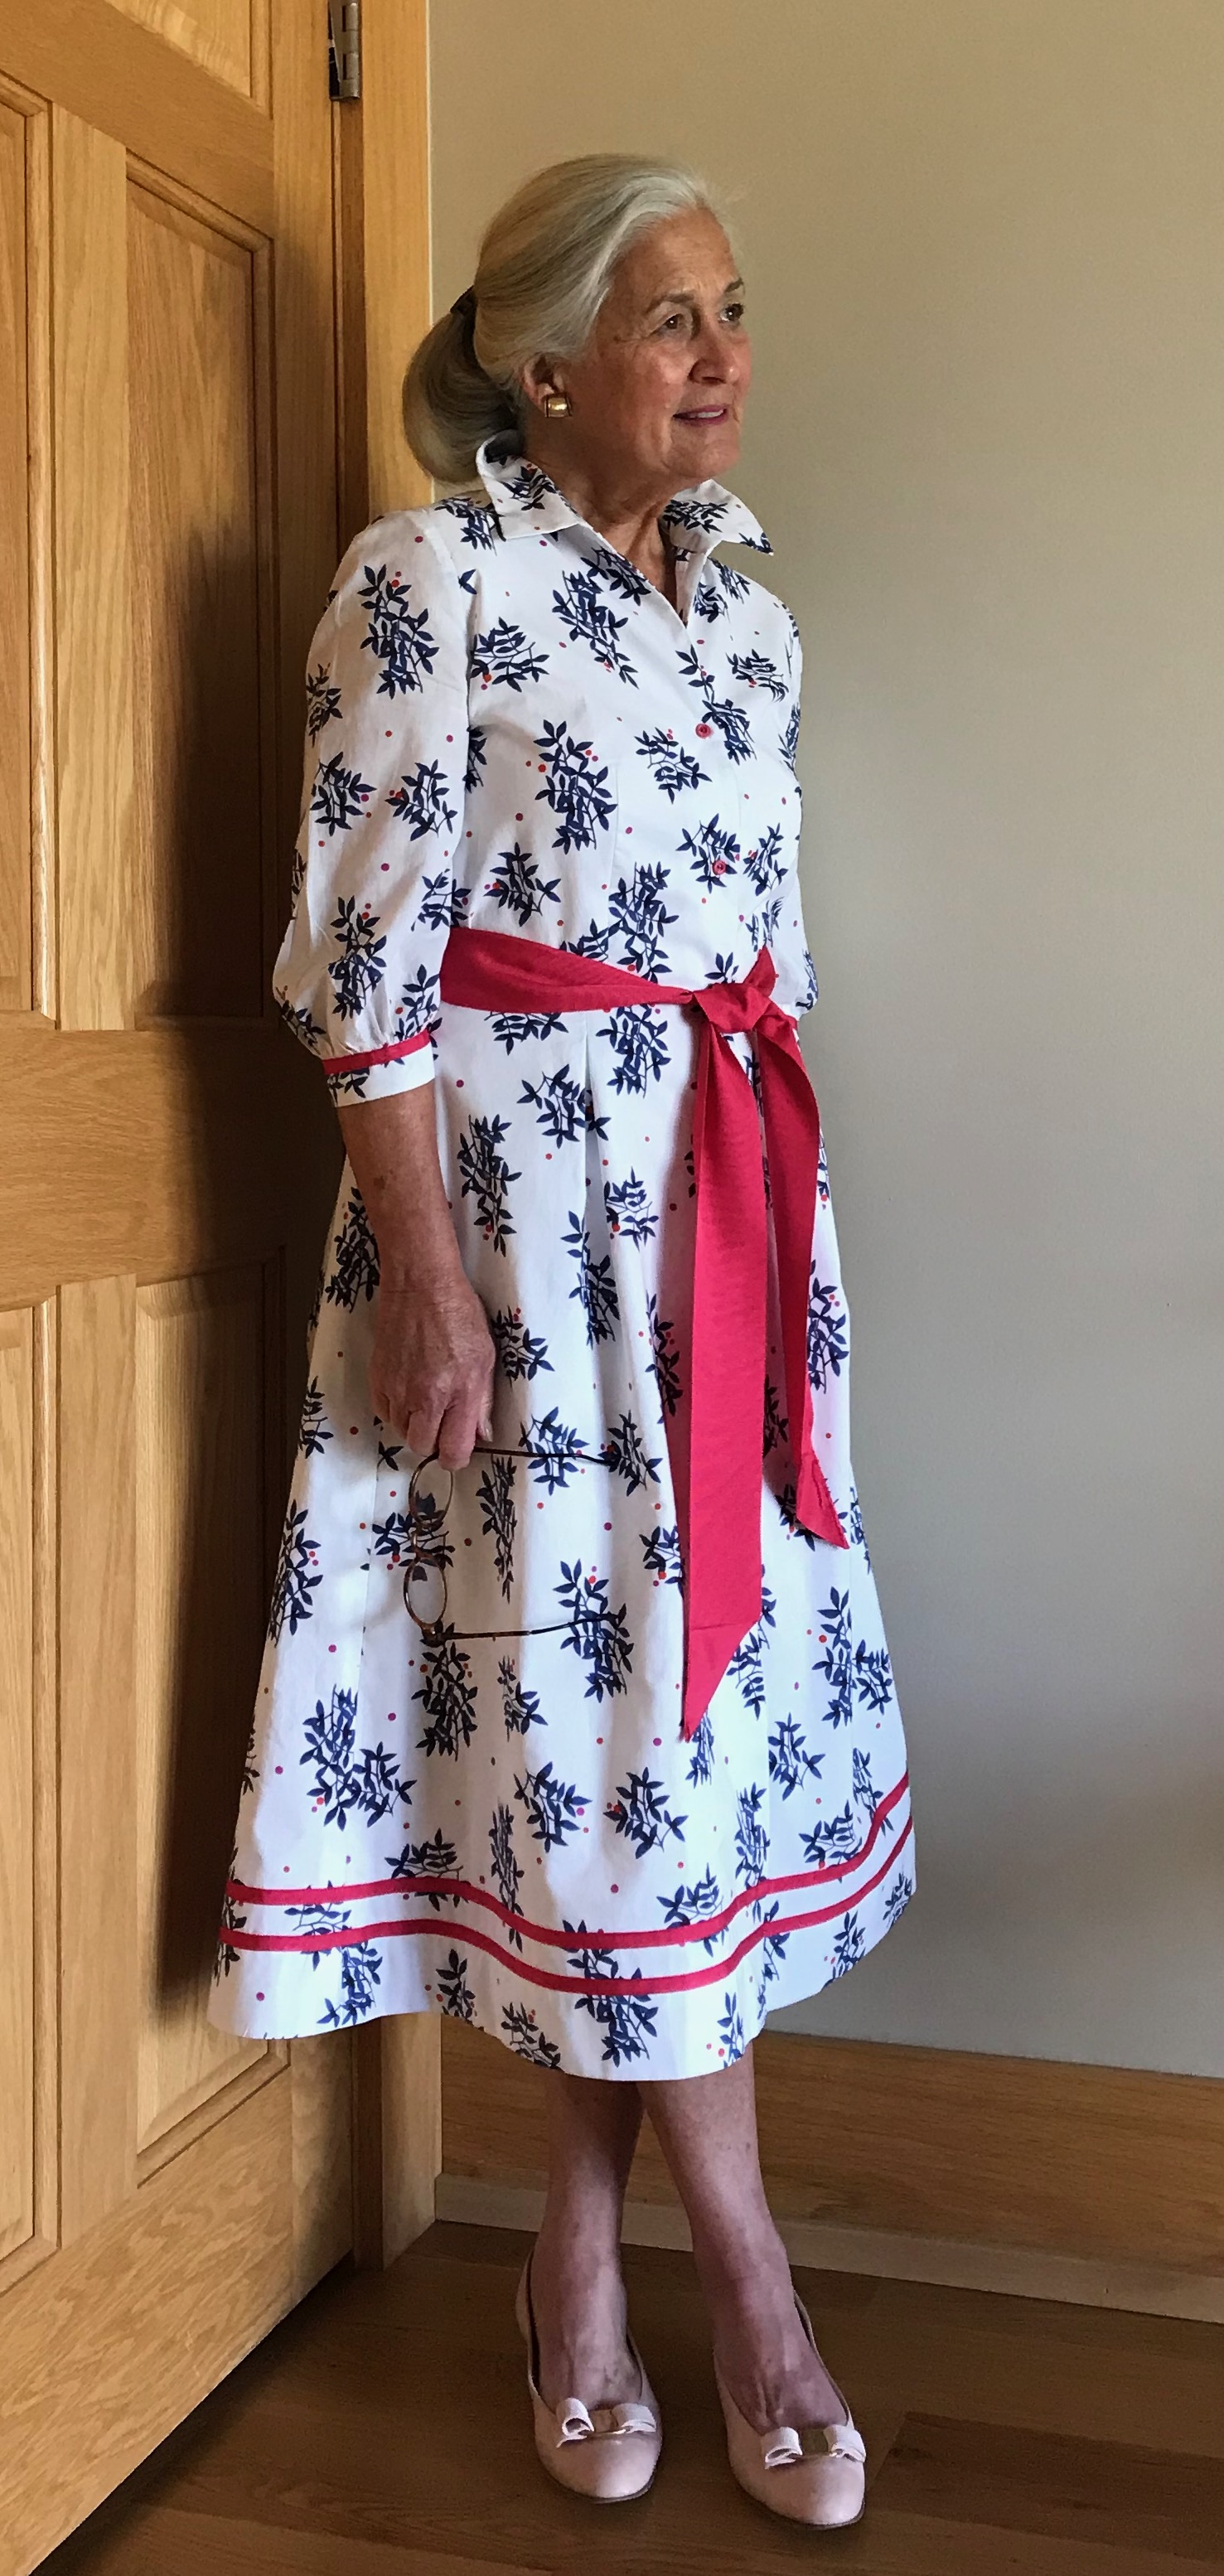
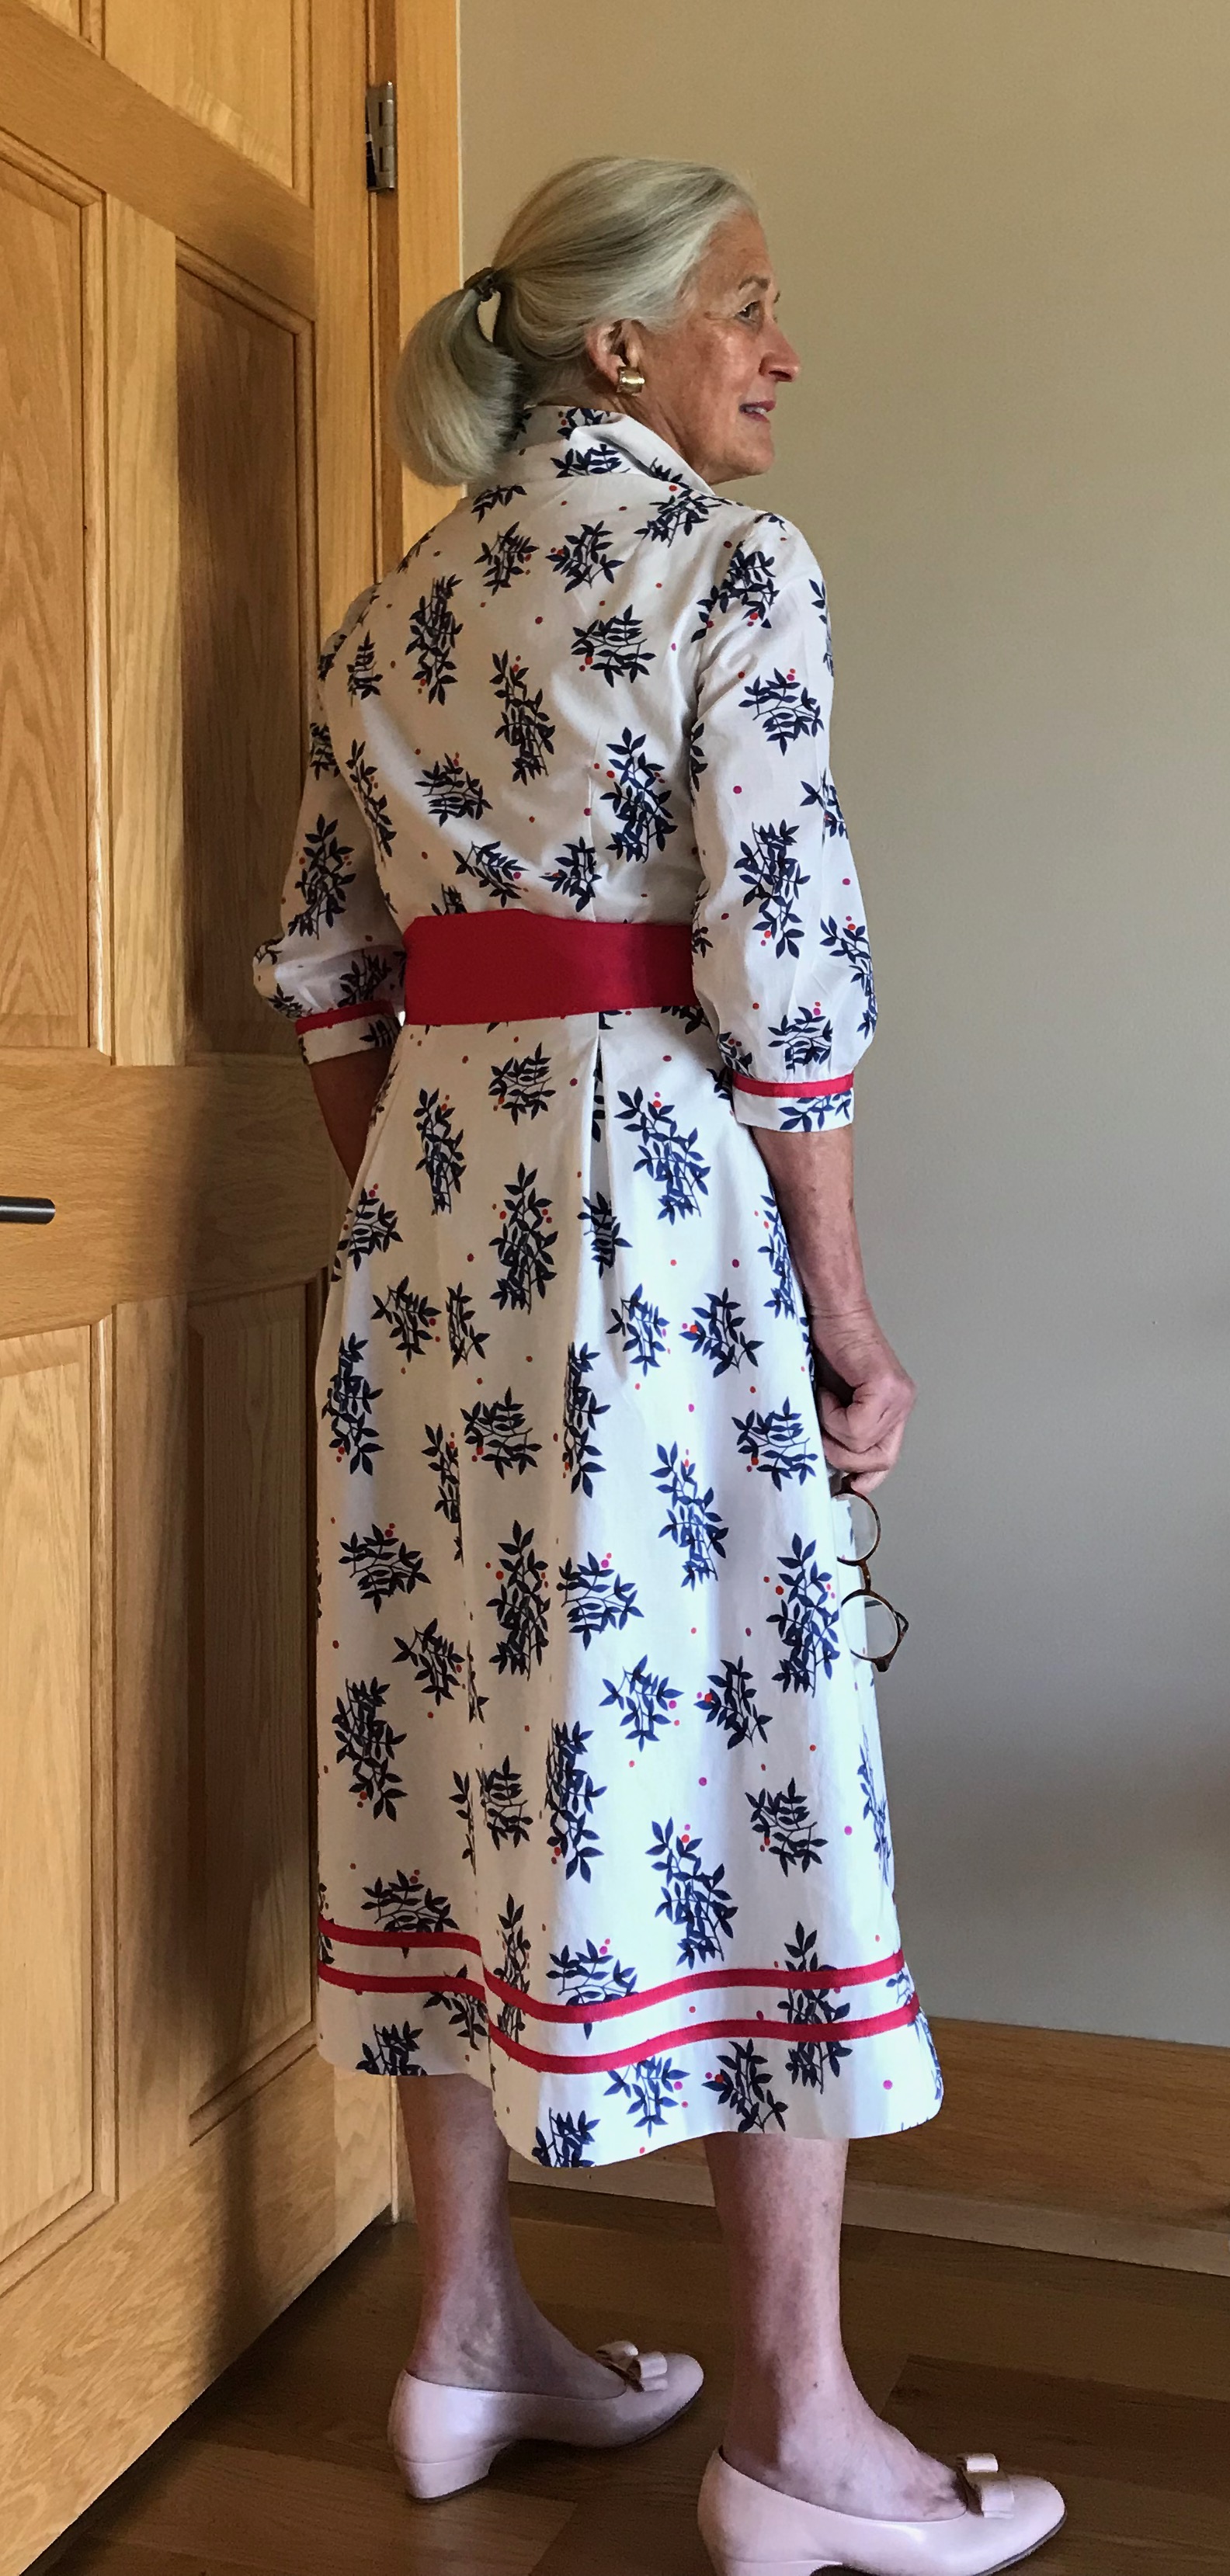
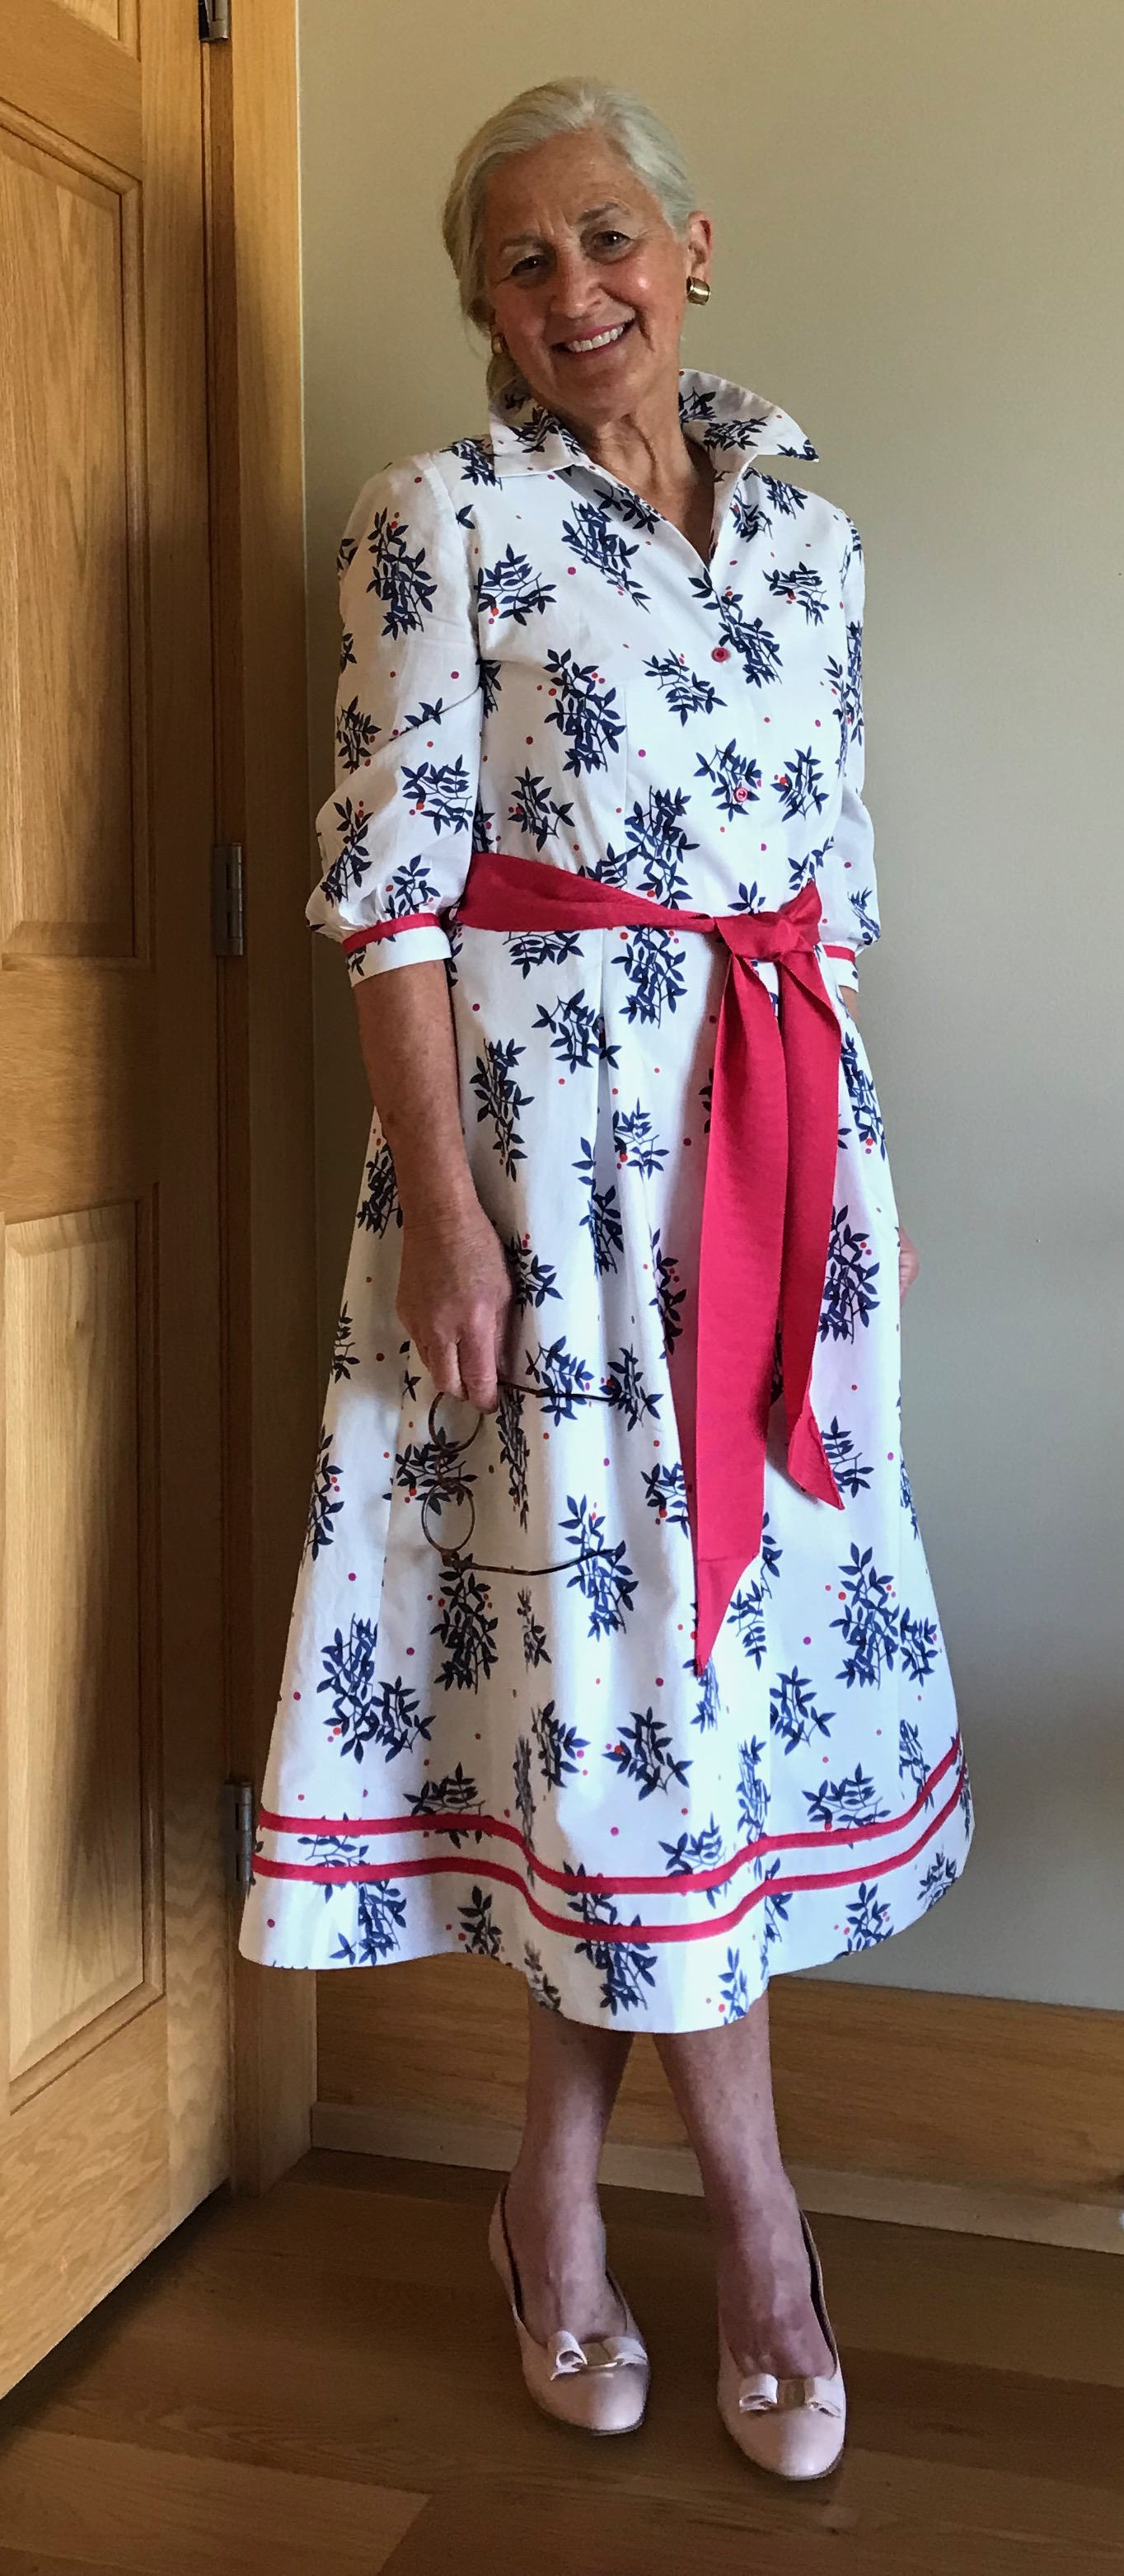
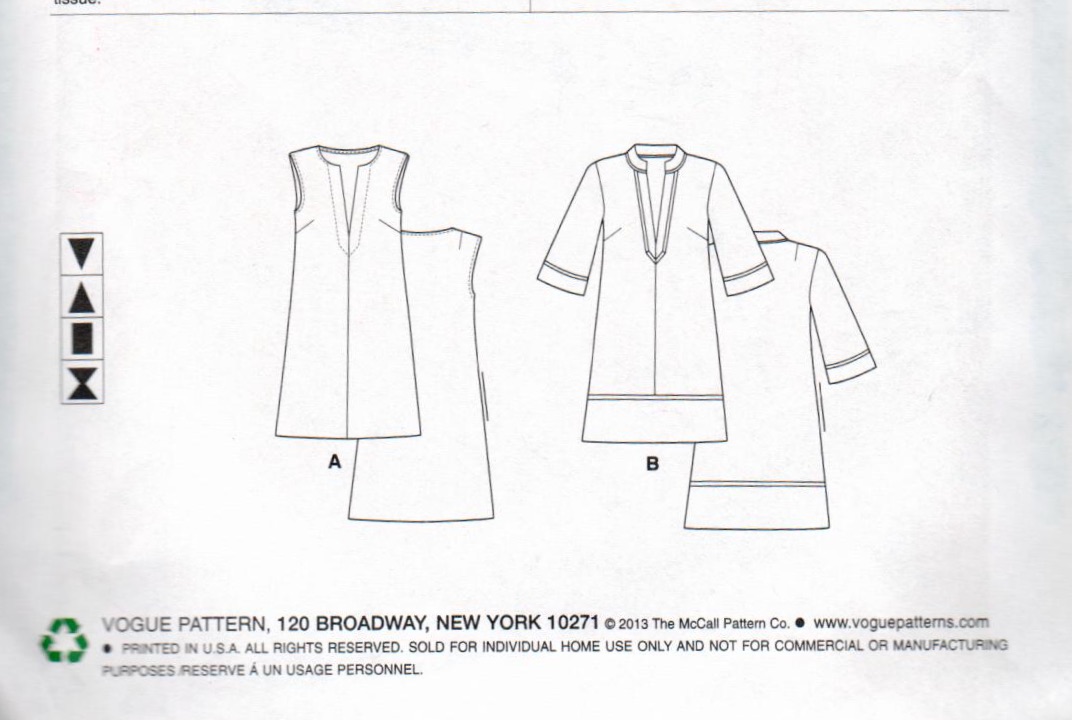
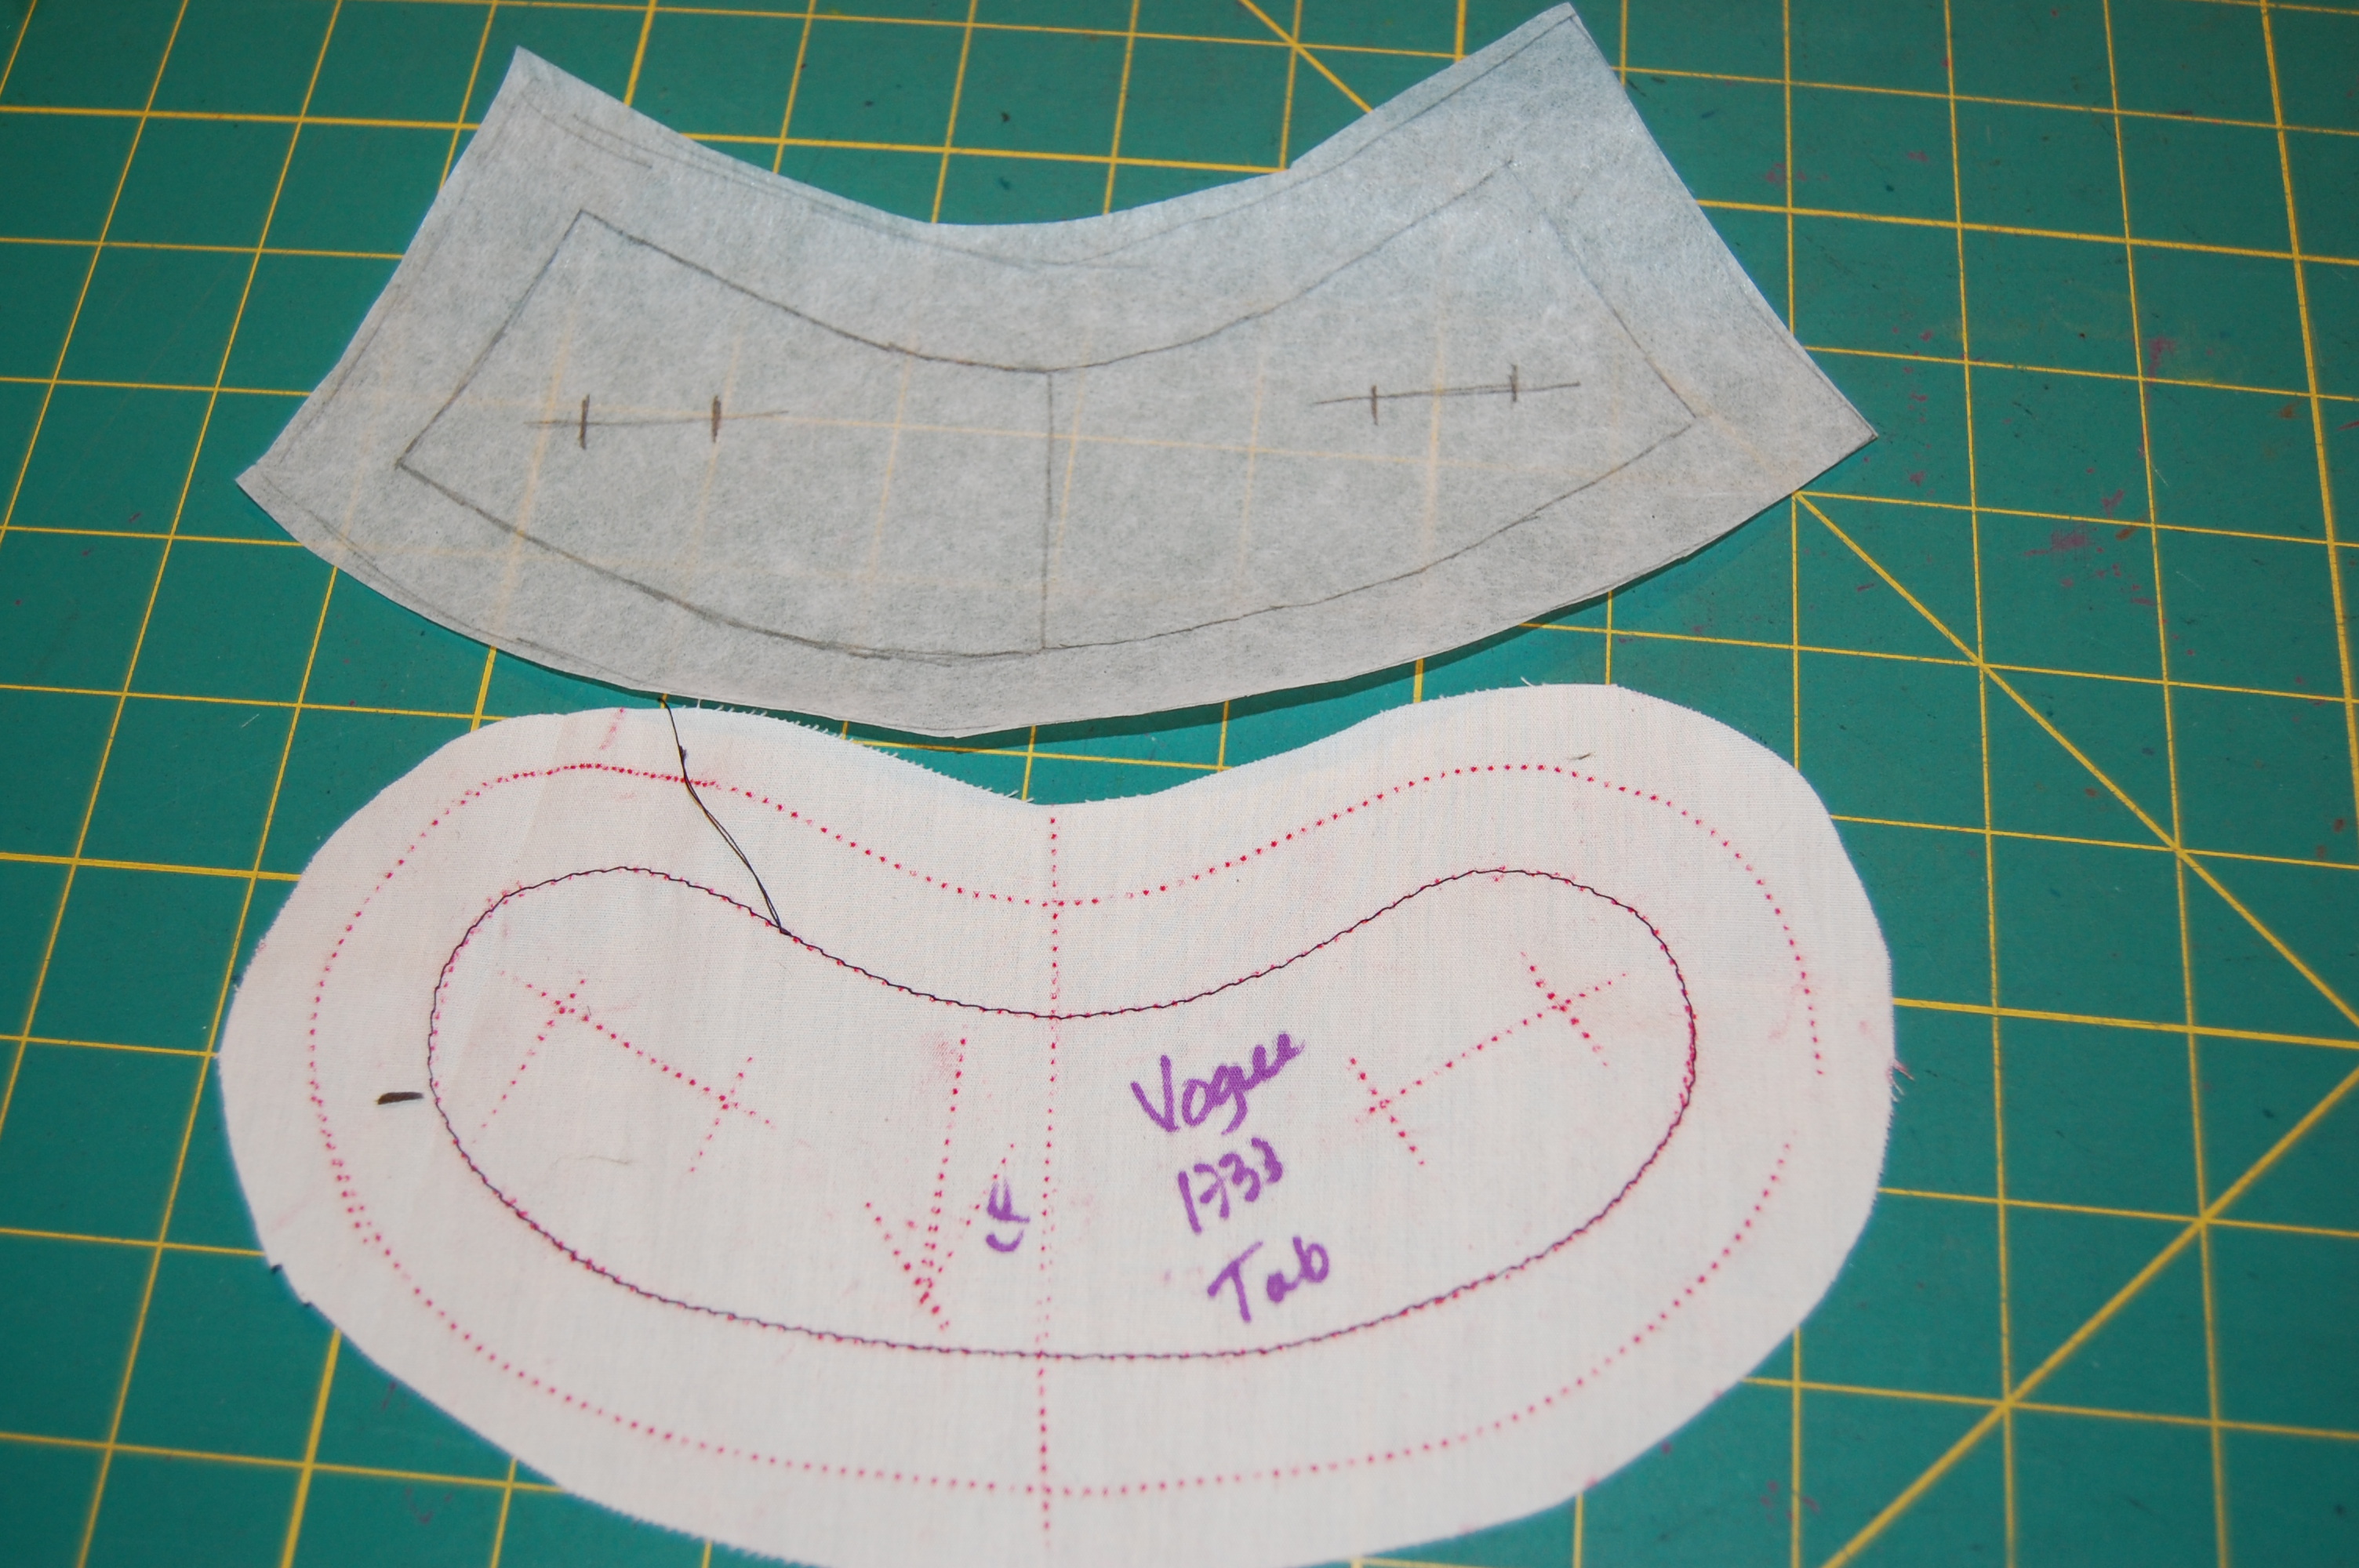
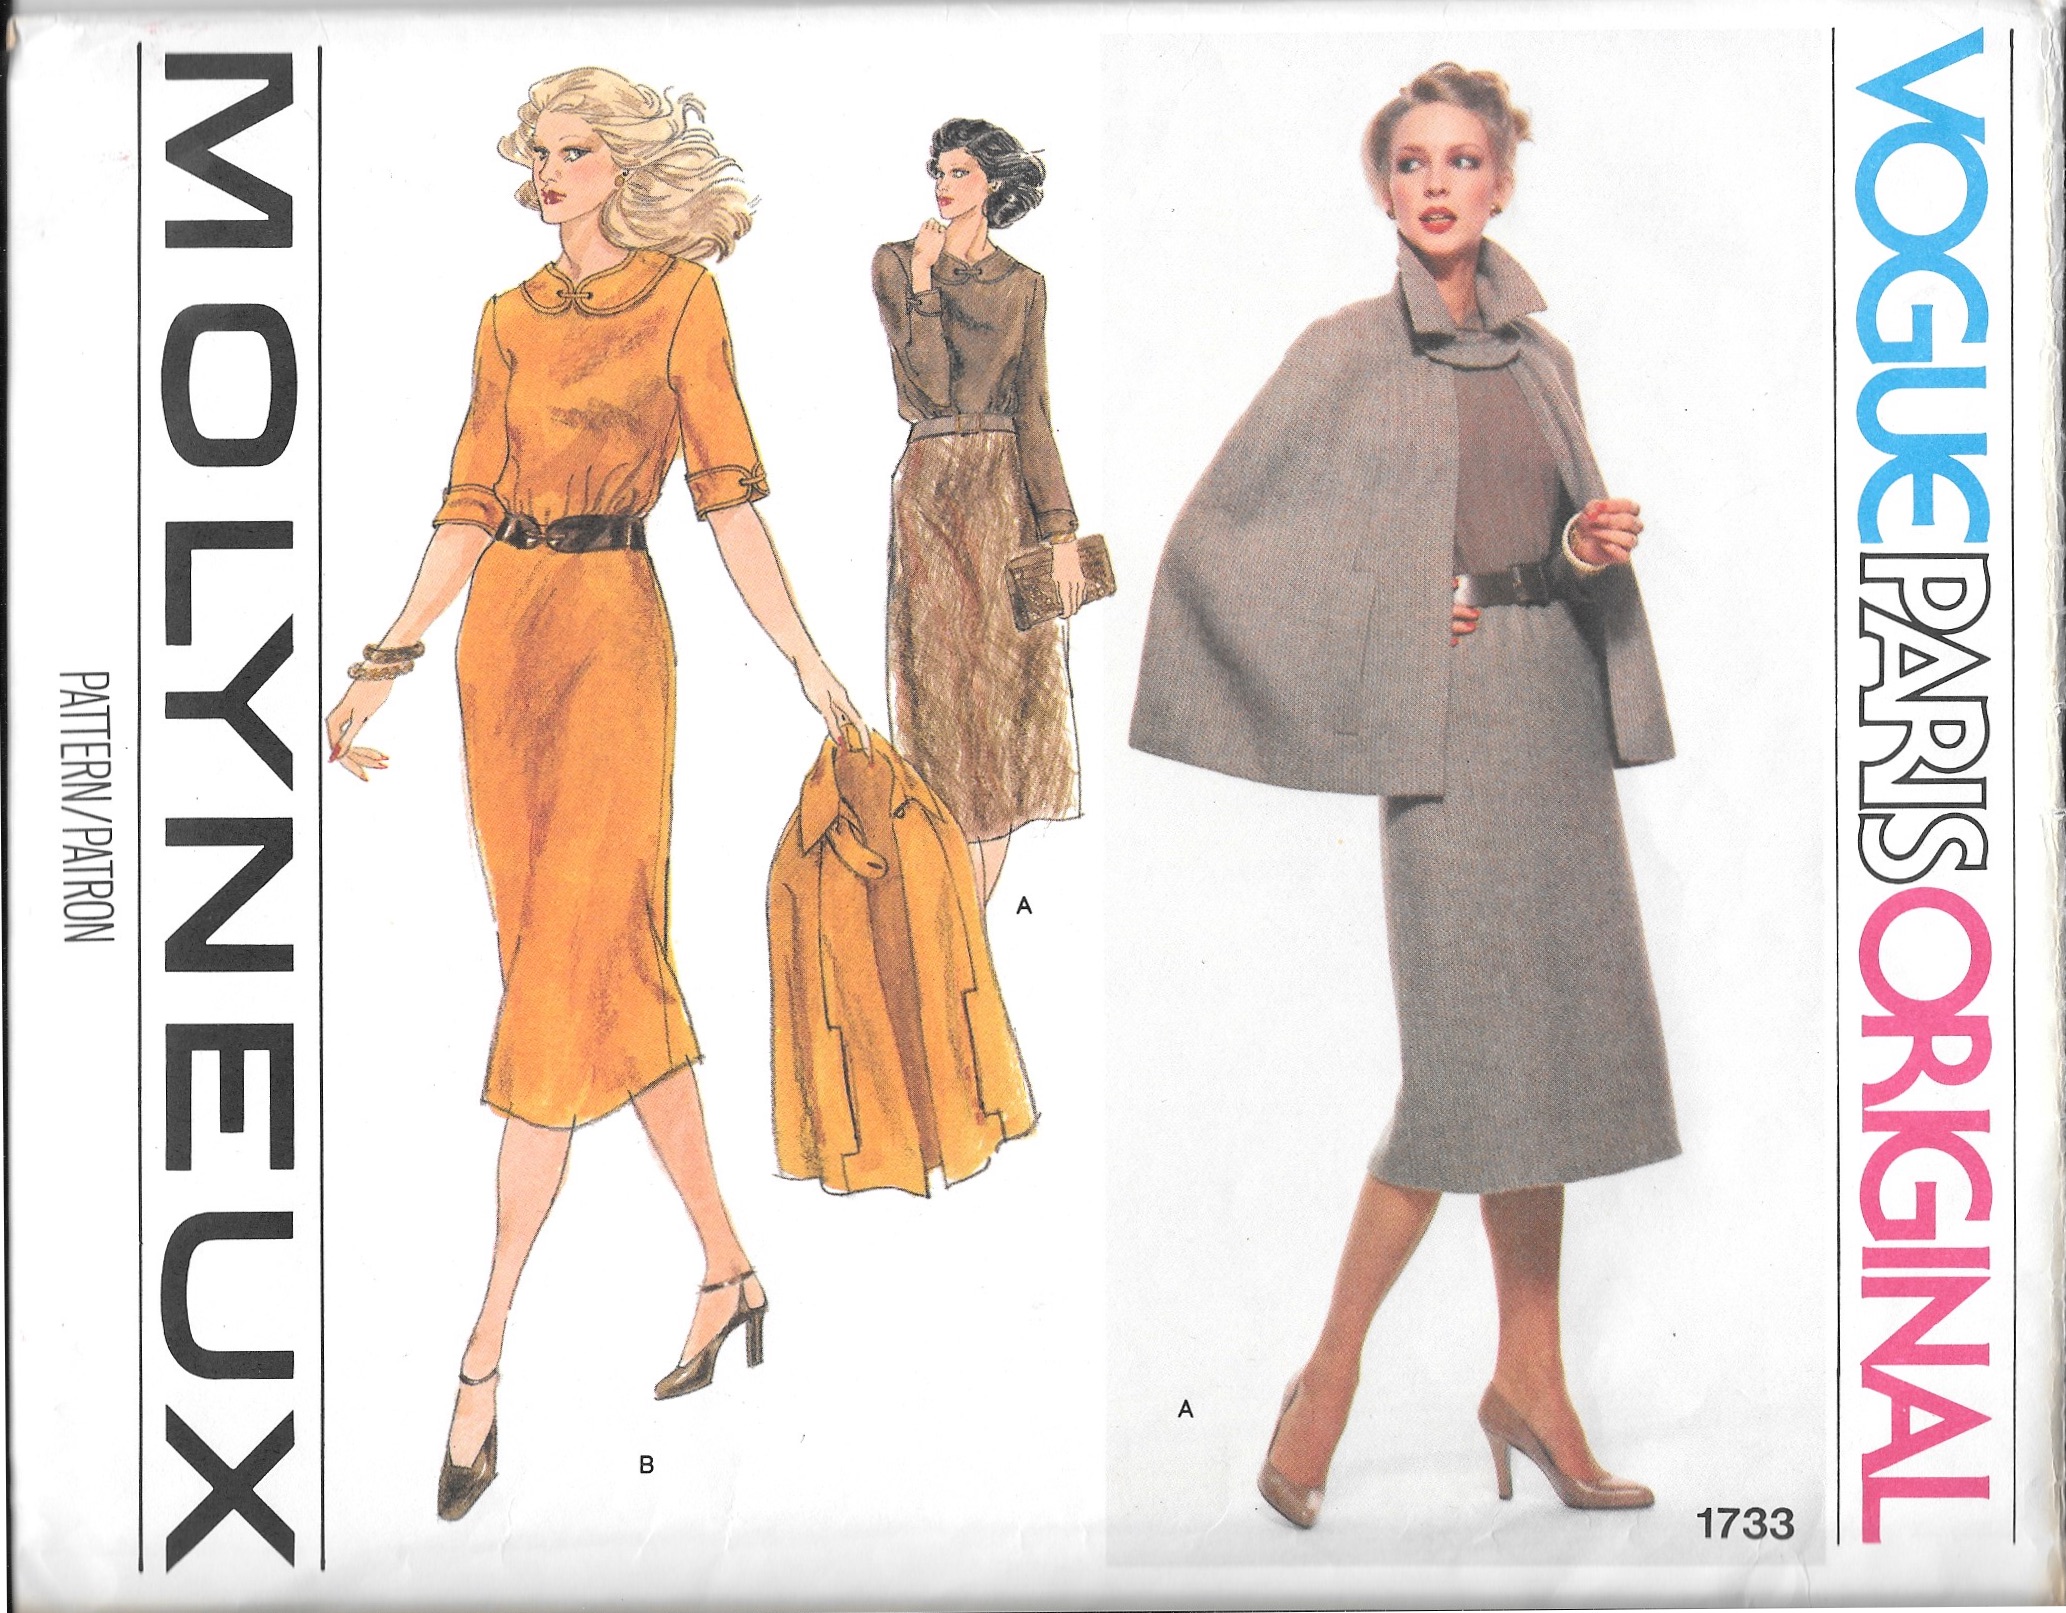
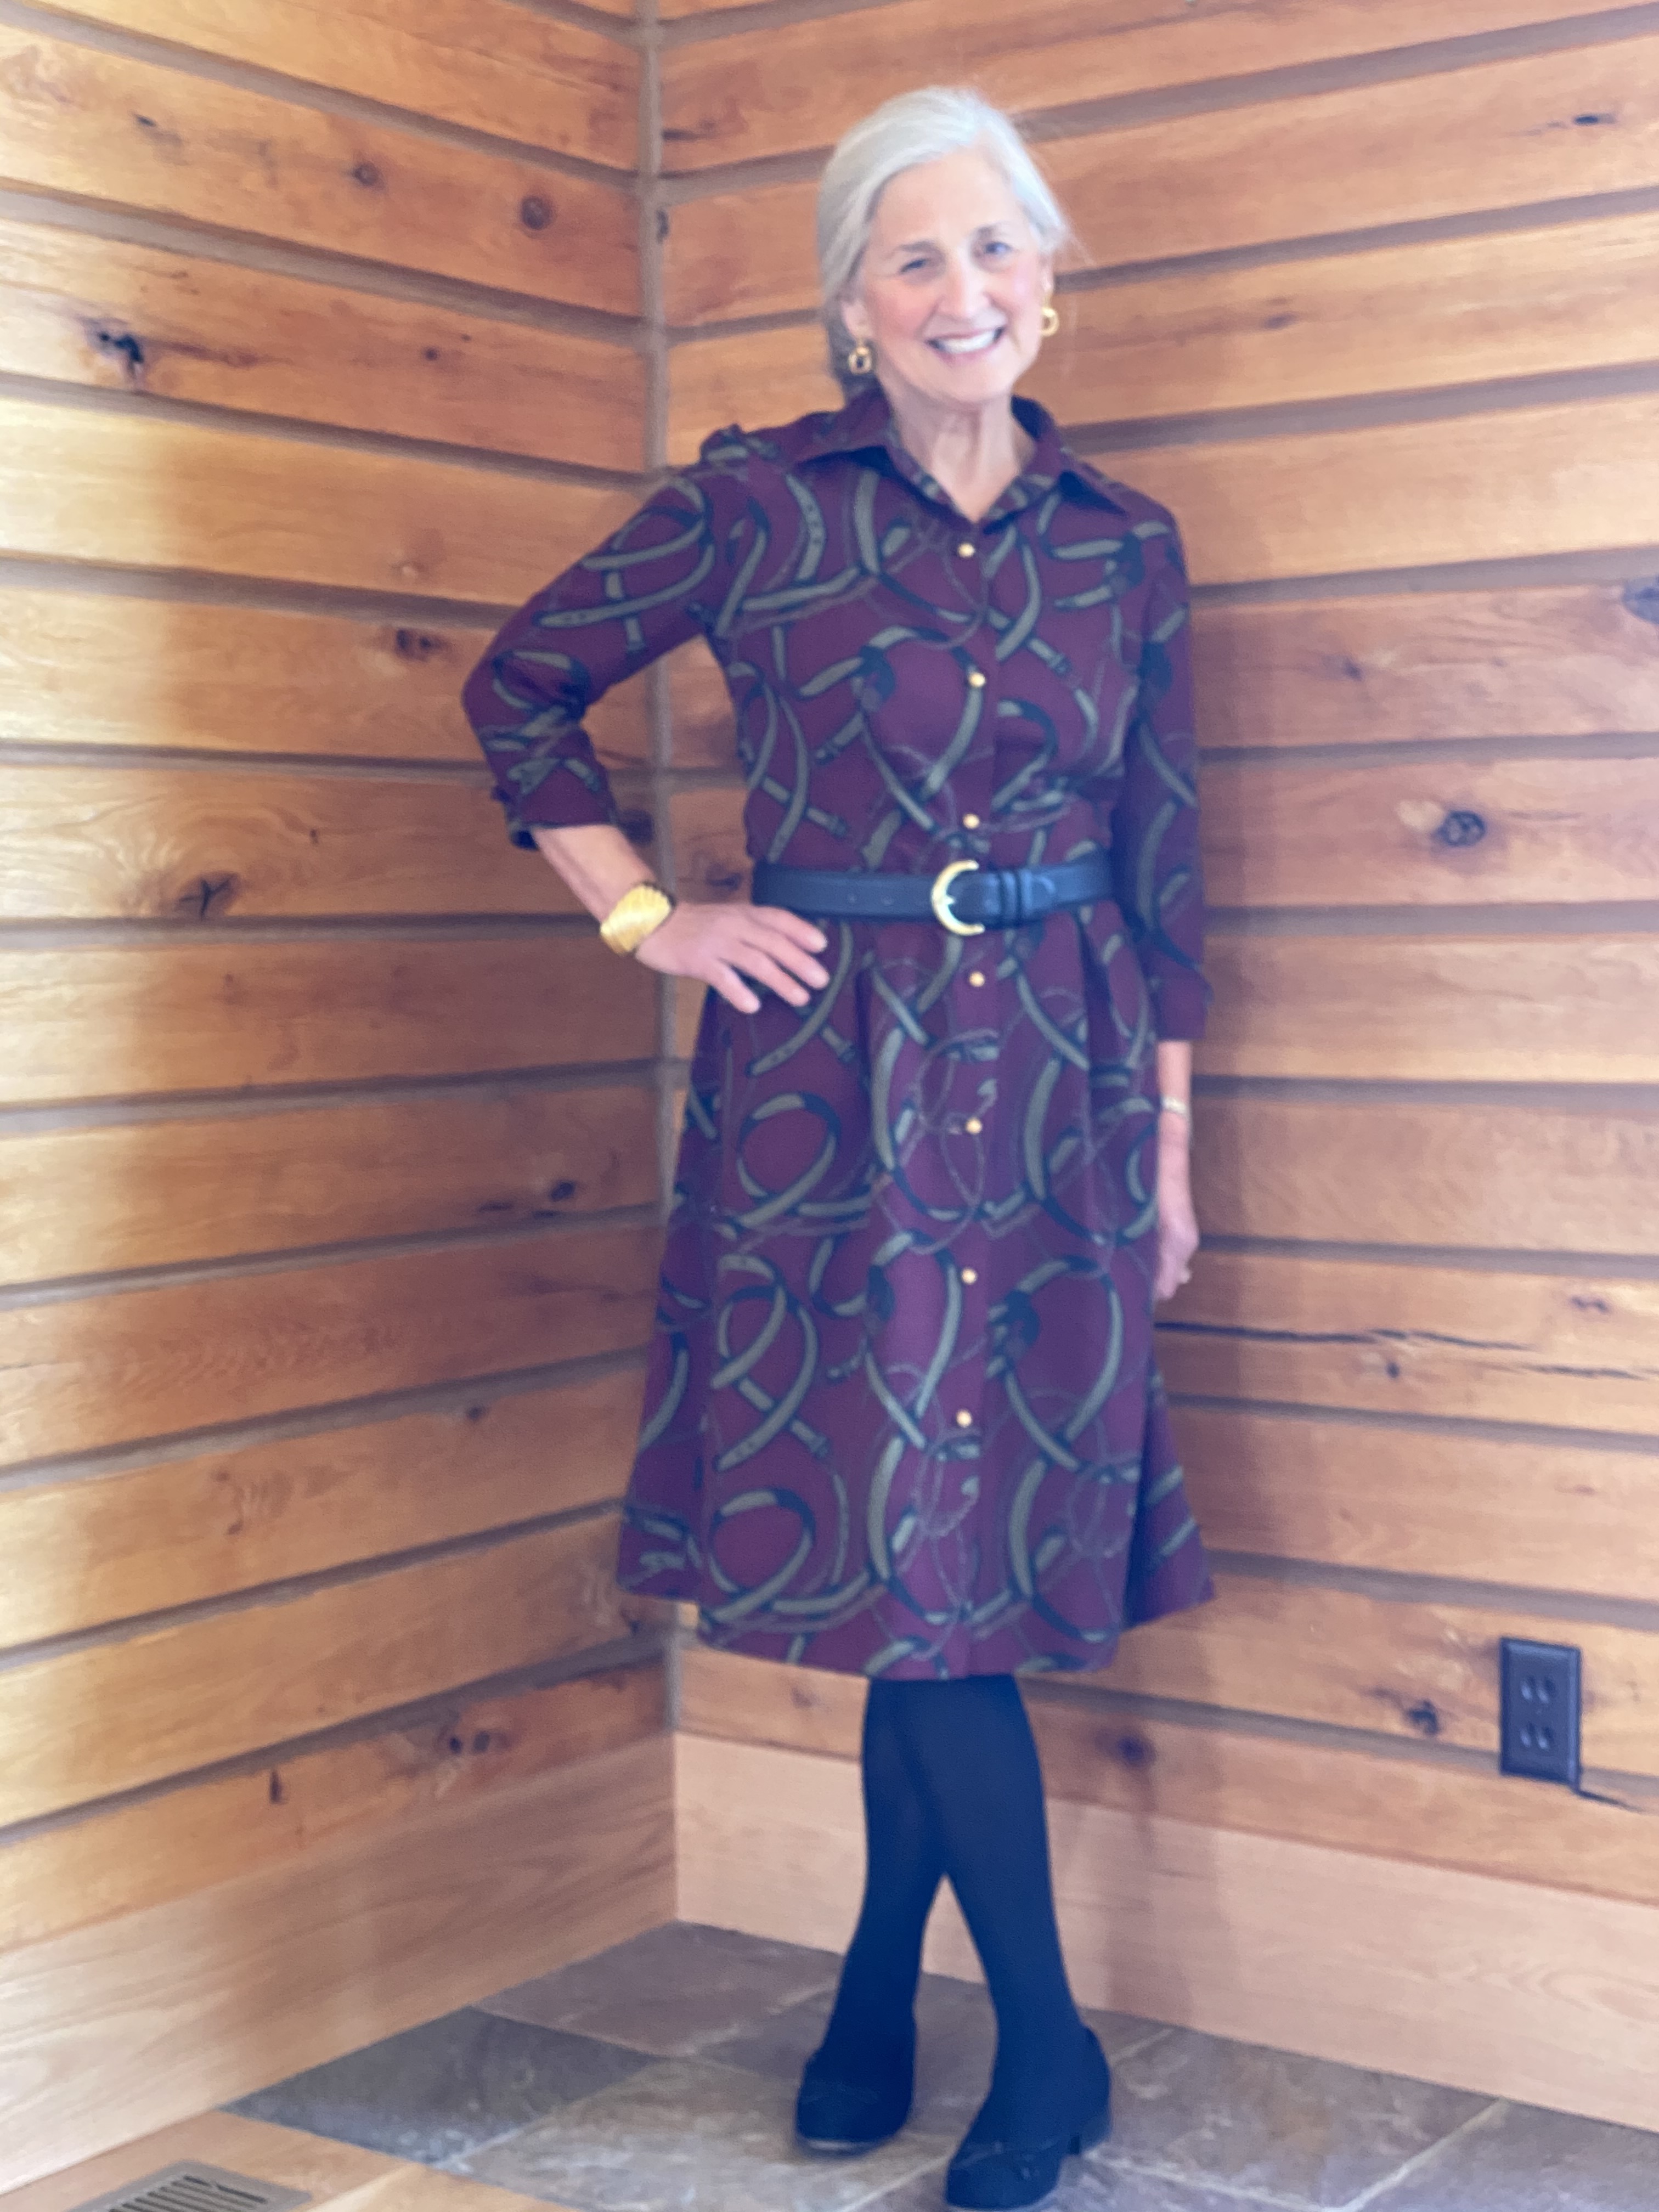
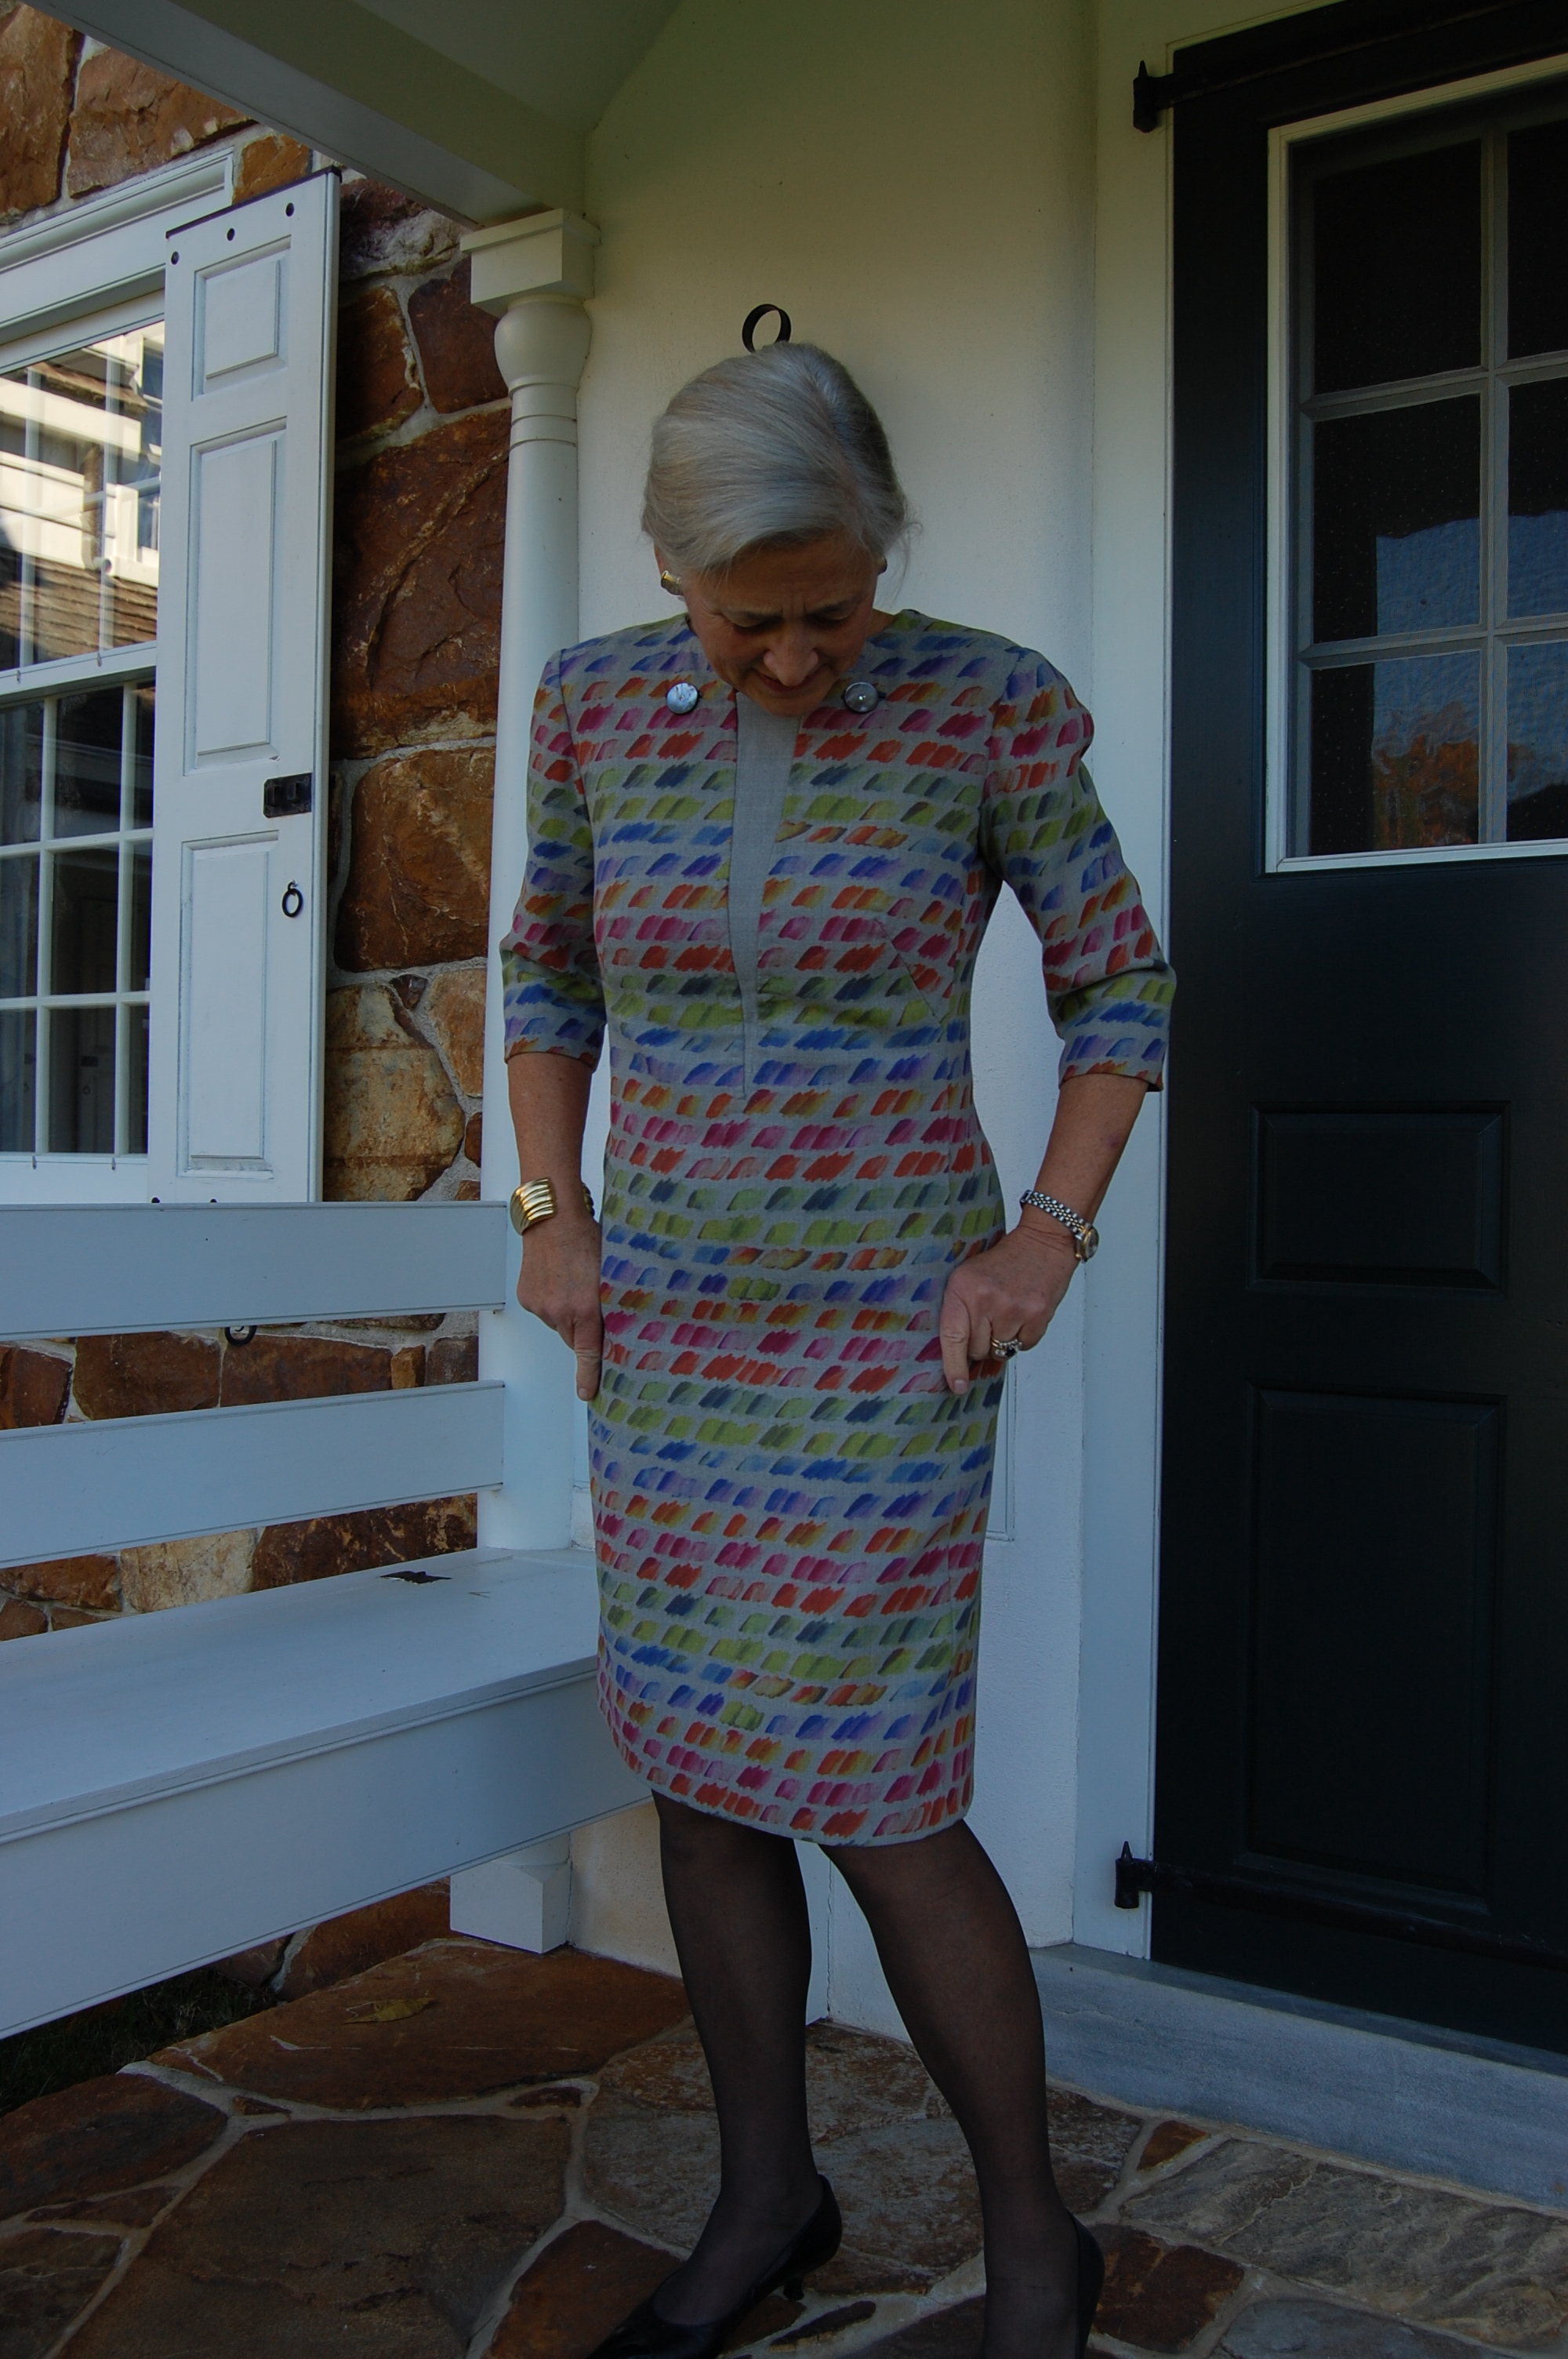
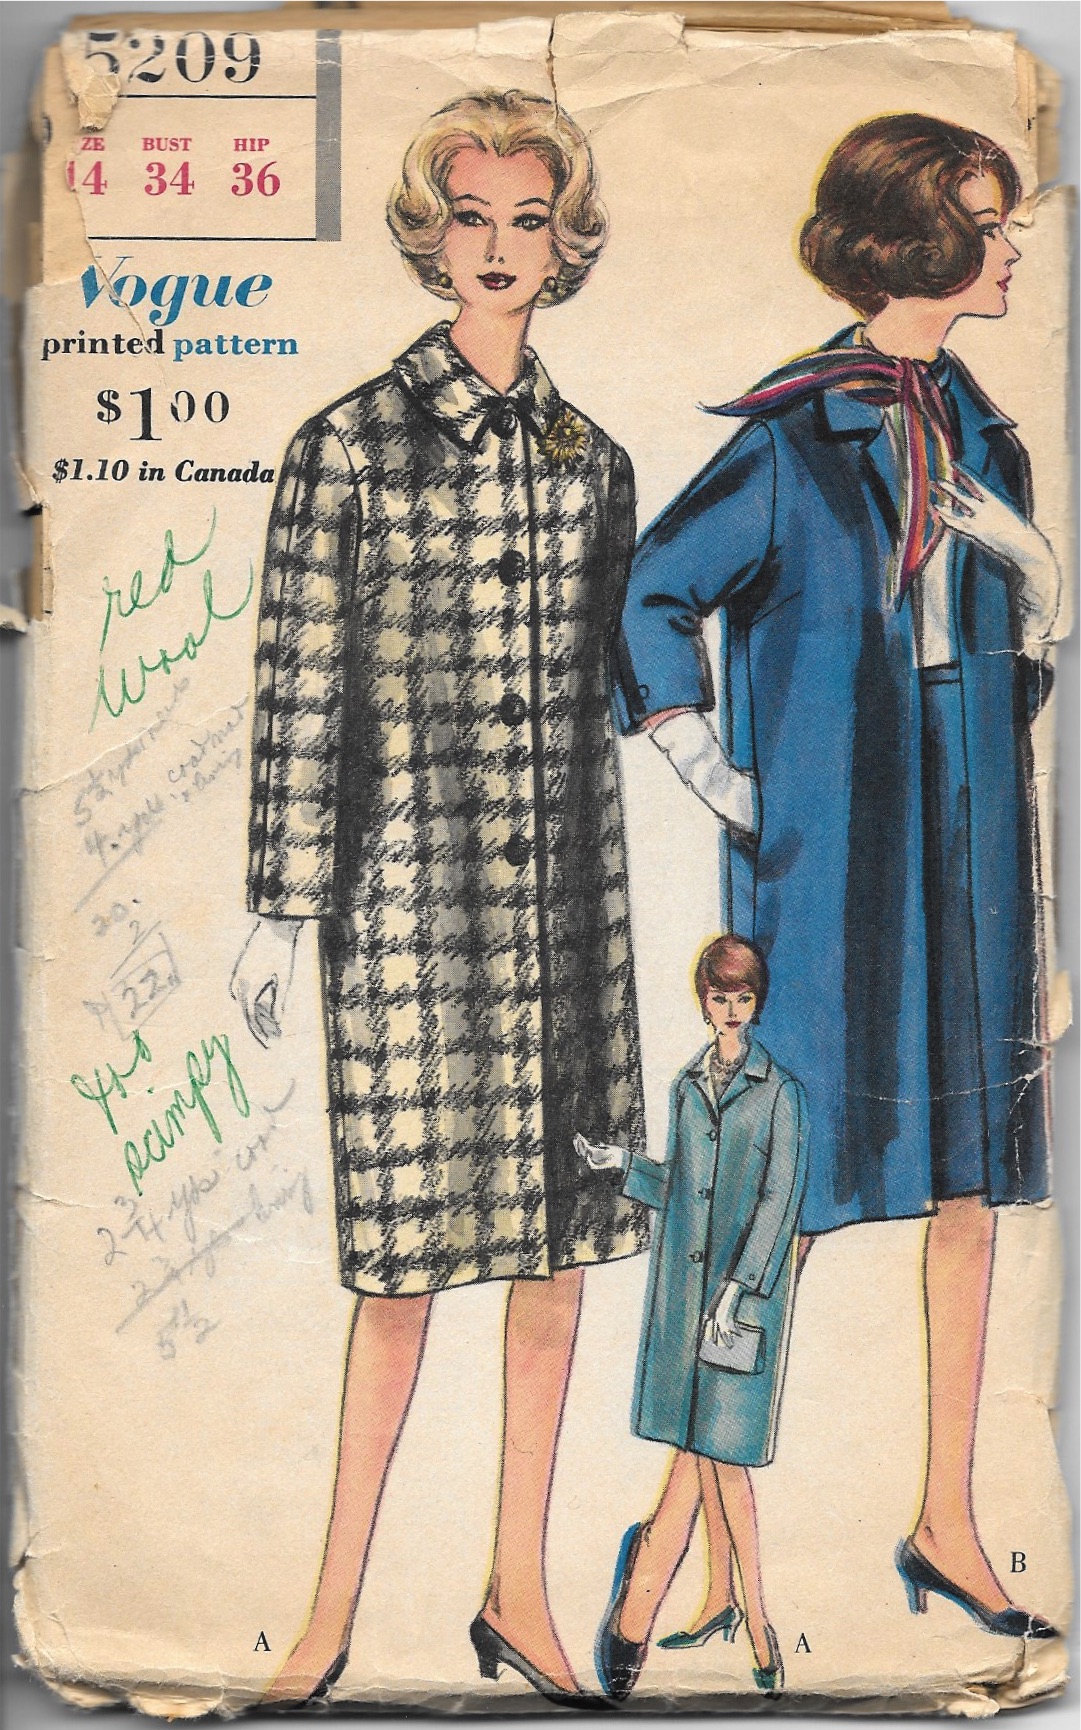
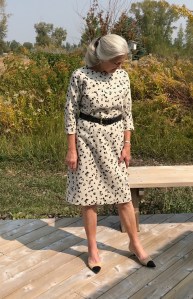
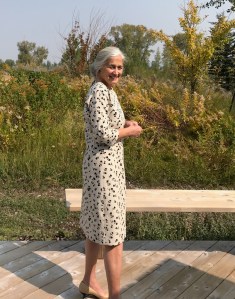
First I thought I would make a midi-skirt to wear with a pretty silk blouse or something.  I even got so far as to make a muslin for a longish skirt, but it just wasn’t going to work.  I didn’t have enough fabric to match the design and create the skirt I wanted.   The next task would be to find a dress pattern which would work.  I kind of viewed this fabric as a good Fall and Spring transition weight, so I wanted sleeves.  And I wanted a pattern which would show off the circle design to its best effect.  One of the patterns in my collection which I have seemed to dwell on frequently is this one:

This pattern is quite interesting. It looks very simple, but in fact, it has a considerable amount of engineering to it and some very nice details.

I like the styling of both the dress and the coat.  I thought I’d take a stab at eyeballing the pattern on my fabric, to see if it might work.  Well, it was going to be a squeaker, but I thought I could manage to get the dress out of the yardage I had – and match all those circles and dots as much as possible. 

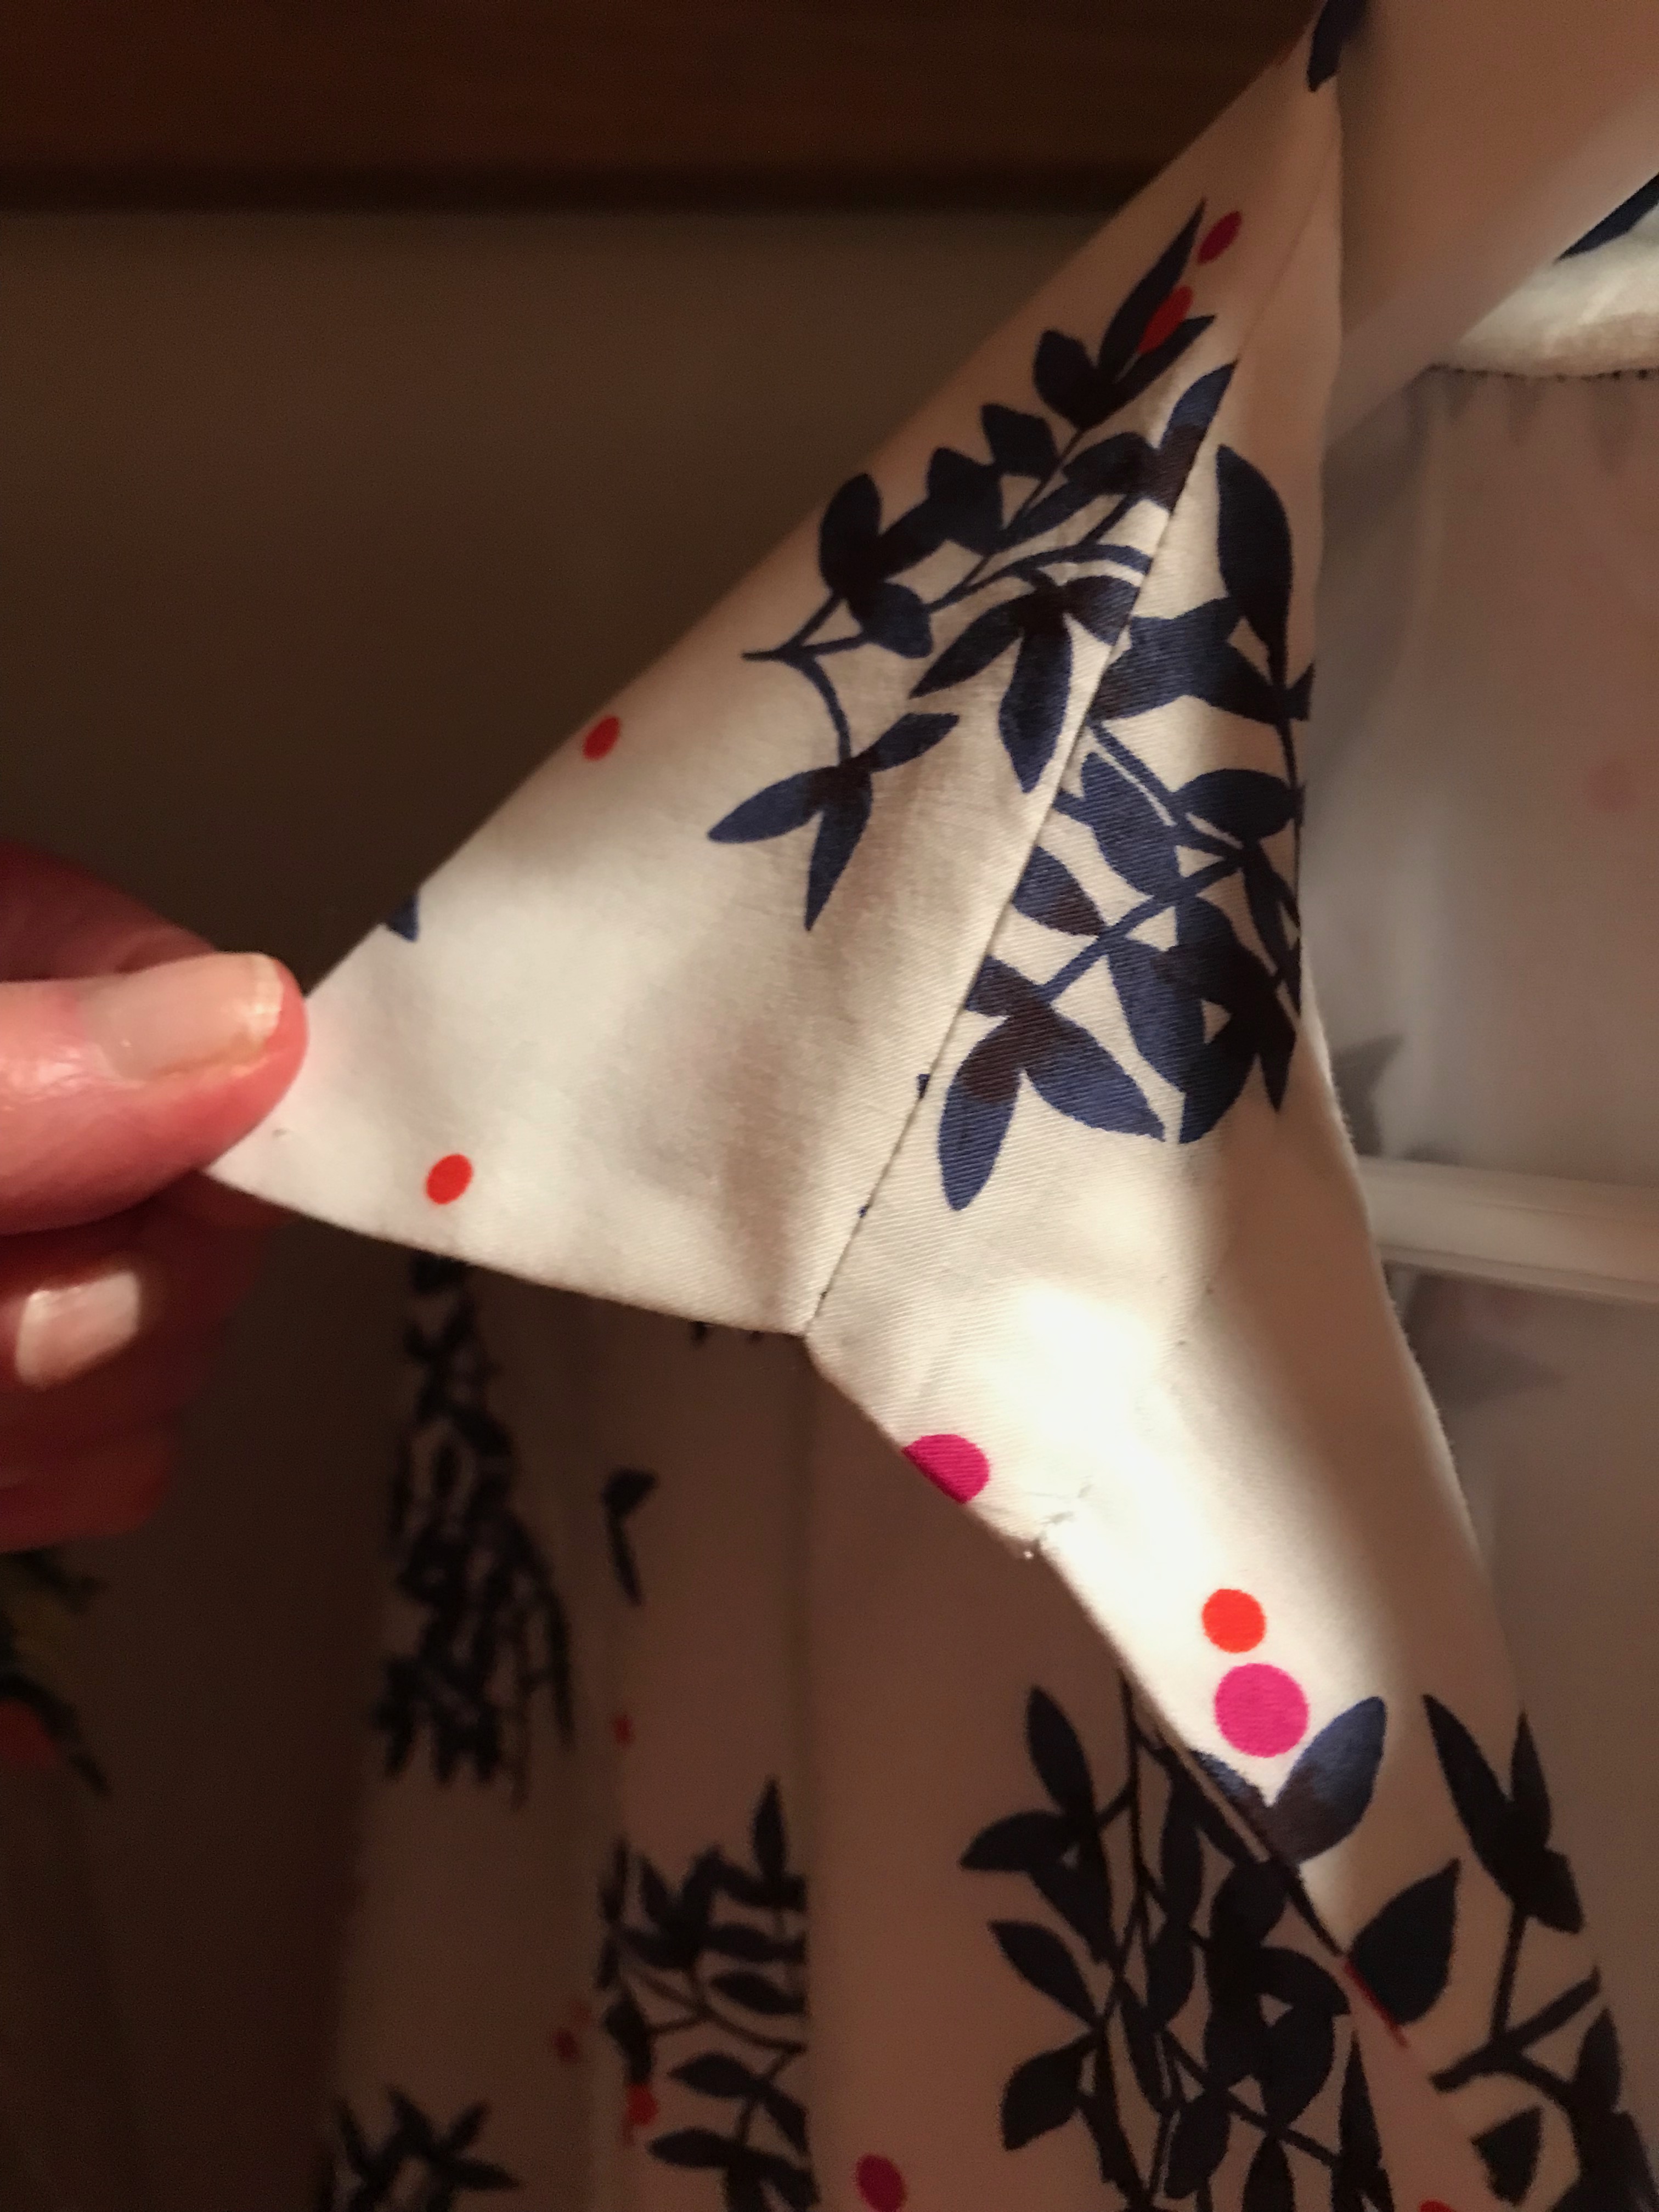
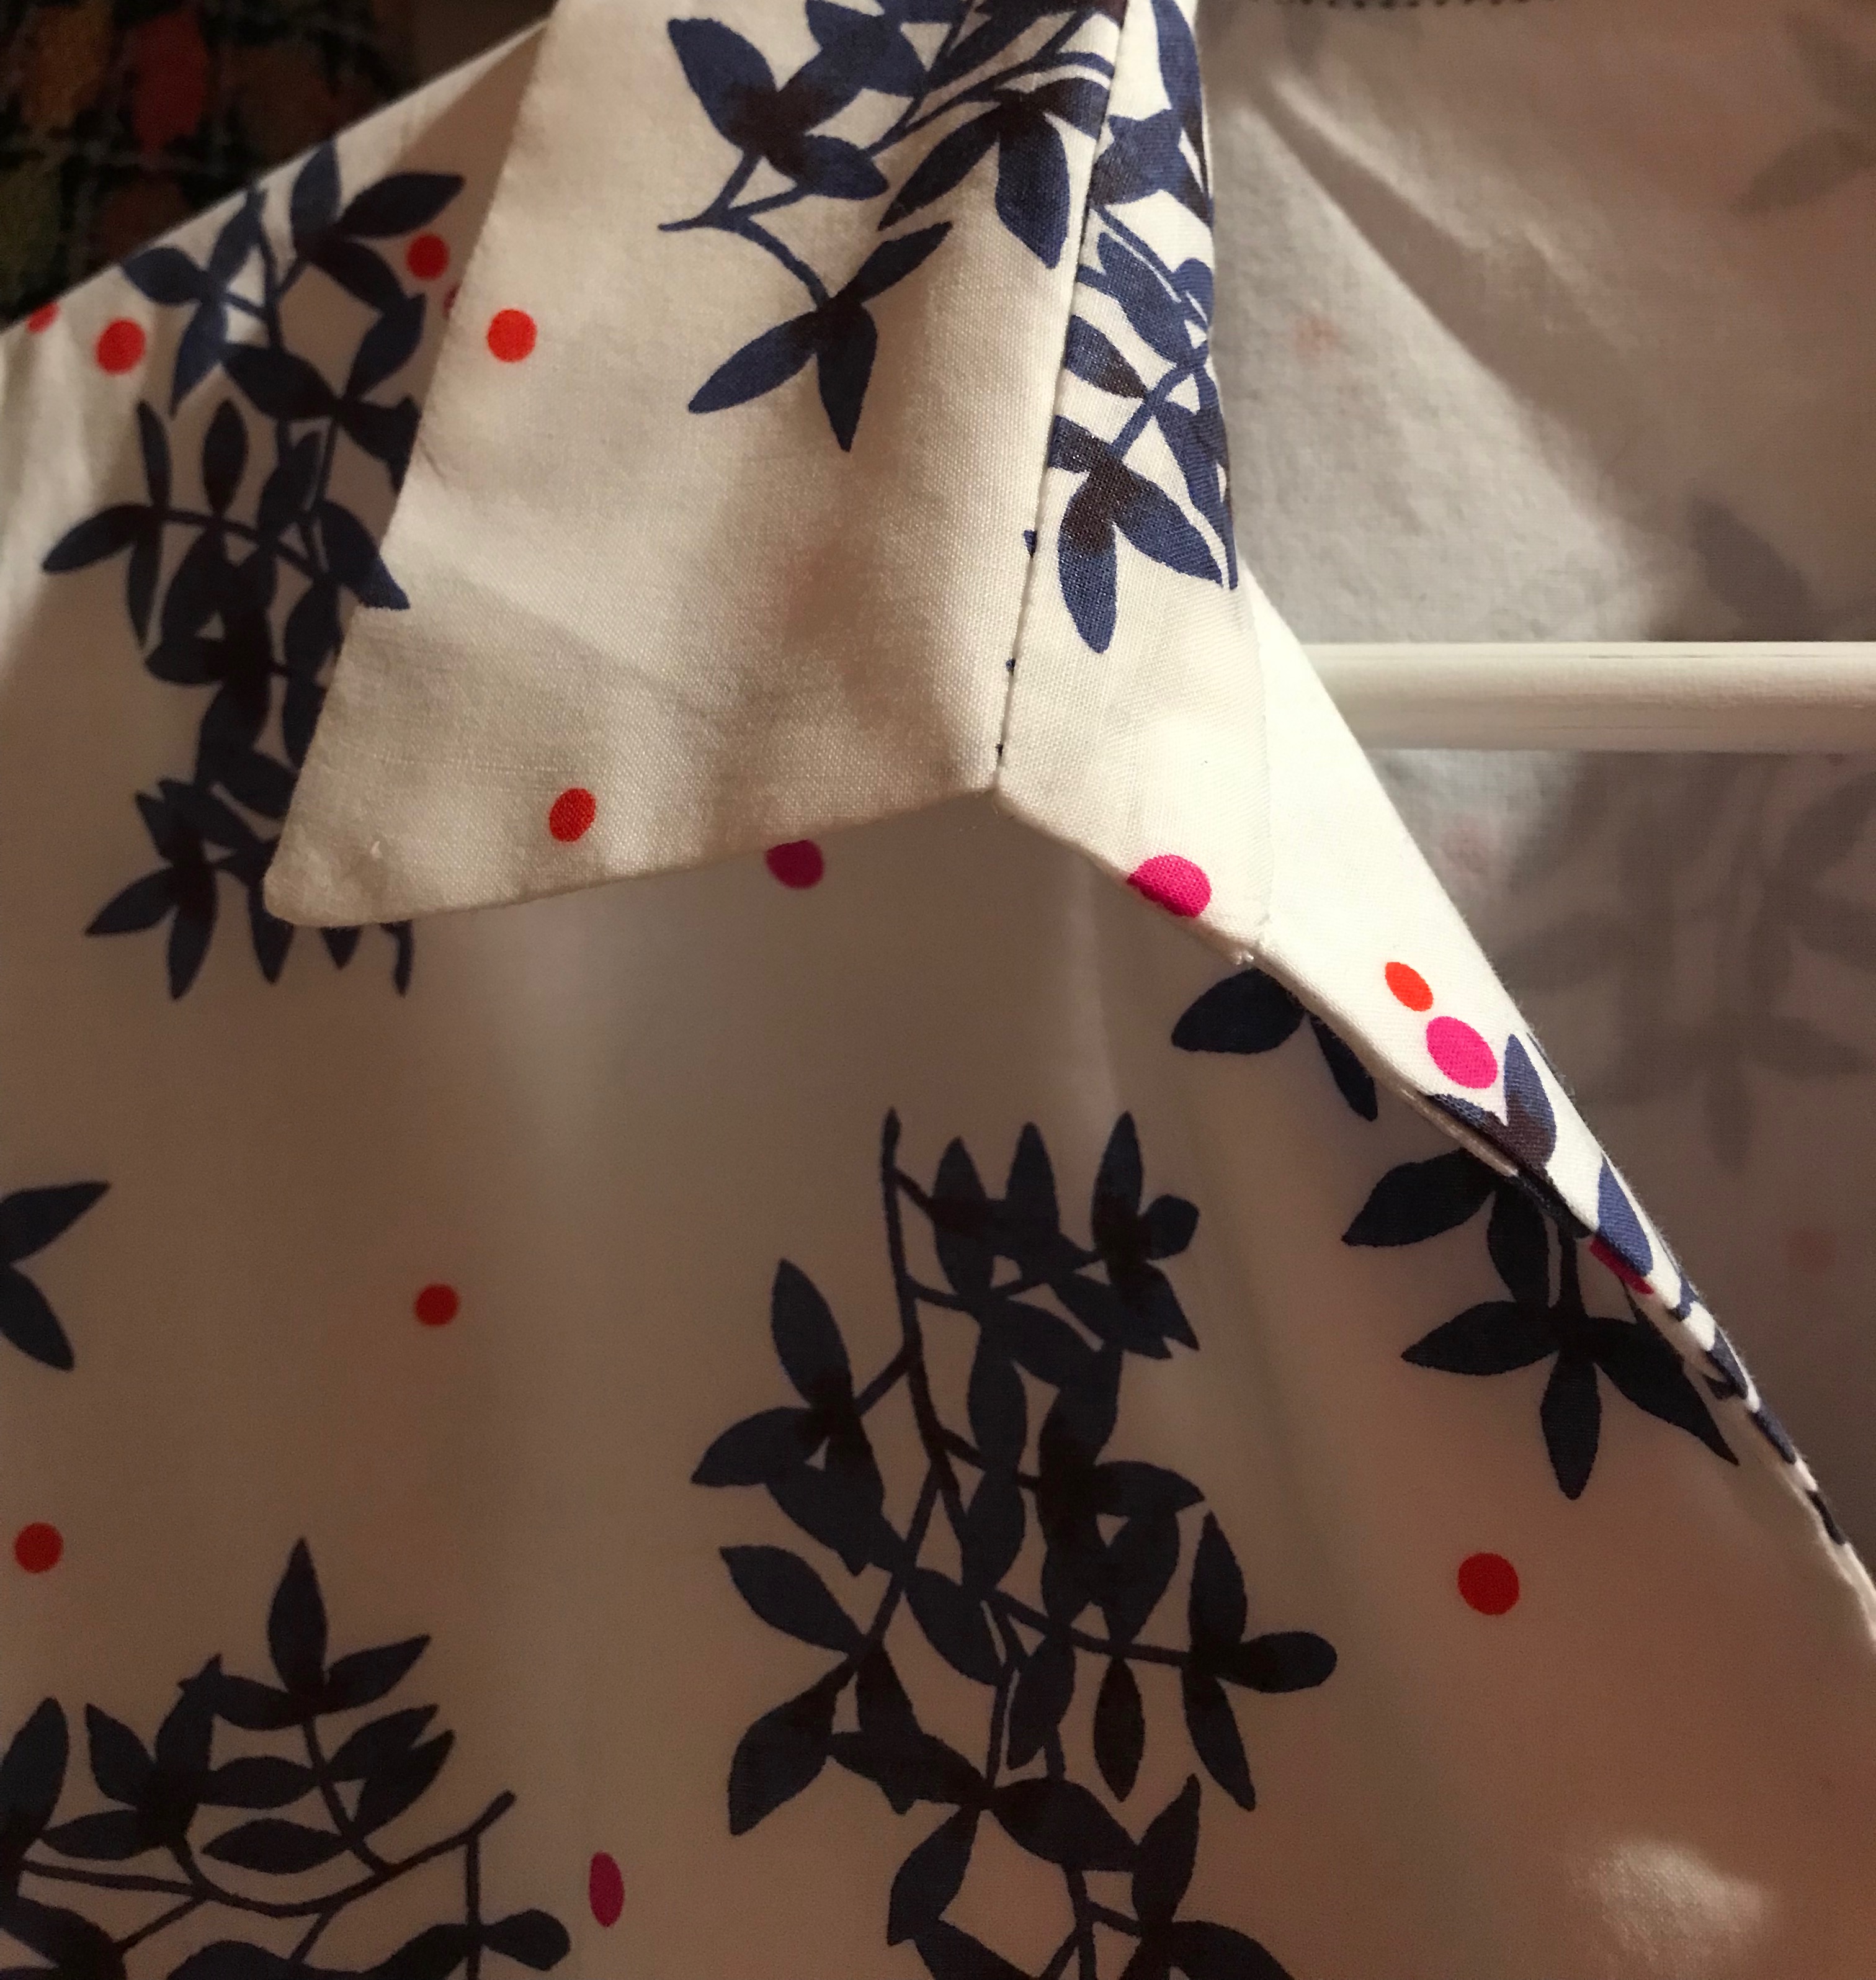
One thing I had to consider was the placement of the large dots and the smaller dots on my body.  Working with dots can be a little tricky – you certainly don’t want prominent dots on top of each bust apex, for example, and a row of large dots around the waist might not be all that flattering.  I thought the row of the largest dots would be best as an anchor at the hemline.  That would place the wide band of smaller dots just over the waistline and somewhat below.  This configuration would place one medium size dot over one bust, but I was okay with that since the dot on the other side was off to the side, and therefore not symmetrical.  I also liked the repeat row of largest dots across the upper chest where they were not too obvious.  And – the sleeves followed the line of varying size dots in a pleasing manner, I thought.  It turned out, I had just enough fabric to get things lined up properly – except for the front facing.  No way could I match that to the front of the dress.  

Now, obviously the facing does not show on the right side of the dress.  Still, I like to match across seams if possible.  Which it wasn’t.  I had to give myself permission to have a mismatched facing, and then I moved on.  (I forgot to take a picture of the facing, unfortunately.)  

A word or two about the fabric before I go on.  According to Fairchild’s Dictionary of Fashion, (Third edition, by Charlotte Mankey Calasibetta and Phyllis Tortora, Fairchild Publications, Inc., New York, New York, c2003, page 395) sateen is a “smooth glossy cotton fabric made in the sateen weave with floating crosswise yarns on the right side, giving a lustrous finish.”  This fabric is a combination of cotton sateen, with circles created by a damask weave on a jacquard loom.  It makes for a striking fabric.  And I think the fact it is done in navy blue makes the contrast more definitive.    Christian Dior was a fan of navy blue, calling it “the only one [color] which can ever compete with black, it has all the same qualities.”  (The Little Dictionary of Fashion, Abrams, N.Y., 2007, page 14).  It is a wonderfully versatile color.  

I made a few changes to the pattern.  I cut the neckline a little wider, I shortened the sleeves by a couple of inches, and the big change was I lined the dress in a lovely silk batiste I purchased at Farmhouse Fabrics. (The pattern did not have instructions or pattern pieces for a lining.)   The pleat in the front of the dress was a bit tricky to line, but I figured it out after quite a bit of thought.  By the way, I underlined the dress with silk organza. 

I could only envision gold buttons with this fabric. I’m not sure these are the right buttons, but they will do until I find something better.

The irregularity of the circles precluded exact matching within the “panels” but I rather like the whimsical effect this creates.

The split cuff with its button is one of the nice details of this pattern.

One more thing about the pattern and the dress.  With the pleat in the front of the dress which extends to the hem, it gives the appearance of a coat dress. However, it is not.  Again Fairchild’s gives us a precise definition of a coat dress: “Dress fastened down front from neck to hem, like a coat, in single- or double-breasted style, either belted or unbelted.  A classic since the 1930s.”  ibid., page 84.  Someday I’ll make a coatdress, but this was not it.

The pleat begins below the closure, extending to the hem, giving the dress a nice sway to it.

As I mentioned in an earlier post, I made this dress to wear on my Paris trip, but alas, I never had the opportunity to do so.  I feel certain it will eventually get its debut, but not in Paris!  

26 Comments

Filed under Buttons - choosing the right ones, Christian Dior, Fashion commentary, Loops for buttons, Mid-Century style, Polka dots, Sateen, Uncategorized, underlinings, vintage Vogue patterns from the 1960s, Vogue patterns

A Fussy-to-Make, Fuchsia-Pink Silk Dress

Sometimes extra incentive is needed to push through a project which turns out to be more difficult than anticipated.  Such was the case with this pink silk jacquard dress.

I had purchased this fabric quite a few years ago online from Britex Fabrics.  I knew it was a dressy fabric, and unsure of what form this dress would take, I made the decision to purchase four yards of this 58” wide silk.  That gave me some latitude in my selection of pattern.  

Finally last Spring I made a decision about what I wanted this dress to be.  That was precipitated by the arrival of a beautiful invitation to a very special event this Fall, and of course (!) I needed a new dress to wear to it. The fabric is a dressy, shimmery silk jacquard, so by its very nature it would make up into a dress which had a certain glamour to it.  

I decided to use a go-to pattern I have used a few times already and make a classic shirtdress.  That may seem like a strange choice, but I envisioned it as very dressy and flowing, and quite appropriate for the fabric.  

While this idea was percolating, I happened to attend a luncheon/presentation by a wonderful organization called the Ibu Movement.  (Pronounced ebu, with a long “e,” this is an Indonesian word meaning “a woman of respect.”)  

The pop-up shop accompanying this event was filled with gorgeous clothing, accessories, even shoes. When I saw this envelope clutch, I knew it would match my silk fabric perfectly and would be the perfect addition to my as-of-yet-to-be-sewn pink dress.  Little did I know at that time it would be the catalyst to make sure I finished the dress!

My first clue as to the fussiness of the fabric was as soon as I pressed it and laid it out for the placement of my muslin pattern. Here is what I noticed:

  1. The fabric had a slightly loose weave to it, making it almost stretchy, certainly very slinky.  Keeping it properly aligned on the straight of grain was going to be a challenge.  
  2. The fabric frayed easily.
  3. It also was prone to shedding silk fibers.  I decided I needed to handle it as little as possible to mitigate this situation.
  4. The jacquard weave in it had a definite horizontal and vertical pattern to it, meaning I would have to match the design horizontally and vertically across seams.  Although I am used to matching plaids and prints, this was a little different as the woven design was of irregular form.
The irregular nature of the weave is apparent in this photo.

I decided to underline the dress (except for the sleeves) with a very lightweight silk batiste, which I hoped would give it some substance, but still preserve the flowing nature of the fabric.  I made the conscious decision not to add an additional lining to the dress.

Although I rarely use fusible interfacing, I realized very early on that sewn-in interfacing was going to shift around and cause all kinds of problems.  Luckily, I had been introduced to a very finely woven, fusible German interfacing available from Farmhouse Fabrics.  I had some on hand and found it to be the perfect stabilizing foundation for the cuffs, the front facing, the collar, the collar stand, and the hem.  

So, that solved one big problem for me.  I was still concerned about being able to get the hem even.  I had good reason to be concerned!  It took two tries to avoid having either a bubble appear or uneven dips around the perimeter. 

The final quandary I had was the buttonholes.  Because the fabric shed silk fibers so easily, I was really worried that my buttonhole attachment might grab onto those fibers and make a mess.  I did some sample buttonholes, which confirmed my suspicions.  So – I used wax paper between the foot of the attachment and the fabric, cutting little windows in the wax paper where the buttonholes would be sewn.  It worked like a dream.  

I found vintage pearl buttons with a slight iridescence to them which I thought worked well with the fabric.
And here is that handbag with the dress!

This was not a particularly fun dress to sew, but that “perfect” handbag kept me focused.  And I am glad it did, as the dress was a success in the end.  And it always feels like an accomplishment to use fabric which has been lying in wait for so long.  

29 Comments

Filed under Buttons - choosing the right ones, Cocktail dresses, Linings, sewing in silk, silk, Uncategorized, underlinings, vintage buttons, Vogue patterns

Completion – How Sweet It Is. 

It has been a slow start to the new sewing year of 2023.  Although I had anticipated the completion of my first project – this black jacket – to be a speedy endeavor, I anticipated incorrectly!  (Has anyone ever said fashion sewing can be very humbling?)

I was making this jacket to go specifically with a wool sheath dress I made two years ago – and also, hopefully, to pair with other dresses or skirts which might benefit from the addition of a somewhat dressy black jacket.  I had the pattern, and I had the fabric, a very soft light-weight cashmere (which I found a number of months ago at Farmhouse Fabrics.) 

I chose this jacket pattern primarily for its “split” center opening which would work well with the unusual center stripe woven into the wool to balance its uneven plaid.

I first needed to make a fitting muslin (toile) and I needed to determine what changes I would make to the original pattern.  That ended up being three items:

  • I changed the neckline to match the neckline of the sheath dress.
  • I added a dart to the top of each sleeve, using that method as a substitute for the running stitches normally used to facilitate the insertion of the sleeve into the armscye. I have used this alteration frequently as it seems to fit my shoulder anatomy well.
  • I shortened the sleeves from full-length to 7/8 length.  I did this as I enjoy wearing bracelets, thus giving them a little “breathing room.”  

Before I started making this jacket, I had the perception I would need to tie the sheath dress and the black jacket together in some way.  Without a shared element, I wasn’t so sure they would necessarily look like they were made for each other.  The only problem was, I had very little yardage remaining from the sheath dress, as I had made it from a limited piece of vintage wool.  What to do?  

Covered buttons would limit my ability to wear the jacket with other pieces, and besides, I thought they would look stark as the only two small embellishments on a very black jacket.  I did not have enough fabric left, even for a small neck scarf, so that idea never had a chance.  I’m not sure when it came to me, but in a eureka moment, I thought a fabric flower made from the vintage plaid would be just the thing to make this outfit work.  

I knew M & S Schmalberg Custom Fabric Flowers in New York City would be my best bet (or only bet) for having a matching flower made.  I wasn’t sure I had enough fabric even for that, but I contacted them, sent pictures and measurements of my scrap of wool, and they made it work!  

I chose a 3” camellia option for my flower.  Look what they did!

A few other details for the construction of the jacket: (1) I under-stitched the facing to control the front edges and neckline of the jacket.

(2) I used a black crepe de chine lining (and lots of extra light when I was sewing it in!) I should mention that I underlined the jacket with silk organza.

(3) The only bit of whimsy I added to the interior was to cover up the ends of the loops for the two buttons with two small jacquard ribbon pieces appliqued on.  No one will ever see these except for me, but I like them.

This is definitely a “dressmaker detail!”

(4) I covered the required snaps with the lining fabric.

I am so happy to have this jacket completed.  Most of my projects seem to take longer than they should, but that makes completing one just that much sweeter.  

.  

59 Comments

Filed under couture construction, Dressmaker details, Jackets, dressy, Loops for buttons, Mid-Century style, Uncategorized, vintage Vogue patterns from the 1960s, Vogue patterns, woolens

The Last Pink (and Blue and White) of Summer

Sometimes the smallest thing can be the deciding factor in the trajectory of a sewing project.  In the case of this dress – my last dress of summer sewing – the buttons told me how to proceed.  There was some serendipity involved as well, which is often the case with my sewing, it seems.  

I purchased the very light and airy white and blue fabric from Britex Fabrics two or three years ago. When it arrived, I tucked it away to think about it.  Somewhere along the line, I purchased the buttons you see here, but not for this fabric.  (I rarely let deep pink vintage buttons get away from me if I can help it.)  Somehow the two – the buttons and the fabric – found each other and became best friends.  That was all well and good, except for the fact those six little buttons needed some help to bring out the fuchsia and orange dots sprinkled amongst the blue flowers on the white background.  Enter deep pink Petersham ribbon left over from holiday dresses I made for my granddaughters last Fall.  Somehow, although this ribbon was not a match to either the fuchsia or the orange, it worked!  I had my palette….

The interesting thing about the color of the pink ribbon is it seems to be the shade if one mixed the fuchsia and orange dots together. And yes, the buttons are very old!

I had decided to use this pattern again, but a longer version, with different sleeves.  

However – and doesn’t it seem there is always an “however” to muddle the plans – I only had six of those petite little buttons.  And theoretically I needed at least eight.  So – I had to get creative.  

I decided I could eliminate two buttons on the bodice if I reconfigured the front opening and collar.  Here is what I did:

  • I angled the front opening: starting at about 6 inches down from the neckline seam, I drew a line from the fold line to the center front line, ending at the neckline.   
  • This allowed me to shorten the collar stand (so it was flush with the front edge of the collar), thus eliminating the need for a button on it.  
  • I redrew the collar so that it would be most attractive either standing up or lying flat.
  • The original pattern had a self-facing for the bodice (as you can see below), so I had to make a separate, applied facing to accommodate the angle.  
  • The angled opening also allowed for the first button to be 6 inches down – meaning I could get away with two buttons on the bodice – if I used snaps at the waist (which isn’t a bad idea anyway.)
On the right above is my muslin pattern made from the original design. On the left is my reconfigured bodice pattern showing the angle detailed above. (My separate facing piece is not shown.)

Here is what the reconfigured collar and collar stand look like up close:

Two buttons on the bodice allowed me 4 buttons for the skirt, which was adequate.  I actually added a small snap 3+ inches below the lowermost button to hold the skirt together indiscreetly. 

Moving on with more changes:  the flowing nature of the fabric dictated a change in the tailored sleeves of the pattern.  I knew I wanted below elbow length with a little bit of fullness, but not too much. A narrow sleeve band seemed appropriate.  And then there was the decision where to apply the narrow Petersham ribbon on the sleeve bands.  Next to the seamline with the gathered line of the body of the sleeve looked best to my eye, so that’s what I did.  

I was fortunate enough to have enough of the narrow Petersham ribbon to put two rows of it at the lower part of the skirt.  These two rows of trim are absolutely essential for this dress to look balanced. 

Unfortunately I didn’t have my preferred blue shoes with me for these photos.

I should mention I underlined the entire dress, with the exception of the sleeves, with very lightweight cotton batiste.  I finished all the seams with Hug Snug seam binding.  

I like the bodice “angled” neckline and the reconfigured collar so much, I will probably use these alterations again sometime, even if I am not compromised by too few buttons!  

Without those little rosy-pink buttons – and without leftover trim from my granddaughters’ dresses – the white and blue flowered fabric would probably still be sitting in my fabric cupboard.  Instead, I was able to finish my summer sewing not only with more pink, but with a dress I really like!  

28 Comments

Filed under Buttons - choosing the right ones, Sleeves, Uncategorized, vintage buttons, Vogue patterns

A Blue, White and Pink Tunic Top

Perhaps many of you are familiar with this famous quote from Edith Head (American costume designer, 1897-1981): “A dress should be tight enough to show you’re a woman and loose enough to prove you’re a lady.”  When it comes to tunic tops, my very inelegant redo of that quote is: “A tunic should be fitted enough to not be baggy and loose enough to be able to get into it.”  I find that combination to be a difficult task.  Let’s see how I did with this one:

When I saw this pretty fabric on Emma One Socks’s website, I just knew I needed to purchase a length of it. All cotton, it is finely woven and silky soft.  Originally, I thought I would make a dress, but when it arrived, I saw it as a tunic top, trimmed in pink, of course.  I have a couple of tunic patterns, but I went back to this one because the front opening is longer than most, making it easier to get on and get off. 

Yes, I needed to shorten it to be a tunic top rather than a dress, but that’s an easy thing to do.

The interesting thing about this pattern is that there is no fastener/button indicated for that long opening.  I’m not sure how one would keep a degree of modesty – or even keep the tunic properly on one’s body – without a button or at least a hook and eye.  More about that later.

There are a couple of features of this pattern I like, besides that long opening in the front.  It has shoulder darts in the back, which I always find add just a little necessary fitting finesse. 

I love these diagrams which give so much information about the pattern. The shoulder darts are clearly indicated here.

I also like the way the front facing is constructed, and the width of the stand-up collar.  However, the pattern lacks slimming darts in the back.  My limited experience with sewing tunics has taught me that without long defining fisheye darts in the back, my tunic is going to be baggy and look like a sack.  So, I added them.  

There are darts there!

I also shortened the sleeves, as I prefer a length just below the elbow, and I took out some of the width of the “trumpet.”  Even with a narrower sleeve, I knew turning up a hem on it would result in a less than smooth finish.  To get around this, I took the pattern piece for the bottom panel for the long sleeve (shown on the pattern), flipped it, narrowed it, and shortened it to give me a facing which would be a perfect fit into the lower curve of the sleeve.  

The “trumpet” design of the sleeve is evident here.
Here is the facing piece I cut from the pattern.
And here it is pinned in place.
The seam connecting the sleeve to the facing is visible here. I turned up a scant 1/4″ of the unfinished edge of the facing and machine sewed it in place. The pink thread you see is from the attachment of the trim.

Back to that front opening:  when sewing the facing on, I added a loop to the right side so that I could strategically place a button to keep the gap closed.  On this fabric, it seems hardly noticeable, but oh my, is it necessary!  

One of the beauties of tunics is there are no rules on how trim is applied or placed or even if it is used.  I had purchased two widths of Petersham ribbon for use on this garment, fully intending on using two rows to echo the front opening.  However, I determined that would be too much.  Instead, I used the narrower ribbon on the collar and as the second row around the hem and the side slits.  The sleeves seemed to look better with the wider width of ribbon. The ribbon adds a degree of stability to the hem, especially, which helps the tunic to hang properly.  

By the way, sewing all that Petersham ribbon on is helped immensely by the use of Dritz WashAway adhesive tape.

Obviously I have not washed this tunic yet, but in its first laundering the tape securing the ribbon will, indeed, wash away. I expect a softer appearance of the ribbon at that point, which seems to have a few waves in it at present.

Pictures often are the best way to check fit on a garment (even after multiple try-ons to fine-tune it), and I was pleased with the final, slightly fitted, non-baggy appearance of this tunic.  In other words, it does not look like a sack!  It is easy to slip on, less so getting it off, but still very manageable.  (Sometimes a side zipper can be – or needs to be – added to help with this task of dressing and undressing.  The abbreviated length of this example precluded that option.) 

If I make this pattern again, I may make the darts a little bit deeper for more definition.

I’m not sure what Edith Head would have thought about tunics, if anything (!), but I am thinking positively about this one.  

27 Comments

Filed under Blouses, Fashion commentary, Loops for buttons, Tunics, Uncategorized, Vogue patterns

A Return to Sewing

Did you think I had abandoned my cape?  After an unexpectedly long hiatus from sewing – due to busy holidays, travel, and things out of my control – I finally returned to my sewing room last week.  And although PINK is supposed to feature large in my 2022 sewing agenda, I first had “anything but pink” unfinished business from 2021.  Yes, that cape which I thought would be such an easy make…  I put the final stitches in it last week, only about 6 weeks after I imagined that would happen.

Hah… Those buttons are much more of a deep olive green in reality!
Can you tell it was freezing when I took these photos? This duo will be a good Fall ensemble, but it is not quite warm enough for the middle of Winter!

In all fairness, I should say whenever I must stop a project and then return to it weeks later, I always imagine that it has taken me much longer than it should have.  There is a “reacquaintance” factor in the time involved.  “Now, just where am I in this?  What’s the next step?  What did I do with the undercollar?  Is the lining already cut out?  If so, where is it?”  and on and on. Believe it or not, I tend to be rather organized about my sewing, leaving notes for myself – that sort of thing.  But still – the momentum needs to be rebooted, both for the project and for myself!

Enough of this babble. On to the cape – what worked, what didn’t, and what will I do differently, should I make this pattern again.  Regardless – the cape is ready to wear, and I am very pleased with how it turned out.  

I had to pay extensive attention to laying out the pattern and matching plaids as best I could, knowing that this uneven plaid was going to play some tricks on me.  For the most part, I think I was fairly successful; at least there aren’t any glaring mismatches.  

I must have sewn, torn out and resewn the collar at least five times until I realized those stripes were never going to perfectly align.
I chose an olive green silk charmeuse from Emma One Sock Fabrics for the lining.

The arm slits are just lovely, both outside and inside:

The welts are continuous with the front princess seam.
The lining is brought right up to the inner edge of the welt and slip-stitched in place.

I was a bit concerned about the size of the collar.  This is a pattern from the 1970s, when collars tended to be a bit oversized.  I certainly did not want this cape to scream 1970s, so I was ready to pare down those collar points if necessary.  But I think the collar is perfect just the way it is.

I under-stitched the collar to control the edges.
I think the size of this collar is just right.
I also under-stitched the front edges of the lining. The entire cape is underlined with silk organza, which gave me the perfect anchor upon which to attach those stitches invisibly.

The one component of this pattern I did have trouble with was the separate closing tab.  The pattern, surprisingly, did not specify bound buttonholes.  Rather it called for machine or hand-stitched buttonholes.  I usually like to make bound buttonholes on wool fabric (there are exceptions, of course, but I did not look at this as one of those).  So I dutifully went at it.  But the narrow width of the tab made turning it, with bound buttonholes applied, nearly impossible.  No, make that totally impossible.  It was lumpy, uneven, and unacceptable.  But I was not going to give up on my bound buttonholes.  I decided to redraw the tab, using “squared-off ends” rather than rounded ends.  I knew that would give me more space to manipulate all the interior buttonhole bulk.  I also oriented the buttonholes horizontally instead of on an angle as shown in the lower pattern piece below.

The lower figure is the original tab as taken from the pattern. The upper figure is my redrawn tab.

Voila!  It worked, and I think it might even be a better look than the tab with the rounded ends.  

Not sure why my olive green enameled buttons look almost mint green in these photos.

So – what would I change next time?  I think I might add an inch or two in length.  I think the cape pictured on the pattern envelope looks longer than the reality of it.  

I also think I would taper the back hem of the cape to a gentle extended curve so that the back of the cape is about one to one-and-a-half inches longer than the front.  When I visualize that, I like what I “see.”  

Making this cape has reinforced my opinions about this type of outer covering – it is graceful and quietly elegant in this unfussy form, even in plaid.  Finishing up this project was necessary, but also, as it turned out, a successful start to the new sewing year.  

27 Comments

Filed under bound buttonholes, Capes, couture construction, Uncategorized, Vintage fabric, vintage Vogue patterns from the 1970s, Vogue patterns, woolens

What Do You Think of Pockets?

Do you love pockets and add them to your sewn creations wherever you can?  Would you be happy never to have to sew another pocket?  Do you tolerate them in a garment, preferring to do without if possible?  Many people have very strong opinions about pockets or the lack thereof. I think those of us who sew are among those with the strong opinions, primarily because we have it in our power to add them or delete them.  My personal mantra on pockets is “Let’s see if we can do without them, unless we can’t.”   

I generally divide my thoughts about pockets into three categories: those in dress pants (slacks), those in dresses and skirts, and those in dressier coats and jackets. (A little caveat is probably useful here  before I get any further.  Yes, jeans should have pockets, as should hiking and/or activewear pants and shorts.  And absolutely, pockets are part of the functionality of active outdoor coats and jackets and vests. Those categories are not part of this discussion.)  

It was over two decades ago when I first started thinking about the dilemma pockets in slacks present.  I had just purchased a navy blue wool flannel, dressy pair of slim pants, which fit well and were flattering.  There were two welt pockets on either side of the front which were basted closed, as is the custom in better clothes (leaving it up to the purchasing customer to remove the basting.)  I left the basting in and preserved the slim silhouette of the slacks.  Had I removed the basting, the front, I am sure, would have “pooched” out at those two spots and, well, not done my tummy any favors.  Once I started buying vintage patterns a decade ago, I began to notice the slacks in the patterns from the 1950s generally were pocketless.  (I have long thought fashion and style in the decade of the 1950s was at its zenith, both in elegance and in silhouette, which is a topic for another discussion.)  Here a few examples of patterns from the 1950s:

Note the defining tuck in the front of the pant legs.
These slim pants are enhanced with 4 shaping darts each, front and back, with no waistband.
These slim pants do have a waistband.

In my mind, pockets in dress slacks are superfluous at best, detrimental at worst, and just unnecessary.  Although I rarely make pants and slacks, I have yet to put a pocket in any of them.

Dresses and skirts are a bit more complicated.  Fuller skirts often provide the perfect camouflage for in-seam pockets.  I have sewn at least three such styles, the patterns for which included pockets in the side seams.  Interestingly, two of them were vintage Diane von Furstenberg patterns from the 1970s; the other is a more recent Vogue shirt dress.

This DvF dress pattern from the 1970s has pockets in the side seams.
And so does this one!
Again, pockets in the side seams in this Vogue pattern. The fuller skirts in all three of these dresses conceal the pockets well, but only if they are empty! If I make any of these patterns again, I will not bother with adding pockets.

There was a charming article appearing this summer in a Weekend Edition of The Wall Street Journal by author Jasmine Guillory and her “perfect dress” which, alas, has pockets. (Check her website here to read the article under “About”.)  Here is what she wrote, “The only element that mars this dress’s perfection is its pockets.  This might be a controversial statement, but I don’t like dresses with pockets.  They pooch at my hips, even when empty, and if you put something in them, it’s worse….  What’s this great need for dresses with pockets?”  She goes on to say she regularly takes her dresses with pockets to the dry cleaner to have the pockets removed.  (Alas, again!  Her dry cleaner closed during the pandemic, meaning that her “perfect dress” still has its pockets, making it “almost perfect.”)  

But what about slimmer silhouettes?  In-seam pockets could cause the same “gapping” situation, which begs the question “Would you put anything in those pockets which would cause that pocket to gap even more?  Probably not.  I would place my hankie or my cell phone or lip stick in my handbag, not in my pocket – and that goes for fuller skirts as well.  (Besides, like Jasmine Guillory, I am quite smitten with handbags.) 

However, what about in-seam pockets which are part of the design?  Here is a notable example:

This Vogue Designer pattern has shallow pockets in its side front seams. Somehow, I can’t imagine this dress without them!

And then, of course, applied pockets are often part of the design, but not really intended for practical use.  Take a look at this evening gown: 

Notice that these pockets open from the side.

You might be able to tell I have decided I am not so keen on pockets in skirts and dresses either – UNLESS they are integral to the design.  

Which brings us to coats and jackets.  I think one’s first reaction to this category would be “Well, of course, jackets and coats need to have pockets.”  And for the most part, I would agree with that.  Often pockets in coats and jackets are part of the design and add stylistic interest as well as functionality.  Here are a few examples of coats I have made, with such pockets: 

The pockets in this coat are inserted into the shortened princess seam.
I am very fond of the slanted pockets in this Christian Dior design.
A pocket detail from a Givenchy Vogue coat pattern, with hand sewn topstitching.

Here is a jacket pattern which is in my sewing queue for 2022.  I absolutely love the pockets.

And where would a Classic French jacket be without its pockets?  They are not really functional, but undeniably integral to the design. 

One of the Classic French jackets I have made.

Not all coats have pockets, however.  Take a look at this Madame Gres design which I made in a lavender linen.  It has no pockets, nor would I want them in this Spring coat.

And here is a “summer” coat which I think is just so chic.  No pockets.

I have made this coat pattern twice – once with pockets and once without. 

The wool version has in-seam pockets which I find useful:

A peek inside one of those in-seam pockets.

But here is the same pattern, made as a “cocktail” coat.  I made it pocketless and love it.

No pockets needed when one has a lovely little clutch to carry.

Clearly there is much to consider when it comes to pockets.  When we add them to a garment, or delete them, or change their placement, or baste them shut to eliminate that dreadful “pooch” problem, we are admitting that not all pockets are equal.  Some are perfect in every way, some not so much, and some – are never missed.  

30 Comments

Filed under Coats, Day dresses, Fashion commentary, Mid-Century style, pockets, Uncategorized, vintage Vogue patterns from the 1950s, Vogue patterns

Tuesday is for Ironing

One might get the idea I love to iron should they take stock of how many cotton blouses I have made over the past few years. Now I do love a crisp cotton blouse, and I find them to be imminently wearable, neat and tidy, and versatile.  So I keep making them.  But do I love to iron?  Not really, although it is not my most dreaded household chore.  (I think that might be grocery shopping – or more precisely, lugging everything home and putting it all away.  I don’t like that.)  

Even wearing a pretty blouse, like this – my most recent make, to the grocery store doesn’t make that chore more bearable!

One advantage to having lots and lots of cotton blouses is that the ironing can pile up, yet I will still have blouses to go to in my closet, so there’s that.  I think – no, I know – another reason I keep making casual cotton blouses is that I love to sew with beautiful quality cotton (of course Liberty comes to mind!) The selection of quality cotton prints, checks, plaids, stripes, and solids available online is astoundingly diverse, making the temptation great to make “just one more blouse.”

And then there are the buttons. If you follow my sewing life through this blog, you know my fascination with and pursuit of vintage buttons to use on my blouses and other projects.  Yes, a white plastic button can perform the same function, but a beautiful pearl button adds a touch of class to a simple blouse like no other detail can.  

A simple pearl button, circa 1960, BGE Originals, “First in Fashions”

It also helps that I have a set of blouse patterns which fit well due to many alterations and tweaking over several years’ use.  It is a lovely feeling to start a new project, knowing I don’t have to fit the pattern and make a muslin before I can get started on the fashion fabric.  

Three of my favorite blouse patterns, for which I have fitted muslins.
And one which I feel sure will become a favorite once I make and fit a muslin for it! View A is a classic look and the sleeves are so elegant.

I had been eyeing this Liberty cotton lawn on the Farmhouse Fabrics website for quite a while when I decided last Spring to go ahead and indulge.  Having a floral among my blouse selections is something just a bit different for me, as I already have numerous ginghams, plaids, and stripes.  

Liberty Lawn is lovely to sew and lovely to wear.
These colors make me happy.

So – is Tuesday really for ironing?  There used to be a proscribed schedule for all those household chores – and it went like this:

Monday: Wash Day

Tuesday:  Ironing Day 

Wednesday:  Sewing Day

Thursday:  Market Day

Friday:  Cleaning Day

Saturday:  Baking Day

Sunday:  Day of Rest

Well, times have changed. Now, every day is Sewing Day.

16 Comments

Filed under Blouse patterns from the 1950's, Blouses, Buttons - choosing the right ones, Liberty cotton, Mid-Century style, Uncategorized, vintage buttons, vintage Vogue patterns from the 1950s, vintage Vogue patterns from the 1970s, Vogue patterns

The Last Dress of Summer

Or is it the first dress of Fall?  It depends on your point of view, apparently.  The Autumnal Equinox, here in the Northern Hemisphere, is September 22nd, officially the first day of (Astronomical) Fall.  Meteorological Fall began on September 1st, marking the point in the year when the temperatures begin to fall (pardon the pun.)  Either way one looks at it, I now have a finished dress which is either late for Summer or just under the wire.  I’m honestly just delighted to have it finished!

Although linen is traditionally thought to be a summertime fabric, I have long thought it is also the perfect fabric for early Fall.  Moygashel linen is especially well suited for this time of year.  Its natural fibers keep it cool for those days which continue to warm up, but its sturdy weave and heft give it a substantial enough look for these days of transition.

I purchased this piece of vintage linen from an Etsy shop years ago.

This particular piece of Moygashel, undoubtably a survivor from the mid-1950s, presented me with a couple of challenges.  First, it was only 35” wide.  And I only had 2½ yards.  Laying out pattern pieces on a single layer of fabric always allows me to maximize their placement, improving my ability to do the impossible – get a dress out of too little fabric.  (Here is another Moygashel linen dress which I was able to squeak out of 1 5/8 yards of 35” fabric.)

This vintage Vogue pattern gave me two sleeve options.  If I had opted for the very short sleeves, I would have had ample yardage.  But, for the seasonal reasons mentioned above, I particularly wanted to make this dress with the below-elbow-length sleeves.  So, I fiddled and figured and made it work by utilizing both the straight of grain and the cross grain for the bodice/sleeve pieces.  I was able to do this because of the allover floral design – ie., no directional limitations.

This pattern is dated 1957.

Interestingly enough, this dress with its cut-on sleeves does not have gussets.  Rather, the underarm seams of the dress sections are curved to add moveability.

This shows where the seams join under the arm close to the top of the side zipper.

I underlined this dress with white cotton batiste (from Farmhouse Fabrics) and I finished the seams with Hug Snug Rayon seam binding.

The buttoned upper back bodice is a real focal point of this pattern.  Being 1957, the pattern calls for “fabric buttonholes” – or bound buttonholes.  So that’s what I did.

When it came to buttons, I wanted to use some sort of faceted black buttons.  After searching online and coming up empty-handed for buttons of the correct size and look, I settled on these carved pearl buttons already in my button collection.

I love these buttons, but I still think black ones would be better …  so I will keep searching and switch them when I’m successful.  That will also allow me to use the “leaf” buttons (I have 6 of them) for something which will show them off to better advantage.

The final construction detail of note is the 10” side zipper.  I used a lapped, hand-picked application which lays inconspicuously below the left sleeve.

It is so inconspicuous, you can barely see it here!

I did not leave an opening on either side at the waist for a belt to slip through.  In fact, I did not have enough fabric to make a self-belt!  However, my intention was always to use a contrasting belt.  I think this fabric will lend itself to using belts of varying colors (red or yellow or pink?) as long as I can coordinate with shoes, handbags and/or jewelry.  That will have to wait until I am home from our Summer location.  Maybe I’ll even find black buttons back home!

I could wear this dress without a belt as well. (But I’m not sure I will…)

One final note about this pattern and dress:  it has to go over the head.  It was much more common for dresses from the 1950s and ‘60s to have side zippers and “over the head access”  only.  This can wreak havoc on hair (and make-up)!  So a little pre-planning is necessary – I will need to finish my primping after I have put on the dress.

And everytime I put this dress on, I shall see the original Moygashel linen label which came with the fabric.

I suspect this dress will go right into the cedar closet for the months to come, as I switch out the wool skirts and dresses and coats and sweaters.  But hopefully, in March, at the Spring Equinox, it will creep out from its dark and quiet spot and maybe even actually be worn!

18 Comments

Filed under bound buttonholes, Buttons - choosing the right ones, Day dresses, Moygashel linen, side-placed zippers, Uncategorized, vintage buttons, Vintage fabric, vintage Vogue patterns from the 1950s, Vogue patterns