Category Archives: sewing in silk

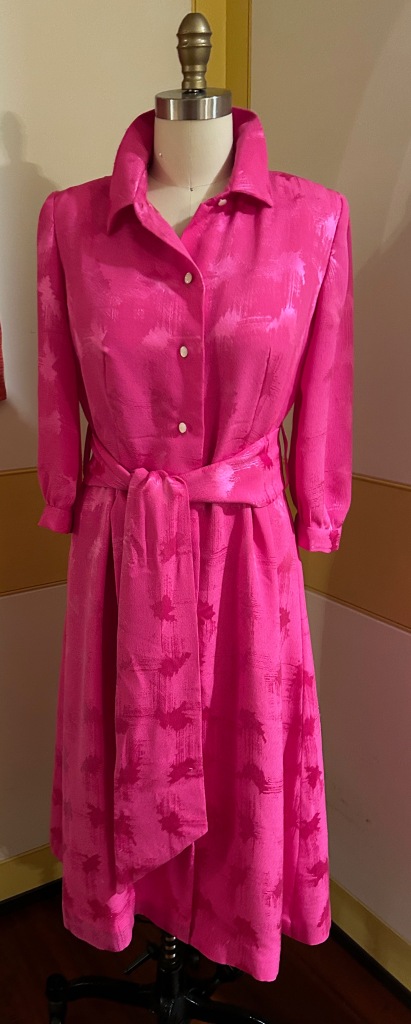
A Fussy-to-Make, Fuchsia-Pink Silk Dress

Sometimes extra incentive is needed to push through a project which turns out to be more difficult than anticipated.  Such was the case with this pink silk jacquard dress.

I had purchased this fabric quite a few years ago online from Britex Fabrics.  I knew it was a dressy fabric, and unsure of what form this dress would take, I made the decision to purchase four yards of this 58” wide silk.  That gave me some latitude in my selection of pattern.  

Finally last Spring I made a decision about what I wanted this dress to be.  That was precipitated by the arrival of a beautiful invitation to a very special event this Fall, and of course (!) I needed a new dress to wear to it. The fabric is a dressy, shimmery silk jacquard, so by its very nature it would make up into a dress which had a certain glamour to it.  

I decided to use a go-to pattern I have used a few times already and make a classic shirtdress.  That may seem like a strange choice, but I envisioned it as very dressy and flowing, and quite appropriate for the fabric.  

While this idea was percolating, I happened to attend a luncheon/presentation by a wonderful organization called the Ibu Movement.  (Pronounced ebu, with a long “e,” this is an Indonesian word meaning “a woman of respect.”)  

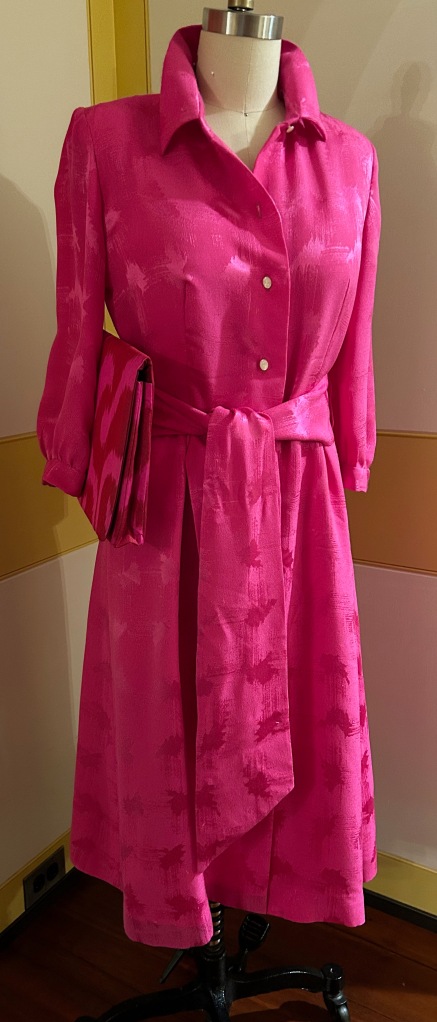
The pop-up shop accompanying this event was filled with gorgeous clothing, accessories, even shoes. When I saw this envelope clutch, I knew it would match my silk fabric perfectly and would be the perfect addition to my as-of-yet-to-be-sewn pink dress.  Little did I know at that time it would be the catalyst to make sure I finished the dress!
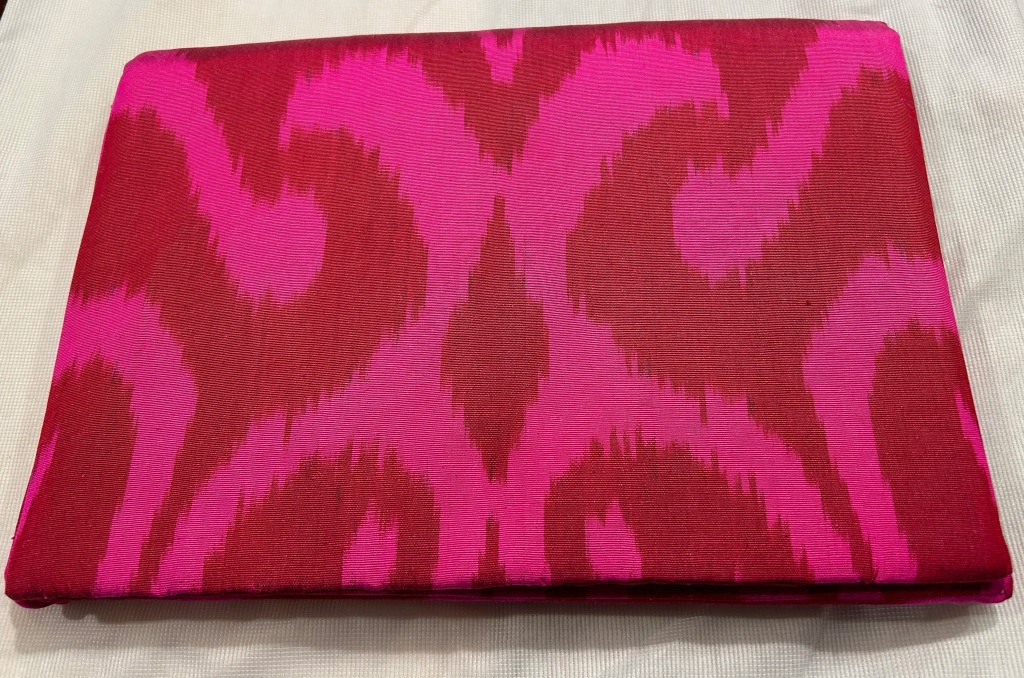
My first clue as to the fussiness of the fabric was as soon as I pressed it and laid it out for the placement of my muslin pattern. Here is what I noticed:

  1. The fabric had a slightly loose weave to it, making it almost stretchy, certainly very slinky.  Keeping it properly aligned on the straight of grain was going to be a challenge.  
  2. The fabric frayed easily.
  3. It also was prone to shedding silk fibers.  I decided I needed to handle it as little as possible to mitigate this situation.
  4. The jacquard weave in it had a definite horizontal and vertical pattern to it, meaning I would have to match the design horizontally and vertically across seams.  Although I am used to matching plaids and prints, this was a little different as the woven design was of irregular form.
The irregular nature of the weave is apparent in this photo.

I decided to underline the dress (except for the sleeves) with a very lightweight silk batiste, which I hoped would give it some substance, but still preserve the flowing nature of the fabric.  I made the conscious decision not to add an additional lining to the dress.

Although I rarely use fusible interfacing, I realized very early on that sewn-in interfacing was going to shift around and cause all kinds of problems.  Luckily, I had been introduced to a very finely woven, fusible German interfacing available from Farmhouse Fabrics.  I had some on hand and found it to be the perfect stabilizing foundation for the cuffs, the front facing, the collar, the collar stand, and the hem.  

So, that solved one big problem for me.  I was still concerned about being able to get the hem even.  I had good reason to be concerned!  It took two tries to avoid having either a bubble appear or uneven dips around the perimeter. 

The final quandary I had was the buttonholes.  Because the fabric shed silk fibers so easily, I was really worried that my buttonhole attachment might grab onto those fibers and make a mess.  I did some sample buttonholes, which confirmed my suspicions.  So – I used wax paper between the foot of the attachment and the fabric, cutting little windows in the wax paper where the buttonholes would be sewn.  It worked like a dream.  

I found vintage pearl buttons with a slight iridescence to them which I thought worked well with the fabric.
And here is that handbag with the dress!

This was not a particularly fun dress to sew, but that “perfect” handbag kept me focused.  And I am glad it did, as the dress was a success in the end.  And it always feels like an accomplishment to use fabric which has been lying in wait for so long.  

29 Comments

Filed under Buttons - choosing the right ones, Cocktail dresses, Linings, sewing in silk, silk, Uncategorized, underlinings, vintage buttons, Vogue patterns

Not Just an Everyday Blouse

Some blouses are worn A LOT.  Those are everyday blouses, and I have quite a few of those (with more to come, I am sure!)  And some blouses are worn infrequently, but equally loved for their unique properties.  These would include exceptional fabric, refined or formal appearance, limited wearing opportunity, or their ability to make a statement.  The blouse I most recently completed has all those properties. 

This deep pink silk charmeuse Jacquard has been in my fabric closet for over ten years, having been purchased at Britex Fabrics when I started sewing for myself again, way back when.  Its color, and the polka dot woven motif, both personal favorites, drew me to it.  A couple of years ago, after purchasing another piece of silk – a printed silk twill – I paired the two fabrics together and added them both to my sewing queue.  The skirt may have to wait until next year, but the blouse earned a spot in 2022’s sewing agenda.

Two fabrics meant for each other!

I used a blouse pattern which I have made once before.  From 1957, this pattern is timeless with its elegant collar (which looks good lying flat or propped up around the neck), petite French cuffs and feminine three-quarter length sleeves.  I suppose in 1957, this style blouse may have been considered a casual piece, which the illustrations on the pattern envelope suggest.  I saw this blouse as dressy, however, and that is how I have interpreted it. 

The collar on this blouse is beautifully engineered.
Here is the first blouse, in silk dupioni, I made from this pattern.

One of the details which make this blouse so flattering to wear is the waistline open-ended darts, easily visible above.  They minimize the bulk when the blouse is tucked inside its skirt and add a lovely billow effect above the waist. I made these darts a bit shallower than the pattern indicated.  When making these darts, I secured their upper edges by pulling the thread tail on one side to the other side so that I had the ability to knot those threads with three tight loops.  For those of you who have made a classic French jacket, this is the same method used to secure the quilting stitches at the end of the columns. The photo below helps to show this.

The darts are secured by knots done by hand both top and bottom.
Those open-ended darts are featured on the back of the bodice, too.

Buttons are such fun to select for a blouse like this.  I have had these vintage white pearl buttons for some time, and no doubt they were waiting for this project.  When the skirt is made at some point, the three-lobed profile will play off the designs in the silk twill.  But, more than that, I needed something to act as a foil for the polka-dotted field.  More “round” would have been fine, but not exciting.  Additionally, these buttons are a bit bigger which helps them hold their own on that deep, rich, pink silk.  

The French cuffs are secured by buttons both front and back.
Love those buttons!

Being the ‘statement” blouse that it is, I doubt I will be wearing this blouse casually. But I’m betting/hoping I will find good reason to wear it not infrequently to one or another tony event.  

25 Comments

Filed under Blouse patterns from the 1950's, Blouses, Buttons - choosing the right ones, Mid-Century style, Polka dots, sewing in silk, Uncategorized, vintage buttons, vintage Vogue patterns from the 1950s

A Frivolous(?) Decision

When inspiration strikes, one must seize it, even if it doesn’t really make sense.  You may remember this fabric from a couple of months ago, purchased online from Britex Fabrics:

This is one of those fabrics which has just gotten better and better the more I have looked at it.  I have had it sitting out in my sewing room since it arrived, just pondering its potential.  Then one day I went “shopping” in my fabric closet.  I have my stored fabrics divided according to fiber or usage, with a large “basket” container for each class.  For example, all the silks are together, as are the linens, the cottons, the lining and underlining and interfacing fabrics, with the wools (which take up more space due to their generally bulkier nature) stacked on shelves next to the baskets.   Well, this particular day – the day I went “shopping” – I pulled out the silk fabrics just to reacquaint myself with what exactly I had in that container.    Buried down at the very bottom I found a deep pink, polka dotted silk charmeuse jacquard and INSPIRATION struck!  I had found the perfect complement to my newly acquired floral printed silk twill.  

At that point all I could imagine was a pink silk blouse and a flowing hostess skirt.  My prudent, practical side told me I have no occasion for such an outfit.  But my creative, dreamy side said “If you make it, you will wear it.”  I am stealing the following quote from some unknown sage, but it is speaking to me now:  “The chief enemy of creativity is good sense.”  

These two fabrics are meant for each other with their perky polka dots and shared sheen.  And the somewhat amazing thing is I purchased the pink charmeuse probably 10 years ago from – you guessed it – Britex Fabrics!  

Once I had the two fabrics side by side, I really began to “see” the floral twill, all its intricacies, the brilliance of design in having a spacious polka-dotted field for those whimsical flowers, and the color combination where the blues and pinks play off of each other in a color tug-of-war.  In the words of Oscar Wilde, “To look at a thing is very different from seeing a thing.”  [My italics]

My mental wheels were really turning by this time.  I knew what blouse pattern would be perfect for this two-piece project.  I had made this 1950’s pattern a few years ago in a silk dupioni – and it has continued to rank among my most favorite makes.  

(Well, this could use a good pressing!) I love the sleeves with their French cuffs and the lovely neckline of this pattern.

I will have to search for a skirt pattern, but suffice it to say, it should have uncluttered lines to show off the fabric, and it definitely needs to have a gentle fullness to it.  Decisions still need to be made as to how I underline this fabric.  I believe white cotton batiste will be best, as I will need to block the show-through of the pink blouse fabric.  That, combined with a white crepe  de chine lining, should do the trick.  We will see, as they say.  

Time is, God-willing, on my side.  I envision the start of this project in late Winter or early Spring of 2022.  And buried deep in my head – like that pink fabric buried deep in its lair – is the thought I may just have to HOST some tony party to provide the perfect setting for my elegant hostess skirt and swanky blouse.  Who wants an invitation?  

24 Comments

Filed under Polka dots, sewing in silk, silk, Uncategorized, vintage Vogue patterns from the 1950s

Almost September

What?  It is almost September and time to assess just exactly what I accomplished the last three months.  I have a friend whose late mother always said, “A flurry of activity at the end of the day does not make up for earlier unfocused, unproductive hours.”  I guess the same could be said for the waning days of a month or a season.  However, despite my nagging feeling that I have not accomplished much this summer, I have actually made some progress on my never-ending list.

For one thing, I tackled the alterations on my silk floral dress about which I wrote earlier in the summer.  I took out the hand-picked, lapped zipper to see if resetting it would give me enough ease over the tight bust and uncomfortable back.  There was much to take out and then put back in:  the lining, part of the neck ruffle, the understitching of the neck facing, and of course the entire zipper, in addition to reattaching the silk organza underlining back to the fashion fabric.  Thank goodness for the ample seam allowances which, in true couture fashion, enabled me to add just enough extra across the back.  Yes, it worked, and I am so much happier with the fit and the look of the dress.  Now I can wear it or hope to wear it! (Someday?)  I still think I will tweak the neckline a bit if I make this pattern again, but I do feel I salvaged this dress.

Well,  these are not the shoes I intend to wear with this dress. They happen to be the only heels I have with me this summer.

This dress fits so much better… I’m so happy I did not put off “fixing” this dress until … who knows when!

Several weeks of the summer were devoted to home decorative sewing, including pillows, cushions, and a tailored bed skirt.  I won’t bore you with that! But it was all very time-consuming, as those things tend to be.  More weeks were spent, happily, with welcoming  family for visits and extended stays and even some sewing for my granddaughters. I have never known two little girls who enjoy “playing dress-up” more than my two.  In a weak moment a couple of years ago I purchased this amazing vintage pattern of the Chiquita Banana Señorita’s dress in girls’ size 6-8.

The Chiquita Banana copyright for this costume is from 1947. The pattern is undated, but it is undoubtably from the 1950s.

I knew this was the summer to make these dresses, so I was off to the races on them.  I opted for rick rack rather than bias tape as the decorative trim. I ordered the fabric from Farmhouse Fabrics – a cotton/poly blend which was lovely, and in equally lovely colors.  As the dresses got heavier and heavier as I worked on them, I decided to eliminate the third row of ruffles.  As it turned out, the dresses were amply sized.  My 5-year-old granddaughter reassured me that it was so good to have dresses with room to grow.  And so, these fiesta dresses will serve them for at least a couple of years.

I wanted the girls to have different colored dresses, and I got creative with the colors, as I really think of these as “fiesta” dresses rather than Chiquita Banana. Lots of twirling ensued!

And then last week – yes the last full week of the month – I was finally able to focus on what will be my last make of Summer. Here is the pattern:

This pattern is dated 1957.

And here is the fabric:

I was fortunate to find this vintage piece of Moygashel linen several years ago. It is also from the 1950s.

And so my last minute flurry of sewing activity is well underway.  Happy September!

23 Comments

Filed under hand-sewn zippers, Moygashel linen, Ruffles, Sewing for children, sewing in silk, Sheath dresses, Uncategorized, Vintage fabric, vintage Vogue patterns from the 1950s

Dreaming in Color

Way back in January of this year – which seems like a lifetime ago now – making plans for my 2020 sewing was an exciting exercise.  I was eagerly looking forward to some upcoming events, including one in early May which was going to require at least two new dresses.  One of these dresses would be worn to a “fancy” evening.  In this casual world, what dressmaker does not relish the idea of making a dressy frock?  It was definitely going to be a fun trip and a varied multi-day event.

C         A        N        C        E        L        L        E       D

Needless to say, that trip and all its events were cancelled.  Other special occasions were also cancelled, along with many that were not so special.  I looked anew at my sewing plans.  I shifted some things around, eliminated others.  But I kept going back to the thought of that dressy dress.  The fabric was so cheerful, the colors so bright I could not abandon the idea of making it, even without an occasion for its wearing. So in early May I decided to go ahead with my original plans, albeit without a deadline.

I had purchased this silk charmeuse from Mendel Goldberg Fabrics in New York City several years ago.  It reminded me of fabric which one might see in a design by Christian Dior, due to its “Impressionistic” appearance.

The subtitle for this informative book is The Inspiration and Influence of Impressionism at the House of Dior.

When I unfolded the fabric to give it a press, I saw it was actually a Pierre Cardin design.  It struck me as somewhat unusual for Cardin, so of course I wanted to know if there had ever been any connection between the two couturiers or their fashion houses.  I went to my St. James Fashion Encyclopedia.  Well, yes, as a matter of fact there was:  “From his earliest work for the House of Dior up to the 1950s [my italics],Cardin displays an interest in the sculptural qualities of cut and construction that are still his trademarks in the 1990s.” (p. 87, The St. James Fashion Encyclopedia, Visible Ink Press, Detroit, Michigan, c1997.)

It may be a bit of a stretch to suppose this fabric does indeed have a Dior connection, but still, I wonder.  Could Cardin – now at his advanced age of 97 – and his fashion house still be influenced by those early days with Dior?  Of Dior’s style direction in the early 1950s, Christian Dior himself wrote ”…Colors were inspired by the pictures of the Impressionists and evoked the fields of flowers dear to Renoir and Van Gogh.”  (p. 5, Dior Impressions, Rizzoli International Publications, Inc., New York, New York, c2013.)  It is fascinating to ponder.

Now back to topic:  I started my dress.  I got the silk organza underlining marked and cut, I cut out the fashion fabric, I basted the two layers together, ready to start the actual construction.  Then I had a bad day.  It had nothing to do with my progress or the process, which was going along fine.  I just had this dismal feeling this was all for naught.  Why would I need such a lovely silk dress?  Where would I wear it?  Were all these hours I was spending in my sewing room just a waste of time? What purpose do all these pretty clothes serve without any social gatherings and occasions to which to wear them?  I think it is fair to say I was having a serious existential sewing crisis.  It was dispiriting and discouraging to say the least.  It made me question my otherwise passionate commitment to couture sewing.

That night I had a dream – in vivid color.  I saw myself in a fancy restaurant which was bustling with people – and I was wearing the very dress I had started – now completed and quite notable in its floral print of bright greens, and pinks and reds and purple.   I was seated at a table with three friends and we were lunching. (Not sure this dress is quite the thing I would wear to a midday lunch, but that’s dreams for you.)   The four of us were having the best time. We were laughing and totally engaged in our conversation and in our friendship. It was lovely and it was memorable.

And there was not a facemask in sight.

23 Comments

Filed under Christian Dior, Fashion history, Formal or fancy dresses, Love of sewing, sewing in silk, silk, Uncategorized

The Last Dress of the Year Past

Little did I know when I found this “end-cut” earlier in the year at Mendel Goldberg Fabrics that “classic blue” would be chosen as Pantone’s Color of the Year for 2020.  But so it was, which makes my last dress of 2019 the perfect transition into the new year and the new decade.

This an Italian silk charmeuse, in a dotted and printed jacquard.

I am one of those people who rarely goes looking for a particular fabric.  I think fabrics find me and when this fabric found me, I really had no plan for what I would make out of it.  But as soon as it arrived, I knew immediately I wanted a sheath dress with three-quarter length sleeves and a V-neck.  I tucked it away, happy with the thought of making this dress, and knowing I had the perfect pattern to make it a reality.

View C, of course! And look at those lovely shaping darts.

This Vogue pattern is from the early 1960s, a little tattered and worn, but very versatile and beautifully engineered.

After finishing my granddaughters’ December dresses, and then my pink Parisian Jacket, and then some cute little flannel blouses for gifts for my little girls, I envisioned finishing this dress to wear to holiday parties.  What was I thinking?  First of all, after tweaking the pattern one last time (I had had the pattern fitted a couple of years ago while in a class with Susan Khalje), it took two full days – yes, TWO – to figure out how in the world to lay out my pattern pieces.  Truth be told, I really did not have enough fabric.  I should have reconsidered, but I am stubborn and tenacious when it comes to my sewing “visions.”  I finally decided that I could exactly match the print on the back center seam and make it sleeveless – OR I could have sleeves and not match the back.  I really, really wanted sleeves.  It had to have sleeves.  So I did the best I could with making the back seam look okay, and I got my sleeves.

Fortunately the all-over placement of the floral motifs lent itself to imprecise matching better than many fabrics would.

And what lovely sleeves they are!  When Susan fitted the pattern, she elongated the top curve of the sleeve to accommodate my prominent shoulders.  She also added a dart at the shoulder of the sleeve (actually slightly forward from the marked shoulder of the pattern to accommodate the roll of my shoulders).  I added a slight amount to the width of the sleeve, about 3/8”.  I have found these vintage patterns are often narrow in the sleeves.

The purple lines are the changes to the muslin.

The double elbow darts in the sleeves make a lovely fit and are placed precisely where they should be.

It’s a little difficult to see the double darts, but they are there!

When it came to the V-neck, I knew I would need to use a facing of some sort, but I did not have enough fabric to cut a full facing.  So – I cut a partial facing instead, just enough to be able to turn the V and have it stable.  (The first thing I did when I started sewing the dress, was to reinforce that neckline with a strip of silk organza selvedge.)  Well, this worked like a charm, much to my delight.

The partial facing extends up from the bottom of the V about 2.5 inches, and then the turned- back seam allowance takes over.

Then I brought the lining fabric right to the edge of the neckline and understitched it to secure it in place, just as you would expect a couture dress to be finished.

I chose a “mushroom” colored crepe de chine for my lining. Blues are very difficult to match as you know, so I decided a contrast color would be best. The lining fabric is from Emma One Sock Fabrics.

I used blue thread for the under stitching.

I used a lapped application for the hand-picked zipper.  The more I use the lapped insertion for zippers, the more I like it.  And I especially like it in a center back seam.

I’m feeling quite pleased with this dress!

There is not much more to say about this blue floral dress, except that it was not finished in time to wear to any holiday event.  Which was fine!  Once I realized this would be the case, I was able to really enjoy the process of making it.  It was a delightful way to end the year – and the decade, which has had such a profound effect on my sewing.


37 Comments

Filed under couture construction, hand-sewn zippers, Linings, Mid-Century style, Pantone Color of the Year, Polka dots, sewing in silk, Sheath dresses, Sleeves, Uncategorized, vintage Vogue patterns from the 1960s

Secrets and Tips for Making a Tailored Bow Belt

After adding the final details – specifically, attaching lingerie straps and sewing on a back neckline hook and eye – to my silk polka dot dress, I was feeling quite happy with my accomplishment.  This dress did not seem to take forever to finish, as many dresses do.  But I could not rest on my laurels for more than a few minutes – as I knew I still had to make a tailored bow – and belt – before this project would be really complete.

I started with the belt.  I had already determined that a 1.5” wide belt would be the most attractive.  I remember “back in the day” when belt-making canvas in various widths was readily available.  Now, however, it takes a search on eBay or Etsy to find such a thing (as far as I can tell.)  Fortunately, one of the last times I was in Britex Fabrics in San Francisco (on the opposite side of the country from where I live), I found a product – kind of a buckram – that I knew would work well for belts.  I bought it in two widths – 1.5” and 1.25”.  I used the wider width as the basis for my belt.

A segment of the belt buckram.

1)  I first cut the desired length of belt buckram, leaving a good amount of overlap.

2) Next I cut out the fashion fabric to cover the buckram, which in my case was silk taffeta. I cut it out on the crossgrain as that gave me the color I wanted (the warp and weft of the fabric were in fuchsia and orange.) For a 1.5” belt I cut a width of 2.75” which allowed for a turn-under of 5/8” on either side. The length of this piece of fabric needed to be the entire length of the belt buckram, plus one inch for turning in the ends.

3) I wanted to line the belt with the navy blue crepe de chine I had used for lining the dress. I cut out a piece of the lining fabric identical in size to the long rectangle of the fashion fabric.  I seamed the two pieces together along one long edge. Then I pressed it so that the lining was slightly offset from the fashion fabric.

I interfaced the fashion fabric with silk organza.

The lining sewn onto one side of the fashion fabric.

4) I placed the belt buckram securely inside against that sewn edge, with the seam allowances towards the back of the belt.  I carefully secured the loose edge of the fashion fabric to the buckram using Dritz Wash Away Wonder Tape.  Then I folded under the raw edge of the lining, pinned it in place and hand-stitched it in place, leaving another slight offset along the second edge.

The underneath side of the belt with the lining attached, one side by machine, the other side by hand.

One end of the covered belt.

Next up was the tailored bow.

1)  I decided the bow should be the width of the front panel of the bodice of the dress, which was 7”.  For a finished bow, I needed to double that length, plus two ½” seam allowances, plus 1 inch for each tapered end of the bow.  7+ 7 + 1 + 1 + 1 = 17” length.   The width needed to be twice the width of the belt (1.5” x 2) plus 2 seam allowances of ½” each.  Total width needed to be 4”  – thus I cut out a piece of fashion fabric 17” x 4”, making sure I cut it out on the crossgrain to match the belt.

2) I interfaced my bow with silk organza, trimming it close to the seam line.

3) I then stitched the strip along its length only (not the ends), leaving about two inches open in the center.

4) I centered that seam along the length on the “inside” side.  I found inserting a metal ruler in the fabric tube helped me position that seam along the inside center.  I then pressed that seam, being careful not to press a crease in the outside edges.

Inserting the metal ruler into the tube of fabric made centering its seam so much easier.

5) I wanted double-peaked bow ends rather than a single angle.  I marked my sewing lines with a fine chalk marker and stitched, starting at the center and stitching to the edge.  I tied off the threads by hand rather than back-tacking. Then I trimmed and clipped the ends.

6) I turned the fabric “tube” to the right side and stitched the opening together by hand. (A hemostat is a huge help in turning narrow tubes of fabric like this.)

7) I don’t believe there is any magic formula for determining the spread of the bow – it is a visual determination, and I experimented until I had it looking well proportioned. I stitched across the width of the fabric tube at that spot.

The stitching is visible between the 13 and 14 inch markers.

This drawing explains the seam a little better.

Then I centered the loops and carefully pressed across the seam I had just sewn.   Basting by hand across this center point secured the position of the loops.

The loops of the bow are held in place by the center stitching line.

8) The bow was now ready for its “knot.”  I had to determine how wide I wanted my knot to be.  I chose to make it one half the width of the belt, or ¾” for the finished width.

9) The strip I cut needed to wrap around the width of the belt, front and back, with ample seam allowance to tuck in.  Twice around the width of the belt equaled 3” plus seam allowance of 1”.  So my strip of fabric needed to be 4 inches long. Its width was twice my chosen width of ¾” (1.5”), plus seam allowance of 1”.  Thus the knot would be made out of a piece of fashion fabric 4” x 2.5”.

10) I sewed the long edge of that piece together.  I again used a metal ruler (a smaller one this time) to position its seam along the center back of the piece.  I pressed it carefully along that center seam and then turned it right side out.

The inside seam on the knot.

The length for the knot turned right side out.

11) I centered this finished tube around the center of my bow, tucked in the raw edges on back, secured by small stitches, and slip-stitched it to the back of my bow.

This diagram shows the back of the bow with the knot being set in place.

12) I hand-stitched the finished bow to one end of the belt, added fasteners, and my belt was finished.

If you are still reading by now – and are still awake (good for you if you are!) – you will realize how much common sense techniques help make such a belt successful.  And in this instance, the success of my completed dress was largely dependent on the right belt – with its classic tailored bow.

12 Comments

Filed under Bows as design feature, sewing in silk, Uncategorized

Wearing Dots

From this …


To this…


How did that happen?

After my purchase of that pattern a couple of years ago, I definitely had second thoughts.  While I loved it when it was first available back in the 1970s – and at that time I was of the age when I probably could have actually worn it – I immediately realized it would not be appropriate for a 60-something-year-old! I tucked it away in my pattern file where I knew I would come across it occasionally and indulge a long-ago dream.  Little did I know it would play a major roll in the realization of this polka-dotted dress.

It took almost eight years for me to come up with a plan for this polka dot silk fabric.  I kept envisioning a waisted, sleeveless dress with a “flowy” skirt, but I could not find a pattern I liked, either vintage or new.  I wanted to avoid darts as much as possible (that’s a story in itself for someday), which meant I needed a princess style bodice.  Many princess line bodices have side seams, but I wanted one without side seams, and with princess line seaming on the bodice back as well.  Pondering all this, I again came across my Belinda Bellville pattern above and thought maybe it would work, with a few changes. But then I noticed that the bodice was supposed to be cut on the bias. 

This pattern detailing from the instruction sheet shows the thee bodice pieces at the top of the picture. The bias is clearly marked.

After not having any success in finding any other suitable pattern, I gave it another look.  Why not cut it on the straight of goods?  It was at least worth a try in muslin, so that’s what I did.  The changes I made to it included; 1) lowering the bust line, 2) eliminating the short-waisted front of the dress and restoring it to waist level, 3) placing the front center part of the bodice on the fold, eliminating the center seam, 4) lowering the neckline just a little, 5) making the waist larger, and 6) adding some ease across the back and shoulders.  With all those changes, I had a bodice I really liked.

But then I needed to make a skirt to complement the bodice.  When I looked at the skirt pattern, I knew I needed to divide it in thirds (for one half of the width of the skirt) and match the seam lines to the seams in the bodice.  Here is what I came up with:

On the left is the one-piece tissue pattern for the skirt. Using the dart lines on that pattern helped me determine the angles I needed for my skirt.

It was about this time I got the idea to make this dress in a longer skirt rather than knee-length, which is where I usually wear my dresses.  The only question I had was – did I have enough fabric to do this?  My silk was 45” wide, and I only had two yards.  I spent at least an hour laying out and eyeballing my muslin pieces on the silk, on the floor, just to see if I could possibly accomplish this task.  I found one combination that would allow this, and took a photo so I could remember how to do it!

It literally took an entire week to work out the pattern and perfect the muslin, but then the sewing began!

As soon as I completed the construction of the bodice, including its silk organza underlining, its catch-stitched raw seam edges, with the seam allowances around the neckline and armholes appropriately tacked in place, I knew I had a bodice which was just what I had envisioned.

Somehow the skirt seams all matched up perfectly with the bodice seams and the center front inverted box pleat, which I added, looked wonderful, I thought.  I made the lining out of navy blue crepe de chine, purchased from Emma One Sock Fabrics.

When it came to under-stitching the neckline and armholes, I decided to do it in white.  It mimics the white polka dots in the fashion fabric and also was much easier to see while doing all that handwork.

Instead of a box pleat in the lining, I did two side pleats to reduce bulk in that critical tummy region!

Fortunately, for the belt, I had silk taffeta left over from two previous projects, which turned out to be a perfect match.  I did not want the belt to take away visually from the rest of the dress, so I made it a modest 1.5 inches wide.  I think it is enough to complete the look, but not overpower it. And OF COURSE I wanted to finish it off with a tailored bow.  (I am planning a post on making this tailored bow belt, so I will not go into the details of it right now.)


An oyster-colored clutch helps to complete the look.

This is a very comfortable dress to wear!

No attempt was made to match any dots, as the pattern was completely random. This is the hand-picked zipper. I love the fact that the navy thread shows up on the white and coral dots.

And should I need a dress coat, this one matches the belt!

While this dress was firmly in my queue for summer sewing, at the time I did my planning I was not making it for any special occasion.  However, as good fortune would have it, two unforeseen occasions are now approaching in late summer for which this dress will be perfect.  I am definitely looking forward to wearing these dots!

41 Comments

Filed under Bows as design feature, Cocktail dresses, couture construction, Linings, Mid-Century style, Polka dots, sewing in silk, silk, Silk taffeta, Uncategorized, vintage Vogue Designer patterns, vintage Vogue patterns from the 1970s

The Champagne Dress

It is a fact of sewing life that the construction of some dresses is just more difficult and time-consuming than other ones. This was a difficult dress to make and at times I really wondered just how long it would take to finish.

Before I go into the making of this dress, I want to put its pattern into historical context. This pattern is one of Vogue Patterns’ “Paris Originals.”

A former owner of this pattern made the notation about the bust enlargement.

As is obvious from the envelope cover, the dress was designed by Guy Laroche (1923-1989; pronounced Ghee Lah-rush); it is copyright 1960. According to the St. James Fashion Encyclopedia, Laroche was a French couture and ready-to-wear designer who worked for Jean Desses from 1950-57. Desses was known for his intricately draped dresses, asymmetry in his designs and ornament derived from the “architecture” of the garment, according to his profile in The St. James Fashion Encyclopedia by Richard Martin, Visible Ink Press, Detroit, MI, c1997, page 100. Bingo! It appears that Laroche learned well from his time with Desses and incorporated some of the same details into his couture designs once he opened his own fashion house in 1961.

I find it interesting that this pattern is dated 1960, one year before Laroche opened his couture house. Perhaps this statement in the Vogue Sewing Book from 1963 helps to explain how Vogue Patterns managed to obtain a Guy Laroche design before he had his own eponymous line:

Please click on the image to enlarge the print.

In any event, the appeal of this pattern, for me at least, was the asymmetrical draped bodice back and the tailored bow which anchors the drape on the right shoulder of the dress. It was also these details – and others – which made it a time-consuming project.

I made some alterations to the pattern before I even got started, as I wanted to eliminate some of the blousing above the waist of the dress. I do not have enough height to carry off too much excess around the mid-section, so I pulled most of the blousing into darts. Doing this made me rethink the instructions for the lining, the waistline of which was supposed to be sewn to the waistline of the dress itself. I assume the joining of these two elements was to insure that the blousing of the dress remained at the proper “elevation.”

The series of dots around the waistline indicate the sewing line to anchor the dress to the lining.

Having removed most of the blousing, I did not need to anchor the dress to its lining, so I left the lining loose.

This photo shows the loose lining and also the back neckline. Ordinarily, in couture sewing, facings are eliminated. However, in this case, knowing that the weight of the drape would be added to the back neck, I chose to use the facing to add more stability. I finished its edge with Hug Snug tape.

As you can see from the diagram of the lining (above), the back neckline is asymmetrical, to accommodate the attached drape on the bodice. I’m not sure why, but I found this rather confusing, resulting in sewing the lining together, first correctly, then thinking I had done it wrong, redoing it in what I thought was correct – and then realizing I had it right the first time. Fortunately it was easy to remove the stitching from the crepe de chine lining silk, but really? Three times? And then guess what this is?

Yes, this is a backwards back bodice!  Apparently I had flipped (or marked incorrectly) my silk organza underlining/pattern when I placed it on the fashion fabric, cut it out incorrectly and even had the underlining and the fashion fabric all carefully basted together.  When I discovered my mistake,  you can imagine my panic until I realized I had enough of the charmeuse left to cut it out again, this time correctly. Of course, then I had to baste it to the organza underlining for a second time. Tick tock, tick tock!

Things then went along fine until I got to the front neckline, which presented a quandary to me. From the instruction sheet, it seemed there was to be no interior finishing of it. It appeared to be a draped version of a bateau neckline. When I tried the dress on, it was uncomfortable as it pulled too tightly from the shoulders (which did not show up in my muslin).  It also did not look good. I decided the only way out of this predicament was to reshape it. I carefully basted and clipped and trimmed and clipped and trimmed some more (no photos of this, I am sorry to say. I was too intent on the task at hand to even think about photos!) But it all worked out. The front neckline certainly isn’t as draped as was intended, but I love the way it fits and looks.

The lining is not supposed to be attached to the dress at the front neck, according to the instruction sheet. In order to finish the neckline without adding any bulk (which would surely show up on that wide bias expanse), I stay-stitched and then catch-stitched the raw edge to the organza underlining. Not as finished a look as I would like, but it works well.

Another section of the pattern which did not present a proper interior finish for this very particular dressmaker, was the drape. It is partially gathered as you can see from the instruction sheet.

#7 shows the gathering of the interior drape.

As I did not care for a raw edge to be hiding under the drape, I decided to bind the edge with Hug Snug tape. This worked out so well and looks nice and tidy!

Besides these time-consuming corrections and additions, there were the hours of work involved in making the bow, attaching it to the dress, and making the belt. Then when I thought I was just about finished, I remembered I needed to add lingerie keepers, due to the wide stance of the shoulders. Okay, I thought. What else??

I have decided the belt is a little loose, so I need to reset the fasteners… What else, indeed!

What a good feeling of accomplishment to finish this dress and like it!

Here is a detail of the bow. I do love a tailored bow!

I haven’t worn it yet for any occasion, but when I do, I hope there is champagne involved, as I am going to toast myself for successfully finishing this one!


46 Comments

Filed under Bows as design feature, Cocktail dresses, couture construction, Linings, Messages from past owners of vintage patterns, Mid-Century style, sewing in silk, side-placed zippers, The Conde Nast Publications, Uncategorized, underlinings, vintage Vogue Designer patterns, vintage Vogue patterns from the 1960s

A Three Piece Outfit for the Holidays: Part 2, the Skirt

If I had known how lengthy a process it is to make a couture Guipure lace skirt, I would have chosen to make it before the blouse. Here I thought I was getting the more complicated part finished first. Well, I could not have been more mistaken! However, it certainly feels good to have both finished, although I may be in “skirt recovery” for a while!

The Guipure lace I used was some that I had purchased a couple of years ago. I liked the fact that the color from my fashion fabric – that coppery brown silk – would be a good contrast to the white lace. However, I did not consider if it was really the best choice for a Guipure skirt, due to the fact that part of the allure of these skirts is camouflaging the seams and darts. The light weight nature of this Guipure – and its very regular pattern – made it somewhat difficult to use for this purpose.

One of the first things I did was determine what selvedge edge of the lace I wanted to use for the hem. Once I had settled that, I had to decide how much of the fashion fabric to leave showing on the hem edge.

This selvedge edge is marked by some of the small daisy-like flowers in a horizontal line with the larger motifs.

And here the larger motifs are more prominent.I preferred this one, but I moved it up a bit to show more of the fashion fabric, in order to “ground” the lower edge.

From then on, I followed the Craftsy Class presented by Threads Magazine, with Susan Khalje teaching. Here are some pictures taken along the way:

Pinned in place, ready to stitch part of the lace covering the back seam.

In trying to camouflage the zipper, I chose to have a fairly substantial flap of lace on the left, to be snapped in place on the right. It would have been better to have smaller overlays across the zipper, which are much easier to handle.

The back of the skirt with all the lace attached and snapped in place.

All in all, the back of the skirt looks okay, I think.

And the shaping over the darts is almost imperceptible on this view of the skirt front.

I have one tip to add: when I was ready to insert the silk lining, there were many fuzzies and threads clinging onto the cotton underlining. I really did not want them encased in my skirt forever, so I quickly removed them all with a lint roller. Then the lining went in just as intended, followed by the Petersham ribbon inner waist band.
Here is the lining with its built-in drop pleat for ease of wearing.

View of the interior Petersham ribbon waist “facing.”

All in all, I am fairly pleased with how this skirt turned out. I learned so much from taking this course and making this skirt, and it probably isn’t surprising that I have a list of things to do differently the next time.

1) choose a heavier weight – or more substantial – Guipure, with a more intricate pattern. This should make it easier to hide the snaps and manipiulate the motifs in the lace to conceal all which must be concealed!

2) use a lighter weight cotton for my underlining. I felt the one I used was just a little heavier than needed. (It was some I found in my stack of quilting cottons.)

The underlining cotton. A little lighter in weight would be preferable.

3) leave 1/2” distance from the top of the zipper to the line for the Petersham ribbon. I left about 3/8” and I think the zipper is a little squashed at the waistline.

4) when I tried on the skirt midway through to doublecheck on the fit, I thought the waist was a little snug, so I added 3/8”. But once the skirt was finished, I found I really did not need the extra fullness. So next time, I’ll keep my original measurement! Hopefully I won’t need suspenders to keep the skirt from falling down.

5) next time I will definitely use a more exciting lining. I think this one is dull.

Now I have one more small thing to make for this outfit (with full pictures to come.)  But I have small on the brain right now as I need to do some sewing for my little granddaughters, making for a fierce competiton in my sewing room. I believe multi-tasking will be on the agenda.


12 Comments

Filed under couture construction, Lace, Linings, sewing in silk, Uncategorized, underlinings