Monthly Archives: January 2013

New Life from an Old Dress

I’m sure I never would have entertained the thought of remaking/repurposing this dress  –

I made this maternity dress in the Fall of 1980 while pregnant with our first child.

I made this maternity dress in the Fall of 1980 while pregnant with our first child. The fabric is US-made Pendleton wool.

– had Emerald Green not emerged as THE color of 2013.  As it was, it seemed silly not to take advantage of this opportunity to make a skirt in a color I love, from a dress that would not be worn again, and which already carried sentimental memories.  So I told myself repeatedly, “Do this.”  And so I did it, but not without much mental anguish.

Before I did any ripping of seams or cutting of fabric, I needed to decide what kind of a skirt I could make, knowing that, even with a maternity tent-style dress, the usable expanse of fabric was limited.  It seemed fairly obvious that a pencil or A-line skirt was about the extent of the possibilities.  But I wanted some kind of a focal point on it, too.  I kept thinking about the fringed Pendleton wool skirt that I had remade, thinking that fringe on this green one would be quite nice as well.  I did a little testing on an inside seam of the dress and determined the wool was so tightly woven, that any “fringing” would have to be somewhat minimal.  It also seemed to be easier to unravel the threads working up and down rather than across.  I figured if I could wiggle out enough fabric to add one overlap (or pleat) at the side front, I could fringe that edge and get the focal point I wanted.

With this plan in mind, I now had to face cutting apart – and into – this dress, which I so clearly remembered making and wearing over 31 years ago.  Honestly, for a couple of days I really couldn’t face this.  My practical side finally triumphed when I decided I would first separate just the side seams on the dress.  If I chickened out at that point, I could always sew it back together, right?  Right!  And so I snipped and snipped and pretty soon I had two usable sections of wool.

The dress with the side seams separated.

The dress with the side seams separated.

Then –  somehow, miraculously, I was suddenly okay with the thought of cutting into this dress.  The back part of the skirt pattern fit perfectly on the back section of the dress – it was even already seamed for me.

My muslin pattern positioned on the back of the dress.

My muslin pattern positioned on the back of the dress.

The front part of the dress gave me enough room to make a new two-piece front, with a pleat on the left side.  I cut out the pieces and set about to fringing.  Re-runs of Downton Abbey helped tremendously with this – I pulled and picked and created fluffy little towers of green threads while totally absorbed in another time and place.

Then it was back to the sewing room to sew this baby (pardon the bad pun) together.  There was not enough fabric  to fashion a waistband on the straight of grain, so I opted to make an inside pieced-together facing instead.

The facing at the waistline.  I attached the 31-year-old Pendleton label in place after all these years!

The facing at the waistline. I attached the 31-year-old Pendleton label in place after all these years!

Then I made a button tab out of bias tape which I just happened to have on hand in emerald green.  What I could not find was a 7” zipper in emerald, nor lining fabric in emerald.  Guess the manufacturers of such items did not get the memo from Pantone about the color of the year!  So I ended up with a black zipper and dark gray Bemberg lining fabric.

The black zipper and gray lining are okay, I think...

The black zipper and gray lining are okay, I think…

I went round and round with a decision about buttons to hold the top part of the pleat in place.  I found several single buttons in my button box, which I really liked, but I really needed two or three.   A trip to Joann’s yielded some pale gray pearl buttons which would have been lovely, except that one broke after I got home when I was taking it off the card!  So I still have to resolve the button issue – as right now I  have exactly one button on the skirt, although I do like its diamond shape quite well…

The fringe detail on the pleat - and the single button.  Sure wish I had another one of these!

The fringe detail on the pleat – and the single button. Sure wish I had another one of these!

It's finished (except for the button issue, of course!).

It’s finished (except for the button issue, of course!).

green skirt

The back view.

The back view.

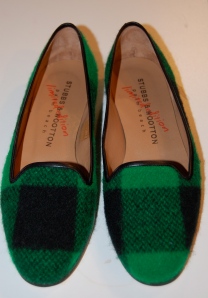
Thinking back on this project, I believe the signs were there, telling me to make this skirt.  Consider that I found these Stubbs and Wootton shoes – green and black Buffalo Check to go with my Pendleton wool:

How I love these comfy flats!

How I love these comfy flats!

And among my collection of silk scarves was this scarf, purchased in the 1980’s from the Museum of American Folk Art, featuring one of their quilts in predominant colors of pink and – yes, Emerald Green.

The green in this scarf could not be more perfect.

The green in this scarf could not be more perfect.

A detail of the scarf on top of the skirt.

A detail of the scarf on top of the skirt.

So – where do I envision wearing this skirt?  How about to a baby shower for my daughter, now expecting her own little one?  After all, she herself  was once sheltered by these warm woolen threads of green – and love.

14 Comments

Filed under 1980's dress patterns, Buttons - choosing the right ones, hand-sewn zippers, Scarves, Uncategorized, woolens

Sewing SMART for 2013

The word “smart” has lots of different meanings.  My desktop Webster’s lists 21 different connotations of this short, very effective word.  I particularly like two of the ways this word was used when I was growing up in the ‘50s and ‘60s:  those  would be meanings #5: “neat or trim in appearance, as a person or garment”, and #6:  “socially elegant; sophisticated or fashionable: the smart crowd”.  With these definitions in mind, I looked for and quickly found some very pertinent examples of these meanings in two Vogue Pattern Book Magazines from 1953 and 1954:

The February/March issue of Vogue pattern Book Magazine 1954 gives the reader ideas for a "smart look all through the day, now and through spring."

The February/March issue of Vogue Pattern Book Magazine 1954 gives the reader ideas for a “smart look all through the day, now and through spring.”

The VPB magazine from October/November 1953 featured "10 smart, new high fashion  Vogue Couturier Designs."

The VPB magazine from October/November 1953 featured “10 smart, new high fashion Vogue Couturier Designs.”

I love this caption from the same issue:  fashions with " a minimum number of pieces to sew and fit ... maximum smartness."

I love this caption from the same issue: fashions with ” a minimum number of pieces to sew and fit … maximum smartness.”

Well, in thinking about some of my sewing goals and aspirations for 2013, I kept coming back to this word – SMART – and decided it would be very useful to use as a  guideline, with each letter of the word reminding me of some of what I hope to accomplish.   SO …

is for SKILLS.  This year I am concentrating on learning new ones, practicing and perfecting ones that I have and taking advantage of at least two classes to help me develop my skills as a dressmaker.  So far, I am enrolled in Craftsy’s “Sewing with Silks: The Liberty Blouse” on-line course (not started yet), and I will be spending a week in Baltimore with Susan Khalje for The Classic French Jacket Class.  Perhaps other classes will wiggle their way into the year as well!

M is for MARKING AND MEASURING my progress and accomplishments, my mistakes (hopefully not too many!), and my plans and intentions.  This is, of course, where “Fifty Dresses” comes in.  Writing this blog helps me focus more on the process than I would normally – and that’s both instructive and rewarding.  So thank you from the bottom of my heart to all of you who follow along, make comments, give me encouragement, and share your sewing insights and ideas through your own blogs or other online presence. Thinking, reading and writing about sewing is almost as much fun as sewing itself.

A is for ART.  Sewing is so much more than a “hobby” or a way to build a wardrobe (albeit slowly!).  It really is an art form, and the more I sew, the more I realize and appreciate this fact.  Some of my creations will no doubt be like simple sketches – quick and easy to make and even easier to throw on for a trip to the grocery store –  while one or two others perhaps will rise closer to “masterpiece” level (I can dream) – made with finest fabrics and specialized techniques, intended for special occasions.  Good art should be taken seriously and seriously enjoyed, don’t you think?

R is for REALISTIC, as in having realistic goals of what I can and cannot accomplish in a set amount of time.   This is the part I have trouble with.   I always think I can sew faster than I can.  Although I am sure I will always plan more than I can possibly accomplish, I am going to try to set more realistic goals (keeping a separate, working list of intended projects to help me focus) in the context of what I know will be a busy year in other aspects of my life.

T is for TIMELESS.  This may be my favorite part of the acronym.  Timeless is the look that I am always striving for in the clothing I make.  Using vintage patterns for the most part allows me to choose styles that really have stood the test of time – and which often have a restrained classicism to them that suits my sensibility.

Sketches in Vogue Pattern Book Magazine from October/November 1956 show styles which look very au courant, from the clothing to the hair to the shoes and accessories.  I'd like to be that lady in red!

Sketches in Vogue Pattern Book Magazine from October/November 1956 show styles which look very au courant, from the clothing to the hair to the shoes and accessories. I’d like to be that lady in red!

How stylish are these looks from the same magazine?

How stylish are these looks from the same magazine?

And a box-jacket suit is always in vogue.

And a box-jacket suit is always in vogue.

It’s fun to see current color and style trends, which harken back to 40, 50, or 60 years ago.  Then to make them, using vintage patterns, with newfound construction knowledge, in some of the beautiful fabrics available today, is the best of many worlds. Not only SMART, but lucky, too, in 2013!

22 Comments

Filed under The Conde Nast Publications, Uncategorized, vintage Vogue Designer patterns, vintage Vogue patterns from the 1950s, Vogue patterns

Chance of Flurries

I am two weeks (maybe closer to three weeks) behind schedule, but I am undaunted.  The last two weeks of 2012 were chock-a-block full of Family, Fun, and Feasting – and then the plague hit our house.   Yes, another F-word – the FLU – which apparently was not the type we got the immunizations for…

But this week has found me back in my sewing room, finishing up what was to be my final project for 2012.  Flexibility, I have learned, is a great asset to cultivate, so I am trying to be flexible in my plans and take it all in stride.  Indeed, I am hoping that I will be striding pretty in newly-sewn pants, which have now joined my wardrobe.

I think I must like pants made out of figured fabric.  As soon as I saw this snowflake wool on the website of Waechter’s Fabrics, I knew I wanted to make it up in winter slacks.

This is a jacquard woven wool, but very light-weight and soft.

This is a jacquard woven wool, but very light-weight and soft.

It was not even a decision to use the same 1960s’ pattern I used for my “very stylish” linen pants last Spring – pants’ patterns that fit are worth using again and again.

I made quite a few alterations to the pattern so that these slacks actually fit me!

I made quite a few alterations to the pattern so that these slacks actually fit me!

I did decide, however, to make these using couture techniques.  I underlined them with a very light-weight rayon voile which I have used successfully before.  I did not want to add much stiffness to this very soft and flexible wool, so the rayon seemed a better match than silk organza in this instance.  I catch-stitched all the seams, and inserted a hand-picked zipper.

The underlined pants, with catch-stitched seams.

The underlined pants, with catch-stitched seams.

Hand-picked zipper.

Hand-picked zipper.

As luck would have it, the newest issue of Threads Magazine arrived right as I was getting started on this project – and Susan Khalje’s article “Build a Better Waistband” (page 44 – 49) immediately caught my attention.  I had already purchased several yards of Petersham ribbon in anticipation of waistbands yet to come, so I was all set.  I carefully followed all her detailed instructions and photos:

The newsest issue of Threads magazine

The newsest issue of Threads Magazine

The Petersham ribbon basted onto the waistline.

The Petersham ribbon basted onto the waistline.

I even decided to make a “faced” waistband.  I knew that this would help reduce bulk in the waistband, but also it would insure that any “itching” around the waist sometimes caused by wool fabric would be eliminated.

I made the facing out of the lining fabric.

I made the facing out of the lining fabric.

Everything was going along swimmingly until I went to set in the lining for the pants, which I made out of Bemberg rayon.  Somehow, the rise from the crotch to the waist was a little short.  I don’t know how this happened, but it did, and so I was faced with figuring out how to remedy this situation short of making an entire new lining.  Well, I decided to attach the waistband just to the underlined wool, not including the lining.  Then I used some careful and tightly-spaced catch-stitching to attach the top of the lining to that waistband seam.  (I forgot to take a photo of this, as I was totally absorbed in this “make-do” process.) This worked beautifully, much to my delight.  The only further fix I knew I needed to do was finish the inside of the waistband.  The waistband facing needed to be a little longer to hide my mistake, so I bound the raw edge with seam binding and used the fell stitch to finish it off.  I’m happy with the way it looks:

The seam binding helps to make a clean finish and hides my mistake!

The seam binding helps to make a clean finish and hides my mistake!

DSC_0761

I don’t think anyone would suspect my mistake – except for all of you, of course!

After final stitches to secure the lining to each of the legs, and then lots of steaming and pressing , my snowflake pants were finished!

Here they are, all finished!

Here they are, all finished!

Snowflake pants

A back view.

A back view.

Kind of a side view.

Kind of a side view.

And a little closer up...  I'm happy with the way I was able to align the snowflake "medallions".

And a little closer up… I’m happy with the way I was able to align the snowflake “medallions”.

We seem to be in a January thaw right now, so the only forecast for flurries must be – in my control??  Well, I happily guarantee that sightings of snowflakes will definitely happen this Winter!

15 Comments

Filed under couture construction, hand-sewn zippers, Uncategorized, underlinings, vintage Vogue patterns from the 1960s, Vogue patterns, woolens