Category Archives: Suit dresses

The Never-Ending Winter

One advantage to this never-ending Winter we are having in the Northeastern part of the United States is the focus – and extra time – it has given me in finishing my Winter projects. After completing my recent Classic French Jacket, I did some “birthday dress” sewing for my granddaughters (still to be shared) and made two baby gifts, and only then did I come back to making a matching sheath dress for that jacket.

I had thought long about how this dress should be constructed, and not having the advantage of taking a class in such a project, I knew I would have to figure it out on my own. I decided I would combine classic couture construction with the techniques used for making a classic French jacket.

First, I underlined the three pieces of the dress (front and two back panels) with black silk organza, and I anchored all the darts with a catch-stitch. (I always go back to that sound advice from Susan Khalje – couture is about control – and I know how this extra step helps to keep everything in its rightful place.)

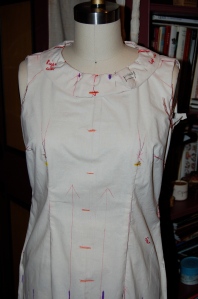
Then I machine quilted the two back panels and the dress front just as I would quilt the separate pieces of a French jacket. I ended the quilting about two inches from the tops and bottoms of the pieces and tied off each line of quilting inside between the two layers. I figured the quilting did not need to be as closely placed as it is with a French jacket, so my quilting lines are about 2 inches apart. This following photo shows the quilted channels on the inside (they are virtually invisible on the fashion fabric):

The three pieces were sewn together as a Jacket would be sewn with the edges of the lining loose and then finished by hand with a fell stitch. At this point I felt fairly confident that the dress was going together as I had hoped. And yes, there is a lot of handwork involved! Next I inserted the long back zipper by hand and then finished the neckline and lining with a fell stitch.

Because I wanted to apply a length of trim above the bust – to match the trim placement on my jacket – I did the armholes last, as the trim needed to be attached before they were finished.


Finally, the hem. The length had to be precise, as there will be no lengthening nor shortening of this baby! The final step was to sew the hemline trim on by hand. I delineated the back vent with the trim to give it some extra interest. Also, although it is not visible here, I angled the edges of the vent slightly to the inside so that when the dress is on, the vent will not gape, but rather hang straight. This is another one of those lovely couture tricks I learned from Susan Khalje!

I must say this dress is a dream to wear, with that quilted silk interior.

And – I am quite happy with how it looks with my jacket.

Br-r-r-r-r!

As warm as this dress and jacket are, I was freezing when these photos were taken!

I have faith that Old Man Winter – who is truly ancient by now – will soon leave us, but not without a fond farewell from Fifty Dresses who appreciated his extra encouragement on seasonal sewing!


41 Comments

Filed under Boucle for French style jackets, classic French jacket, couture construction, Linings, Sheath dresses, Suit dresses, Uncategorized

Reflections on the Couture Legacy of Norman Norell

It was my distinct pleasure and good fortune to visit the current Exhibition on Norman Norell at the Museum at the Fashion Institute of Technology (MFIT) in New York City last week. For those of you not familiar with this mid-century American designer, you may be surprised to learn of his enduring influence on, and remarkable contributions to American fashion and glamour. He also, in his extensive and versatile body of work, employed the finest couture techniques, making his clothes still the envy of designers and those of us who strive for excellence in our fashion sewing.

Norell: Dean of American Fashion opened on February 9, 2018 and will close on April 14th. Guest Curator and designer Jeffrey Banks and Deputy Director of MFIT, Patricia Mears, collaborated on this Exhibition. Included are examples from his entire career; however, the Exhibition focuses for the most part on his final, spectacular 12 years, from 1960 – 1972. Norell (1900-1972) left his native Indiana to pursue his interest in illustration and fashion design in New York. He worked under Hattie Carnegie, and then at the beginning of World War II he began a partnership with Anthony Traina, the label for which is the well-known Traina-Norell designation. It was in 1960 that Norell started his own eponymous line of clothing, and it was during this period, up to his untimely death in 1972, that he set his real mark on American fashion.

To all of you I commend the MFIT Exhibition website for learning more about Norell’s life and the evolution of his body of work, including a fascinating video presentation by Exhibition Curator Jeffrey Banks. (Be sure to click on “explore the Exhibition website” which will lead you to some excellent content.) It was with this background knowledge that I entered the Exhibition, knowing I wanted to view it on two levels – 1) as a dazzling display of some of the most beautiful fashions ever assembled, and 2) as an opportunity to see up close some of the construction details, style lines, and elegant touches in his fashions, serving as inspiration for my own fashion sewing.

The Exhibit is physically divided into two areas, the first of which serves as a guide to his trademark themes, each with a small grouping of fashions. I was immediately smitten with this selection of LBDs:
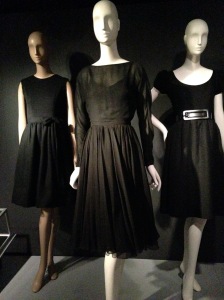
All of these dresses have a timeless appearance, making them as stylish today as when they were designed. From left to right, #1 Label: Norman Norell New York. Black sleeveless bodice with skirt and satin sash, 1963. wool jersey, wool twill. Lent by Kenneth Pool [a major lender to the Exhibit.];
#2 Label: Traina-Norell New York. Black cocktail ensemble, 1950. silk chiffon, silk satin. MFIT, Gift in memory of Miriam Abrams; #3 Label: Norman Norell New York. Black dress with belt, 1962-1963. Wool, leather. MFIT, Gift of Mortimer Soloman.

As a way of illustrating the impeccable couture construction for which Norell fashions are known, this “inside-out” dress was displayed.

Click on the photo for a closer look.

It was all I could do to keep from reaching over to see more of it. Noted on the caption were ”the hand-picked zipper and extra wide seam allowance, the deep hem … edged with bias-cut silk so that it is softly defined yet sturdy. Furthermore, the neckline and armholes are minimally interfaced to give shape without impeding movement, and they are under-pressed in order to hide the seams.”

The larger gallery of the Exhibit practically took my breath away when I entered. The large center stage is resplendent with examples of his famous eveningwear, including his sequined “mermaid” dresses.

The low light in the Exhibition gallery only added to the ambience and allure of these creations.

Around the perimeter of the gallery were featured many, many of his glorious coats, capes and dress suits, as well as dresses. I snapped this photo of one of his trademark sailor dresses to show the hand-picked zipper and the large patch pockets applied by hand (note the provenance on this dress in the caption):

Label: Traina-Norell New York. Off-white sailor dress with navy collar and red tie, circa 1957. Linen. MFIT, Gift of Lauren Bacall.

There were so many terrific examples of Norell’s vibrant use of color, including this coral cape from 1962.

Label: Norell. Coral double breasted cape, 1962. Wool melton. Lent by Kenneth Pool.

And I could not take my eyes away from this combination of off-white evening gown with a red bolero jacket and peacock blue sash from 1968.

The beautiful shape of the jacket, with those amazing buttons and bound buttonholes, sets off the sash to perfection. Label: Norman Norell New York. Off-white evening gown with red bolero jacket and peacock blue sash, 1968. Cotton organdy, wool, silk taffeta. Lent by Kenneth Pool.

Another brilliantly hued ensemble is this pink evening coat with matching skirt and blouse from 1964. Note the rhinestone buttons, the beautiful bound buttonholes, the angled pockets, and the lovely seaming detail of the high yoke on the coat which descends into the sleeves.

Label: Norell, Norman Norell New York. Pink evening coat with matching skirt and blouse, 1964. Wool, rhinestone buttons. MFIT, Gift of Lauren Bacall.

Norell was known for his cone and wedge-shaped coats, of which this purple one is an excellent example.  Note the spread of the descending buttons on this coat:

Photography was permitted, although flash photography was not, so my pictures do not do justice to many of these fashions. Label: Norell. Purple cone shaped double breasted coat with Peter Pan collar, 1966. Wool melton. Lent by Kenneth Pool.

This coat and pants ensemble from 1970 is set off beautifully by its wide belt:

Label: Norell. Coat and pants ensemble, 1970. Wool herringbone, leather. Lent by Kenneth Pool.

The collar is absolutely stunning. And those bound buttonholes are a work of art in that heavy wool herringbone weave.

Norell used the talented stitchers of the garment worker’s union to make his clothing.

While I am writing about coats (one of my favorite subjects!), I want to show you details from two which help to illustrate the quality and finesse for which Norell’s fashions are known. First is this pocket detail from an off-white coat with black collar, 1962-1965.

Label: Norell. Off-white coat with black collar, 1962-1965. Wool and velvet. MFIT, Gift of Mrs. Jane Albert

The right edge of the flap is angled slightly to follow the side seam line, a subtle touch which gives it a graceful appearance.

Second is another pocket detail on a beige coat with pilgrim collar from 1968:

Label: Norell. Beige coat with pilgrim collar, 1968. Wool. MFIT, Gift from the collection of Margery J. Davidson, lovingly donated by her son Harold S. Graham.

The pocket is an extension of a princess seam, beautifully angled. And more shaping is apparent to the left of the full-length seam, giving this coat such elegant and refined lines.

Seeing this following grouping of dresses and jackets gave me a new appreciation of the concept of “less is more.” According to the caption, Norell “chose to trim his day and evening wear with mink, fox, and sable. The judicious use of this expensive and sensuous material elevated the glamour quotient of his restrained daywear.”

From left to right: #1 Label: Norell. Pale oatmeal midi dress and bolero jacket, 1967. Wool, crystal fox. Lent by Kenneth Pool. #2 Label: Norell. Pale peach jacket and black gown, 1966. Brushed wool, fox, sheer jersey. Lent by Kenneth Pool. #3 Label: Norell. Red and black check suit, 1962. Wool, black fox, leather. Lent by Kenneth Pool.

One more Little Black Dress has the most beautifully placed buttons:

Label: Norman Norell New York. Black dress with jeweled buttons, 1965. Wool crepe. Lent by Kenneth Pool.

I loved the caption which (partially) stated: “Deceptively simple, Norell’s dresses were visually quiet but strategically constructed… to enhance a woman’s body.”

I could go on and on as there is so much more to celebrate about this remarkably talented “Dean of American Fashion.” Fortunately, the Exhibition is accompanied by a book, titled: Norell: Master of American Fashion, by Jeffrey Banks and Doria de la Chapelle.   Published by Rizzoli, the book is lavishly illustrated and beautifully presented, both in content and inspiration. I commend it to you.

In closing, on a personal note, I cannot help but think back to 1972, the year I graduated from college and the year Norman Norell died. So much has changed in the world of fashion and fashion sewing since those heady years. Seeing an exhibition like this one is a lovely reminder of the true timelessness of quality and restrained elegance, providing endless inspiration to those of us who dream and sew.

15 Comments

Filed under bound buttonholes, Capes, Coats, Cocktail dresses, couture construction, Day dresses, Dressmaker coats, Dressmaker suits, Fashion commentary, Fashion Exhibits, Little Black Dress, Mid-Century style, Suit dresses, Uncategorized

My Suit Dress Fully Evolved – Finally! – Part 5

Can it really be that May will arrive in a few days? If that is true, then I am only about 2 months behind in my sewing schedule. But who’s keeping track? I’m happy that I have plowed through to finish my wool suit dress, even though it will immediately go into my cedar closet for safe storage until next Fall.

When I fell off the edge of the world after Part 4 (only figuratively, thank goodness!), I was starting on the sheath dress. I had decided to add a collar to it, so that I could use that fourth vintage button (I had already used three on the jacket itself). Matching the windowpane plaid on the collar section took some special attention, as this photo shows:

Collared sheath I underlined the collar with the lining fabric, and I made a working bound buttonhole instead of just sewing the button in place. Anything to make it more involved, right?

Detail of the button on the collar.

Detail of the button on the collar.

Lining the collar with silk charmeuse reduced bulk and helps it lay flat.

Lining the collar with silk charmeuse reduced bulk and helps it lay flat.

From that point on, it was a straightforward sheath dress. I love a sheath dress. I think it is such a flattering silhouette, and very feminine. As far as I am concerned, one can never have too many sheath dresses (just as one can never have too many shoes). Speaking of shoes, I decided this outfit needed complementary shoes! What do you think?

collared sheath

I wear a lot of red and blue, so I expect these shoes to serve me well!

I wear a lot of red and blue, so I expect these shoes to serve me well!

It turns out that even a simple sheath can take a lot of time to make when one is using couture techniques: underlining of silk organza; interior seams catch-stitched; hand-picked zipper; instead of facings, neck and armholes finished with lining-abutted edges, then pick-stitched for stability. The silk charmeuse lining in the dress matches the jacket lining and is an extravagance, I will admit. But it feels heavenly, and adds a fluidity to the dress which is a good match for the butter-soft cashmere wool fashion fabric.

Suit dress

Shown with the jacket unbuttoned.

Shown with the jacket unbuttoned.

Suit dress

A close-up look...

A close-up look…

... and another one.

… and another one.

And a partial back view.

And a partial back view.

I am happy I added the collar to the dress, as that extra detail seems to help the dress stand on its own if/when I take the jacket off. Framing the face is always a good fashion decision, and I think the collar helps in that regard.

Just the dress!

Just the dress!

Suit dress

So happy this is finished!

So happy this is finished!

I consider finishing this outfit a major accomplishment!  So what’s next? Something easy or something more complex? Those questions to be answered soon, with this caveat: it will most definitely be something for Spring/Summer!


Details:

Navy blue Cashmere fashion fabric:  Britex Fabrics, San Francisco, CA

Silk charmeuse lining fabric:  Britex Fabrics

Buttons:  vintage Ultra Kraft, ca. 1950s

Shoes: Ferragamo

Patterns:  Jacket: vintage Jo Mattli Vogue Designer pattern; Dress: vintage Vogue blouse pattern combined with new Butterick dress pattern

31 Comments

Filed under Buttons - choosing the right ones, couture construction, Dressmaker suits, Shoes to make an outfit complete, Suit dresses, vintage buttons, vintage Vogue Designer patterns, vintage Vogue patterns from the 1970s, woolens

The Evolution of a Suit Dress, Part 4: An Appreciation of Jo Mattli, and Dress-making Days Commence

The New Vogue Sewing Book published in 1963 contained a “Couturier Supplement”. According to the Foreword in this magazine-styled book, “Only Vogue Patterns can bring you original designs from the Paris and International Couture houses, because of an exclusive arrangement with world famous designers.” One of the 17 designers featured in the supplement was Jo Mattli.

Designers in Vogue

Designers in Vogue-1

Jo Mattli is second from the left on the top row. Click on the photo to see the image up close.

A quick look at the two-page spread on these designers shows a veritable who’s who of fashion design, with names very much still known today. Except for perhaps Jo Mattli.   (Mattli was born Giuseppe Gustavo Mattli in 1907 in Locarno, Swirtzerland; he died in 1982 in England). He is absent from The St. James Fashion Encyclopedia, even though he was considered one of the “big ten” London couturiers in 1953, when London Society was busy readying for the coronation of Queen Elizabeth II. Perhaps it was his move into ready-to-wear in 1955 that relegated him to lesser status among the world’s great couturiers. This did not keep Vogue Patterns from recognizing his wide appeal to stylish women who appreciated his attention to fine detailing, and his expertise in creating practical, wearable and charming dresses and suits.   As one of Vogue’s featured designers in their Vogue Couturier Design-labeled series, Jo Mattli made his mark. Indeed, even he recognized the value of being part of Vogue Patterns, saying “the royalties from these patterns had helped support his couture business” (from Wikipedia, the free encyclopedia).

The jacket I just completed (part one of a two-part jacket and dress ensemble) is the third Jo Mattli Vogue design I have sewn. Two years ago I made a suit from this pattern:

From Vogue's Designer series, ca 1970.

I would like to make this pattern again. The first time I made it, the fabric I chose was too heavy, but the fit and the styling were excellent.

Late last summer I made a cocktail dress from this pattern:

I still have plans to make the coat, to coordinate with the cocktail dress.

I still have plans to make the coat, to coordinate with the cocktail dress.

And now with three “makes” under my belt, my appreciation for Mattli’s design and construction sense is growing. Not only that, I realized after going through my pattern collection, that I have two more Mattli patterns, each of which also displays his characteristic and interesting seam detailing.

This is actually a one-piece dress, although it looks like it is a two-piece outfit.

This is actually a one-piece dress, although it looks like it is a two-piece outfit.

Dress Suit - red Mattli suit

Another beautiful suit!

While the Mattli-designed jacket in my suit dress ensemble is certainly the star of the outfit, I am hoping the dress will have its own charms. After being out of town and away from my sewing all last week, I have now been able to turn my attention to the dress part of the outfit. I believe I have successfully combined two patterns (sheath dress and collared blouse) to create – what else? – a collared sheath!

Dress for Mattli jacket

I was still adjusting the fit when I took this photo. Hopefully it will not look like a bag when I actually wear it!

After I had the muslin fitted and completed, I got the idea to make the end of the tab on the collar rounded, to mimic the curves on the jacket’s sleeves and on the jacket’s lower front edges.   I also had to take significant width out of the collar. I am hoping it will work and look good…

This shows the curved detail on the edge of the sleeve.

This shows the curved detail on the edge of the sleeve.

This shows not only the added curve to the collar end, but also how much width I had to remove from the collar pattern

This shows not only the added curve to the left collar end, but also how much width I had to remove from the collar pattern.

And here is the right collar section.

And here is the right collar section.

I  hope that Jo Mattli would approve of a dress being paired with his jacket. He would probably refer to it as a “slimline afternoon dress” were he alive. I have no doubt he created many such beautiful dresses in his lifetime.

[NOTE: Jo Mattli is the subject of a thesis by Dr. Caroline Ness entitled Famous, Forgotten, Found: rediscovering the career of London couture fashion designer Giuseppe (Jo) Mattli, 1934-1980.]

10 Comments

Filed under Cocktail dresses, Dressmaker suits, Jo Mattli, Suit dresses, Uncategorized, vintage Vogue Designer patterns, vintage Vogue patterns from the 1960s

The Evolution of a Suit Dress – Part 3: Finished Jacket

It is a fairly well-known fact that making a classic French “Chanel-like” jacket takes about (or at least!) 70 dedicated hours of sewing time. I did not keep track of the hours I spent on my Jo Mattli-designed jacket, but I am guessing that it rivals – in time spent sewing – both of the classic French jackets I have made. However, I am not complaining. I would commit to it all over again. And just think – I still have to make the coordinating dress for this jacket!

Mattli jacket But it is finished, and happily so. One of the true joys of sewing is the ability it gives us to make some stylistic changes, add embellishments if desired, and use our heads to determine what works and what doesn’t work for the fabric we are using and the intended usage of our garments. While I did not make any stylistic changes to this jacket, I did add my own “dressmaker details” while stitching my way through this project. But first a few more regular details, picking up where I left off in my last post.

1) To finish the underside of the bound buttonholes, I used organza patches. I have started using this method all the time, as it makes such a neat, fool-proof finish.

The silk organza patch is sewn onto the right side.  After cutting and clipping the corners - carefully! - you turn the organza and you have a perfectly finished opening to back up to your bound buttonhole.  then it is easy to sew the two sides together very neatly.

The silk organza patch is sewn onto the right side. After cutting and clipping the corners – carefully! – you turn the organza and you have a perfectly finished opening to back up to your bound buttonhole. Then it is easy to sew the two sides together very neatly.

2) Even though the entire jacket is underlined with silk organza, I added another layer of silk organza “interfacing” to the hemline, as directed in the pattern instructions.

Mattli jacket

I always like to baste the hem along the bottom edge to stabilize it until the jacket is complete.

I always like to baste the hem along the bottom edge to stabilize it until the jacket is complete.

3) I used black “cigarette” which I purchase from Susan Khalje’s store for the sleeve headings. I doubled and graduated the two layers to achieve the correct amount of sleeve–cap cushioning. Unfortunately, no photos were able to pick up the details in this – too much black and navy blue and not enough contrast!

This is what the "cigarette" looks like.

This is what the “cigarette” looks like.

One of the interesting construction details in this design is the notched collar. Most notched collars are seamed at the “notch,”,joining the upper collar and the front facing and forming a “V”.

This diagram from The Vogue Sewing Book. c. 1970, Butterick Division, New York, New York, shows a classic notched collar.

This diagram from The Vogue Sewing Book. c. 1970, Butterick Division, New York, New York, shows a classic notched collar.

However, the collar in this Mattli design is formed by extensions of the front facing, with a center back seam on the upper-collar portion of the facings.   Hopefully these photos will explain better than words can:

You can see there is no seam at the "notch."

You can see there is no seam at the “notch.”

Here is the seam at the back upper collar.

Here is the seam at the back upper collar.

While I was contemplating the lining for the jacket, I thought it would add just a really special touch if I did a interior bias piping to set off the lining where it joins the jacket along the front edges and around the neck. Normally this is made out of silk, but I did not have any light-weight silk which was the correct color of red. However, I did find some scraps left over from a red wool challis maternity dress I made for myself over 34 years ago. (Yes, you read that correctly!) Very light in weight – and the exact color I needed – made it the perfect fabric for this detail.

I cut a bias strip one inch in width and folded it in half.  I guess this proves it pays to save scraps!?

I cut a bias strip one inch in width and folded it in half. I guess this proves it pays to save scraps!?

This is such an easy flourish to do, and it adds such a professional touch.  Adding this flat “piping” is quickly becoming a standard for me when I make jackets or coats. Once you have your bias strip cut, folded in half and pressed, all you need to do is baste it in place along the line where the lining will be hand-stitched to the jacket interior.

The bias "piping" basted in place.

The bias “piping” basted in place. Click on the photo to see it close-up.

And here’s what the finished lining looks like:

Mattli jacket

Here is the back neck edge.

Here is the back neck edge.

I really like this extra flourish.

I really like this extra flourish.

Now – true confessions!  After top-stitching the sleeve edges, the collar and most of one front, I decided I did not like it.  I thought it detracted from the windowpane of the fabric, so I took it all out.  NO top-stitching – for me – on this jacket!

Finally, I made a small change to the back hem of the jacket. Can you figure out what it is? (A previous photo of the jacket back will also give you a clue.)

Mattli jacket I used a trick I learned from my French Jacket class with Susan Khalje: I added a slight curve to the hem and lengthened it by about a half-inch, graduating it back to the prescribed hemline at the side back seams. I love this graceful detail. I believe it will be especially effective when it is paired with the dress. (This photo also shows that all the hours I spent on the layout, making sure I had matched the plaid, was time well spent!)

Speaking of the dress (and matching more plaid) . . .   I never imagined I wouldn’t have this entire ensemble completed by about now. So – it looks like I’ll still be sewing on wool when Spring arrives. Hopefully by the time Spring departs I will have moved on to something more seasonal!

26 Comments

Filed under bound buttonholes, couture construction, Dressmaker details, piping, Suit dresses, Uncategorized, underlinings, vintage Vogue Designer patterns, vintage Vogue patterns from the 1970s, woolens

The Evolution of a Suit Dress, Part 2: Details, Details

How can something which is taking so much time to make still be so much fun? It must be because of all the delightful details to consider, to execute, to alter, and to research. One of the most important details for the jacket of a project like this is the choice of buttons.

Dress Suit - front of pattern envelope

One of the advantages of having my blue windowpane-checked cashmere for a couple of years before sewing with it has been the opportunity to find just the right buttons. When I came across these buttons in an Etsy shop, I knew they would be perfect.

These buttons are 7/8" square.

These buttons are 7/8″ square.

The size is right, as is the shape – which picks up the “square” in the fabric. How I was so lucky to find them in navy blue, I’m not sure. Additionally, and this is very subtle, but the depth of the buttons allows a curvature to each edge, which mimics the curved front edge of the jacket and also the curved cuffs. Of course, when making bound buttonholes, one must have the buttons in hand before beginning the project, since the buttonholes are one of the first details to execute.

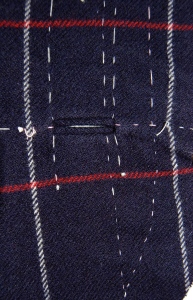
ne can never have too many markings basted in place for bound buttonholes!

One can never have too many markings basted in place for bound buttonholes!

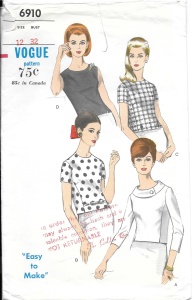
Because I need only three buttons for the jacket, the fourth button has been rattling around in my brain. I think  I might possibly be able to use it as a coordinating detail on the sheath dress I have planned for this ensemble. Back to my vintage pattern collection I have gone to look for some suitable inspiration. What I have found is this pattern:

Dress Suit 2 - blouse pattern-2 Although I have yet to work out the logistics, I am thinking that I can turn the collared blouse with the one-button detail (lower right) into a sleeveless sheath dress. The button may not really show (I think) unless I take the jacket off, but I kind of like the subtlety of it all. Once I make a muslin (toile), I will have a better idea of how it will look, so stay tuned! One thing I do know, is that such a collar on the dress will need to lay very flat, with no bulkiness. One way to achieve that will be to back it with the silk charmeuse I will be using for the jacket and dress lining instead of backing it with another layer of wool.

So what am I using for the lining? When I bought the lining for my color-blocked coat last winter, I purchased extra yardage of the silk charmeuse (from Britex). Now I can’t remember what my reasoning was, but once I got it home from San Francisco and I saw how complimentary it was with the navy blue cashmere, I knew I should save it for this project. Fortunately, I have enough of it to line both the jacket and the dress. Not that anyone is ever going to see the lining in the dress, but I’ll know it’s beautiful – and oh, so wonderful to wear!

Dress Suit 2 - lining fabric There are always lots of details in the construction of a rolled collar. At the risk of boring some of you, I’ll quickly go over a few tricks I learned from Susan Khalje last year when I made my color-blocked coat. First, here is a picture (by request from some of you) of the lightly pad-stitched and interfaced jacket front.

Here is an inside look at the interfaced right side of the jacket showing the underside of the buttonholes.

Here, too, is an inside look at the underside of the three bound buttonholes.

The undercollar is also interfaced with black silk organza. It is basted onto the body of the jacket in order to establish the roll line. Once I marked the roll line with pins, I removed it and basted along the roll line in preparation for heavy pad-stitching of that section.

Establishing the roll line of the undercollar.

Establishing the roll line of the undercollar.

Suit dress under collar

The roll line is marked with pins; then I basted along that pin line.

Once I finished the pad-stitching (impossible to see here on the black organza), I then placed it on the dress form, pinned it in place and steamed it. This process reinforces the “memory” of the roll.

A dress form is indispensable for steaming the undercollar.  You can see the basted roll lie in this photo.

A dress form is indispensable for steaming the undercollar. You can see the basted roll line in this photo.

The back of the undercollar after steaming.

The back of the undercollar after steaming.

As I make progress on this jacket, I am reconsidering the amount of top-stitching I want to do on it. The pattern calls for double rows of top-stitching along seam lines, front edges and sleeve edges. I plan on modifying this somewhat.

Dress Suit 2 - topstitching detail-1

This diagram clearly shows the extent of proposed top-stitching. I will definitely not be doing this much!

Top-stitching always makes me nervous. It may be my least favorite part of sewing. I’d rather sew on buttons than top-stitch! Let’s see how well I do with it – in my next post – before I can get back to more fun-stitching.

16 Comments

Filed under bound buttonholes, Buttons - choosing the right ones, couture construction, Suit dresses, Uncategorized, vintage buttons, vintage Vogue Designer patterns, vintage Vogue patterns from the 1970s, woolens

The Evolution of a Suit Dress, Part 1

“Suit dress – Used in 1960s to refer to a jacket and dress ensemble that resembled a tailored suit.”   (The Fairchild Dictionary of Fashion, Third edition; Fairchild Publications, Inc., New York, New York, 2010)

Although the inspiration for my current project does not have its beginnings in the 1960s, it is certainly influenced by that era. The actual beginning was about 1974 or ‘75, although I did not know it then. That was when I first laid my eyes upon this Jo Mattli Designer pattern from Vogue:

Dress Suit - front of pattern envelope

I loved the tailored, but feminine, look of the jacket, with its high, notched collar and its sleeves with gracefully curved slits. (I was less enamored with the style of the skirt, but skirts can easily be substituted, of course.)

This diagram of the jacket  back better shows the interesting treatment to the cuff edges of the sleeves.

This diagram of the jacket back better shows the interesting treatment to the cuff edges of the sleeves.  Click on the picture to see a close-up view.

I admired this pattern on a regular basis while it was listed for sale in the Vogue Catalogue at my local fabric store, but in the end I didn’t buy it. That hefty $3.00 purchase price, and not knowing for sure that I would actually end up making this outfit,  kept me from its purchase. Now I am not nearly as practical – or maybe I have learned from experience. One must get these things which speak to them while they can! So when I found this pattern a couple of years ago on eBay, I knew it was time to fulfill a long-delayed dream (at a much higher price than $3.00, I might add!).

Shortly thereafter I found this navy blue, windowpane-check cashmere fabric on one of my trips to Britex Fabrics in San Francisco. I purchased what I was sure would be ample yardage to make a two-piece suit (jacket and skirt, with this Jo Mattli design in mind) and to compensate for matching the plaid. Then I set it aside, knowing that the time to start this project had to be right.

The feel of this wool is best described as like soft butter.

The feel of this wool is best described as like soft butter.

I am so glad I waited. As I have grown in my sewing and dressmaking skills (with so much credit in that arena attributed to what I have learned in classes with Susan Khalje), I came to see this fabric and this suit taking on a slightly different appearance. I knew I wanted to make the Mattli jacket, but more and more I felt that this fabric was too special to mix it up with a blouse, no matter what color or how simple that blouse might be. I began to envision the jacket paired with a sheath dress – in effect, a classic 1960s’ inspired suit dress.

But would I have enough fabric? Britex has always been very accommodating when cutting yardages for me, adding inches to compensate for the layout of plaids and designs, and simply being generous in adding a few inches to my requested amount. (I have found most fine fabric stores to be similarly inclined – Mendel Goldberg, for example, also adheres to this customer-friendly practice. Have you found this generally to be true as well?)   Well, those of you who read my blog know that a little shortage of fabric has never kept me from my intended goal. Of course, I would have enough fabric… And so I do, especially with those few extra inches courtesy of Britex added on!

Fitting the muslin (toile) for the jacket took more thought and planning than usual. Much of this is because the pattern I found on eBay was actually one size smaller than what I usually buy and wear. For some reason I find it easier to size down patterns than size them up, so I’d rather, if necessary, start with a too-large pattern than one too small. Adding length and width to the body of the jacket, fitting the sleeves (which also needed a little more circumference) into those new dimensions, and adjusting the front/neck facing, which is part of the notched collar, was quite a puzzle. It took days!

I transferred my final changes from the muslin to silk organza, and then I was in business. I love a challenge, and it’s a good thing I do! Do you know how nerve-racking it is to make sure all your plaid lines match up vertically and horizontally? Also, I knew I could lay out only the jacket pattern pieces initially. There are two reasons for this: one is that I have not yet determined which sheath dress pattern I want to use. The other is that the plaid on the dress is going to have to match – perfectly – the plaid in the jacket horizontally first, with the vertical match being as close as it can be, taking into account darts and the curves in the body of the dress. So – I have to finish the jacket before I can lay out the dress. That fortuitously gives me some more time to think about the dress, which is still taking shape in my mind!

I chose to use white silk organza rather than black, as it is much easier to see the windowpane lines through the white, and easier on the eyes, too.

I chose to use white silk organza underling rather than black, as it is much easier to see the windowpane lines through the white, and easier on the eyes, too.

This photo better shows my markings on the silk organza underlining.

This photo better shows my markings on the silk organza underlining.

With all the silk organza underlining basted onto the wool, I am ready to sew.

A pile of prepared pieces!

A pile of prepared pieces!

But hold the horses there, Fifty Dresses! First, there are interfacings to be pad-stitched and bound buttonholes to be made.

I am using black silk organza for the interfacing.  This is what I did on my color-blocked coat, under Susan Khalje's tutelage, and I was delighted with the results!

I am using black silk organza for the interfacing. This is what I did on my color-blocked coat, under Susan Khalje’s tutelage, and I was delighted with the results!

It is clear there is no hurrying this jacket, nor should there be. Some dreams just take a little more time.

17 Comments

Filed under couture construction, Dressmaker suits, Mid-Century style, Suit dresses, Uncategorized, vintage Vogue Designer patterns, vintage Vogue patterns from the 1970s, woolens