Category Archives: Asian-inspired dress designs

A Lesson from Lilly

Have you ever purchased a piece of fabric on a whim – and then regretted it? That’s exactly what happened to me, here in the midst of July. I saw this piece of Lilly Pulitzer silk fabric offered on eBay, and without giving it too much thought, I bought two yards.

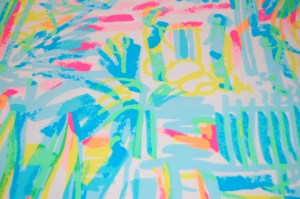
I have always loved most of the Lilly prints and color combinations, and something about this silk just looked fresh and summery to me. I have long wanted to make the pattern pictured below again, and with its Asian flare, I thought the multi-colored, abstract printed Lilly silk would pair well with it.

The date on this pattern is 1958. I made the blouse/tunic a few years ago and still enjoy wearing it. I would like to make view B sometime…

I had several scraps of solid green silk, one of which I thought would be good as a contrast fabric for the button details on the front of the blouse. (The pattern calls it a tunic, but it looks more like a blouse to me.) As it turned out, I used a scrap of green silk out of which I had made a blouse to go with a purchased Lilly skirt way back in the 1970s! I still have the skirt, but not the blouse…

Anyway, I am digressing. When the fabric arrived – in an itsy-bitsy package that weighed about an ounce – I knew I had made a mistake. Yes, it was silk, but it was so flimsy and slippery I wasn’t very sure it could be sewn with any sort of finesse. (Now I know that assessment was correct.) I contemplated saving it for a lining for something sometime, although truly, it would make a flopsy lining.  Deep down, I knew if I didn’t make it right now, I would never, ever use it. And that would be a waste of money for sure.

Well, now I am going to digress. I find that if I purchase a piece of fabric of impeccable quality, I can hold onto to it for months or even years without ever fearing it will never be used. In fact, the better quality the fabric is, sometimes the longer I wait to use it. That allows me time to think about and search for the perfect pattern, time to explore possible dressmaker details for it, and time to savor its beauty. When it comes to silk in particular, I have found that high quality, fine silk, even very lightweight silk, has a substance to it and a hand to it that makes sewing with it a pleasure.

Let me tell you, this was not a pleasure. I slipped and slid the whole way through the construction of this tunic/blouse. My pins would not stay in place, falling out willy-nilly. Clipping and trimming was a nightmare, as the fabric kept sliding in the way of my scissors. I contemplated spraying the entire thing with hairspray to stabilize it! Then, once I had enough of the tunic/blouse sewn that I was able to visualize my green silk accent strips on it, I realized that the green buttons I had planned to use were going to look – awful.

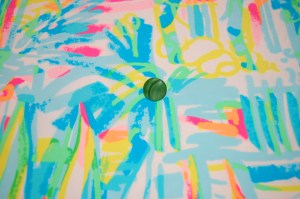
The green of this button is too deep for the colors of this fabric.

Happily, my luck changed just a bit. I went to my button box and found this card of four buttons.

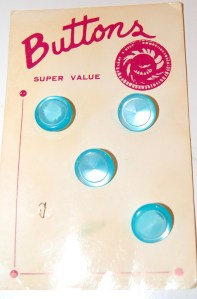
One button was missing, but that was okay, as I only needed four.

They had been a “bonus” addition in an order of buttons from an Etsy shop, and I really thought I would never have any use for them. But guess what? They were just right for this tunic/blouse. At least this one thing was easy!

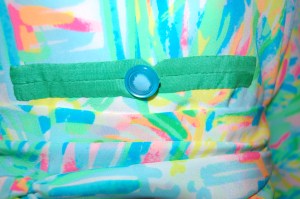
The blue of the button seems to work well with the solid green.

As you can see, I persevered and finished this monster.

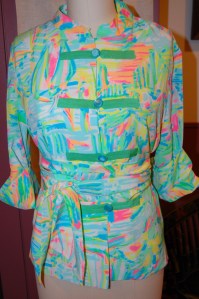
I made an Obi-style sash to wear with it, which I think improves its appearance.

The back of this blouse has a center seam, which allows for some really nice shaping. I haven’t had a chance to get any self-modeled photos made yet, for which I apologize.

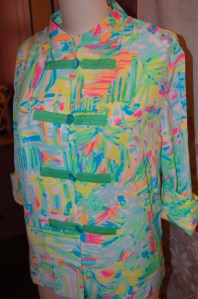
Here it is without the sash. In order to keep the slippery sleeves folded up, I had to add a snap on the inside seam of each sleeve.

I haven’t worn it anywhere yet. We shall see if I get any favorable comments; if I do, then perhaps I will eventually enjoy wearing it. At the least, it will stand as a lesson to me – never, ever again to buy any fabric on a whim.

30 Comments

Filed under Asian-inspired dress designs, Blouse patterns from the 1950's, Blouses, Buttons - choosing the right ones, sewing in silk, Uncategorized, vintage Vogue patterns from the 1950s

Eating my words.

I never expected to find a pattern from the decade of the ‘80s that I liked, as my refrain about fashions from that span of time has always been:  “Those ’80s’ styles were just too awful”.  But I humbly ate my words when I finally found a pattern (from an Etsy shop) for a sarong skirt, which just happens to be from 1985.

I won’t be making the bra top… And notice the “big” shoulders on the blouse, which otherwise would be kind of cute, I think!

It’s quite obvious where the Vogue pattern designer got the inspiration for this sarong and “bra-type top” look.  Here is the scoop from Fairchild’s Dictionary of Fashion , p. 395 (Fairchild Publications, Inc., New York, New York, 2010):

“Long straight wraparound skirt made of bright-colored tropical design fabric with deep fold in front, held on by a scarf around waist.  Worn by men and women of the Malay Archipelago.  Adapted as a beach dress style with wraparound skirt draped to one side and strapless top first designed by Edith Head for Dorothy Lamour film Hurricane, in 1937.  Worn by Lamour in many films of the 1930s and 1940s. [my emphasis]

This sketch accompanies the entry for sarong skirt/dress in Fairchild’s Dictionary.

The original owner of the pattern made the long version skirt while I decided to make the shorter version.  She left cryptic notes throughout the instruction sheet.

Here is an example of some of the notes which the original owner made on the instruction sheets.

I made some of my own notes, but I wrote them on the muslin which I made to test the pattern before cutting into my fashion fabric.   I am glad I did, too, as I discovered that the overlap for the skirt was not quite enough for a “street” skirt (as opposed to the beachy/resort intent of the pattern).  So – I made the side panels each about 2” wider.  Then to make the waist still work, I added a dart in the left side front (which is the hidden side of the wrap).  I  made the ties each about 2 inches longer, as I thought they would be more becoming and lay flatter if they had a little more length to them.

Here is the diagram from the envelope which shows the thumbnail details of the two skirts.

I had picked out this tropical-look fabric, ordered a swatch, then the yardage from B & J Fabrics in New York.

Here’s how it all turned out:

Not quite Dorothy Lamour.

A close-up view, showing the ties.

When I was putting my new skirt in my closet, I spied my chartreuse green Tommy Bahama top, which is almost vintage itself, it’s so old.  But, h-m-m-m-m, the wheels started turning and I paired the two together here:

The green in the top actually matches the green in skirt better than it shows here. Just wish I had some green shoes to match…

From 1937 – to 1985 – to 2012, I suspect this is one style which will never go out of style.

16 Comments

Filed under 1980's dress patterns, Asian-inspired dress designs, Uncategorized, vintage Vogue Designer patterns, Vogue patterns

“You are going to have some new clothes.”

So said the fortune which was tucked inside my cookie.  What it failed to mention was that I was going to be the one making those new clothes, but otherwise I’d say it was right on target. Well, it seemed only fitting that, with this Chinese dictum, and with my burning desire to use those shell buttons (which kind of give off an exotic aura), I should indulge my attraction to Asian-inspired clothing design, and make this tunic my next sewing project.

The date on this pattern is 1958. The envelope is in sad shape, but the pattern pieces are fine!

I had another reason, too, to choose this tunic pattern.  After my last project, the Pierre Cardin silk dress, I was ready for something that did not need to be underlined or lined – and I was ready for something casual and fun.  I might add “bright” to that list, too, as the fabric I chose is indeed that!

This is the swatch I ordered from B&J Fabrics.

Just a reminder (if you need it) that I wanted to use these buttons for this tunic.

I had the fabric swatch sitting on my ironing board in my sewing room when I started work on my “Pierre Cardin” dress.  The pink silk from that dress complimented this silk check so much that, putting the two together seemed inevitable.  I played around with some small scraps, scrunching them around those orange shell buttons, still on their card.  What could be more perfect than making the buttonhole loops and details out of the pink fabric, to set off those shell buttons?  I was sure that would be much more effective than making the loops and details out of the same checked fabric.

I ordered enough fabric to make a matching obi-type sash, as I thought I might want to wear the tunic “belted” sometimes, too.  (In the back of my mind is the knowledge that I have enough of that pink silk left, that I can make a skirt – or blouse – with it.  I’m definitely leaning towards skirt…)

First, of course, I set out to make a muslin.  When I opened the pattern, the pieces for the dress had been previously used, but not the pieces for the tunic.  The collar was universal for all three views.  However, in addition to the tissue collar, there was a collar piece cut out of newspaper.

Here are the two pattern pieces for the collar – the top one cut by the original home sewer.

There was nothing written on the instruction sheet or envelope to explain this mystery – and it appeared that the “newspaper” collar was shorter in length than the tissue pattern.

Here you can see the newspaper pattern is shorter than the tissue one.

Having no explanation, I just decided to use the tissue pattern – and I figured the muslin would tell me what I needed to know.  Did it ever!  The collar included with the pattern is too long for the neckline, so this home sewer in the late ‘50s re-cut it to fit her pattern.  I decided to take another approach: I kept the tissue collar and widened the neckline enough so it fit perfectly.  I also decided to shorten the shoulders a bit, for a more structured fit, and I took the center back seam in a bit at the waistline.  I ended up adding long tapered “floating” darts to each side of the back, too, to give it a little more definition to the waistline –  but I am getting ahead of myself…

As is my method of approaching a new project, that is, getting a few things constructed before I need them, I decided to make the obi sash first.  I just kind of guessed for width and length, making it 4” wide (finished width) and 77” long, so it could go around me twice comfortably with a double knot in front.

The completed sash.

Next I made the button loops and details.  The pattern didn’t give too much instruction on these pieces, other than the length they should be and the finished width (1/4”).  (I should mention here that I decided to put 5 buttons on the tunic, not 4 as is shown on the pattern.)  I cut bias strips 1”wide, folded them in half lengthwise, sewed the seam twice and turned them with a bodkin.  Nice and easy!

From top to bottom, the making of the strips for the buttonholes and details: 1″ wide bias strip, one folded and stitched, one turned and finished! (Click on the photo to see these close-up.)

I put flat-felled seams in the sleeves and added interfacing to the front edges even though the pattern did not call for this.  The most time-consuming part of the whole thing was hemming the ends of the buttonhole loops and details and then sewing them onto the tunic.  But that’s really what the project was about – showcasing those buttons in an appropriate way.

The finished tunic, with the sleeves folded up, as they are supposed to be.

A close-up of the front, with the button detailing.

An even closer look at one of the buttons and loops.

This photo will make my daughter very happy! Here I am modeling my new tunic, with sash.

One more view of the sashed tunic. Picture this with a narrow skirt in that same solid pink…

I think it works – what do you think?

One final thought:  fortune cookies are a little like potato chips (or chocolate!) – it’s hard to eat just one.  Yes, my first cookie was followed by another one – and I was hoping for a similarly enticing fortune.

Imagine my surprise when my second fortune was exactly the same as the first one!

20 Comments

Filed under Asian-inspired dress designs, Blouse patterns from the 1950's, Buttons - choosing the right ones, sewing in silk, Uncategorized, vintage buttons, vintage Vogue patterns from the 1950s

Lessons from 1953

When I first discovered vintage Vogue patterns on eBay last Spring, I was delighted to find that most of the patterns from the 1950s were dated, usually with a line which stated, for example, Copyright 1956 The Conde Nast Publications, Inc..  It took me a couple of weeks to realize that I should also be looking for another important bit of information on the pattern cover: the words Printed Pattern.  I discovered this the hard way;  I purchased a pattern, dated 1953, that was not printed.

I've always liked Asian-inspired dress designs, and I thought this one from 1953 was so pretty. Do you see the size on this pattern? Yes - it's a 14! That's the size one wore in 1953 to fit a 32" bust and 35" hip.


I remember my mother mentioning how difficult unprinted patterns were to use – and I was about to find out why! The tissue pattern pieces were only marked with small holes of varying sizes;  to try to make sense of these markings, I had to look at the instruction layout sheets and translate if they were for a dart,  a stitching line, a pivot point, or some other detail.

These particular pattern pieces had never been used – and I must admit I felt a little guilty taking them from their envelope where they had quietly lived for so many years and pinning them onto my fabric, but pin I did.  I cut that baby out, marked that nebulous galaxy of pattern holes as best I could with chalk, and proceeded to sew, following the directions precisely.

The first thing I realized was that the bust darts were a little too high, but that was an easy fix (seam ripper and redrawing the dart lines).  These early patterns say that the dress should be fitted over the proper foundation garments.  (I don’t think they meant just comfy bra and cotton panties.) Anyone who has watched old movies or even Mad Men recognizes that mid-century look of the pointed and properly perched bosom! That’s one mid-century look I’ll forego.   So that was adjustment # 1.

I lowered the bust line by re-placing the darts.

Next, do you see that band that runs the length of the dress?  The pattern pieces for that were shaped to match the curve of the neck and across the chest.  I thought to myself – now why not just use a bias piece of fabric, which I felt would take the curves better and be easier to topstitch without puckers.  But I followed the pattern exactly – and wouldn’t you know, I had exactly those problems topstitching the curved areas.  As if that were not bad enough, when I tried on the partially completed dress, the neck fit too high and tight, rumpling up the shoulders and it looked awful.

I was going to have to re-cut the neckline, to make it larger. In doing that, I knew the neck area of the band, as it was cut out, would no longer match the new neckline.  I was going to have to piece in another section.  This was not fun, and I was beginning to think this lovely blue dupioni silk was going to end up as a skirt instead of a dress.  But I went back to my original thought – and cut a bias piece to fill in that recut section.  It worked!  That was BIG (ver-r-r-ry BIG) adjustment # 2.

Here is the recut neckline. I was able to hide the pieced seam under the front flap.

Here is the back of the neckline after I recut it.

Here is a close-up of the bodice and armhole band.

By now I was sick of this dress.  I still had buttons to cover and attach, armholes to do, interior snaps, the hem, and the cummerbund to complete.  Well, you can see from the photos that I did finish this dress, although it was late summer before I sewed the last stitch.

The completed dress. You can see I shortened the hem from mid-calf (as shown on the pattern envelope) to just below the knee.

Here is a close-up of the covered buttons and button loops.

I’m still not completely happy with it, but it provided me with these valuable lessons:

1)   Stay away from unprinted patterns.

2)   Check the bustline placement before marking and sewing the darts.

3)   When in doubt, trust my instincts (I should have used all bias for that band and those armholes.)

4)   For best results, make the pattern up in muslin first.  If I had done this, I could have made the bust and neck adjustments before I cut the pattern out in the blue and white silk.

I had a chance to wear this dress during the warm September we had here in eastern Pennsylvania – and I am sure no one suspected I was wearing a dress designed in 1953!  Amazing!

3 Comments

Filed under Asian-inspired dress designs, The Conde Nast Publications, Uncategorized, Unprinted patterns from the 1950s, Vogue patterns