Tag Archives: Mid-Century style

The Last Dress of Summer

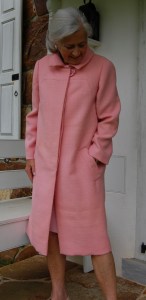
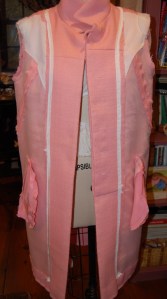
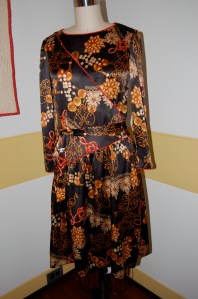
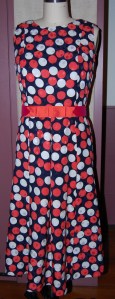
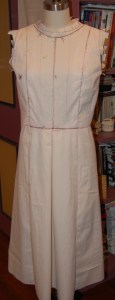
Or is it the first dress of Fall?  It depends on your point of view, apparently.  The Autumnal Equinox, here in the Northern Hemisphere, is September 22nd, officially the first day of (Astronomical) Fall.  Meteorological Fall began on September 1st, marking the point in the year when the temperatures begin to fall (pardon the pun.)  Either way one looks at it, I now have a finished dress which is either late for Summer or just under the wire.  I’m honestly just delighted to have it finished!

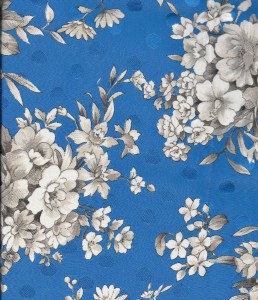
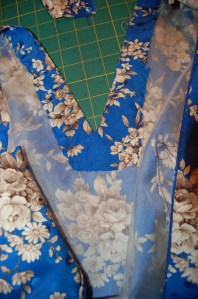
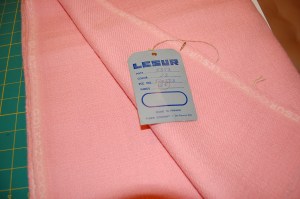
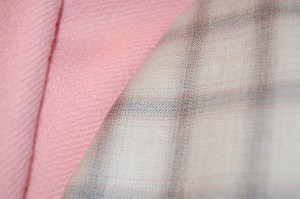
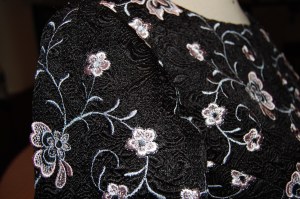
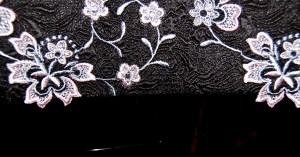
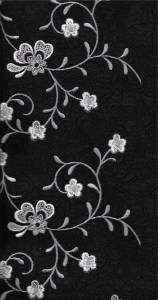
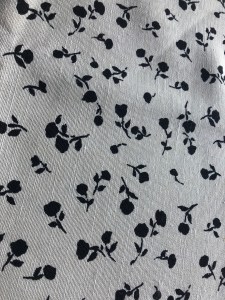
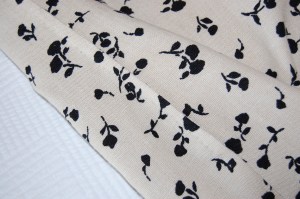
Although linen is traditionally thought to be a summertime fabric, I have long thought it is also the perfect fabric for early Fall.  Moygashel linen is especially well suited for this time of year.  Its natural fibers keep it cool for those days which continue to warm up, but its sturdy weave and heft give it a substantial enough look for these days of transition.

I purchased this piece of vintage linen from an Etsy shop years ago.

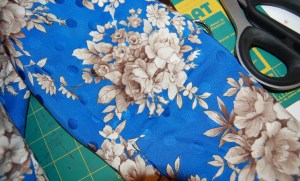
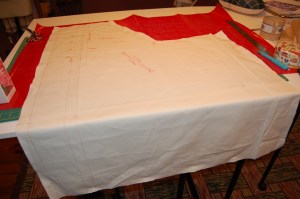
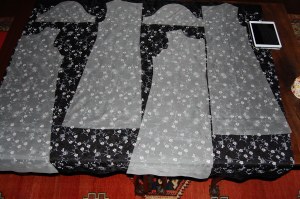
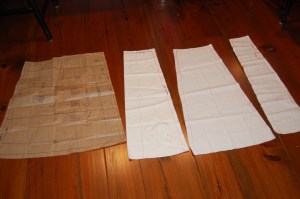
This particular piece of Moygashel, undoubtably a survivor from the mid-1950s, presented me with a couple of challenges.  First, it was only 35” wide.  And I only had 2½ yards.  Laying out pattern pieces on a single layer of fabric always allows me to maximize their placement, improving my ability to do the impossible – get a dress out of too little fabric.  (Here is another Moygashel linen dress which I was able to squeak out of 1 5/8 yards of 35” fabric.)

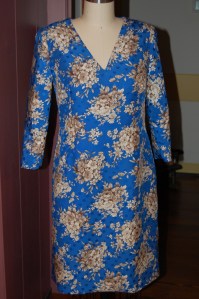
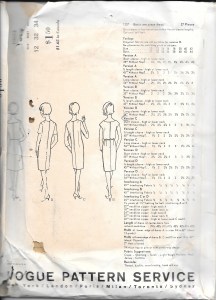
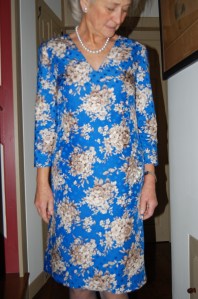
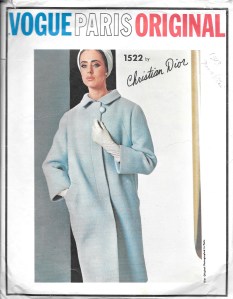
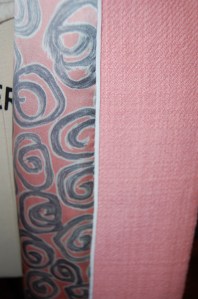
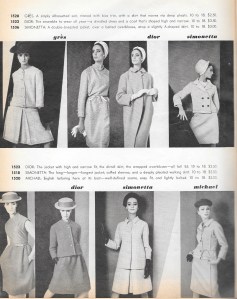
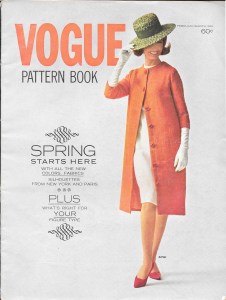
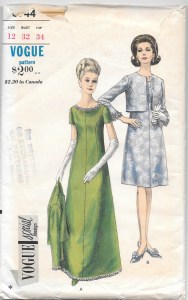
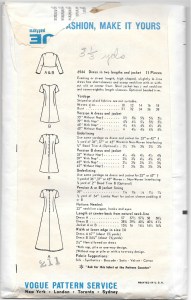
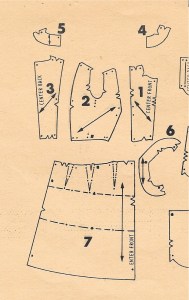
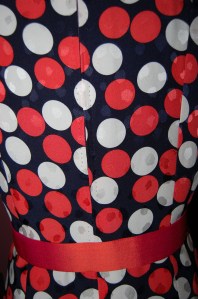
This vintage Vogue pattern gave me two sleeve options.  If I had opted for the very short sleeves, I would have had ample yardage.  But, for the seasonal reasons mentioned above, I particularly wanted to make this dress with the below-elbow-length sleeves.  So, I fiddled and figured and made it work by utilizing both the straight of grain and the cross grain for the bodice/sleeve pieces.  I was able to do this because of the allover floral design – ie., no directional limitations.

This pattern is dated 1957.

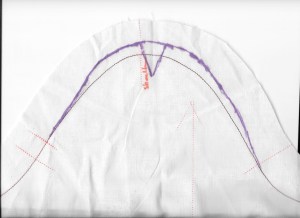
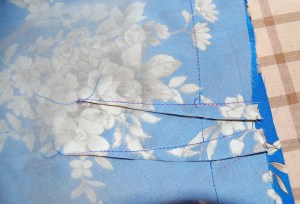
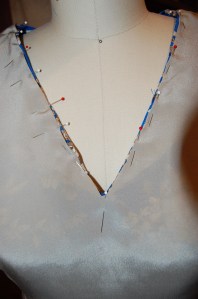
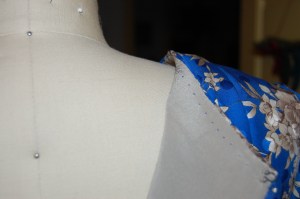
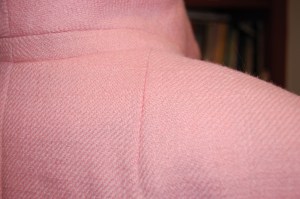
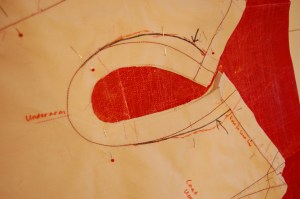
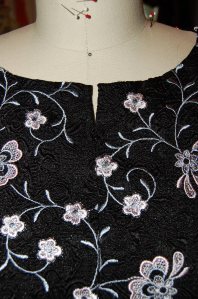
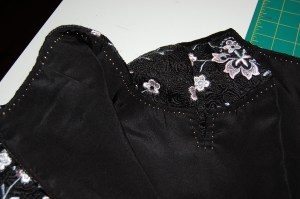
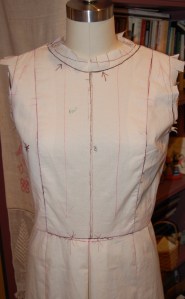
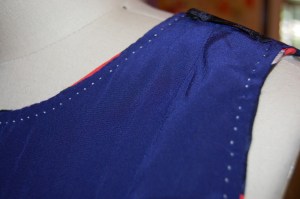
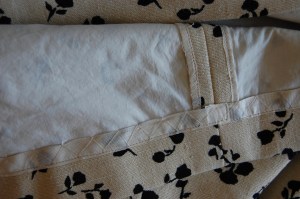
Interestingly enough, this dress with its cut-on sleeves does not have gussets.  Rather, the underarm seams of the dress sections are curved to add moveability.

This shows where the seams join under the arm close to the top of the side zipper.

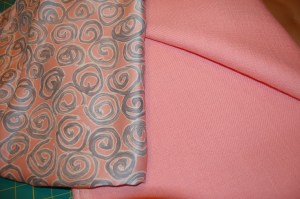
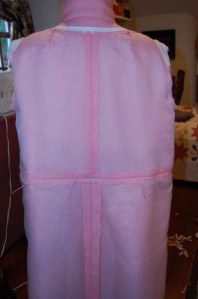
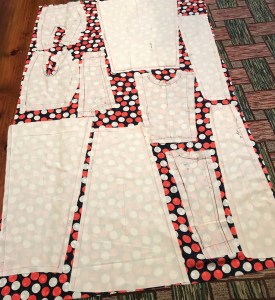
I underlined this dress with white cotton batiste (from Farmhouse Fabrics) and I finished the seams with Hug Snug Rayon seam binding.

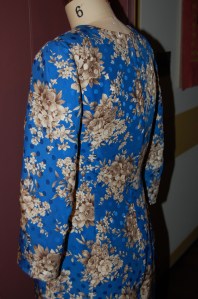
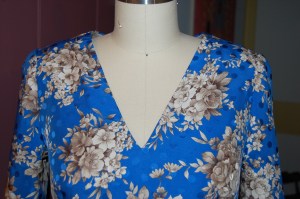
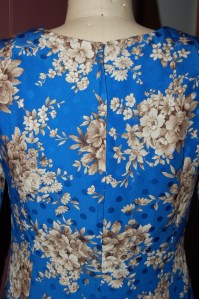
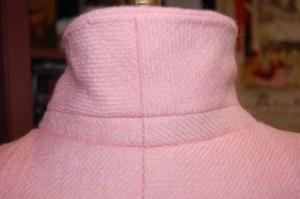
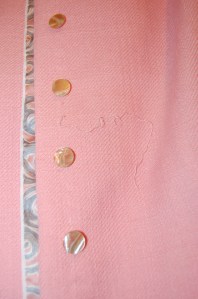
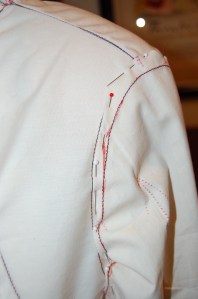
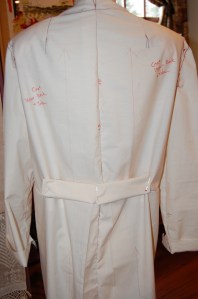
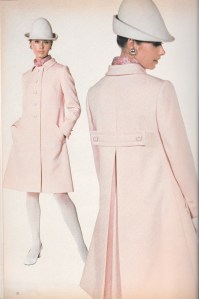
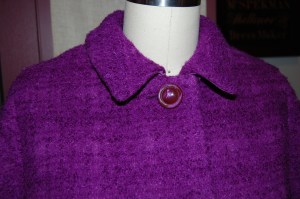
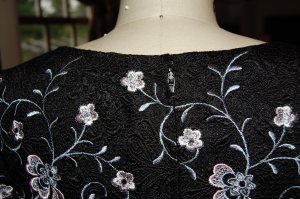
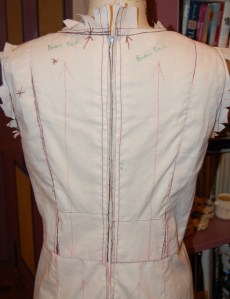
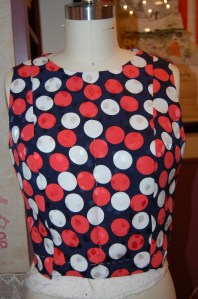
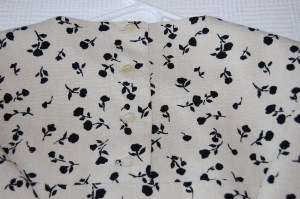
The buttoned upper back bodice is a real focal point of this pattern.  Being 1957, the pattern calls for “fabric buttonholes” – or bound buttonholes.  So that’s what I did.

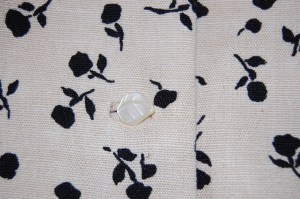
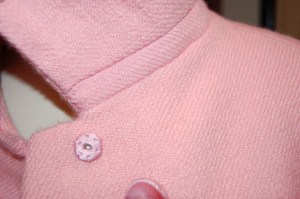
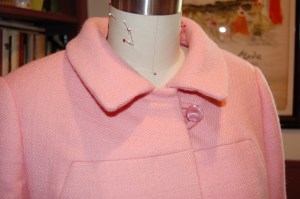
When it came to buttons, I wanted to use some sort of faceted black buttons.  After searching online and coming up empty-handed for buttons of the correct size and look, I settled on these carved pearl buttons already in my button collection.

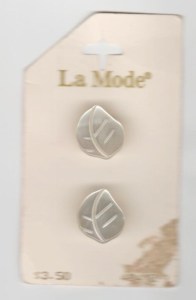
I love these buttons, but I still think black ones would be better …  so I will keep searching and switch them when I’m successful.  That will also allow me to use the “leaf” buttons (I have 6 of them) for something which will show them off to better advantage.

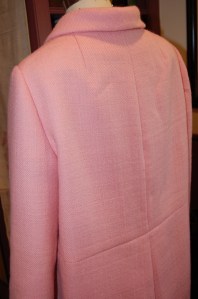
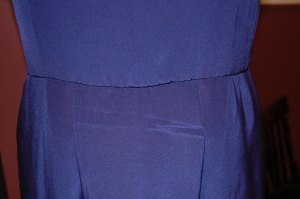
The final construction detail of note is the 10” side zipper.  I used a lapped, hand-picked application which lays inconspicuously below the left sleeve.

It is so inconspicuous, you can barely see it here!

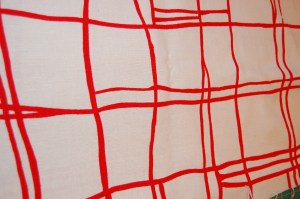
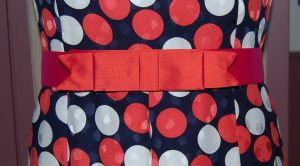
I did not leave an opening on either side at the waist for a belt to slip through.  In fact, I did not have enough fabric to make a self-belt!  However, my intention was always to use a contrasting belt.  I think this fabric will lend itself to using belts of varying colors (red or yellow or pink?) as long as I can coordinate with shoes, handbags and/or jewelry.  That will have to wait until I am home from our Summer location.  Maybe I’ll even find black buttons back home!

I could wear this dress without a belt as well. (But I’m not sure I will…)

One final note about this pattern and dress:  it has to go over the head.  It was much more common for dresses from the 1950s and ‘60s to have side zippers and “over the head access”  only.  This can wreak havoc on hair (and make-up)!  So a little pre-planning is necessary – I will need to finish my primping after I have put on the dress.

And everytime I put this dress on, I shall see the original Moygashel linen label which came with the fabric.

I suspect this dress will go right into the cedar closet for the months to come, as I switch out the wool skirts and dresses and coats and sweaters.  But hopefully, in March, at the Spring Equinox, it will creep out from its dark and quiet spot and maybe even actually be worn!

18 Comments

Filed under bound buttonholes, Buttons - choosing the right ones, Day dresses, Moygashel linen, side-placed zippers, Uncategorized, vintage buttons, Vintage fabric, vintage Vogue patterns from the 1950s, Vogue patterns

What Do You Think of Sewing Contests?

And – what do you know about them?  One of the more venerable sewing contests is the annual Make It With Wool.  Founded in 1947, it is still going strong and features winners in various categories/age groups.  Prizes for winners and runners’-up include scholarships, sewing machines and fabrics, and of course, national recognition in the field.  Pattern Review sponsors several sewing competitions throughout each year, in addition to a “sewing bee.”   Its followers are legion at this point, and it is always a coup to be a winner, selected by readers’ votes.

But what would you say if I told you that in 1956 the Singer Sewing Machine Company introduced a national sewing contest with prize money totaling $125,000?   The 1st Grand Prize carried the unbelievable reward of $25,000.  In current 2020 American dollars, that is almost $240,000!  Not only that, the 33 regional first prize winners also received a free trip to New York.  Take a look at the following two-page ad which appeared in the February/March 1957 Vogue Pattern Book Magazine, announcing the second year of the competition.


Vogue Pattern Book Magazine of August/September 1957 included this page “as we go to press…”

Vogue Pattern Company was rightly proud of their representation in this contest and in others.

And then here is the feature article on those winners in the following issue (October/November, 1957):


Judging was based on “fashion points of appearance, fit and selection of design, colour and fabric, plus construction points of quality and accuracy of cutting, sewing and finishing.”  Isn’t this what most of us strive to attain in our own sewing?

By the next year, 1958, the contest included a new category, called the Young Homemaker Division, for young women between the ages of 18 – 25.  $9,000 of prize money was awarded to the top four winners.  What beautiful dresses and ensembles they created!

I suspect these young women continued to sew throughout their lives.

Also that year, the General Federation of Women’s Clubs sponsored their own sewing contest.  The theme of the contest was “the ideal costume for a clubwoman’s wardrobe.”  Points of consideration in the judging were: “fashion-rightness,” “versatility and appropriateness for club occasions,” “becomingness to the wearer,” “over-all fashion effect,” and “workmanship.”  24 of the state finalists submitted entries consisting of a dress with its own jacket or coat.  That is still to this day a winning combination, classic and chic.

The prize money was certainly less impressive in this contest, at $250, $150 and $100 for the first-, second-, and third-place winners, but imagine the prestige of winning for “your” club, at a time when there were 1,485 clubs represented in the contest!

By 1963, Singer Sewing Company had started the Young Stylemaker Contest for girls aged 10 – 21.  The caption on the following article tells it all:

Included in the trip to Paris for the two winners was a tour of the famous Parisian couture houses.  Can you imagine having such an opportunity at that point in your life?

This contest had expanded its scope by 1965, ferrying fifteen finalists to Rome via a chartered jet for a 5-day stay before the final judging of the Stylemaker Contest.  Notes by the contestants included the charming observation “how very chic the Italian women are.”

By 1969, this contest had drawn more than 93,000 participants!  As part of their prize, the three winners each were given an all-expense paid, one-week trip for two to London, Paris or Rome.  The purpose of the Stylemaker Contest was to “encourage young and creative talents in Fashion sewing.”

By 1971, it appears that changes were in the air for the Stylemaker Contest.  Whittled down to two winning divisions, only the overall winner received a trip to London, Paris or Rome for two, although both final winners also received cash prizes of $800 and $600 respectively.  The “heyday” period of home fashion sewing was sadly beginning to draw to a close.

Needless to say, fashion sewing contests no longer command such notable and generous prize money or trips.  Those were heady times in the 1950s, ‘60s, and ‘70s, likely never to be experienced again.  However, I would like to think a new sewing heyday is upon us – or perhaps we are it.  What place do contests have in our current global community of sewing?

I rarely enter sewing contests, not for any reason other than the fact that I have so many projects in my queue that the last thing I need to put my attention on is something that is not top priority for me.  But that doesn’t mean I will never enter a contest.  I actually think I probably should at some point. So – again, what do you think of them?   Sewing is creative, so obviously contests today still value and encourage creativity.  Surely emphasis is still placed on fashion appropriateness, workmanship, style, a flattering assessment, fabric and color selection. It is precisely these goals which make fashion sewing so exciting, at least for me, and I suspect for most of us.

Let’s learn a little from the past and make it new again.


34 Comments

Filed under Fashion history, Love of sewing, Mid-Century style, Sewing Contests, The Conde Nast Publications, Uncategorized, vintage Vogue patterns from the 1950s, vintage Vogue patterns from the 1960s, vintage Vogue patterns from the 1970s

The Last Dress of the Year Past

Little did I know when I found this “end-cut” earlier in the year at Mendel Goldberg Fabrics that “classic blue” would be chosen as Pantone’s Color of the Year for 2020.  But so it was, which makes my last dress of 2019 the perfect transition into the new year and the new decade.

This an Italian silk charmeuse, in a dotted and printed jacquard.

I am one of those people who rarely goes looking for a particular fabric.  I think fabrics find me and when this fabric found me, I really had no plan for what I would make out of it.  But as soon as it arrived, I knew immediately I wanted a sheath dress with three-quarter length sleeves and a V-neck.  I tucked it away, happy with the thought of making this dress, and knowing I had the perfect pattern to make it a reality.

View C, of course! And look at those lovely shaping darts.

This Vogue pattern is from the early 1960s, a little tattered and worn, but very versatile and beautifully engineered.

After finishing my granddaughters’ December dresses, and then my pink Parisian Jacket, and then some cute little flannel blouses for gifts for my little girls, I envisioned finishing this dress to wear to holiday parties.  What was I thinking?  First of all, after tweaking the pattern one last time (I had had the pattern fitted a couple of years ago while in a class with Susan Khalje), it took two full days – yes, TWO – to figure out how in the world to lay out my pattern pieces.  Truth be told, I really did not have enough fabric.  I should have reconsidered, but I am stubborn and tenacious when it comes to my sewing “visions.”  I finally decided that I could exactly match the print on the back center seam and make it sleeveless – OR I could have sleeves and not match the back.  I really, really wanted sleeves.  It had to have sleeves.  So I did the best I could with making the back seam look okay, and I got my sleeves.

Fortunately the all-over placement of the floral motifs lent itself to imprecise matching better than many fabrics would.

And what lovely sleeves they are!  When Susan fitted the pattern, she elongated the top curve of the sleeve to accommodate my prominent shoulders.  She also added a dart at the shoulder of the sleeve (actually slightly forward from the marked shoulder of the pattern to accommodate the roll of my shoulders).  I added a slight amount to the width of the sleeve, about 3/8”.  I have found these vintage patterns are often narrow in the sleeves.

The purple lines are the changes to the muslin.

The double elbow darts in the sleeves make a lovely fit and are placed precisely where they should be.

It’s a little difficult to see the double darts, but they are there!

When it came to the V-neck, I knew I would need to use a facing of some sort, but I did not have enough fabric to cut a full facing.  So – I cut a partial facing instead, just enough to be able to turn the V and have it stable.  (The first thing I did when I started sewing the dress, was to reinforce that neckline with a strip of silk organza selvedge.)  Well, this worked like a charm, much to my delight.

The partial facing extends up from the bottom of the V about 2.5 inches, and then the turned- back seam allowance takes over.

Then I brought the lining fabric right to the edge of the neckline and understitched it to secure it in place, just as you would expect a couture dress to be finished.

I chose a “mushroom” colored crepe de chine for my lining. Blues are very difficult to match as you know, so I decided a contrast color would be best. The lining fabric is from Emma One Sock Fabrics.

I used blue thread for the under stitching.

I used a lapped application for the hand-picked zipper.  The more I use the lapped insertion for zippers, the more I like it.  And I especially like it in a center back seam.

I’m feeling quite pleased with this dress!

There is not much more to say about this blue floral dress, except that it was not finished in time to wear to any holiday event.  Which was fine!  Once I realized this would be the case, I was able to really enjoy the process of making it.  It was a delightful way to end the year – and the decade, which has had such a profound effect on my sewing.


37 Comments

Filed under couture construction, hand-sewn zippers, Linings, Mid-Century style, Pantone Color of the Year, Polka dots, sewing in silk, Sheath dresses, Sleeves, Uncategorized, vintage Vogue patterns from the 1960s

Fashion and Friendship

There is no dearth of books about fashion available for reading or just perusing.  Most of those, however, are books intended for an adult audience, so I am always delighted to find a “fashion book” written and illustrated for children.  I have always found that these books written for children are of equal delight for adults, and especially so when said adult can share them with an interested child or grandchild.

For Audrey with love:  Audrey Hepburn and Givenchy, by Philip Hopman is just such a book.

Copyright text and illustrations 2016; English translation copyright 2018 by NorthSouth Books, Inc., New York. Available in bookstores and on Amazon.

Written originally in Dutch and published in the Netherlands in 2016, this book was translated into English and published in the United States, Great Britain, Canada, Australia, and New Zealand in 2018.  Philip Hopman is not only the author, he is also the illustrator. His whimsical drawings are captivating both for their fashion sense and for their charming renditions of Audrey Hepburn and Hubert de Givenchy.

This is truly a story of friendship, but of friendship born out of a shared appreciation of beautiful clothing, Givenchy being, of course, the designer of those stunning clothes, and Audrey Hepburn being the client.  She was the one who could wear his designs like no other!

By the time they met, Givenchy was already a sought after designer, with an impressive roster of clients.  Among those clients were Greta Garbo, Grace Kelly, Jackie Kennedy, Wallis Simpson, and many others.

(Should you purchase this book for a child in your life, I recommend reading it through once or twice by yourself. Some of the text needs to be read across from the left to the right page, top to bottom, for the story line to be most meaningful, especially for a non-reader. This is a minor detail, but an important one for the enjoyment of its storyline.)

He initially claimed that he had no time to design for the rising movie star, but once she tried on a few of his clothes, he realized she was the perfect fit for his designs, both in style and in essence.   They became best friends, with a lasting connection and concern for each other that transcended the clothes.   Audrey was known to have said “When I wear his [Givenchy’s] clothes, I feel safe.  I’m not afraid of anything.”

This is a sweet book, but the success of such a children’s book is how it is received by this younger audience.  Does it engage them? Does it tell a story that is meaningful to them?  Does it start a conversation?  Does it spark imagination?  Is it a book that can be read over and over and still be enjoyed?

I purchased this book specifically for my two granddaughters’ visit with us this summer.  These are two little girls (currently six and four years of age) who like clothes and like dresses, so I felt fairly certain they would like this book.  What I wasn’t prepared for was how well it captured their imagination.  Before we even got to the title page, they were immersed in the lining pages.


They looked at the silhouette of each dress, loved the wide-brimmed hat with the white streamers, and decided the red dress was the one they liked the best.

Each page brought new delights for them, and they picked out their favorite designs as we read through the text.  We talked about how sometimes dreams don’t come true (when young, Audrey wanted to be a ballet dancer, but was told she was too tall, and her feet were too big!)  But we decided when one dream is crushed, there are other ones to pursue.  We talked about friendship, and we talked about how important it is to care for other people, no matter how busy and famous one might be.

But mostly, we talked about the clothes!  And that red dress?  Little four-year-old Carolina asked me if I will make that dress for her some day.  How can I refuse such a request?  Of course, I said YES.

14 Comments

Filed under Book reviews, Fashion history, Uncategorized

The Pink Coat Odyssey, The Finish!

Is it possible to fall in love with a coat?  If so, then that is what has happened with my pink coat.  It was a relationship which grew over several years.

First, I found the pattern, this Vogue Paris Original Designer Pattern from 1965.  It was an eBay purchase made several years ago, with a promise to myself that one day, when I found the right fabric, I would make it.

Next I found this silk charmeuse couture fabric on the website of Mendel Goldberg Fabrics. It was an end cut, 2.25 yards, and when I purchased it, I envisioned another wrap dress, not the lining of a coat.  Luckily I had no urgent plans to use it, and thus it eventually found its way inside the pink coat.

I am showing the lining silk here along with the pink wool to show how well they complement each other.

And then – I found the pink wool.  Also an eBay purchase, this wool was not inexpensively priced, but I recognized its rarity and its “presence” in the posted pictures.  Then I hoped it would live up to its promise once I received it and saw it in person.  Over the years I have found some amazing things on eBay, but this wool is one of the real treasures.

Because I have already posted quite a bit about the coat’s muslin/toile and certain salient details, I will not go into too much more description about the coat’s construction.  But I do want to point out some of this pattern’s engineering charms.

1) On the photo on the pattern envelope, I believe the soft shoulder of the coat is evident.  I used a “cigarette-type” sleeve heading in each shoulder to enhance the smooth transition from the shoulder to the top of the sleeve.  Not so evident on the pattern illustration is the drape of the back of the coat from the shoulder line.  I realized this drape works so well because of the two neckline darts.  They are in the neckline, not the shoulder seam; they add necessary shaping without disturbing the drape.

Can you see how the dart comes off from the neckline, not the shoulder seam?

2) The collar is an engineering marvel in my mind.  The under-collar  is constructed from four pieces, two main sections cut on the bias, and a 2-piece collar band, seamed at the center back.  The band helps the collar to turn beautifully.

This photo clearly shows the components of the under-collar. You can also see the under-stitching I did in silk buttonhole twist.

3) When I made the toile, I was concerned about the fullness of the back of the coat.  It seemed a bit much, and I have already written about my intention to add a half belt to draw in the fullness, if needed. Nope!   I am so happy with the finished look – it has that 1960s’ vibe without being overwhelming.  I did move the vertical back seam line up 1.25” to rest at my natural waistline, rather than below it.  For me, this was the correct alteration.  It may not be on someone else who has more height than I do.  Another consideration was that a half belt would have concealed the seam detailing which is so lovely on the back of the coat.

An inside look at the back of the coat, showing its drape from the shoulder seams.

The other significant alteration I made was to remove 1.5″ of width from each sleeve.  I possibly could have taken out even more, but I will be wearing this coat over sweaters and perhaps even a jacket, so the sleeves as I cut them will still accommodate that bulk.  But I would not want them any fuller!

Although the pattern did not call for it, I added flat piping to the edge of the lining.  I chose white silk crepe de chine for this contrast detail.  I felt any other color would have been too demonstrative.

The coat kind of looks like a sack of potatoes in this photo of its front edge!

The finished look of the lining edge.

I had some difficulty finding pink buttons.  I ended up with two varieties found in two Etsy shops.  I used a larger pink-swirly one for the looped closure, and smaller pink pearl-y ones for the concealed opening.  If I ever find ones I like better, that’s a easy switch.  But the more I see these, the more I like this combination.

Basting threads are still evident in this photo.

Alas, it is much too warm for wearing wool coats now, but it is ready for next Fall’s cooler days.  By then I hope to have a  windowpane checked skirt, in delicate gray, white and pink wool, specially made to wear with this coat.

It is always interesting what photos reveal. I am thinking I may need to redo the hem to get a softer look to it. It looks like it has crinkles in it!

I will take any excuse to show the inside of this coat!

I cut a piece of the selvedge with the Lesur name on it and attached it to the right front facing of the coat right below the placket.  I think this is an important part of the story of this project.

There is a very slight bow to the back of the coat, again reminiscent of the ’60s.

This coat is almost making me anxious for next Fall!

As I worked on this coat, I came to realize how perfectly suited the pattern and the wool were for each other.   It was such a privilege to spend so many hours with such quality.  No wonder I fell in love!

34 Comments

Filed under Buttons - choosing the right ones, Christian Dior, Coats, couture construction, Dressmaker coats, Linings, Mid-Century style, Uncategorized, Vintage fabric, vintage Vogue Designer patterns, vintage Vogue patterns from the 1960s, woolens

The Best Laid Plans

The best laid plans sometimes need revision.  As a person who likes to make careful lists and schedules, I find it difficult at times when life conspires to upset those plans.  Especially difficult is when my sewing plans go awry!

I have been dreaming about making this coat in my treasured vintage pink wool.

With new enthusiasm after seeing the Dior Exhibit in Denver, I was sure this coat would be well underway by the end of March. However, for an unexpected, albeit happy, change of events, here we are at the end of March and all I have finished is my toile.  But my enthusiasm is still on track!

A fun part of any project in which I use a Vogue Designer pattern is devoted to finding out more about the initial debut of the pattern, and documentation of its appearance in Vogue Pattern Book Magazine.  Although I had a good hunch that this pattern was from the mid-sixties, I was quite delighted to see it included in a feature of new Designer patterns debuting in  the October/November 1965 VPBM.       .

The caption for my coat pattern, top and center, reads: “DIOR: The ensemble to wear all year – a dirndled dress and a coat that’s shaped high and narrow.”

 Of course this was when Marc Bohan was the Creative Director at Christian Dior, a period of the 1960s known for its gorgeous dressmaker coats and ensembles.  Here is a sampling of some other designs appearing in the same time frame in a few Vogue Pattern Book Magazines.

I actually own this pattern, too. I have always loved the look of this coat.  This pattern is shown in the same issue of Vogue Pattern Book Magazine as the Dior design, October/November 1965.  What a great year for coats.

This kimono-sleeved coat was shown made in textured pineapple wool by Einiger. I made my purple coat from vintage Einiger wool, so I know what fabulous quality it is.

This coat features a spread collar on a low V-neck.  This coat and the one above are shown in the February/March 1966 Vogue Pattern Book Magazine.

This coat is described as being “the total look of the Chanelesque tradition.” It, too, was made from “mossy-surfaced” Einiger wool.

And this coat is reminiscent of the Dior design I am making, with its pointed collar, straight-shape and concealed closing. The tubular belt is a brilliant addition. This design is by Guy Laroche and both it and the pink coat shown above were included in the February/March 1964 Vogue Pattern Book Magazine.

Back to my toile: I made the first one without any alterations to the pattern.  The first thing I noticed is that the horizontal seam which extends around the back and angles up on either side of the front, seemed to add extra “baggage” in the lower back.

Here was my first toile atop the waxed marking paper. This shows the lower front and back piece, with its angled side seam.

The seam was designed to be below the waistline, but I determined it might look better on me if it were reset to fall exactly on the waist.  This adjustment would keep the spirit of the design, but would be more flattering on me for some reason.

I made another slight adjustment to the shoulder line.  First I cut the shoulder line on the body of the coat back about ½ inch on either side, to reduce some excess fabric across the upper chest.  That made some pulling in the top of the sleeves. So then I added about ½ inch to the top half/curve of each sleeve.  So it was an even swap, just distributed differently.

This shows my markings on the upper shoulder.

And the adjustments to the top of the sleeves.

Interestingly, the sleeves have no shaping by darts or seams on this pattern.  They seemed a bit too full to me, so I tapered the seam to reduce the width of each sleeve by about 1.5 inches.  I have had to make this adjustment to other coat patterns from the same time period, so perhaps a fuller sleeve is a hallmark of that era.  I did not want to narrow the sleeves too much, as they need to be comfortable to wear over long sleeved dresses and sweaters.

I am contemplating adding a half belt, secured with buttons to the back of the coat.  That’s a decision I’ll make as the coat comes together.  The drape of the wool, as opposed to the drape of the muslin, may convince me I do not need it, but I rather like the appearance of a back belt.

Here is a rough mock-up of a possible belt, but this needs much more thought!

I found this picture of another coat which has a high back belt, probably about the length of one which I might add. It is so helpful to find examples like this of design details.

Lots of pink featured in coats from the 1960s. This design was featured in the February/March 1968 International Vogue Pattern Book.

So, I have embarrassing little to show for the past three weeks regarding this coat.  Perhaps the next three weeks may be kinder to me. We shall see!

17 Comments

Filed under Christian Dior, Coats, Dressmaker coats, Fashion history, Mid-Century style, Uncategorized, vintage Vogue Designer patterns, vintage Vogue patterns from the 1960s

“. . . A Vivifying and Effervescent Color. . .”

Every December when Pantone announces its Color of the Year for the upcoming annum, I think of it as a holiday gift for the mind and senses.  The commercial implications of the selection are obvious, as the manufacturers in the lifestyle and fashion industries are guided to a degree by the chosen color.  Or perhaps the Color of the Year is more of an affirmation of the direction these manufacturers were headed anyway.  Nevertheless, the color serves as a guideline and often an inspiration.  The color for 2019 is Living Coral, Pantone 16-1546.

Described as “a peachy shade of orange with a golden undertone,” the color shown here is not nearly as vibrant as the real thing!

Its description reads as follows: “ Vibrant, yet mellow, Living Coral embraces us with warmth and nourishment to provide comfort and buoyancy in our continually shifting environment.  Sociable and spirited, the engaging nature of Living Coral welcomes and encourages lighthearted activity.  Symbolizing our innate need for optimism and joyful pursuits, Living Coral embodies our desire for playful expression.”

Pantone has been selecting a Color of the Year for 20 years, although the company had its beginning in 1962.  It certainly appears that they went back to their early roots in when choosing Living Coral for 2019.  Take a look back 58 years at this cover of a 1963 Vogue Pattern Book Magazine:

This cardigan coat is paired with a white wool dress underneath.

One of the prominent colors featured inside this issue from February/March 1963 is referred to as “absolute orange” and “sun-tinged melon.”

This 7/8 length tunic coat is in “the softest of the melon shades.”

And this is a “pink-infused shade of melon.”

Even the back cover of the magazine shows a golden-tinged orange color.

Well, I do not need any convincing to be excited about the chosen color for 2019, as I already have made several garments n this hue.  Not only do I love this coral color, I admire its versatility and wearability with other contrasting colors. Following is a quick run-through of my examples of Living Coral.

Although this dress gave me fits when I was making it (because of the pattern and the fact that it called for knit fabric and I used a stretch charmeuse silk instead), I do get compliments whenever I wear it, so I guess I did something right. Even the print in the fabric looks a bit sea-life and like living coral.

This dressy coat has to be one of my favorite makes:

To me this is a perfect example of Living Coral color.  One of the reasons I love this coat so much is because it pairs so well with blue.

Another example of coral and blue – this time navy blue – is this dress I made a few months ago.

And then last year about this time of year, I made this blouse to pair with a bronze-and-white-lace skirt, tied together with a coral sash.

My most recent make for me (I’ve been sewing for my little granddaughters, too, soon to be revealed!), is this coral wool skirt.  I have worn it with gray , and it will also look good with navy blue and light blue , and of course, winter white.

Although I haven’t tried it yet, I think Living Coral will look spectacular with this year’s color of Ultra Violet, and 2017’s Greenery.

I made this coat last Spring in a color very close to Ultra Violet.

With three weeks left in December, I am presently concentrating on the more traditional colors of red and green and blue and gold.  But Living Coral gives us an optimistic view of the year to come, and that’s a vivifying message for all of us.

19 Comments

Filed under Fashion history, Mid-Century style, Pantone Color of the Year, Uncategorized

An A-Line Cocktail Dress

The A-Line silhouette is certainly a very recognizable and common style.  Although there is nothing spectacular about it, it does have a rather interesting origin in modern fashion history.  I had lots of time to think about this style as I worked through my most recent project, and I was surprised with what I discovered.

This entry in Fairchild’s Dictionary of Fashion gives a succinct history:

“Apparel styled close and narrow at the shoulders or waist and flaring gently away from the body to the hem in a line resembling the letter A.  Introduced in 1955 by Paris couturier Christian Dior, the term is used as an adjective in describing a wide variety of apparel with this shape, including coats, dresses, jumpers, and skirts.” (The Fairchild Dictionary of Fashion, by Charlotte Mankey Calasibetta and Phyllis Tortora, Third edition, Fairchild Publications, Inc., New York, New York, c2003, page 11)

A further entry adds “…Usually made with narrow shoulders, [and] a high neckline…” (Ibid, page 11)

Dior’s “A-Line” collection in the Spring of 1955 featured a “fingertip-length flared jacket worn over a dress with a very full, pleated skirt.” (“A-Line dress,” by Susan Ward; Encyclopedia of Clothing and Fashion, by Valerie Steele; Thomson Gale, Detroit, Michigan, pages 35-36) Fairchild’s Dictionary has a depiction of this very dress which was called “the most wanted silhouette in Paris.”

Obviously the A-Line shape then evolved into a less dramatic, and more ubiquitous style during the 1960s and ‘70s, much closer to  what we recognize today as A-Line.

When I was contemplating which pattern to use for my dress (I had purchased the fabric, 1½ yards, 54” wide,  from Mendel Goldberg Fabrics in April of this year), I wanted a style which would showcase the fabric. Although I originally thought I would go with a sheath dress silhouette for this fabric, when I found this pattern, it struck a chord.

The line drawing for the shorter length shows more detail of its seaming and darts. The description on the pattern envelope reads: “Evening or street length, high shaped, slightly A-line dress has short sleeves and scoop neckline with or without slit at center front…”

I liked that center front seam with its notched neckline, even though I knew it might be a little tricky to match the embroidered vines and flowers.  However, I thought  the semi-attached appliqués would be lovely overlapping the seams.

The small slit in the center front neckline.

It took me a full week to finish my muslin.  The bust needed to be dropped so those princess-seamed darts needed a lot of adjustment.  In the shoulder area I had some gaping in the front, and I also needed to reshape the top of the shoulders.  Instead of easing the sleevecaps to fit the armscye, I decided to replace that ease with a shaping dart to the top of the sleeves.  I really liked the fluid look that gave to the shoulder line. I drafted three-quarter sleeves as I was contemplating that change to the original pattern.

It is difficult to see in this black fabric, but this is the top of the sleeve with its shaping dart.  If you look closely, you can see some loose edges of the larger appliqués.

Can you guess what is coming next?  As is often the case when I purchase fabric first and then choose a pattern, I created a challenge for myself.  It was almost immediately obvious to me that I would not be able to work on the lengthwise grain of fabric, as I could not begin to fit the pattern pieces onto the fabric and do any matching whatsoever. As luck would have it, I preferred the appearance of the meandering of the vines and flowers on the crossgrain, and I figured out how to stagger the pattern pieces to both fit the fabric, and match the seams.  But those three-quarter length sleeves?  No way were they going to happen!  I could just fit in the original short sleeves, so short they were going to be!

Here are the silk organza underlining (pattern) pieces laid out on my fabric. I had to stagger the four main pieces to fit it on the fabric. Fortunately I was still able to match the pattern of the vines and flowers. Whew! (I took pictures on my iPad to help with the matching.  You can see it in the upper right corner.)

I ended up basting by hand every single seam on this dress.  Even with great care, it was incredibly easy to catch corners of those loose appliqués by mistake, so it was much easier to make adjustments in basting rather than in the finished machine-sewn seams.  The basting also showed me I needed to take out a small bit of the width of the skirt from the waist down, about an inch total.  When is an inch more than an inch?  In this dress!  That one inch made a huge difference in its final appearance.

Because I was sewing this dress using couture techniques, the neck facing was eliminated, with the black crepe de chine lining fell-stitched to the edge of the neckline.  When I under-stitched the lining to secure it in place, I used an off-white silk buttonhole twist. It was so much easier to see light thread on the black lining, and also, I think it looks pretty.

I hand picked the zipper, which virtually disappears in this dark jacquard embroidered fabric.

I was able to arrange the hem of the skirt so the larger of the semi-attached appliqués would hang just beneath the fold-line.

This shows two of the appliqués at the hemline.

I love the graceful flow of this dress.

The simple look of this dress belies the hours and hours I spent on it!

And I am so pleased that I was unable to make three-quarter length sleeves. These short sleeves are just perfect!

I am quite happy with the way this dress turned out.  I do think its simple lines show off the fabric well – no need for anything too fussy when the fabric is so incredibly lovely!  I love that I can wear this 1960’s A-Line style and somehow feel – and hopefully look – very current.


30 Comments

Filed under Cocktail dresses, couture construction, Fashion history, Formal or fancy dresses, hand-sewn zippers, Mid-Century style, Uncategorized, underlinings, vintage Vogue patterns from the 1960s

A Sewing Draught

The weather outside is frightful, as the popular Christmas song goes.  It has been too hot and too wet here in eastern Pennsylvania (USA) this summer.  Our family travels, however, took us to areas that were both too hot and much too dry. It was exactly those lengthy travels which helped determine the atmospheric conditions in my sewing room during the past weeks.  There has been a definite draught in that part of the house.  The sewing machines have been huddled under their covers, the fabric has lain folded and fallow, there has not been even a bubble of moisture from the steam iron, nor the slightest snip from the scissors.  It has been a place undisturbed and quite barren.

So, finally, it is time to change all that!  Now I am faced with the question – Do I try to squeeze in the making of one more summer dress (it certainly still feels like summer) – or do I forge ahead with a project which has a mid-October deadline?

If I go with one more summer dress, it will be one made from this vintage Moygashel linen, which has been in my queue for quite some time – and somehow never made it to the top.

Realistically, it would probably be wiser to focus on that mid-October dress, which is going to be a cocktail dress made from this amazing fabric, a lightweight brocade, embroidered and with with lace appliqués.  One of the perks of attending Susan Khalje’s Couture Sewing School in Baltimore (which I did last April) is the opportunity to see and purchase fabric from Mendel Goldberg Fabrics.  Alice Wildes, the proprietress, arrives at the beginning of each week-long class with a car full of her gorgeous, carefully selected yard goods, and that is where I purchased this piece.

The embroidered flower stems are a light gray, and the flowers themselves are a pale pink.

Getting this brocade was actually a last minute decision, as I already had one cotton piece selected – and I was trying to be circumspect in buying more fabric (remind me again of why I ever think this will work?) Anyway, I’m so glad I succumbed as I love it and have determined which pattern to use for its construction:

I will be making the shorter dress, without the jacket.

I like the notched neck detail on the shorter dress. I may make below elbow length sleeves – still to be determined.

Although this dress appears to be a simple silhouette, I have plans to change it up a bit, which will add to its complexity, so it certainly cannot be rushed.

With any luck, the weather will start to change for the better no matter which project I embark on.  The only question is – which one will get the nod?

13 Comments

Filed under Cocktail dresses, Formal or fancy dresses, Lace, Linen, Moygashel linen, Uncategorized, Vintage fabric, vintage Vogue patterns from the 1960s

Wearing Dots

From this …


To this…


How did that happen?

After my purchase of that pattern a couple of years ago, I definitely had second thoughts.  While I loved it when it was first available back in the 1970s – and at that time I was of the age when I probably could have actually worn it – I immediately realized it would not be appropriate for a 60-something-year-old! I tucked it away in my pattern file where I knew I would come across it occasionally and indulge a long-ago dream.  Little did I know it would play a major roll in the realization of this polka-dotted dress.

It took almost eight years for me to come up with a plan for this polka dot silk fabric.  I kept envisioning a waisted, sleeveless dress with a “flowy” skirt, but I could not find a pattern I liked, either vintage or new.  I wanted to avoid darts as much as possible (that’s a story in itself for someday), which meant I needed a princess style bodice.  Many princess line bodices have side seams, but I wanted one without side seams, and with princess line seaming on the bodice back as well.  Pondering all this, I again came across my Belinda Bellville pattern above and thought maybe it would work, with a few changes. But then I noticed that the bodice was supposed to be cut on the bias. 

This pattern detailing from the instruction sheet shows the thee bodice pieces at the top of the picture. The bias is clearly marked.

After not having any success in finding any other suitable pattern, I gave it another look.  Why not cut it on the straight of goods?  It was at least worth a try in muslin, so that’s what I did.  The changes I made to it included; 1) lowering the bust line, 2) eliminating the short-waisted front of the dress and restoring it to waist level, 3) placing the front center part of the bodice on the fold, eliminating the center seam, 4) lowering the neckline just a little, 5) making the waist larger, and 6) adding some ease across the back and shoulders.  With all those changes, I had a bodice I really liked.

But then I needed to make a skirt to complement the bodice.  When I looked at the skirt pattern, I knew I needed to divide it in thirds (for one half of the width of the skirt) and match the seam lines to the seams in the bodice.  Here is what I came up with:

On the left is the one-piece tissue pattern for the skirt. Using the dart lines on that pattern helped me determine the angles I needed for my skirt.

It was about this time I got the idea to make this dress in a longer skirt rather than knee-length, which is where I usually wear my dresses.  The only question I had was – did I have enough fabric to do this?  My silk was 45” wide, and I only had two yards.  I spent at least an hour laying out and eyeballing my muslin pieces on the silk, on the floor, just to see if I could possibly accomplish this task.  I found one combination that would allow this, and took a photo so I could remember how to do it!

It literally took an entire week to work out the pattern and perfect the muslin, but then the sewing began!

As soon as I completed the construction of the bodice, including its silk organza underlining, its catch-stitched raw seam edges, with the seam allowances around the neckline and armholes appropriately tacked in place, I knew I had a bodice which was just what I had envisioned.

Somehow the skirt seams all matched up perfectly with the bodice seams and the center front inverted box pleat, which I added, looked wonderful, I thought.  I made the lining out of navy blue crepe de chine, purchased from Emma One Sock Fabrics.

When it came to under-stitching the neckline and armholes, I decided to do it in white.  It mimics the white polka dots in the fashion fabric and also was much easier to see while doing all that handwork.

Instead of a box pleat in the lining, I did two side pleats to reduce bulk in that critical tummy region!

Fortunately, for the belt, I had silk taffeta left over from two previous projects, which turned out to be a perfect match.  I did not want the belt to take away visually from the rest of the dress, so I made it a modest 1.5 inches wide.  I think it is enough to complete the look, but not overpower it. And OF COURSE I wanted to finish it off with a tailored bow.  (I am planning a post on making this tailored bow belt, so I will not go into the details of it right now.)


An oyster-colored clutch helps to complete the look.

This is a very comfortable dress to wear!

No attempt was made to match any dots, as the pattern was completely random. This is the hand-picked zipper. I love the fact that the navy thread shows up on the white and coral dots.

And should I need a dress coat, this one matches the belt!

While this dress was firmly in my queue for summer sewing, at the time I did my planning I was not making it for any special occasion.  However, as good fortune would have it, two unforeseen occasions are now approaching in late summer for which this dress will be perfect.  I am definitely looking forward to wearing these dots!

41 Comments

Filed under Bows as design feature, Cocktail dresses, couture construction, Linings, Mid-Century style, Polka dots, sewing in silk, silk, Silk taffeta, Uncategorized, vintage Vogue Designer patterns, vintage Vogue patterns from the 1970s