
Why is it that we so often think every wedding to which we are invited means we need a new dress? Sometimes it is warranted; maybe we really do need a new dress! Maybe what we already have in our closet isn’t right for the season or the “ambience” of the wedding site. Maybe the couple getting married is very dear to us, and it just seems right to celebrate this event with something new and special. Maybe the wedding season is busy enough that we really cannot wear the same dress to multiple events where we will probably see many of the same friends and people. But maybe, just maybe, a wedding invitation is exactly the perfect excuse we need to indulge our love of fancy, dressy clothes.
Fortunately, I have not only a wedding to attend, but also, the following weekend, another elegant evening of “cocktails, dinner and dancing,” so it just seemed appropriate – necessary even! – to make a dress/ensemble that could suffice for both. Well, the dress is done, but not the jacket.

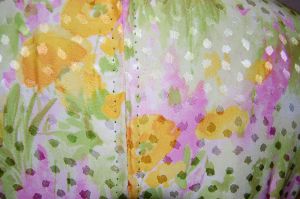
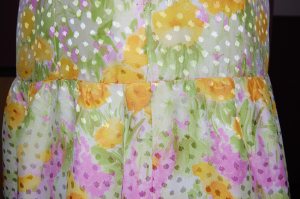
Front . . .

. . . and back

This is, of course, the pattern I had to alter in order to fit it onto my available fabric.

I made a couple more small changes to the dress. I broadened and lowered the neckline by a small amount, to make it more pleasing on me. I eliminated the neck facing and used the couture method of finishing that edge, with the dress lining brought up to the edge, fell-stitched in place, and secured with small back stitches. I also decided to make the center back zipper a focus when I found a vintage spool of green silk buttonhole twist in my collection. Using an idea I had seen one of my readers do (thank you, Cissie!), I pick-stitched the zipper with the twist, leaving a little trail of bright green dots along the center back.
In the Department of “Nothing is Easy,” I ran into a problem with the fullness of the “half-skirt” on the front of the dress. You may recall from my last post, that I doubled one of the back skirt sections to use for the front skirt (replacing the diagonally shaped flounces as shown on the pattern which required more fabric than I had.) When I made my muslin (toile), I did not realize that the front skirt was fuller than the two back skirt sections. I had all three sections of the fashion fabric sewn together, with the seams all catch-stitched, and the lining attached too (in order to treat both pieces as one in the ruffling process.) I was half way through basting the skirt onto the body of the dress when I realized there was too much fullness in the front. I had to take it all apart, and figure out where I had made the mistake. It turned out that the front section of the dress was narrower than the two back sections sewn together. So I had to do some calculations, coming up with the fact that I had to take 4.5” off the width of the front skirt. That took a whole afternoon of sewing to take care of that adjustment!
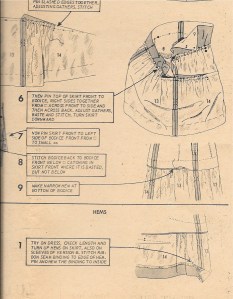
The skirt was attached to the bodice in an rather unusual way as you can see in this photo and the instruction sheet below.
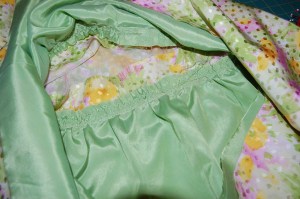
I also had to figure out how to line the top part of the dress. I finally decided to leave the top part of the lining hanging loose inside the dress – and it actually works beautifully!

The skirt lining is not attached to the bodice lining at all.
Two small interesting design notes on this pattern are worth noting. First, if you look at the pattern envelope, you see small neckline darts on the back of the dress.
 When I studied the pattern, those darts were not there! Either the artist made a mistake, or the darts were eliminated when the pattern was drafted.
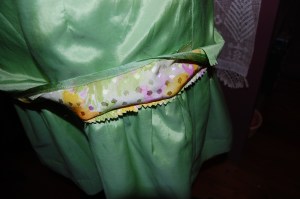
Another interesting design aspect is the center back seam in the skirt. Usually center back seams are there because there is an opening that the seam needs to accommodate. That is not the case in this dress, as the zipper does not extend into the skirt. However, even though it is very subtle, it just looks better to have a seam in the skirt that matches up with the center back seam of the bodice section.
That center back seam which is picked up in the skirt.

It has been rainy and cold all week so no photos outside. I need a dress like this to remind me that it is actually May.


Another back view

I have decided I am “wedding ready” even without the jacket. However, if I get the jacket finished, I’ll be very happy!

This is a sweet dress and looks lovely on you. Hope you get your jacket done and enjoy the parties!
Thank you, Margene!
What a nice look for summer! I want one!
Thank you, Kathy. I think I am going to want another dress made from this pattern!
It is just beautiful! Classic and elegant…..you will get to the jacket. Re new dress for wedding, I think also, weddings (and funerals unfortunately) are those occasions that gather friends and relatives for ONLY ‘weddings and funerals’. You want to look good, as good as you looked 10 years ago! And the want the photos to prove it! For weddings, you can go all out. And what’s more, it’s a compliment to the bride and groom. Loved this post. Jane
Thank you, Jane, for your lovely and insightful comment. Sometime I am going to do a post on “dressing well is a sign of respect” – and certainly weddings deserve this special attention to attire! Concerning the jacket – yes, it will get done, just maybe not in time for the wedding, but we’ll see!
Mother Nature is so proud that you’re celebrating spring and Mothers Day weekend and blessing a new family with this stunningly classy outfit that she’s behaving with uncompromising determination that you’re going to need that jacket this weekend. I’d cheat if time too short: I’d leave the seam finishing until later and tack/baste/tape the lining…and no one will know unless you tell. The dress is great alone with that perfect sheath fit you do so well, plus the youthful ruffle that’s ready to dance. You’re making me hungry thinking about what 2 favorites I’d cook simultaneously for four meals of leftovers to make more time. If wearing it with a lavender linen coat or something else is meant to be, then that, too, will be just fine. Enjoy! And thanks for sharing. I hadn’t thought about the back seam like that. I’m glad the polka dots show. I think polka dots are happy. Have a happy couple of weekends!
Hi Mery! Yes, I love polka dots, too. I think those are what so attracted me to this fabric in the first place. It has a lot going on in it! I do have a yellow silk wrap I can use if the jacket isn’t done, so I am not fretting this too much. And who’s cooking? Let’s eat out! (Although planned leftovers are always a good idea…)
Beautiful! I love a dropped waist and I’ve been noticing a lot of them showing up on designer dresses this season. They surely take what could be a simple sheath silhouette and elevate it to fancy! I have a wedding coming up this month and will admit I’m wearing a dress I made two years ago for another wedding. I love the dress and it’s a completely different guest list so ….But I do have one in September and think I’ll look into a dropped waist for that. I am looking forward to seeing the jacket to complete the ensemble, but it’s still a gorgeous dress on its own.
Thank you, Marguerite! Who would ever think this pattern is from the early 1960s, with its current flair? Now I have been “guilty” as well of wearing an already-in-my-closet dress to weddings. But isn’t it nice to have a couple to choose from – especially if they are favorite pieces already?
This is so lovely. The fabric is to die for. Can I ask what technique you used to line the dress – is the zip machine stitched to the lining?
Thank you, Katy. The lining is entirely put in by hand, including that length along the zipper. It looks time-consuming, but it really doesn’t take all that long and the finished product is really nice.
That’s the perfect dress for a spring wedding! Beautiful finishing techniques, I love the effect of the buttonhole twist for the pick-stitched zipper.
Thank you, Marianne. I am looking forward to wearing it! Just hope it warms up a bit – it’s very chilly here along the East Coast.
Absolutely stunning dress and so perfect for spring/summer weddings! I love how you figured out a way to “make this work” with not quite enough fabric. Isn’t it satisfying when you come up with creative solutions? In studying the pattern instruction sheet, it looks like the seam joining the top and skirt is turned down towards the gathering making the gathers pouf out more. The wider seam allowance on the top section stabilizes the gathers. It doesn’t look like the pattern has a lining so your method of attaching a lining works brilliantly. Enjoy the parties and please post the jacket when you have time to complete it.
Thanks, Mary! I thought the joining technique indicated in this pattern was very clever – it’s a much more graceful seam than if the bodice and skirt were just abutted. You are correct – there was no lining for the dress, but I have a hard time making a silk dress without a lining, so I just had to figure it out! I am really happy with how it turned out.
What gorgeous fabric! Your dress is simply perfect for a spring wedding or party. Do hope you’ll get the jacket done!
Thanks, Cissie! The jacket will get done – just maybe not in time for the wedding (maybe for the second party??)
Oh Karen, this dress is just beautiful! The loving attention you give to your garments is always evident. I think taking the skirt apart would have pushed me over the edge but I’m so glad you managed. Love the zipper and the dress. It is so you 😊
Thanks, Sarah! I was a bit discouraged at the prospects of taking the skirt apart, but now I’m glad I did. By the way, congratulations on your new book!! How exciting to have it in print…
Beautiful!
Ah – thank you!
Such beautiful fabric! I always love how you analyze how best to make your
lovely clothes!
Thank you, Mary Lynn!
so pretty! 🙂
Thanks, Heather!
Your dress looks lovely on you! Good idea with the lining hanging loose!