
When is a sewing project really, really, finally finished? That was the question I was asking myself after I thought I had finished my Pink Coat, but then decided I had more to do. Or, more precisely, I had things to undo and then redo.
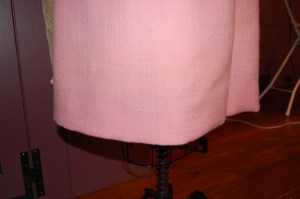
After seeing the photos I posted on this blog, my eye went right to that crinkled hem.

I had not noticed how crinkled the hem appeared until I saw these photos.
I had purposely steamed the hem lightly, not wanting to make it a knife edge, but after seeing these crinkles, I went back and steamed it again. I still had crinkles. My expectation at this point was that I would probably have to take the hem out and redo it. This suspicion was confirmed when I sought advice from Susan Khalje. She oh-so-gently agreed with me! First she suggested removing the silk organza from the bottom of the coat up to the fold line of the hem, and lightly catch-stitching it along the fold, which would not show. I did this after taking out all the stitching along the lining, the facings, and the seam allowances, in order to undo the hem.
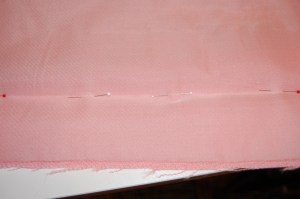
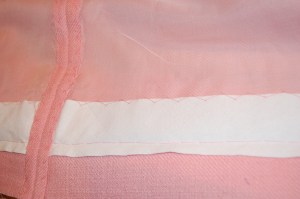
The pins mark the fold line of the hem; as you can see, the silk organza underlining extends to the bottom edge of the coat.
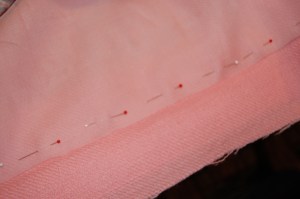
I then pinned about a half inch above the hem line, so I was able to remove the silk organza right at the hem fold. I then used a catch-stitch to secure the silk organza right along the fold line.
Doing this helped, but the hem was still not as soft as I thought it should be. Susan’s next suggestion was to add a bias strip of flannel to the interior of the hem, which I suspected was what I had needed to do from the start. I went to my trusty Vogue Sewing Book from 1970 to get guidance and found this:
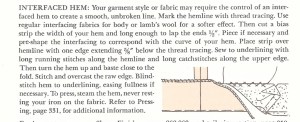
From: The Vogue Sewing Book, edited by Patricia Perry, Vogue Patterns, New York, New York, c1970, page 324.
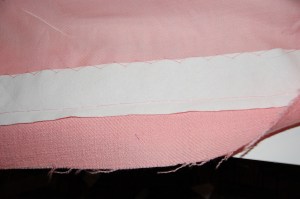
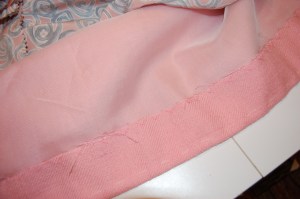
I used all cotton white flannel, cut 2½ inches wide, the width of the hem. I positioned it so that ⅝“ was below the fold line, with the remaining above. I used a catch-stitch on the wider section of flannel, securing it to the silk organza. Then I did a loose running stitch right on the fold line. After every step, I gently steamed the area.
Obviously I had to take out the catch-stitching along the lower portion of the center back seam, and then I was able to slip the flannel under the seam allowance.
Then I was ready to put the hem back in, and reattach the facings and lining.
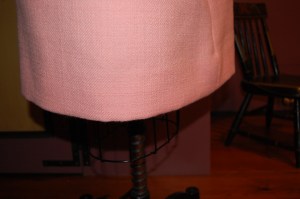
None of this was difficult, but it was time-consuming. However, I am much happier with the appearance of the hem now. It is soft and hangs with more grace.
A much smoother, softer hem!
Susan also suggested that I make an adjustment to the front edges of the collar. Although I had under-stitiched it, I apparently did not coax the front-edge seams back away from the edge enough, allowing them to show more than they should. So I took out a majority of the understitching and re–did it, too.


The collar lays flatter now, and I am really happy with it.
Needless to say, I was a bit discouraged that I was facing so much work to correct these problem areas, but I knew it needed to be done. I considered waiting until next Fall to tackle these fixes, but I decided I would feel less like doing it then than now, so I dug in. It became a good learning experience, and a good reminder that different fabrics behave in different ways. It is up to the dressmaker to seek out the best solution for a problem area and then do it, or in this case, re-do it. Hooray, the Pink Coat is finally – really – finished.

Mmmmnnnn… thank you for sharing this information and process. It explains so much I hadn’t understood.
Oh, you are welcome! Thank you for letting me know it was helpful.
How satisfying now to have gone the extra mile. BEAUTIFUL!
Thank you! Yes, I now feel very good about this coat, and I am so glad I persevered to do the fixes it needed.
Part of me is tempted to say I would just flash that gorgeous lining and no one would notice the hem. However, you are right. This has too many strengths to be undermined by a weaker length of the chain. Yea, it really is gorgeous and ready to completely enjoy.
Well, I intend to flash that lining as often as I can! But the hem had to be corrected, so now it is, and I am much happier with it.
Much improved hem! They can be so troublesome, especially when you are ready to be finished! Every time you put this coat on you will be so glad you did the fixes.😄
Isn’t it amazing how much work can be in a hem, just, as you say, when you are ready to be done with it!? But better now than next Fall, and I am now quite happy with the results.
Well done on finding a solution. Now you can wear it without that sewers angst! I used a bias cut interfacing on a lovely coat made from a cashmere fabric that was a bit too soft for the task a few winters ago. It seemed to do the trick. The creasing in the fabric finally brought me undone. Now that’s a whole other lesson that I am trying to learn🤫
It’s so disappointing when a fabric doesn’t behave, especially after you have spent many hours on it. It’s a tough lesson for anyone. That’s one of the reason I think sewing has many life lessons in its process!
Wow – I thought it looked stupendous before, and now it is more so! Those changes made a major difference. Kudos for your time and effort to make it even more spectacular! And thanks for sharing the information.
Thank you, Heather. I’m glad the changes are noticeable, in a good way! Always love to hear from you!
Just wow, thank you for this informative and interesting post. The photos just provided more guidance – from one who is a visual learner. Sam the Aussie
You are welcome, Sam – I am so glad this post was useful for you! Thank you for letting me know.
I have often noticed this type of problem with hems in photos of famous ladies in the news and I always wondered about it. Now, thanks to you, I know the why’s and the fix for the problem. You are a wealth of fabulous information. Thank you for being the perfect seamstress for us all to emulate.
This was a great learning experience for me, Peggy. No more crinkly hems for me! I just hope next time I figure it out before I have to tear out what I have already spent hours on. Certainly not quite perfect – or even close, but thank you for your kind words!
Sometimes a photo can show easily overlooked details. The hem looks absolutely couture now. So much softer without any hint of crinkling. I’m sure once you noticed it there was no way you weren’t going to the trouble of redoing. Beautiful coat.
So often I see things in photos that I did not see in the garment hanging on my dress form. You’re correct – I really could not live with it the way it was, so it was time well spent. Thanks, Mary!
The flannel in the hem. I wonder if I should reread that book every year while the machine is at the spa. So many good ideas.
Thanks as ever. Making us better.
Yes, that book is a treasure. It has been my trusted companion for many, many years, and still is my go-to source!
Thank you for posting this. I have a velvet dress that requires this heat treatment, and I have been putting it off since February. You must be thrilled that you tackled this sooner rather than later. What a difference small changes – albeit time consuming changes – make to the entire garment. If you’re anything like me, wearing will be a pleasure now that you’ve made these changes. I always look at hems and shoulders in garments, for some reason.
It looks lovely! What a wonderful source of help Susan is!!