
Dresses – and garments in general – with back interest have always intrigued me. The addition of a simple back belt can add so much to a coat design, for example, and a yoke in the back of a dress can be the perfect place to add complimentary buttons which might not have a place on the front of the dress. Perhaps it was this reason why I was drawn to this Advance pattern, which I found in an Etsy store.
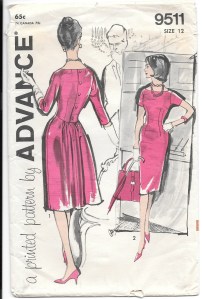
Thanks to one of my readers, I know that this pattern dates to 1960.
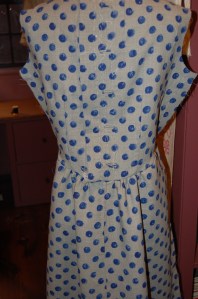
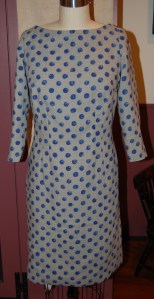
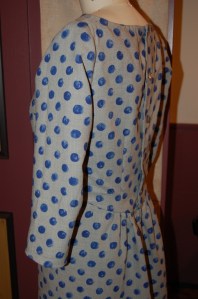
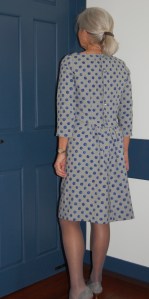
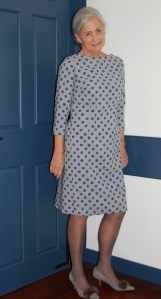
I hesitated for quite a while before buying it, as I just wasn’t so sure the gathered back skirt on this dress would look as good on me as it looked on the pattern envelope. I also did not want a “dated” or “too cutesy” look. But finally I gave in and made the purchase. The buttoned back and the dropped back waist were two details which really appealed to me, as well as the sleek sheath look of the front of the dress. I also knew that the right fabric could work wonders, and I bought the pattern with this gray and blue polka dotted wool/silk blend in mind.
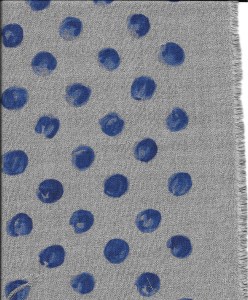
I purchased this fabric from Mendel Goldberg in New York City.
Then, there is always that steadfast fall-back, as well – making a muslin (toile) and if it really doesn’t work, then just scrapping it! What could I lose besides a few yards of cheap muslin and a few hours of time?
I had never used an Advance vintage pattern before, so I was interested to see how one would make up. I was impressed! The pattern pieces went together very precisely, and, in particular, the flounce, or gathering, at the back of the skirt was not overdone. The only initial change I made to the pattern before cutting out my muslin was to lower the bust dart, which I always have to do. Once I made the muslin, it was a little snug across the front, so I added ¼” to either side seam. As it turned out, I needed the extra width just across the midriff area, and ended up taking out quite a bit of extra width from the waist down.
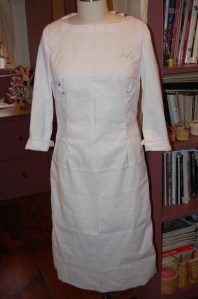
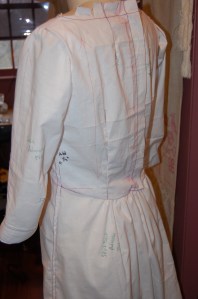
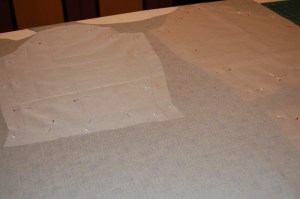
Some pictures of my muslin.
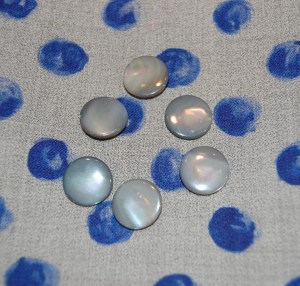
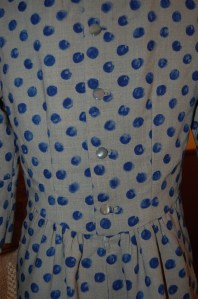
While I was working on the muslin, I was in a quandary over the buttons. I had to have them before I could start work on the fashion fabric because of those pesky, but beautiful, bound buttonholes, which are one of the first things to go in. Nothing I had on hand was right and after a very brief dalliance with the thought of blue buttons (what was I thinking, even briefly??), I knew gray mother-of-pearl buttons were what was needed. As luck would have it I found a set of six 5/8” buttons in an Etsy shop, which were described as blue-gray mother-of-pearl. As soon as they arrived in my mailbox, I knew they were perfect.
By this time I had transposed the muslin onto white silk organza, made my working pattern, basted the fashion fabric and the organza together, and ordered marine blue crepe de chine from EmmaOneSock for the lining.
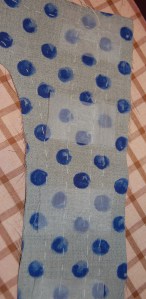
For those of you who asked, here is a picture of the silk organza being used as the pattern. When cut out, the two are basted together by hand along the seam lines, dart markings, and hem lines and then handled as one piece.
I also used silk organza patches for the facings for the bound buttonholes.
Here the facings are turned towards the inside. Proper measuring is essential for this technique to be successful.
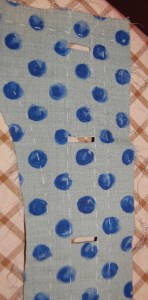
The back of the dress during construction.
Although the pattern called for lining only the skirt back, I wanted to fully line the entire dress. The pattern for the back skirt lining is shown here in the thumbnail diagram:
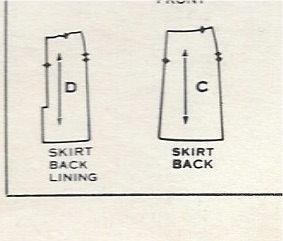
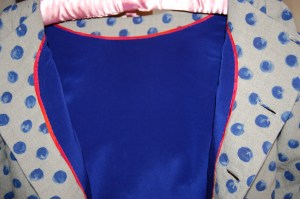
It was cut narrower than the skirt back, with darts for shaping rather than gathering. I had to make a decision about how to complete the lining – should I attach it to the waist seam at the back and somehow join the front to the back at the side seams, or should I make the lining as a completely free-falling piece? I opted for the latter, with the sleeves, of course, being inserted separately. It worked beautifully. Then, for some extra detail, I added a contrasting flat piping to the edge where the lining meets the facing.
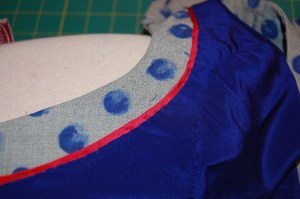
I had this coral colored silk bias tape which I chose to use for this extra detail.
Often facings are eliminated in couture sewing, but in this case, with the buttoned placket in the back, I decided to keep the facings so the buttonholes and buttons would have a firmer foundation.
This dress turned out to be all that I wanted – a classic slim sheath from the front, with surprise back detail which (I think?) is flattering, adding extreme comfort to its wearing, and which sets it apart from the average design.


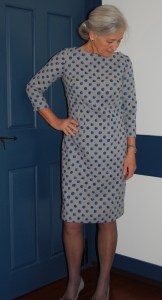

Coming and going, it feels like a good way to start off the new sewing year .

Welcome back to your sewing room. A beautiful dress, although I wouldn’t have expected anything less from you. You are such an inspiration.
It’s wonderful to be back at sewing! Thank you so much for your lovely comment!
What a flattering dress! The colors and design are both are perfect for you!
Thank you, Lynn. I have a real weakness for polka dots, so this fabric was a must-have!
Absolutely stunning! You look beautiful in it!
Thank you so much for the construction pictures. I’m working on a simple sheath dress using couture techniques and your post is really helpful.
Thank you, Kati. Couture techniques turn a simple sheath into something special! I’m delighted my post was helpful to you.
Another winner! You motivate me to get at my sewing.
Thanks, Heather! A little extra motivation comes in handy for all of us!
I also appreciate your views of the construction techniques….I am one of those people who have to see a picture to understand the instructions!
I’m glad the construction pictures were helpful to you, Donna. It’s sometimes difficult to remember to take the photos throughout, but they help me appreciate the project more after it’s finished even if I don’t feature them in a post.
Wonderful design and the fabric is perfect. I also love the surprise detail in the back.
Thank you, Mary. I do love the fabric and it seemed to be perfect for this design.
It looks lovely on you. Thanks for the informative post.
You’re welcome, Jeri! Thank you for your comment!
This is a beautiful dress in every way and looks lovely on you. Thank you for all of the construction and design details.
Thank you, Bernice. I’m glad if the construction details have been helpful to you.
This dress is really beautiful.
Thank you, Christin!
Oh goodness I wasn’t expecting you to complete the project with this fabric so quickly – a lovely surprise to see your story pop up in my feedly. Love the grey and blue dots on you – very flattering colourwise. And you’re right – a lovely sleek sheath dress in the front, sedate but still interesting party in the back 😉
The sleeves are lovely too – are they the original from the pattern as well?
Hi Mel! It didn’t seem especially quick to me, but no sewing ever does! The sleeves are exactly from the pattern, and they have those lovely elbow darts that help to make them so flattering.
Ah yes, my next question was going to be did it have elbow darts! Such a beautiful shape they give.
As always, you have done a masterful job with this dress pattern and material. Elegant and sophisticated from any point of view.
Oh, thanks, Mary! Elegant and sophisticated was just what I wanted!
I love this pattern, and I love the finished dress on you! I want a sheath with some extra details for Girl #2’s graduation, and this silhouette looks like a great place to start. So glad to see your post this morning, Karen! How’s the wrist faring theses days?
You can never go wrong with a sheath dress, especially if it has something special to it. Thanks for asking about my hand. I was so encouraged while making this dress, as I am now able to sew without it hurting or cramping on me. It’s been a long road, but I’ve made so much progress.
OH that’s very good news! I know that the damp cold is not pleasant right after a break like that. Glad to know you are coming along OK!
Such a lovely dress – front and back, inside and out! The lining is a beautiful vibrant contrast (too bad it isn’t visible, right?), and those buttons are perfect! Loving the gray and blue combination. Glad your back to sewing and hope it isn’t painful. 🙂
I just can’t resist a pretty lining, even if I am the only one to see it! I was so thrilled with those buttons – quite a good find, I think! And, yes, I am finally able to sew, pain free! Thank you, Jen!
As expected, a couture success. Love the dress from both the front and back. Your attention to detail is inspiring.
Thank you, Cissie! And your sewing is inspiring to me!
Oh, what a great project! Nothing fought you and you made it all work so well. The fabric makes me smile like I’m looking at a bouquet of bachelors buttons. Pardon the mixed metaphor but you’ve really been making the color gray sing with these dresses and your cashmere coat. Your demonstrations instruct the novices and inspire the experienced. Lovely dress.
Thank you, Mery! I have been on a gray kick recently! I’m so happy with how this dress turned out…
I recently stumbled on this blog while sniffing out the internets for vintage patterns and styles. Your writing flows with wonderful ease and grace (something I still work at) and your knowledge of sewing made my jaw drop below the concrete–I am still trying to pick it up and snap it (no pun intended) back into place. Gray isn’t a color I would have thought of right off the bat, but I must say it suits you!
Thank you, Jaenice! I am still trying to pick MY jaw up after reading your very complimentary comment! One thing I have learned about sewing is that there is always more to learn…
Yes, there is always more to learn, isn’t there? That’s as true of sewing as it is of knitting–I began as a novice knitter. It’s been a little while since I last knitted; I want to start again.
As for what motivated me to take an interest in sewing, I confess I was frustrated with a combination of things: Fit problems, styles (I didn’t and don’t like most of them), colors (none of the ones I like are current, or if they are they’re custom at a tailor’s), cuts, and proportions. I learned hand sewing as a little girl, and I want to make more progress on machine sewing. Good to meet you!
Beautiful, front, back and inside! You always find the best fabrics and patterns!
Thank you, Marianne! Those patterns and fabrics are the stuff of dreams!
Just beautiful, you are a genius. Love your blogs, You have an amazing ability to visualise how the finished garment will look and what will suit you. Just perfect in every sense. Congratulations.
Thank you so much, Patricia, for your amazing comment! I so appreciate hearing from you.
Lovely inside and out!
Thanks, Linda! I do love a pretty interior in a dress!