
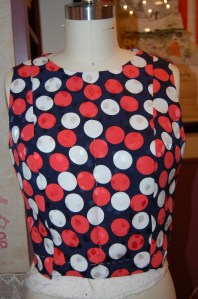
From this …
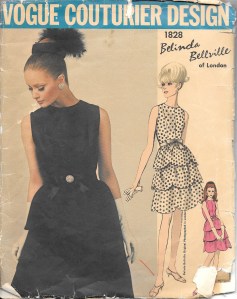
To this…
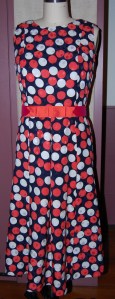
How did that happen?
After my purchase of that pattern a couple of years ago, I definitely had second thoughts. While I loved it when it was first available back in the 1970s – and at that time I was of the age when I probably could have actually worn it – I immediately realized it would not be appropriate for a 60-something-year-old! I tucked it away in my pattern file where I knew I would come across it occasionally and indulge a long-ago dream. Little did I know it would play a major roll in the realization of this polka-dotted dress.

It took almost eight years for me to come up with a plan for this polka dot silk fabric. I kept envisioning a waisted, sleeveless dress with a “flowy” skirt, but I could not find a pattern I liked, either vintage or new. I wanted to avoid darts as much as possible (that’s a story in itself for someday), which meant I needed a princess style bodice. Many princess line bodices have side seams, but I wanted one without side seams, and with princess line seaming on the bodice back as well. Pondering all this, I again came across my Belinda Bellville pattern above and thought maybe it would work, with a few changes. But then I noticed that the bodice was supposed to be cut on the bias.
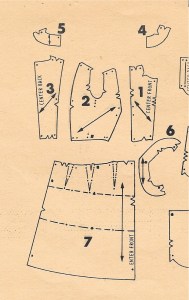
This pattern detailing from the instruction sheet shows the thee bodice pieces at the top of the picture. The bias is clearly marked.
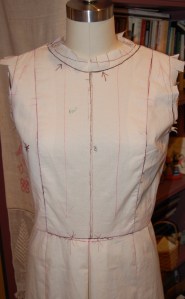
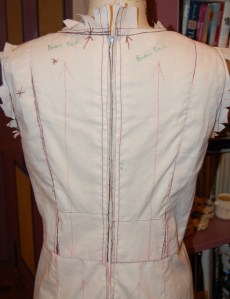
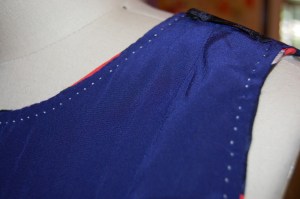
After not having any success in finding any other suitable pattern, I gave it another look. Why not cut it on the straight of goods? It was at least worth a try in muslin, so that’s what I did. The changes I made to it included; 1) lowering the bust line, 2) eliminating the short-waisted front of the dress and restoring it to waist level, 3) placing the front center part of the bodice on the fold, eliminating the center seam, 4) lowering the neckline just a little, 5) making the waist larger, and 6) adding some ease across the back and shoulders. With all those changes, I had a bodice I really liked.
But then I needed to make a skirt to complement the bodice. When I looked at the skirt pattern, I knew I needed to divide it in thirds (for one half of the width of the skirt) and match the seam lines to the seams in the bodice. Here is what I came up with:
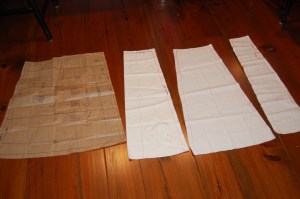
On the left is the one-piece tissue pattern for the skirt. Using the dart lines on that pattern helped me determine the angles I needed for my skirt.
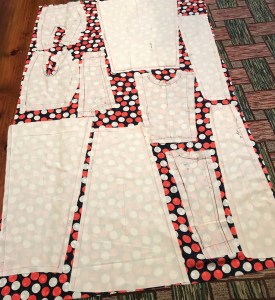
It was about this time I got the idea to make this dress in a longer skirt rather than knee-length, which is where I usually wear my dresses. The only question I had was – did I have enough fabric to do this? My silk was 45” wide, and I only had two yards. I spent at least an hour laying out and eyeballing my muslin pieces on the silk, on the floor, just to see if I could possibly accomplish this task. I found one combination that would allow this, and took a photo so I could remember how to do it!
It literally took an entire week to work out the pattern and perfect the muslin, but then the sewing began!
As soon as I completed the construction of the bodice, including its silk organza underlining, its catch-stitched raw seam edges, with the seam allowances around the neckline and armholes appropriately tacked in place, I knew I had a bodice which was just what I had envisioned.
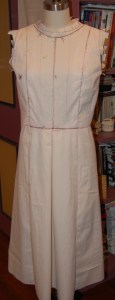
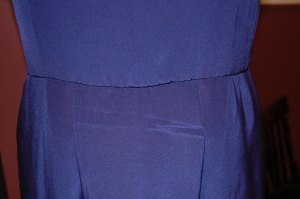
Somehow the skirt seams all matched up perfectly with the bodice seams and the center front inverted box pleat, which I added, looked wonderful, I thought. I made the lining out of navy blue crepe de chine, purchased from Emma One Sock Fabrics.
When it came to under-stitching the neckline and armholes, I decided to do it in white. It mimics the white polka dots in the fashion fabric and also was much easier to see while doing all that handwork.
Instead of a box pleat in the lining, I did two side pleats to reduce bulk in that critical tummy region!
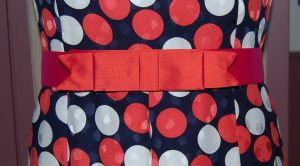
Fortunately, for the belt, I had silk taffeta left over from two previous projects, which turned out to be a perfect match. I did not want the belt to take away visually from the rest of the dress, so I made it a modest 1.5 inches wide. I think it is enough to complete the look, but not overpower it. And OF COURSE I wanted to finish it off with a tailored bow. (I am planning a post on making this tailored bow belt, so I will not go into the details of it right now.)


An oyster-colored clutch helps to complete the look.
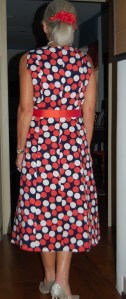
This is a very comfortable dress to wear!
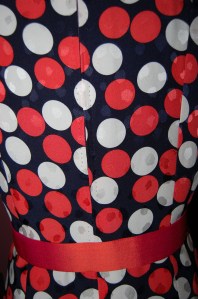
No attempt was made to match any dots, as the pattern was completely random. This is the hand-picked zipper. I love the fact that the navy thread shows up on the white and coral dots.


And should I need a dress coat, this one matches the belt!

While this dress was firmly in my queue for summer sewing, at the time I did my planning I was not making it for any special occasion. However, as good fortune would have it, two unforeseen occasions are now approaching in late summer for which this dress will be perfect. I am definitely looking forward to wearing these dots!

Beautiful (as always! I always learn something from your post. Thank you for sharing the details of your planning and decision process.
Thank you, Barbara. It’s amazing how much thought can go into one single dress! I am so glad you find it helpful.
Beautiful!!
Thank you, Susan!
Many thanks, Susan!
Hi Karen, another simply stunning creation, love polka dots, always look classy. Your patience is amazing and attention to detail shows in the finished result. Very impressed with the cutting layout, no waste!!!
You look beautiful.
Thank you, Patricia. I am always happy when there is minimal waste of fabric! For some reason I don’t like to throw away even little scraps, but this dress left just a very small pile of little pieces. I so appreciate your kind comment!
It was fun to read your process in getting to this beautiful final result. The dress is beautiful and with your coat over top it’s exquisite 🙂
Thank you, Kathleen! Now hopefully one of the times I wear this dress, it will be cool enough to need that coat!
Wish I could have been a little mouse in your sewing room while you went through the process of making this dress. Thank you for sharing the process. I’m learning so much from your posts. J Lynn
Thank you so much, J Lynn. It is very gratifying to know you learn from my posts – and you’re welcome in my sewing room anytime!
The details on your pattern changes are really helpful…they get me thinking about the “almost” patterns I have that could be tweaked. Thanks for the imspiration, and I ♥️ the line of that dress!
Thank you, Kathy! I love a pattern with good lines that can be used as a basis for “tweaking.” I am still kind of amazed that I was able to turn that Bellville design into my dress!
Lovely! A different silhouette than usual – and you like it? I certainly do. What made you want no side seams?
I love this silhouette, Heather, but you are correct – it is a bit different! And good question about the side seams. I did not want the flare of the skirt to come from the side, but rather from offset front and back seams. To me this makes the swing of the skirt more graceful. It also eliminates the need for darts as the shaping is incorporated into those seams.
Absolutely wonderful!
Thank you, Michele!
Wow you look fabulous. Congratulations on all your efforts. I’m really looking forward to the bow belt article.
Thank you, Mercedes! The belt and bow seemed like a project into itself! I’m glad to know you are interested!
Wonderful. So feminine. You look fabulous and so much hard work has paid off. I look forward to the bow belt.
I’ve never met a polka dot I didn’t love! This lovely dress is no exception. I am always amazed (and shamed) by your meticulous preparations! Beautiful job.
I feel the same about polka dots, Cissie! Can’t wait to wear this dress – and thank you for your lovely words!
Just beautiful. I love polka dots, and this dress is perfect. And your work is such a pleasure to see – thanks for posting the details! I love how you chose to follow the polka dot theme with your understitching. It’s those kind of details that make your garments such pieces of art.
I find that to be one of the really fun aspects of fashion sewing – those little details which no one ever sees, but which add just a touch of luxury and uniqueness to a garment. It is so much fun to be able to share these things with other people who appreciate them, too!
You make such beautiful dresses! Thank you for taking the time to share the thought process and construction of them.
Thank you so much, Rhonda! I get a lot of satisfaction out of knowing that people like you appreciate the time I take to do these posts.
Just lovely. Thank you for the construction details.
You are so welcome, Anne! And thank you!
Belinda Bellville designs exude such a youthful vibe. Combined with dots bubbling over everywhere and your smile that dress sashays even when you’re standing still. I’m still gaga about that coat. It and both dresses look fabulous in every light from dawn thru firelight. Two of my 20’s & 30’s favorite dresses were B.B. patterns. I think about making them again, but, well, so many changes. Starting anew with yours as an inspiration now seems like a better starting point. Oh, you’re bound to enjoy wherever you wear these.
It is wonderful to have another dress which coordinates with that coat. And you are correct about BB designs, but I had never thought of it before. I’m glad I was able to use that pattern – and now I have a dress design which I really love, and which fits well. There is another dress from this pattern in my future (sometime)!
I want to look like you and possess your impeccable style. Gorgeous.
WOW! You made my day! Thank you so much, Ruth!
This dress is absolutely fabulous!
Thank you so much, Irene! I am so appreciative of your comment!
You look so absolutely lovely,,,,, and the dress is gorgeous also 🙂 In your reply to the question about no side seams your answer sounded like you were, in an earlier life, an engineer or at least have a math background. Your thought process all the way through is remarkable and I love that you take these old patterns which really were rather tiny (I think the 12 was 34 -24 – 34) which is what I made back “in the day” and I haven’t had those measurements for decades…… and make the fit look so current. I think that means you’ve kept your lovely figure and everything is still in the right place!
Love it when I see you have a new post!
Oh, thank you, Mary Lynn! Ten minutes before these photos were taken I was in blue jeans and not looking so glamorous. The power of clothing! No math background, but I love seeing how things go together and the cause and effect of certain combinations. Now about those tiny patterns! Yes, I agree! Although I still wear the same size pattern I did when I was younger, I have to make many alterations (for droopy bustline, widening waist, shoulder ease, and sometimes even sleeves that seem just a bit too tight.) But somehow those old patterns are so adaptable. I just love using them! Thanks for your comment; so happy you like my blog!
Knock ’em dead, Karen! Can you please tell us why you divided the skirt in thirds (for one half of the width of the skirt)?
Yes, Janet. I wanted the seams in the skirt to line up exactly with the seams in the bodice. Thanks for asking!
So beautiful and elegant! Happy you have occasions to wear this! Amazed this was fashioned from a mere TWO yards of 45″ fabric! No excuses for me now with my 20 year old luscious pink silk crepe of the same dimensions! Just found your blog thru Pintrist, as am delving into Chanel #2, and was exploring Chanel sleeve setting. Enjoy your summer.
Thank you, Wynne! I was amazed that I was able to get this dress out of just two yards, too! It helps to lay out and cut single layer, and also, with no self facings, I had more flexibility with my pattern pieces. Good luck with your 20-year-old pink silk crepe!
You really are such an inspiration! Thanks for all your detailed posts! ❤ I am still working on finding the perfect polka dot pattern to add to my wardrobe. Well, I did just find a tiny neck scarf, black with white dots. It's vintage and I figured it would look amazing with a white tunic. Thanks again for your wisdom and encouragement! 🙂