
Sometimes it is the smallest little detail which can make or break a sewing project. In the case of my pink coat, it was that single loop at the top front edge.
Normally loops are very straightforward, but with this pattern, that was not the case. When I looked ahead at the pattern instructions, this is what I found:
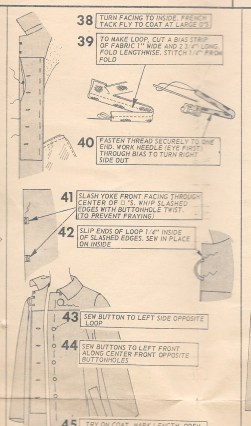
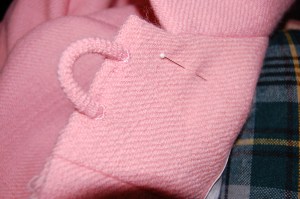
Because the front facing is not a separate piece, but rather folded back from the front edge, there was no seam within which to secure that loop. The instructions directed me to “slash” the yoke front facing through the center of the “squares,” shown here in basting:
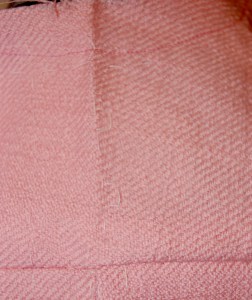
The basted “squares” indicating where the “slashes” should be are in white just to the right of the center fold line in the photo.
And this was supposed to be done after the collar was already on and the facing properly secured in place. Well, I knew I wasn’t going to be slashing anything without getting a second opinion, and furthermore, I knew I would need to do the installation of the loop before the collar was on and the facing turned. I did not know how I could ever secure the loop without access to the inside of the facing.
I went online to Susan Khalje’s Couture Sewing Club which is by subscription on Facebook. Once I posed the question about the best way to accomplish this task, Mary Funt of the blog Cloning Couture suggested I use an awl to work holes where those squares were, separating the wool threads and enlarging the openings to the size I needed. Then I could whip the edges with silk buttonhole twist to secure them. Mary also suggested I use a medical clamp (hemostat, which I highly recommend as a vital sewing tool! I have had mine for years and use it frequently), to help flatten the raw ends of the loop.
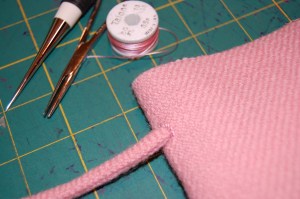
This shows the awl, the hemostat, and my spool of vintage pink silk buttonhole twist, along with a sample “insertion” of the loop.
First I practiced! Here are my practice holes:
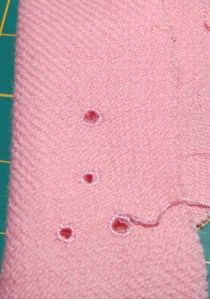
Practice holes helped me determine how large the hole needed to be to accommodate the loop.
The hemostat was also helpful in pulling the end of the loop through the holes I made. Susan Khalje further suggested that the loop would need to be very securely fastened inside, and she suggested I under-stitch that part of the facing, catching the loop in the stitching.
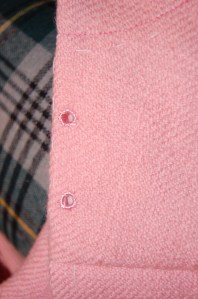
The completed holes, bound with silk twist.
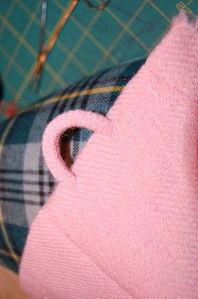
The loop inserted into the facing.
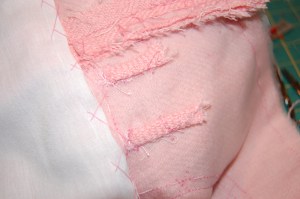
This shows the secured ends of the loop inside the facing.
The under-stitched facing, in which I further secured the loop.
Oh my goodness! Thank you Mary Funt and Susan Khalje! Using this method produced exactly the results I wanted.
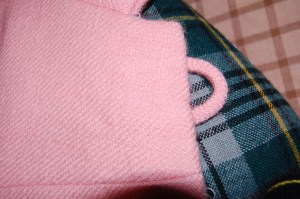
The finished loop.
After the mystery of the loop was solved successfully, it was on to the collar, and ultimately on to the final steps before attaching the lining. The completion of this coat is in sight, after all this time. I can’t wait!

Wow! This is a great idea and I applaud your efforts used in your approach to finding the best method in applying the loop. This is basically the process followed when an embroidery eyelet is made. Thank you for sharing this with us.
It worked so well, Peggy. I was so grateful to get such good advice from two sewing professionals!
Wow. Those little holes were so beautiful. Who would have ever thought I would go gaga over little holes. I think if I were you – I would flip and fold that coat and so the little loop always showed. Flaunt that loop like crazy!
I can’t wait to see other posts and the finished result.
Patty Mack
Sent from Mail for Windows 10
Your comment made me laugh, Patty! Who would ever know so much work went into a single loop?
That’s some fine engineering, and it’s already pretty. This is so fun to share vicariously in your challenges. We’re having a record breaking cool spring: I hope you also have enough cool to get to wear it right away.
We have had some unreasonably cool weather, but alas, I doubt I’ll get a chance to wear this coat this Spring. Next Fall, though … mark your calendar!
Happy the suggestions worked for you. It is the little details that separate ordinary from couture. The coat is looking wonderful. Waiting for the final showing.
I can’t thank you enough for your guidance on this, Mary!
A fine, small detail perfectly executed. MAJOR feature! What a beauty the finished coat will be. Thank you for all this information. Lovely!
Thank you! So much effort for one little loop, but it was really worth it!
I echo the WOW and how lovely this looks! Thanks for sharing!
Ah, thank you, Heather!
Those eyelets are gorgeous! The loop is a nifty piece of engineering!
Thanks, Kathy!
Such clever advice to solve your challenge, Karen, and congratulations on the neat needlework. I always love looking at projects from the inside where all of the work takes place. Thank you also for your comments regarding the preshrinking of wool silk fabric in the last post also.
I, too, love to see inside garments – so much of the story is hiding there. I hope your silk/wool blend fabric is behaving for you!
Karen, such fabulous detailing!!! And workmanship, of course!! Your detailed instructions and advice will be an excellent resource for me to return to when I am faced with similar detailing aspects of my future projects.
The engineering aspects of these designs are so fascinating, aren’t they! Your coat is going to be fabulous!
Yes, I just love the engineering methods and details, both of which vintage Vogue is known for. It is such a pleasure to use these patterns.
I cannot imagine the amount of detail you put into your gorgeous projects. Truly – just seeing the word “slash” on the instructions would fill me with terror. And yet you slash away, and voila! A masterpiece results. Following the progress of this luscious pink beauty.
I was fairly terrified at that word “slash,” too! Poking a hole was much more civilized than slashing!
This is a great idea! The first sentence of your post is sooooo real!! Thanks for sharing.
Thanks for commenting, Kristie. Glad you liked the solution to figuring out this small detail.
Yikes! I certainly can appreciate how you didn’t slash! I’m thinking a tighter weave may have proven to be more difficult to separate fibers though. Turned out beautiful and I’m eagerly awaiting the final showing!!!
Sew perfect! I poured over every detail. Thank you so much for documenting your projects so thoroughly. I have a vintage piece of baby blue wool and I am now totally inspired. I think you made the right choice on narrowing the sleeves and not adding the back placket. Both details would have been too vintage in a costumer way.
Thank you, Suzanne, and I am glad you are inspired to use your vintage wool!