
One advantage to this never-ending Winter we are having in the Northeastern part of the United States is the focus – and extra time – it has given me in finishing my Winter projects. After completing my recent Classic French Jacket, I did some “birthday dress” sewing for my granddaughters (still to be shared) and made two baby gifts, and only then did I come back to making a matching sheath dress for that jacket.
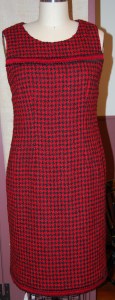
I had thought long about how this dress should be constructed, and not having the advantage of taking a class in such a project, I knew I would have to figure it out on my own. I decided I would combine classic couture construction with the techniques used for making a classic French jacket.
First, I underlined the three pieces of the dress (front and two back panels) with black silk organza, and I anchored all the darts with a catch-stitch. (I always go back to that sound advice from Susan Khalje – couture is about control – and I know how this extra step helps to keep everything in its rightful place.)
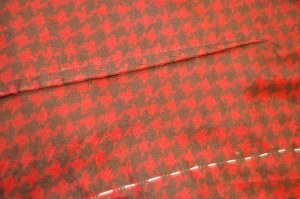
Then I machine quilted the two back panels and the dress front just as I would quilt the separate pieces of a French jacket. I ended the quilting about two inches from the tops and bottoms of the pieces and tied off each line of quilting inside between the two layers. I figured the quilting did not need to be as closely placed as it is with a French jacket, so my quilting lines are about 2 inches apart. This following photo shows the quilted channels on the inside (they are virtually invisible on the fashion fabric):
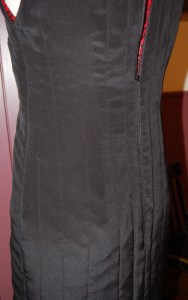
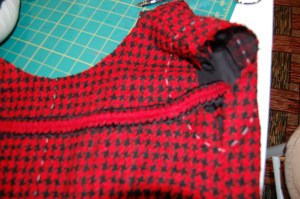
The three pieces were sewn together as a Jacket would be sewn with the edges of the lining loose and then finished by hand with a fell stitch. At this point I felt fairly confident that the dress was going together as I had hoped. And yes, there is a lot of handwork involved! Next I inserted the long back zipper by hand and then finished the neckline and lining with a fell stitch.
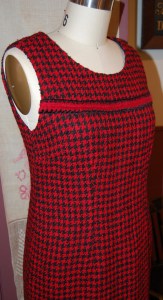
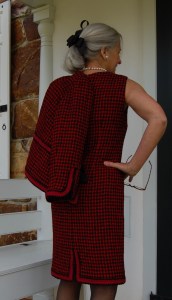
Because I wanted to apply a length of trim above the bust – to match the trim placement on my jacket – I did the armholes last, as the trim needed to be attached before they were finished.
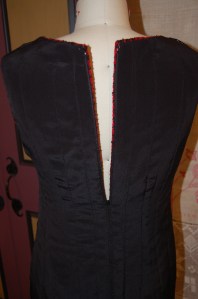
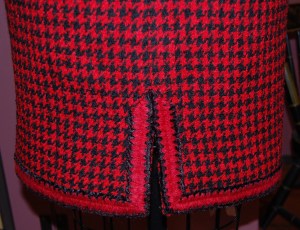
Finally, the hem. The length had to be precise, as there will be no lengthening nor shortening of this baby! The final step was to sew the hemline trim on by hand. I delineated the back vent with the trim to give it some extra interest. Also, although it is not visible here, I angled the edges of the vent slightly to the inside so that when the dress is on, the vent will not gape, but rather hang straight. This is another one of those lovely couture tricks I learned from Susan Khalje!
I must say this dress is a dream to wear, with that quilted silk interior.
And – I am quite happy with how it looks with my jacket.


Br-r-r-r-r!


As warm as this dress and jacket are, I was freezing when these photos were taken!

I have faith that Old Man Winter – who is truly ancient by now – will soon leave us, but not without a fond farewell from Fifty Dresses who appreciated his extra encouragement on seasonal sewing!

Beautiful! The dress and jacket look very expensive and unique. True couture pieces!
Thank you, Gail!
My gosh – who needs Spring with clothes like these? Karen, you’ve outdone yourself with this exquisite ensemble loaded with beautiful details. I love the way you applied the trim. Congratulations! 😉
Thanks, Sarah! When I planned this outfit, I kind of knew how I would apply the trim, but took an educated guess on how much yardage I would need. I have one yard left over, just close enough for comfort…
Breathtaking! So thrilled to see some of the details that went into creating this very special dress to go with the jacket. SO EXCITED, I’m enrolled in Susan Khalje’s French Classic Jacket class this October. Appreciate your blog so much. THANK YOU for wonderful information and ideas.
Thank you, Margene! You are in for a treat – and you will love Susan’s class. I am so glad you are enrolled – you really have something wonderful to look forward to!
I love everything about it – the trim is not too much and just right. So elegant!
Thank you so much! It is always a balancing act with the trim on these jackets – it really does need to be just right. I am glad you think it is!
Just so elegant, the trim detail makes it very special!
Thank you, Jay! I felt very fortunate to find this perfect trim at Britex Fabrics in San Francisco last Fall.
Such a gorgeous ensemble! Your meticulous work is always inspiring.
Thank you, Cissie! I don’t think I will ever tire of making these jackets (and now matching sheaths!)
Wow! What a fabulous outfit you have created for yourself. Thank you for sharing your mastery of couture techniques. You are an inspiration!
PS As you note, what is up with all this cold weather here on the Main Line. Our usual rolls-out-over-months spring is being held hostage!
Thank you, Debra! Yes, where IS Spring? It seems to be getting colder rather than warmer! Maybe it knows I still have lots of wool fabric waiting in the wings??
I love your dress and the combination of dress and jacket. Gorgeous! The fit is fabulous.
I like that quote ‘couture is control’. I’ll remember that. When I made my jacket, additional control steps weren’t mentioned but since then I’ve learned that it would have been helpful to overlock edges to control fraying. Apparently it’s done in the real thing. I didn’t know that. It sure wouldn’t helped me!
Learning all these couture techniques is a long, steady process – and totally fascinating. Its amazing how such little extra steps can add so much to the finished piece. The more I learn, the more I realize how true this is.
Thank you for your lovely compliment on my jacket and dress!
Such an elegant outfit! Quilted silk feels so luxurious, must be wonderful to wear this dress.
Thank you, Marianne! Yes, it feels very luxurious! Oo, la, la!
What a fabulous ensemble! I love the couture details you added, it makes the dress so special. I love the Susan Khalje quote and I refer to her Craftsy class and Threads articles time and time again.
Thank you, Cynthia! Susan’s videos and article are a wealth of knowledge. I, too, refer to them frequently. And, excitedly, I am headed to Baltimore this week for one of her Couture Sewing Schools, so I’ll be learning even more!
So beautiful and I bet it’s a dream to wear! Just to feel it sliding over your body – all warm and cozy and looking so fabulous! You’re a real inspiration 🙂
Thank you, Kathleen! Yes, this dress is so, so comfy to wear!
This winter some nights at reading time I sat under an extra-high lift down comforter in a bed preheated with a new mattress warmer and considered digging out from my files an old article about how Inuit ladies make and care for caribou anoraks. I didn’t. Not because I’m 2,000 miles south of caribou. But rather, I didn’t because I’m spoiled. I am spoiled to vicariously enjoying your trips to exhibitions and you making city slacks and astonishing suits and dresses. This is the most astonishing. I didn’t think couture dresses usually use the jacket technique of quilting, but yours is better (and must indeed feel luscious). I don’t know a word for better than couture. I am speechless.
Can’t wait to see the little ones’ dresses. And spring everywhere.
Well, if Spring does not arrive soon, I may be making a Caribou anorak (but I hope it won’t come to that!) Thank you, Mery! You may be speechless, but it’s always fun to get your comments!
The little one’s dresses are very Spring-y and were fun to make. The youngest one’s birthday is this coming week, so after she opens her gifts (and hopefully likes her dress!) then I will be able to do a post on them. Happy April to you!
Oh my word, what a stunning combination! I love it! I would be looking forward to next winter with this hanging in my wardrobe. 💕
Thank you, Lorna! It does make the prospects of next winter a bit more appealing!
Lovely dress and I enjoyed reading the details of how you created this dress! Very classic and stylish.
Thank you – it was interesting to make, for sure.
I just love all the dresses💯.. Nice post dear
Check out my new post.. Its on a lovely Ankara dress that can be worn to almost every occasion.
Karen what a gorgeous ensemble! I enjoyed all the detail and inspiration. Where can I find more information on how to angle a vent towards the inside? Thanks!
Thank you, Sylvia. It is so easy to angle the vent. Instead of following the back seam in a straight vertical line on either side of your vent, gradually angle each one slightly towards the center line. You will be adding about 1/4 inch to each side of the vent at the bottom of your hem. It will look like the vent is slightly overlapping itself when the dress or skirt is lying flat, but once you are wearing it, the vent will appear to hang straight. Hope this helps!
Thank you!
Such lovely work! You teach me something new every time I visit. This is a lovely fabric and with all the finishing touches you have made it extra special!
Thank you, Linda!
Beautiful outfit! Thanks for sharing all the time and steps taken to make this lovely outfit. Red is my favorite and looks marvelous on you.x
I like red, too, Marilou! Thank you for your comment!
Wow, what a fabulous ensemble. The perfect mix of classic elegance and unusual details to make it truly outstanding!
Thank you so much! I think I will enjoy wearing it once we are in the right season again for it!
A very smart looking ensemble. Your work is beautiful. As always I love reading your blogs, they never fail to inspire me to do more, learn more and perfect my craft. Thank you xx
Thank you, Karen. Your comments inspire me in ways you cannot imagine.
this is a stunningly beautiful work of art. So gorgeous. I could go on and on about how wonderful your craftsmanship is. I love the patience and creative thought put into the design and execution. Bravo Madame.
Thank you so much for your lovely, complimentary words!
you’re welcome