Tag Archives: Chanel-inspired jackets

Classic French Jacket – Number 5

Never did I imagine that when I last wrote about the progress on this jacket, it would be an entire month before I could declare it “finished.”  But such is a fact of life with the construction of one of these jackets.  They always seem to take much longer to complete than ever imagined.  (I should remind myself that during that month, I also made a wool skirt and I was away twice on short trips, but still…)

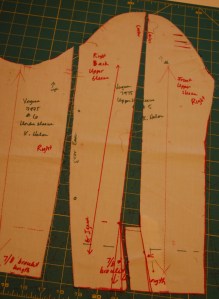
As this is the fifth one I have made, I can safely say that I have developed my own set of tips for working my way through the lengthy construction process.  Of course, it all has to start with a pattern which is a perfect fit.  Fortunately my muslin pattern is from a Jackets Class I had with Susan Khalje over five years ago. With this pattern, I can go right to my boucle and get started.

While it is often recommended to cut out just the body of the jacket, minus the sleeves (the variegated weave of which is then checked with the constructed jacket body before cutting them out), I have developed enough confidence that I cut out my sleeves along with the body of the jacket.  This allows me to make the sleeves first.  For me there are two advantages to doing this: 1) there is a psychological benefit in knowing that the sleeves are lined, linings are fell-stitched in place, trim is on, and the sleeves are as finished as they can be before setting them into the body of the jacket, and 2) I like to trim the sleeves first, as a way of testing the trim I have chosen.  If I do not like it, I only have trim on one, or two, sleeves which must be removed.  It is also much easier to sew trim on a sleeve which is still separate from the jacket.

Another tip I have learned is to use my walking foot not only for the channel quilting of the lining and fashion fabric (a must), but also for all the seams.  I pin profusely, but the walking foot helps to keep the fabric from slipping, crucial when matching all those lines and plaids prevalent in a typical boucle weave.

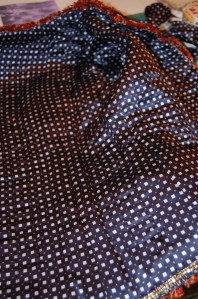
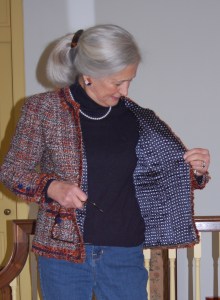
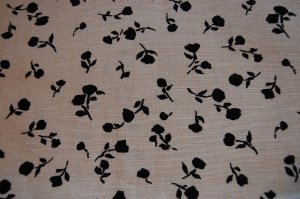
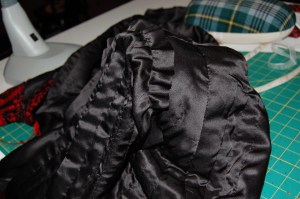
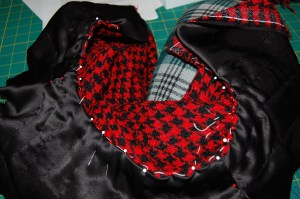
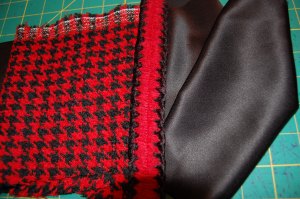
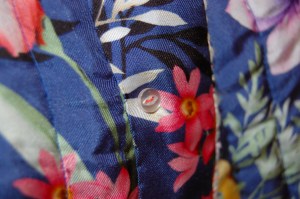
I chose this navy and white silk charmeuse from Britex Fabrics for my lining fabric. The boucle is from Mendel Goldberg Fabrics.

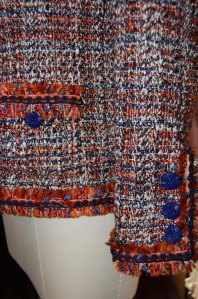
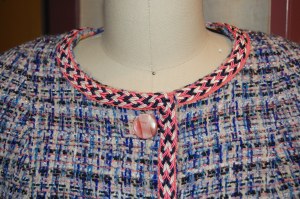
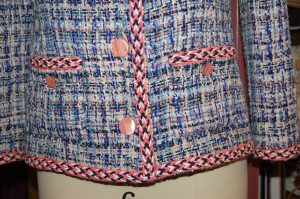
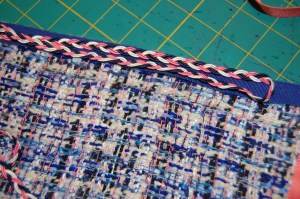
I really went round and round with the trim for this jacket.  I knew I wanted to use self-fringe, but I also knew it would need some definition added to it.  After trying several colors of velvet and Petersham ribbon in the trough of the fringe, I realized I would have to go to a bright orange as an underlay for the navy twisted braid I wanted to place on top.

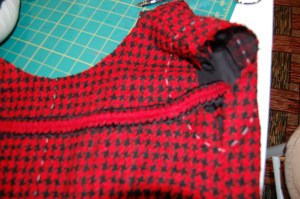
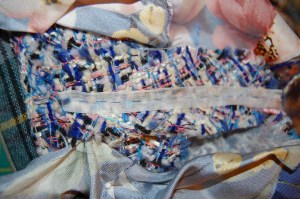
The trim was applied in three steps. Here the fringe is attached as the first step. Not too exciting all by itself.

The next step was to apply this bright orange velvet ribbon, also from Britex. It was really a leap of faith to use this very demonstrative color. It looks fairly garish like this! (I sewed each edge of this ribbon separately, so twice around for this part of the trim.)

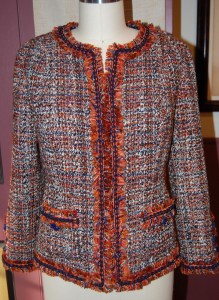
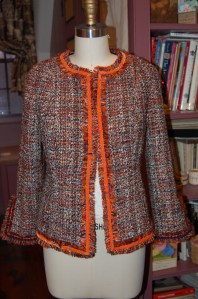
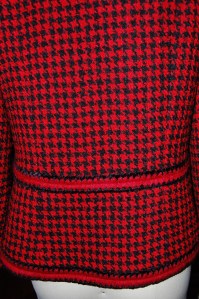
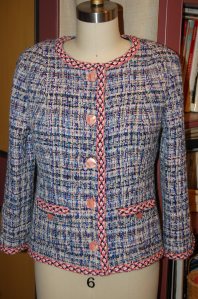
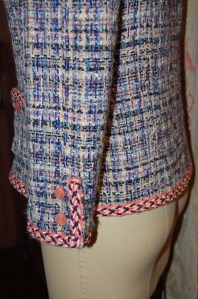
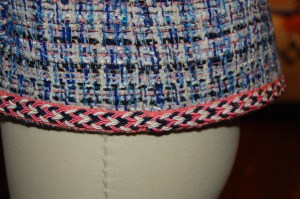
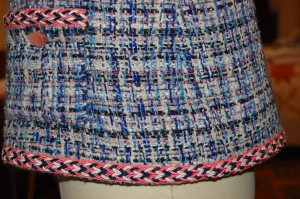
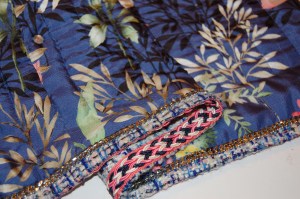
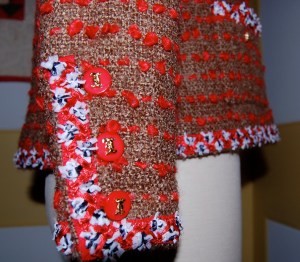
But once the navy twisted braid is on, step number three, that bright orange underlay is fine.

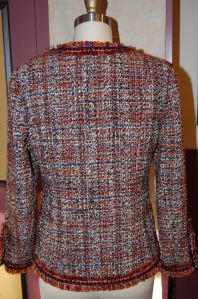
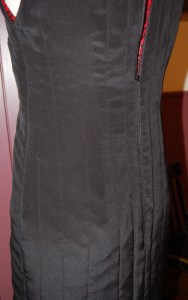
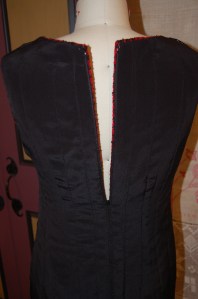
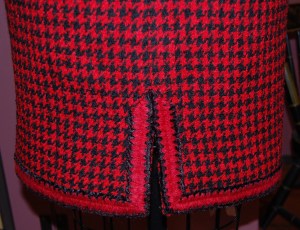
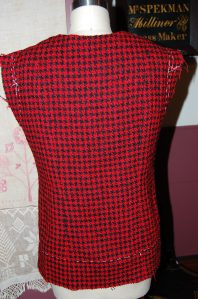
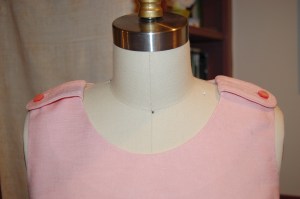
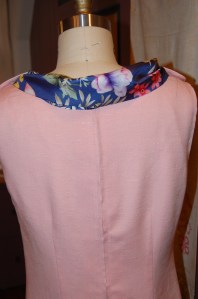
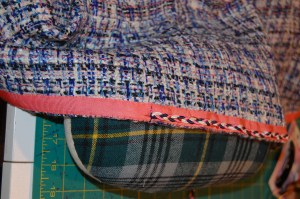
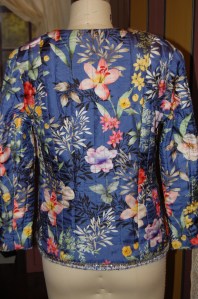
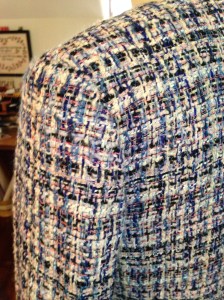
One thing I have done with all my jackets – and this is a tip from Susan Khalje – is to add about 1/2 inch in length to the center back of the jacket, curving it up gently to the side seams. I love the effect that this little bit of extra curve gives to the back of the jacket.

I always wax and iron the thread which I use for applying the trim.  It adds strength, but also is easier with which to work.  For this jacket, I also carefully ironed each “level” of trim as I applied it.

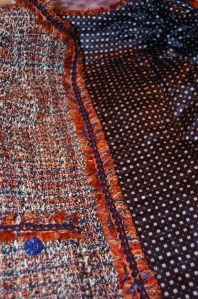
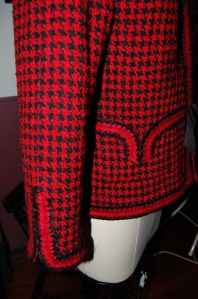
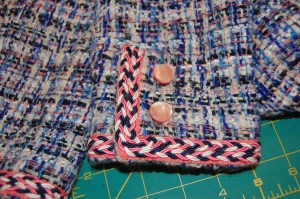
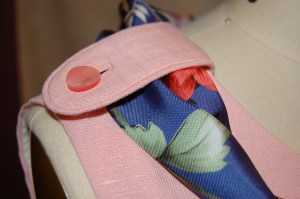
A detail of the right pocket. Of course, and this is preaching to the choir, the pockets absolutely cannot be cut out until the body of the jacket is completed. Their placement is a visual determination which really depends upon the fit and appearance of the finished jacket.

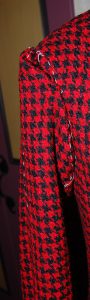
I found these vintage buttons in one of my button boxes.  I knew I wanted to use dark blue buttons, and I kind of liked the appearance of these.

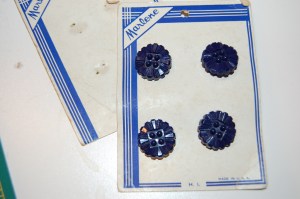
The only hesitation I had is that they are plastic!  It seems a bit of a sacrilege to put plastic buttons on one of these jackets, but I actually think they look okay.  If I find other navy blue buttons in my future travels, I might switch them at some point.  But right now, they work.

Because I had only 8 buttons, I was limited to two pockets, and three buttons on each sleeve. I probably would not have put four pockets on this jacket anyway, so that was not really a compromise.

I have enough of the boucle left over to make a simple straight skirt, I think.  However, that will not happen this year!  I am so ready to move on to my next project.  In fact, it may be well over a year before I plunge into another one of these jackets.  I have but one other boucle lurking about in my fabric closet right now, and I am content to let it stay there for a while.

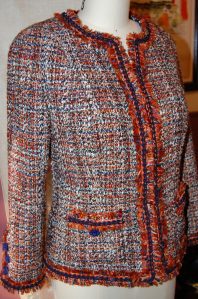
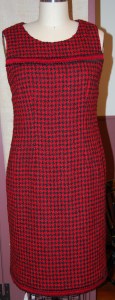
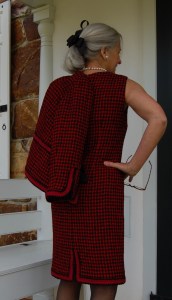
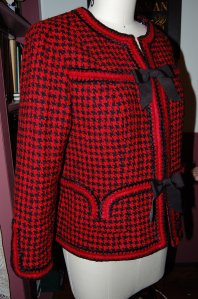
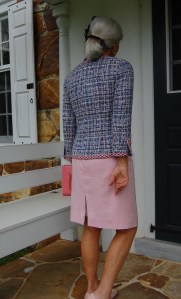
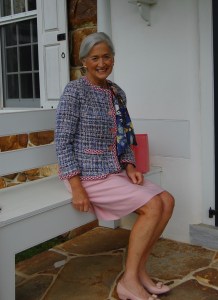
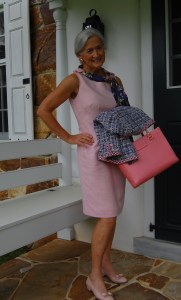
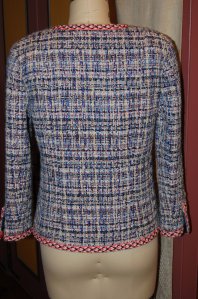
It was much too cold for outdoor pictures, so these will have to do!

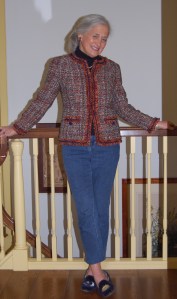
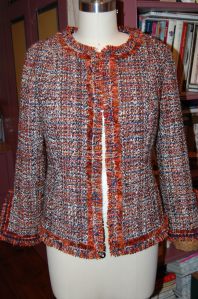
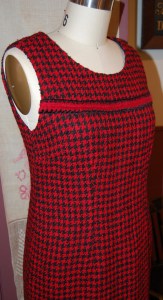
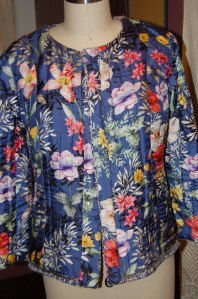
I like the jacket worn closed …

… or open.

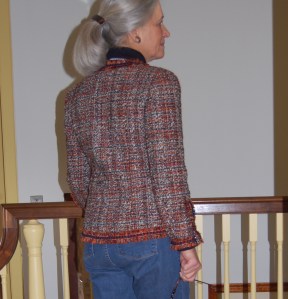
The curve of the back hem is apparent here.

Now it’s time to tiptoe ever so quietly into the lighter shades and fabrics of early Spring, despite the snow that is currently falling. I am so happy to have this jacket in the “finished” column.

40 Comments

Filed under Boucle for French style jackets, Buttons - choosing the right ones, Chanel-type jackets, classic French jacket, couture construction, Linings, Uncategorized, vintage buttons

Something Old is New Again – and Again – and Again . . .

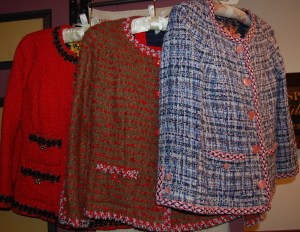
Coco Chanel said it herself, “I am against fashion that doesn’t last.”  Could she possibly have known her Classic French Jacket would become such a lasting icon in the annals of fashion and style?  Would she be amazed at how often her jacket has been imitated and copied – for decades now?  And could she possibly have ever guessed the allure this style has for those of us who sew fashions for ourselves?

I really do not know the answers to these questions.  From what I do know of this enigmatic woman, I can only guess that privately she may have suspected her creation had staying power far beyond most fashions. And certainly, as I have said before, “only Chanel is Chanel,” but what a blueprint she gave to those of us, either as individuals or as fashion companies, to copy and to change and to make her classic jacket into our very own.

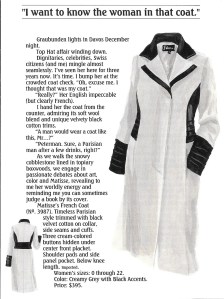
I have been thinking about Coco Chanel quite a bit these days as I work on my fifth Classic French Jacket.    Last Fall,  about the time when I was getting ready to cut out my #5, The Wall Street Journal had this feature article on “Chanel-ish” jackets.

This article appeared in the Weekend Section of The Wall Street Journal, October 27 – 28, 2018. The center caption states: “8 Chanel-ish jackets that aren’t by Chanel, demonstrating the pervasiveness of Mademoiselle Coco’s enduring – and constantly reimagined – tweed jacket design.”

The featured  jackets range in price from a “zara” version at $129 all the way up to a Gucci one at $13,500.  I suspect few, if any, of these jackets are channel quilted as a real Chanel would be, but they all have that familiar, yet varying look that is so recognizable – the tweed or boucle fabric; the embellishment in the form of fringe, trim, and buttons; the boxy or minimally shaped profile; the symmetrical, balanced demeanor; and the ability to be worn casually or dressily.

Just about any women’s fashion catalog you open has examples which relate to Coco Chanel’s jacket. For example, in the span of just three pages of a recent Gorsuch catalog, four jackets have that classic Coco look.

A longer version of the classic jacket, its roots are immediately recognizable.

Another longer jacket which would look equally at home with a lace dress or, as shown, with denims.

And a traditional shorter jacket, shown in two colors. All these examples are in the Gorsuch GETAWAY catalog, Winter of 2019, pages 30-32.

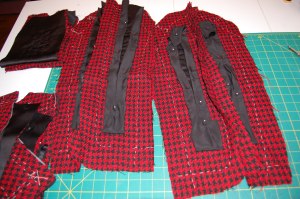
Those of us who make our own Classic French Jackets are privy to the reality of hours of hand-sewing and unusual construction techniques inherent in one of these jackets.   These are not fast projects.  However, the pleasure of taking this classic design and having the stylistic freedom to choose and decide on all the components, while adhering to the “rules” of the basic style, make all those hours worthwhile.

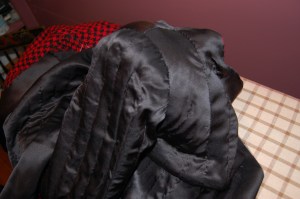
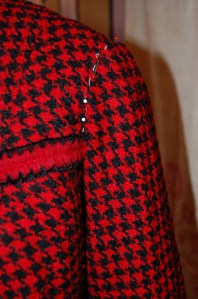
Or so I tell myself! Here is where I am with my #5: quilting completed, lining fell-stitched in place as much as possible, sleeves assembled and ready to sew onto the body of the jacket.

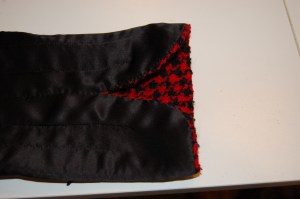
Here the right sleeve is just pinned at the shoulder.

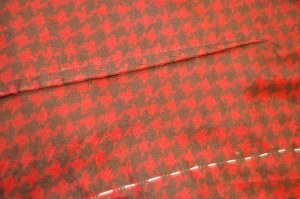
It is always a relief when I am sure the sleeves are going to match the plaid of the body of the jacket.

There is something about the shaping of these three piece sleeves, with vent, that is just so lovely.

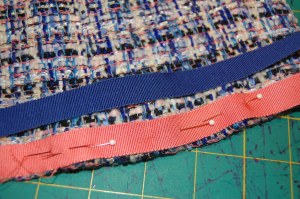
I am still deciding on trim for this jacket, although I believe there is going to be fringe on this one.  Perhaps a two-sided fringe with a pop of coordinating color between the edges.  It would be fascinating to know what would Coco suggest.  But then, it is such personal decisions which give these jackets their individuality.

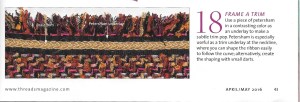
I will be deciding on either Petersham ribbon or velvet ribbon as the underlay in the center trough of the fringe. It has been quite a search for the best color to use.

Coco Chanel was also known to have said, ”One cannot be forever innovating.  I want to create classics.”  Well, that she did with her classic jacket.  And we are all the beneficiaries of her genius.  Her idea, hatched in the 1920s, then defined to its current look in 1954, is an old idea which is continually reimagined and reformulated by those of us fortunate enough to sew.  Merci, Mademoiselle Chanel!

23 Comments

Filed under Chanel-type jackets, classic French jacket, Coco Chanel, Fashion commentary, Uncategorized

Another Rosy Outlook for the New Year

There is a fine art to planning ahead, and nowhere is this more obvious than in planning a new sewing year.  No matter how carefully I think it through, I still end up with some fabrics that never make it out of storage and some newly-purchased fabrics that quickly get moved to the head of the queue.  But no matter!  I still find it useful to make a list of intended projects, while at the same time reminding myself that being flexible and realistic about my intentions is what is really necessary.  (There are, after all, those unexpected special events which can’t be planned for, but which take top priority when the “save the date” card arrives in the mail.)

When I look back at what I accomplished in 2018, I happily find that about half my projects used fabrics which I had purchased at least a few years prior.  Some had actually been in my collection for more than a few years! Last year’s list was replete with rosy hues and rosy prints, and this year is not too different, especially considering three of my most favorite fabrics from last year are being forwarded onto my plans for 2019. Will this be the year that I finally get this vintage piece of Moygashel linen made into a dress?  I’ve only been trying to do this for at least three years now!

A very early 1950s’ linen, petite black flower silhouettes on a pale ecru background.

But for starters, and as with last year, I am first finishing up a project which I began, but did not have time to finish before the holidays took over my sewing room – and my life!

I am bound and determined to finish the Classic French Jacket I started in late 2018. While I am currently working on the body of the jacket, having completed its quilting, I am still undecided about trim.  I am auditioning different options, but have yet to find the perfect one.

However, I am anxious to get on with it, as the rest of my list includes:

1)  a wool coat

2)  3 cotton shirtwaist blouses

3)  1 boat-neck blouse (silk, maybe, or still undecided)

I love this French blouse-weight silk, so it is a heavy favorite for a boat-neck blouse to be made along with fellow dressmakers enrolled in Susan Khalje’s Couture Sewing Club.

4)  1 linen skirt

5)  2 wool skirts

6)  1 wool, two-piece dress

7)  1 cotton dress

I found this amazing cotton at Mulberry Silks in North Carolina when I was looking for fabric for the Christmas dresses for my granddaughters.

8)  1 linen dress – referenced above

9)  1 silk dress

10) birthday dresses for my two little granddaughters

11) play dresses for granddaughters

12) holiday/Christmas sewing for those same two little girls

and finally

13) some necessary home decorator sewing, which is not my favorite thing to do, until I see it finished and can enjoy living with it!

The wool coat will be my first major project in 2019 once the French jacket is finished.  I can’t wait to get started on this vintage Lesur wool from Paris, lined in a pink, gray and white silk purchased from Mendel Goldberg a few years ago.

I will probably make a simple wool skirt before starting the coat, as I know it will be a relatively quick project nestled between the jacket and the coat.  I found this wool when Promenade Fabrics was closing their Etsy shop a few months ago.  How I love a red and navy tartan.  I could not resist it, and I am glad I didn’t.

The hand of this wool is so lovely. I think it will make a beautiful skirt. And I have just the shoes to wear with it!

Life is, of course, filled with all kinds of non-sewing duties, and I have plenty on that list, too.  It will be a tricky balancing act to make significant progress in both realms, but my guess is that sewing wins out over cleaning out the attic.

Welcome, 2019, with all your grand opportunities!

10 Comments

Filed under classic French jacket, Coats, Linen, Moygashel linen, Uncategorized, Vintage fabric, woolens

The Never-Ending Winter

One advantage to this never-ending Winter we are having in the Northeastern part of the United States is the focus – and extra time – it has given me in finishing my Winter projects. After completing my recent Classic French Jacket, I did some “birthday dress” sewing for my granddaughters (still to be shared) and made two baby gifts, and only then did I come back to making a matching sheath dress for that jacket.

I had thought long about how this dress should be constructed, and not having the advantage of taking a class in such a project, I knew I would have to figure it out on my own. I decided I would combine classic couture construction with the techniques used for making a classic French jacket.

First, I underlined the three pieces of the dress (front and two back panels) with black silk organza, and I anchored all the darts with a catch-stitch. (I always go back to that sound advice from Susan Khalje – couture is about control – and I know how this extra step helps to keep everything in its rightful place.)

Then I machine quilted the two back panels and the dress front just as I would quilt the separate pieces of a French jacket. I ended the quilting about two inches from the tops and bottoms of the pieces and tied off each line of quilting inside between the two layers. I figured the quilting did not need to be as closely placed as it is with a French jacket, so my quilting lines are about 2 inches apart. This following photo shows the quilted channels on the inside (they are virtually invisible on the fashion fabric):

The three pieces were sewn together as a Jacket would be sewn with the edges of the lining loose and then finished by hand with a fell stitch. At this point I felt fairly confident that the dress was going together as I had hoped. And yes, there is a lot of handwork involved! Next I inserted the long back zipper by hand and then finished the neckline and lining with a fell stitch.

Because I wanted to apply a length of trim above the bust – to match the trim placement on my jacket – I did the armholes last, as the trim needed to be attached before they were finished.


Finally, the hem. The length had to be precise, as there will be no lengthening nor shortening of this baby! The final step was to sew the hemline trim on by hand. I delineated the back vent with the trim to give it some extra interest. Also, although it is not visible here, I angled the edges of the vent slightly to the inside so that when the dress is on, the vent will not gape, but rather hang straight. This is another one of those lovely couture tricks I learned from Susan Khalje!

I must say this dress is a dream to wear, with that quilted silk interior.

And – I am quite happy with how it looks with my jacket.

Br-r-r-r-r!

As warm as this dress and jacket are, I was freezing when these photos were taken!

I have faith that Old Man Winter – who is truly ancient by now – will soon leave us, but not without a fond farewell from Fifty Dresses who appreciated his extra encouragement on seasonal sewing!


40 Comments

Filed under Boucle for French style jackets, classic French jacket, couture construction, Linings, Sheath dresses, Suit dresses, Uncategorized

Classic French Jacket – Number Four

Many of you, no doubt, are familiar with the “10,000 hour” theory. In a nutshell, it purports that to master something, artistically or technically, you must devote at least 10,000 hours to that endeavor (assuming you have a proclivity for it in the first place.) Well, cognitively I know I have a long way to go towards having 10,000 hours devoted to these Classic French Jackets, but it sure seems like I just devoted at least half of those hours to my current, just-finished jacket!

That said, I was aware of an interesting phenomenon as I plugged away on this project. I felt more confident in the process on this one – and more confident in my ability to execute it well. I noticed this especially when I got to the point of inserting the sleeves. The sleeves are, as many of you know, inserted entirely by hand. In previous jackets this has always been my least favorite part. For one thing, you are working within the confined area of the armhole, with lots of very wide seam allowances and “flapping” fabric. It is messy, but precision is necessary to get a beautiful shoulder line and a sleeve that fits well and feels comfortable.   This time it did not feel like an imperfect process; I actually felt like I knew what I was doing!

Getting ready to insert one sleeve.

Voila! It’s in.

Perhaps another of the clues to my feeling more confident in the process of this jacket is the fact that I felt I could take it in a little bit of a new direction. The most obvious departure from the norm is the fact that it has no buttons. Having seen some of the real Chanel jackets in my Pinterest feed that are embellished with bows instead of buttons, gave me the idea to change up this jacket. I really like bows, and I thought using bows would be the perfect foil to this rather regular, non-whimsical hounds-tooth boucle.

I also decided I would eliminate the sleeve extensions and go for curved hems, set off by the trim alone – no bows even for this professed lover of them, as I thought that would be just too much.

Before the trim is applied.

Here is what it looks like on the inside.

Another guiding principle I used for the embellishment of this jacket is the fact that I am planning a matching sheath dress for it. Obviously I want the two pieces to complement each other beyond the shared fabric, so the dress will be trimmed in a manner coordinating with the jacket. (These details will be shared in a future post when I have the dress underway. Eternally optimistic here!) Anyway, envisioning the jacket and dress worn together led me to add both the waistline trim and the trim above the bust (which is across the front only.)

First some details on the waistline trim: I set the pockets to follow this line; the trim is continuous across the top of the pockets (which pick up the curved hems of the sleeves.) I gradually dipped the back edge of the jacket by ½ inch in the center back (a couture technique I picked up from Susan Khalje) and had the waistline trim follow that contour, which I think adds a very graceful look.

I sewed the pocket linings by machine, as that gave the curved dip a better turn. I sewed first along the stitching lines and then cut the curve.

The slightly curved back of the jacket.

Second, I decided I needed the trim across the upper bust as an anchor for the bow I had planned. Obviously I had to set this trim in place before I inserted the sleeves.

The left sleeve pinned in place, the trim already applied.

It was a difficult decision for me to forego a printed lining for this jacket, but I am so glad I did. The black charmeuse has been tiring to work on for my blurry eyes, but it just seems right in this application. And just think – now I have an entire dress to concoct using more black lining!

The boucle is from Mendel Goldberg Fabrics; the trim is from Britex Fabrics, and the black silk charmeuse lining is from Emma One Sock Fabrics.

Until the matching dress is finished, a black sweater and black skirt will have to do.

A red handbag is just what this rather dark and dreary day needs.

I will definitely be ready for some bright Spring colors when this entire ensemble is finished.

46 Comments

Filed under Boucle for French style jackets, Bows as design feature, Chanel-type jackets, classic French jacket, couture construction, Linings

The Essential Coat

How many coats do you own? (Not enough?) How many do you need? (More than you know!) Putting need aside, how many should you have? (Plenty!) In your sewing and in planning your wardrobe, do you give as much thought to your coats as you do to your dresses or pants or blouses? My guess is that you do not.

In our very casual world, coats seem to have taken on the essence of “practical” or “function over form.”   To me, this is such a shame, as I believe coats have an aura to them unmatched by any other garment. They are, after all, so often a significant part of the first impression you make when arriving at an event or party – or anything for that matter. A fantastic coat can also leave a lasting impression when departing such an event.

In her iconic book, What Should I Wear, Claire McCardell devotes an entire chapter to coats. Here is just a small snippet of her thoughts on the impression that your coat can make: “…Remember that a first impression often comes when you are wearing a coat. When you are interviewed for a job, you keep your coat on. Your future employer’s first impression of you may be based on the coat you are wearing.

When you walk down the aisle of a theatre, you are wearing a coat … your audience has already judged you and the most beautiful dress in the world cannot alter that first impression. Coats ride buses and subways and taxicabs…. A coat is not something to be dismissed lightly.”   (The Rookery Press, New York, New York, 2012, pages 61- 62.)

In The Little Pink Book of Elegance: The Modern Girl’s Guide to Living with Style, by Jodi Kahn, she writes: “Many an elegant look is spoiled by throwing on a coat or a wrap that is anything but . . . [I]f you think about the most elegant women you know, or those in the pubic eye, you’ll probably realize they have fabulous outerwear. In the ‘60s, Jacqueline Kennedy asked her designer of the day, Oleg Cassini, to pay special attention to what she wore over her clothes since she was always being photographed coming and going. Even if you don’t have to worry about getting your picture snapped around every corner, a few great coats will transform almost any [look.]” (Peter Pauper Press, Inc., White Plains, New York, c2005, pages 29-30.)

A beautiful coat can also hint at what is beneath it. One of the most elegant looks one can wear (and make for herself) is a matching coat and dress ensemble, where the two pieces are intended only to ever be worn with each other. Such a coat and dress often share similar style lines.   This Vogue Couturier Design by Mattli of London is an example of this:

Another example of a coat and dress with complementary style lines is this Vogue pattern:

And although the style lines of the dress and the coat in this Vogue Paris Original by Madame Gres are not matching, clearly the coat and dress featured in blue on the pattern envelope are intended as such an ensemble:

Here is an example of a formal dress and matching coat, sharing seaming details and clearly designed to go together. Would this dress be anywhere as exciting without its matching coat?

This evening coat makes my heart skip a beat!

Not every coat needs to match a dress, however. Here is a small sampling of coats, both dressy “dressmaker” coats and classy, more tailored coats, the prototypes of which have their rightful place in your coat wardrobe:

This is my original pattern from which I made the featured coat when I was in my mid-twenties. I loved this coat and only wish I still had it!

I am very anxious to make a coat from this pattern.

This is a beautiful example of a dressmaker coat.

Another dressmaker coat.

A coat better suited for everyday wear, but still beautiful.

One of the many catalogs we receive here at our home is the catalog from the J. Peterman Company. It is so creatively conceived and presented, with each entry reading like a mini story, and often evocative of other times and places. The “Owner’s Manual” (as the company’s catalogs are called) arriving during this past holiday season was no exception. Imagine my delight when turning the page to this entry for a “French Coat with timeless Parisian style.”

Click on the image to read its story.

But what really caught my eye was the caption at the top of the page: “I want to know the woman in that coat.” In a nutshell, that sums up the power of a beautiful coat. What fun to know that, as ones who can make our coats, we can also be the woman who made that coat!

And now, in deference to some of my readers who want progress reports on my Number Four Classic French Jacket, here are a few photos – and a short quiz for those of you who have never made one of these jackets, but hope to one day.

Here is the neckline, ready to be stitched.

I call this the “vest” stage. This is the front of the jacket . . .

And this is the back of the jacket.

It is always fun to pin the sleeves on quickly just to see a jacket taking form!

As you can see, all the machine quilting is complete. I’ve finished the interior seams as much as I can at this point. The next step is to insert the sleeves. Then I can complete the finishing work on the interior seams and the hems and get to work on the trim and the pockets.

QUIZ: How much more will I be using my sewing machine to do this work?

  1. a) only for the insertion of the sleeves
  2. b) only to make the pockets
  3. c) both for the insertion of the sleeves and to make the pockets
  4. d) not for anything

Back to Coats:  Are you ready to make one after reading this post? I hope so!

30 Comments

Filed under Chanel-type jackets, Coats, Dressmaker coats, Mid-Century style, Uncategorized, vintage Vogue Designer patterns, vintage Vogue patterns from the 1960s, vintage Vogue patterns from the 1970s

Number Four – But Who’s Counting?

One of my more fortuitous undertakings upon my return to fashion sewing early in the current decade was learning how to make a Classic French Jacket. I traveled to Baltimore, Maryland (USA) to take one of Susan Khalje’s week-long classes devoted to this iconic fashion, and I never looked back. As soon as I had finished my first one, I could not wait to start another one and then another one.

From left to right, my first, second and third jackets. I made a sheath dress out of the charmeuse lining fabric for the first jacket: a blouse for the second jacket, again out of the lining silk; and a coordinating linen dress and silk scarf for the third jacket.

Choosing and applying trim is one of my favorite parts in the process of making these jackets.

Of course, the Classic French Jacket is based on Coco Chanel’s original 1920s’ cardigan jacket, updated and reintroduced as the “Chanel suit” when she reopened her couture house in 1954. A “Chanel suit” usually “consisted of two or three pieces: a cardigan style jacket, weighted with her trademark gilt chain stitched around the inside hem, a simple easy-to-wear skirt, worn with a blouse, the blouse fabric coordinated with the jacket lining.” (The Saint James Fashion Encyclopedia by Richard Martin, Visible Ink Press, Detroit, MI, c1997, page 81.) As I have said before, “Only Chanel is Chanel.” But a classic Chanel jacket is undeniably the prototype for the Classic French Jacket.

What a succinct and perfect “thumbnail” description of a Chanel Jacket. (The Fairchild Dictionary of Fashion, Third Edition, by Charlotte Mankey Calasibetta and Phyllis Tortora, Fairchild Publications, Inc., New York, New York, 2010, page 65.)

It is such a clever design, with some basic building blocks: 1) boucle fabric, the “sponginess” of which is necessary to help hide those quilting stitches which hold it to its silk lining fabric, 2) coordinating charmeuse/silk for that lining, 3) coordinating or contrast trim/trims, 4) usually fasteners of some sort, 5) a weighted chain for the hem, and 6) a pattern which includes three piece sleeves. One of its main charms, particularly for dressmakers, is the opportunity it gives to make a unique, creatively conceived jacket, whose “heritage” is nonetheless instantly recognizable.

As planned, after finishing my “Champagne Dress” in the first half of January, I brought out my red and black houndstooth boucle to get started on my fourth classic French jacket.

I decided to use plain black charmeuse for the jacket lining. I also plan to make a sheath dress out of the boucle to match the jacket. And I am quite excited to have found this trim!

As luck and life would have it, I then ran into a “snag” for three weeks, which I will not go into, but suffice it to say, I have just returned, finally, to serious work on this jacket. So – I am little behind where I wanted to be – but excited to see some progress and enjoying the process very much.

The quilting is complete, and now onto sewing the seams and finishing them.

Because I have written about making these jackets in previous posts, I certainly do not want to bore my readers with more of the same. To help fill the “space,” I plan to do a couple posts about other sewing and fashion subjects near and dear to my heart – and maybe a few updates on Number Four, too!

28 Comments

Filed under Boucle for French style jackets, Chanel-type jackets, Coco Chanel, Uncategorized

Jacket AND Dress!

One of the aspects of fashion sewing that appeals to me so much is how projects seem to take on a life of their own. By the time I have it finished, a piece rarely ends up being exactly how I thought it might be when I started it. Most of the time, that’s a good thing. (There are those flops, which are bad things, but thankfully this post is not about a flop.)

When I did the planning and started the construction of my recent Classic French Jacket, I really thought I would be making a pale blue linen sheath to wear with it, using fabric already in my collection. But somehow that pink accent in the weave of the boucle, the trim I selected, and the buttons, all conspired together and changed my mind for me.

Fortunately, I also had a piece of pale pink linen in my fabric collection (at this point, I might ask myself, what color linen do I not have in my collection? But let’s not go there….) By this time I had already decided I needed to figure out a way to show that gorgeous lining silk in my jacket, rather than having it solely hidden inside. Having seen accent scarves paired with Chanel jackets on Pinterest gave me the idea to make a scarf. Then I thought it might be fun to “attach” the scarf to the pink (planned) dress in some fashion.

I came up with buttoned shoulder tabs as a possibility. I had purchased eight small buttons for my jacket – three for each sleeve and one for each pocket, long before I had this idea. You might recall in my last post, that I decided to make the sleeve vents for two buttons instead of three? That’s where I found/got the two buttons I needed for shoulder tabs.

I ended up liking my two button vents!

The first tabs I made just did not look right. First of all, they did not turn well, with a pleasing curve And when I placed them at the neckline of my dress, all I saw were the seams.

I even finished the bound buttonholes before deciding I didn’t like these.

I had to think through lots of possible solutions and finally had a eureka moment when I thought of piping the edges.

Piping makes the sewn curve much easier to turn well.

So much better!

I placed the tabs slightly forward rather than exactly on top of the shoulder seam.

The rest of the dress was very straightforward, as sheath dresses tend to be. It is lined with a lightweight, cotton/linen blend, but I did not underline it, as I like to preserve the washability of most of my linen garments (easier without an underlining.)  It is also cooler without an underlining.

Being a lover of pink, I already had pink pumps that match the dress exactly – and a handbag which brings out the peachy part of the pink in the boucle.

The tabs on this dress give it kind of a ’60s vibe. Unintended, but kind of a nice touch to go with the jacket.

Because these two pieces – and this look – came together from so many sources, I think it is a good idea to give credit where credit is due:

Boucle: Mendel Goldberg Fabrics , NYC, gift from my grown children.

Soutache Braid and Buttons: M & J Trimming, NYC

Pink Petersham Ribbon: Britex Fabrics, San Francisco

Lining and Scarf silk: Britex Fabrics, San Francisco

Pink Linen: vintage Moygashel, 35” wide, purchased on Etsy

Cotton/linen lining for the dress: JoAnn’s Fabrics, purchased in bulk a couple of years ago

Shoes: Ferragamo, old!

Handbag: Kate Spade, also old.

I do love pink!

So that’s it! One major project now residing in my closet rather than in my sewing room. Time to start something new…

33 Comments

Filed under Boucle for French style jackets, bound buttonholes, Buttons - choosing the right ones, Chanel-type jackets, Linen, Linings, Mid-Century style, Moygashel linen, piping, Scarves, Shoes to make an outfit complete, Uncategorized, Vintage fabric

“Secret” Ingredients

Like that extra dash of nutmeg, which makes a dish sparkle in an indecipherable way, Classic French Jackets also have some secret ingredients. Except, they really are not secrets at all. They are, however, a few of the components which help to make these jackets so “classic” and just a step above ordinary.

Before I get to those details, however, let me show you my finished – yes, finished! – jacket.

To start with, one of the main features of a classic French jacket is the three-piece sleeve. The seam placed along the center point of the shoulder and running down along the outside of the arm does two things: it allows for the all-important vent and it provides a gentle curved shaping of the sleeve. The under-sleeve piece, which straddles the underarm area reduces bulk in the lower armscye and also contributes to the shaping of the sleeve.

The depth and width of the extension on the vent is entirely subject to the decision of the dressmaker. I opted to make my vents and their extensions suitable for two buttons. I originally planned on making a three-button vent, but I changed my mind, for reasons you will see in a future post.

Probably the most visible component of one of these jackets is the trim. This is such a personal choice, and the selection of the trim can really change the entire complexion of the jacket. As you all may know by now, I decided to use a layer of Petersham ribbon under the braid I selected. Once the Petersham was on, and I had started applying the soutache braid, I took this picture to illustrate how combining two layers of trim can effect such a different look.

On this jacket I placed my trim right on the outside edges of the parts being adorned, but this is also a personal choice.   Yes, there are “rules” to making these jackets, but the way you trim your jacket is not one of them! I also like to apply my trim after the interior of the jacket is finished, but I have seen a number of very successful jackets where the trim was applied before the edges were finished in the interior.

In the Classic French Jacket Class I took with Susan Khalje a few summers ago (which I cannot recommend highly enough!), she made the point that a lot of couture jackets are hemmed slightly longer in back, allowing for a gentle curve that is flattering and feminine. I love this look and used it again for this jacket. I think it is particularly effective with contrasting trim.

The gentle slope of the back hem is a little more apparent in this side view.

Obviously the trim has to have a starting point and an ending point somewhere on the jacket, right? Common sense tells us it should be in the most inconspicuous place – which, for the most part, happens to be in the side seam under your non-dominant arm. I am right-handed, so I made my starting and ending spot under my left arm.

I decided to make a double continuous loop of the soutache braid in order to reduce the bulk at the beginning and ending spot. Here you can see how I looped it in order to apply it this way.

From a little farther away, it is barely perceptible. By the way, do you see how that pocket is buckling?  I realized I had sewn the button on a little too low, so I had to do that over.  Seems there is always something to “tweak” at the end!

Because the boucle I used for this jacket is more of a lightweight weave, I decided I needed to anchor the buttons in some way. So I sewed them on (with waxed and ironed, double thread, of course), attaching them on the lining side with small white buttons.

While we are looking inside, here are photos of the jacket turned inside out.

I did not make any attempt to “match” the print because I did not think it would have made any difference.

Another key, necessary ingredient to one of these jackets is the chain which weights the jacket and keeps it looking neat and tidy. Sewing on the chain has to follow the Goldilocks rule: not too tight and not too loose.

I chose a silver-toned chain for this color combination.

The lining fabric I used for this jacket is such a lovely silk twill print. It seems a shame to hide such a beauty on the inside, although the interiors of these jackets are one of their most delightful secret ingredients. You will, however, be seeing more of this silk, along with photos of me wearing my jacket – all in a post to come soon!

33 Comments

Filed under Boucle for French style jackets, Chanel-type jackets, couture construction, Linings, Uncategorized

More on Making a Classic French Jacket

What more can be said about the process of making a classic French jacket? Well, actually, quite a lot! These jackets look deceptively simple (and elegant) when finished, but their looks belie the hours involved in their construction.

One of their sneaky little secrets is the sewing of the sleeves onto the body of the jacket. The shoulder seam is one of the few areas of the jacket which requires interior reinforcement. The selvedge edge of the lining fabric can be used for this, but I prefer to use a selvedge edge of silk organza.

The strip of organza is sewn on the seam line by hand.

Once that is in place, the sleeve is ready to be inserted – all by hand! Pinning the sleeve in place accurately is so important, as the grainline of the boucle needs to hang perfectly both vertically and horizontally (and match, too, of course.) The top half of the sleeve is sewn from the outside with small, tight fell stitches. Then the lower half of the sleeve is sewn on the inside with small backstitches, both segments using waxed, double thread. If done correctly, the cap of the sleeve will curve nicely.

Looking at the sleeve head from the back of the jacket

And from the front.

Finishing the sleeve insertion is, for me, the last big hurdle to get over before the really fun part starts. That, of course, is the trim. I deliberated quite a bit over the trim for this jacket. I originally thought I would emphasize the blue in the boucle, using pink as a small accent. When I could not find a “demonstrative, stand-alone” trim I liked, I determined to use an underlay of Petersham ribbon, with a coordinating, narrower trim on top.

For those of you who are not familiar with Petersham ribbon, take a look at this cover from Threads Magazine, May 2016.

In the accompanying article by Susan Khalje, one of her suggestions is to use Petersham ribbon to frame a trim.

I used Petersham ribbon on my last French Jacket, and was really delighted with the effect.

Red Petersham ribbon under the frilly trim gives it more dimension.

The more I looked at the blue, the more I thought it did not give the effect I wanted. I then decided to try Petersham ribbon in a pink hue.

There are actually two pinks in the weave of the boucle, one peachy and one clear pink. Doing the trim this way brings out both hues, which I really like.

The Petersham ribbon is peachy, while the soutache trim has a clear pink intertwined with white and navy blue. The buttons take either hue!

Of course, this application of trims means four times around the perimeter of the jacket by hand to apply first the Petersham and then the double row of soutache trim. I never make things easy. Is it any wonder this jacket isn’t finished yet?

19 Comments

Filed under Boucle for French style jackets, Chanel-type jackets, couture construction, Uncategorized