
Never did I imagine that when I last wrote about the progress on this jacket, it would be an entire month before I could declare it “finished.” But such is a fact of life with the construction of one of these jackets. They always seem to take much longer to complete than ever imagined. (I should remind myself that during that month, I also made a wool skirt and I was away twice on short trips, but still…)
As this is the fifth one I have made, I can safely say that I have developed my own set of tips for working my way through the lengthy construction process. Of course, it all has to start with a pattern which is a perfect fit. Fortunately my muslin pattern is from a Jackets Class I had with Susan Khalje over five years ago. With this pattern, I can go right to my boucle and get started.
While it is often recommended to cut out just the body of the jacket, minus the sleeves (the variegated weave of which is then checked with the constructed jacket body before cutting them out), I have developed enough confidence that I cut out my sleeves along with the body of the jacket. This allows me to make the sleeves first. For me there are two advantages to doing this: 1) there is a psychological benefit in knowing that the sleeves are lined, linings are fell-stitched in place, trim is on, and the sleeves are as finished as they can be before setting them into the body of the jacket, and 2) I like to trim the sleeves first, as a way of testing the trim I have chosen. If I do not like it, I only have trim on one, or two, sleeves which must be removed. It is also much easier to sew trim on a sleeve which is still separate from the jacket.
Another tip I have learned is to use my walking foot not only for the channel quilting of the lining and fashion fabric (a must), but also for all the seams. I pin profusely, but the walking foot helps to keep the fabric from slipping, crucial when matching all those lines and plaids prevalent in a typical boucle weave.
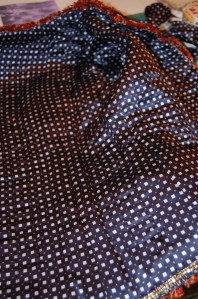
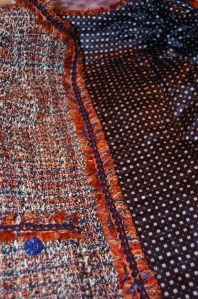
I chose this navy and white silk charmeuse from Britex Fabrics for my lining fabric. The boucle is from Mendel Goldberg Fabrics.
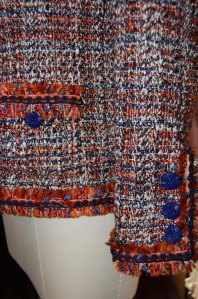
I really went round and round with the trim for this jacket. I knew I wanted to use self-fringe, but I also knew it would need some definition added to it. After trying several colors of velvet and Petersham ribbon in the trough of the fringe, I realized I would have to go to a bright orange as an underlay for the navy twisted braid I wanted to place on top.
The trim was applied in three steps. Here the fringe is attached as the first step. Not too exciting all by itself.
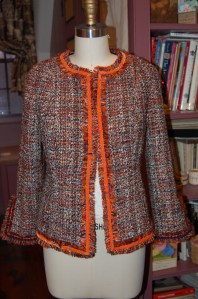
The next step was to apply this bright orange velvet ribbon, also from Britex. It was really a leap of faith to use this very demonstrative color. It looks fairly garish like this! (I sewed each edge of this ribbon separately, so twice around for this part of the trim.)
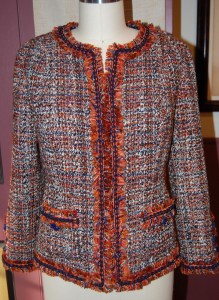
But once the navy twisted braid is on, step number three, that bright orange underlay is fine.
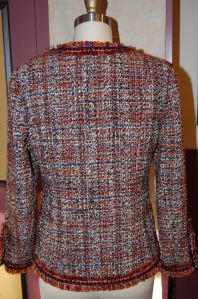
One thing I have done with all my jackets – and this is a tip from Susan Khalje – is to add about 1/2 inch in length to the center back of the jacket, curving it up gently to the side seams. I love the effect that this little bit of extra curve gives to the back of the jacket.
I always wax and iron the thread which I use for applying the trim. It adds strength, but also is easier with which to work. For this jacket, I also carefully ironed each “level” of trim as I applied it.
A detail of the right pocket. Of course, and this is preaching to the choir, the pockets absolutely cannot be cut out until the body of the jacket is completed. Their placement is a visual determination which really depends upon the fit and appearance of the finished jacket.
I found these vintage buttons in one of my button boxes. I knew I wanted to use dark blue buttons, and I kind of liked the appearance of these.
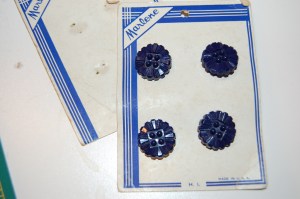
The only hesitation I had is that they are plastic! It seems a bit of a sacrilege to put plastic buttons on one of these jackets, but I actually think they look okay. If I find other navy blue buttons in my future travels, I might switch them at some point. But right now, they work.
Because I had only 8 buttons, I was limited to two pockets, and three buttons on each sleeve. I probably would not have put four pockets on this jacket anyway, so that was not really a compromise.
I have enough of the boucle left over to make a simple straight skirt, I think. However, that will not happen this year! I am so ready to move on to my next project. In fact, it may be well over a year before I plunge into another one of these jackets. I have but one other boucle lurking about in my fabric closet right now, and I am content to let it stay there for a while.
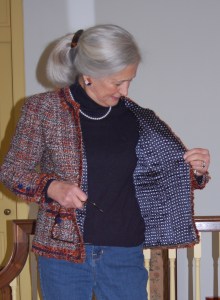
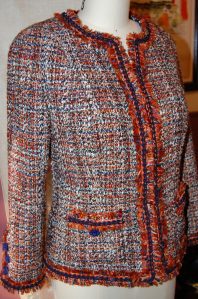
It was much too cold for outdoor pictures, so these will have to do!

I like the jacket worn closed …

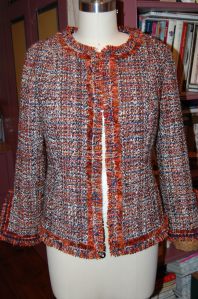
… or open.
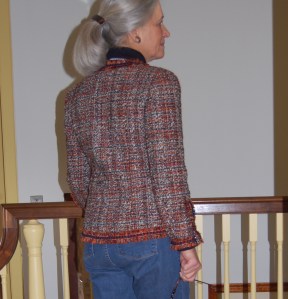
The curve of the back hem is apparent here.
Now it’s time to tiptoe ever so quietly into the lighter shades and fabrics of early Spring, despite the snow that is currently falling. I am so happy to have this jacket in the “finished” column.

Lovely jacket. Your creations are classic beauties and your blog is so informative. Even if I never become nearly as skillful as your are at making beautiful clothing, I am inspired by your blog.
Thank you, that is so lovely to hear.
As usual, beautiful project and great post. Thanks for sharing your thought process. I learn something every time.
Thank you for your kind compliments, Barbara! I am so glad you find my blog helpful.
Beautiful, well fitted jacket which you do with great skill. I also appreciate learning about your process. Thank you.
Thanks, Pat! I am continually learning with these jackets, which make their construction very interesting!
Gosh, that’s gorgeous! The texture of your buttons reflects so perfectly the texture of your fabric and the rippledy fringe. Your tips are as inspiring as your finished jacket. I’m glad your chilly weather enables such lovely workmanship and a chance to wear your lovely makes. We’ve had way too much heat way too early even for this region. I used to prefer the heat and dread the cold, but between weather’s extremes and your inspiring makes, I’m beginning to change my mind. Happy new jacket wearing, and happy almost spring to you!
Thanks, Mery! I must admit I do love winter clothes – until Spring arrives in full bloom and then I like Spring clothes and … well, you get it! It’s nice not to get bored with one’s wardrobe – and to be able to look forward to the changing seasons.
Just lovely! And you were right to take that leap of faith with the ‘fluorescent’ orange, as it definitely makes the trim pop. I love the fit from the back. Such a lovely jacket!
Thank you! When that trim arrived in the mail, I never would have guessed that it would actually work, but it does!
I so enjoy following your sewing projects. My skills are not so finely hewn And it is wonderful to pick up tips along the way. A dear friend many years ago taught me to add half an inch at the CB and yes it does improve the line. I love this jacket and your fringing finish – simply perfect. Thank you for adding detail of the construction process.
Thank you, Cheryl. I so appreciate your kind comment. I think I will always add that half inch at the CB, even if it is a regular jacket.
Just wonderful, and that’s so much for sharing the trim steps, it is a great lesson in how colors can change things, quite amazing!
Thanks, Kathy! I was very amazed that the bright orange turned out to be what I needed!
Lovely and I like the strong colors! Great work! And thanks for sharing.
Thank you, Heather!
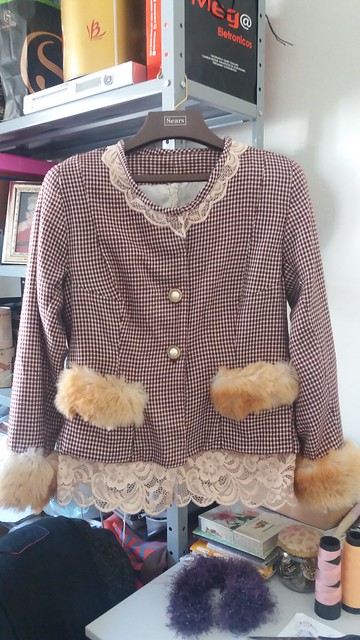
Your jacket is lovely indeed with these colours, I heart this combination. And not to mention the matching earrings. Very elegant and pleasing the eye. I have used some of your tips while sewing my two, partially Chanel-inspired jackets. Thank you! And what is curious one always finds their little tricks here and there that suit best.
Here is link to my jackets. I use flickr to upload my stuff – https://www.flickr.com/photos/126283189@N02/46261499954/in/dateposted-public/
These are lovely and unique, Nadeja. Thank you for sharing!
It’s very kind of you, thank you!
Thanks so much for your comment, Nadejda, and good for you for noticing the earrings!
Thanks so much for your comment, Nadejda, and good for you for noticing the earrings!
Thanks so much for your comment, Nadejda, and good for you for noticing the earrings!
Love your jacket. Making one myself. Can I ask where you bought your chain.
Thank you, Debby. I buy my chains from Susan Khalje’s online store. She sells them by the inch, in brass or silver tones. They are the perfect weight and size for these jackets. I highly recommend them!
Thank you, Debby. I live in a small town in Brazil and here there is that old, tiny shop where an elder lady, who happens to be the owner, is selling this kind of chain.
As always, your projects are perfection. Mine for the year is still unfinished but as soon as I can take a break from sewing for an upcoming vacation, I hope to get back to it!
Thanks, Cissie! I love vacations, but they always seem to wreak havoc with my sewing plans. Have fun – and yes, you will get back to your jacket. They wait patiently for us.
Last night at midnight I saw your post. The new Chanel is done! I needed to get off the internet and go to bed, BUT not without taking a quick look. So down to the bottom of the post to see you model your latest creation. BEAUTIFUL! This afternoon just went back and read (soaked up) all your construction details. Wonderful info for my upcoming Khalje retreat in June. Can’t wait. Thanks for another special post. LOOKS FANTASTIC!
Thank you! I am really delighted that it is finished and that I feel good about it! Sometimes when I work so long on one thing, I start to see every little blemish or loose thread. Comments like yours make me feel great! You will be so amazed at the process when you take your class with Susan. I think I’ve already said this to you, but I’ll say it agin – I’m excited for you!
Beautiful! I love the details you put into your creations!
Thank you, Linda! That’s lovely to hear!
Another breathtaking jacket! I would never have guessed you used bright orange as part of the trim. Beautiful result!
Thanks, Marianne! I think I am still getting used to the idea that I used that bright orange as part of the trim!
My apologies for the late comment to your posting. You are an inspiration! I will now return to my current project where I’m struggling! I wish you had a “sewing hotline”. I am impressed with your eye for color and sense for textures. I will follow your example in waxing and ironing my thread! Great technique. My thanks to you for showing all of your followers that perfection can still be achieved.
No apologies necessary, Peggy! I have had many a project where I have struggled, so welcome to the club. Not so sure about perfection achieved – but it is something we all strive for, isn’t it?
It looks great. Good tips. I have another jacket on the cards for later this year – only my second though!
Thanks, Anne! Happy Sewing on your second!
So beautiful! I’m in the process of making my first French Jacket (following Susan Khalje’s terrific video class). I have found your blog very helpful and have enjoyed seeing and reading about all of your jackets. All so lovely and unique.
Thank you, Bernice. Susan is such a terrific teacher; her videos are so well done that one feels like they are taking a private lesson with her! Best of luck with your jacket!