
Oh, lets’s just skip Part 2 and go right to the finish! To be honest, a separate Part 2 was somehow lost in the midst of a flurry of sewing while I concentrated on “December Dresses” for my two granddaughters. More on those another time.
When I returned to my Parisian Jacket, I was almost ready to tackle the gussets. Sewing the bottom curved seam of the gussets was easy to do on the machine. But when it came to the other two seams, working in such tight angles, I did not even try to sew them on my machine. I went right to hand sewing them, using a small tight backstitch, and I ended up with good results.
Having the gussets finished meant that the basic body of the jacket was together. Then it was on to the collar and the front facings. Following Susan Khalje’s video instructions, I was able to get a very precise finish to the collar.
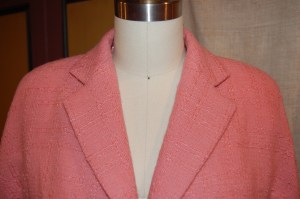
I had to be careful to match the weave of the fabric, up and down and across.
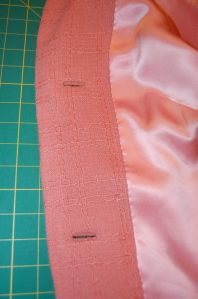
There are two bound buttonholes in the right front of the jacket, and this is where I deviated slightly from the order of construction that Susan was following. Instead of partially sewing on the right front facing and then making the buttonholes, I did my buttonholes before I attached any part of the facing. I felt like I had more control doing it this way.
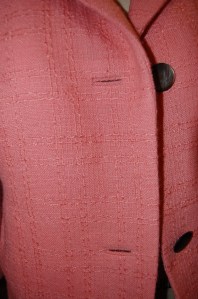
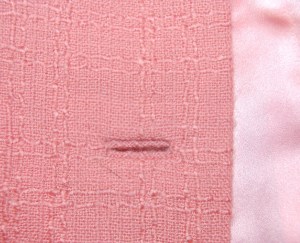
The finish of the buttonhole on the facing. (Please pardon the cat fur!)
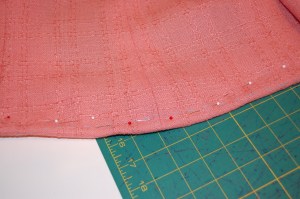
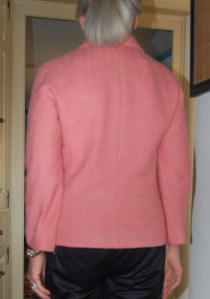
Whenever I have made a Classic French Jacket, I have added a slight curve to the back hem, and I find this to be very pleasing. I decided to do the same with this jacket. At the center back I marked the hemline at 5/8” below the marked hem, and then I gradually curved it up to the side point of the jacket. It is quite subtle, but I think a nice addition.
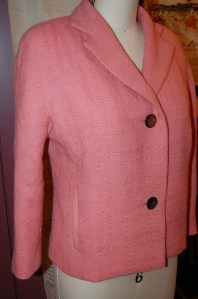
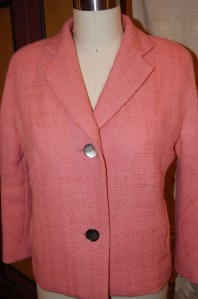
I went round and round with buttons for this jacket. Ideally I would have loved to find some pink ones, but the pink of this vintage Linton fabric is really not a clear pink. It is a bit “dusty” and finding buttons to match proved too big a task. So I opted for these vintage mother-of-pearl gray buttons, which happen to have pink overtones to them.
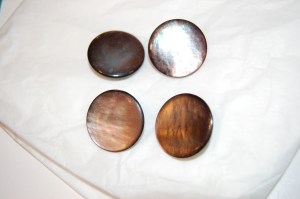
I expect to wear this jacket with gray quite a bit, so the gray buttons make sense to me. I actually really like them now that they are on.
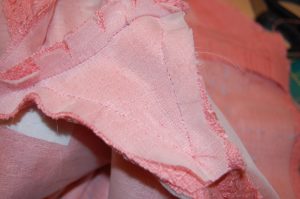
I chose a pink silk charmeuse from Emma One Sock Fabrics for my lining. I would have loved to use a flowered silk, but the ‘see-through’ factor of the light pink wool prohibited that. And actually the pink lining seems to add some vibrancy to the fashion fabric. It makes a very pretty “inside”.
I sewed the lining in entirely by hand, which was an option. The front seams of the lining could also be machine stitched.
This was a very time-consuming project, even without making granddaughter dresses in the midst of it. The video series is 13 parts long and Susan is extremely complete in her instructions. I attribute my success with this jacket to three main facts:
- I basted every seam before machine sewing them, even the seams in the lining.
- Except for the bound buttonholes, I carefully followed Susan’s order of construction as she laid them out in her videos.
- I viewed each lesson over and over to make sure I wasn’t missing anything.


There were many couture tips shared by Susan during the making of this jacket, but these four are ones I will use again and again:
- Sew the sides of the pocket bags in by hand with a small fell-stitch rather than sewing them by machine. What a great finish this made.
- Catch-stitch the upper curve of the pocket bags to the underlining of the jacket. This keeps them in place and prevents sagging of the bag inside the garment.
- Use straight-of-grain silk organza strips to stabilize the on-bias cuffs of the bias sleeves. This keeps the lower edge of the sleeve from “growing” as bias is wont to do.
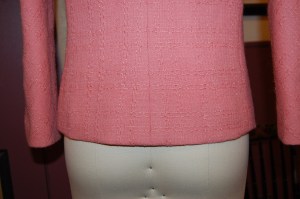
- To add a center back pleat to the lining, which is necessary of course, place the back jacket pattern piece on the fold of your lining silk, set back from the edge by about one inch. (You will not have a center back seam in your lining with this method.) The extra inch makes a natural pleat which can be secured at the neckline and at the waist or slightly below.
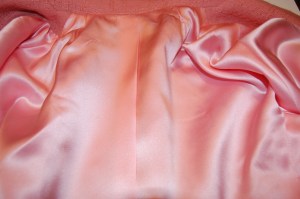
It may be a little difficult to see the center back pleat, as everything is so pink, but it is in the center of the photo.
I am already looking forward to making this jacket again. I can visualize it in a vintage Moygashel linen – it would be beautiful for Spring and Summer and Fall. I think this jacket may become as addictive to sew as a Classic French Jacket!

Gorgeous! What a beautiful jacket. The lining is so perfect! Your careful, precise, and skillful work, with such excellent results, is truly inspiring! Looking forward to clearing the decks and starting mine!
Thank you, Fran. That’s what you need to do – clear the decks and go full speed ahead. This jacket is time-consuming to make, but really a fascinating project.
The back of that jacket is perfection — the 5/8″ curve doesn’t show but makes all the difference. For any woman with a slight forward tilt, it would really help. I had forgotten glove-length sleeves — they made me realize how much I hate the too-long sleeves (covering part of your hand? Really?) that have been on my latest store-bought tops. Just reading about your work relaxes me (Knowing I won’t be doing it!) Armchair sewing instead of armchair travel…. Happy New Year.
Thank you so much! I love that term – armchair sewing. Here’s to a 2020 fulled with sewing and armchair sewing!
Beautiful job. It’s the little details that truly make this a work of art. I also love bright contrast linings but there are times that a plain lining is perfect.
Thank you, Mary. This was such an enjoyable project – and I learned so much from making it. A win-win!
Wonderful jacket, wonderful execution and fit! The sleeve with gusset looks lovely and comfortable. I am surprised by the two button closure @ CF, though. Did Susan discuss the reason for two vs. three?
Thank you, Joan. There is the option for three buttons, which I might do if I decide to lengthen this jacket next time. But Susan did not discuss the reasoning behind two buttons, that I remember.
p.s. great color with your complexion and hair, too! And I am not a “pink kind of girl” ;-}
Ah, lovely to hear that!
Luscious lining in a gorgeous jacket. I knew I would like this jacket as soon as I saw the line drawings, and yours is even better than I imagined.
Thank you, Mery! I like this jacket, too!
I’m thrilled for you that your jacket is complete and more beautiful than I ever thought possible. Your talent is a joy to behold. The color and texture of the fabric is sublime.
Thank you, Peggy! This jacket definitely took longer to make than I imagined it would, so I’m very glad to have it finished. But then again, most sewing takes longer than I imagine!
Beautiful jacket. I so enjoy reading your process and “witnesss2fashion” has now named it armchair sewing! Also, love the glove length sleeves.
Thank you, Pat. I went round and round with the sleeve length, but am happy with what I settled on. Now I need pink gloves…
Absolutely lovely! I’m lost for words! 😍💕
Thank you, Kati! How sweet.
Hi Karen!
Beautiful work!!! And that collar is perfection!
I love the idea of sewing the underarm gusset by hand — I will try the same when I work such a project. There is nothing like the control you get with hand sewing, is there!
I agree – hand sewing is so effective, especially in certain applications. When I make this jacket again, I will definitely do the gussets by hand again. Thank you, Jacqueline!
A beautifully made jacket. Did you consider making fabric covered buttons?
I did not. The weave of the fabric would not have lent itself to covered buttons very well. Thanks for commenting!
Hello. Lovely reading your blog. Very impressed with your result.
I’m in the process of making this jacket while in self- isolation. Thought it would keep my mind active and open to problem solving. I have done several courses already with Susan and have watched the video.
I am using vintage green fabric with a floral silk lining and two big buttons my mother had on a dress in the sixties, all found deep within my sewing cupboard!
Questions- the video I watched didn’t have 13 parts. I’m unsure which way is up with the pockets as no instructions for them. I also have pieces left over eg lining for front facing, extra collar. What have I done wrong????
Hi Margot, your fabrics and buttons sound lovely! Wish I could see them. I’m not sure why your video does not have 13 parts. Perhaps go back to Susan’s club website and check the video section again. As I remember the last part is quite short and is about sewing on the buttons and other small finishes. I am guessing you inadvertently cut an extra collar and an unnecessary facing lining. I wouldn’t worry about it. It would be worse if you were missing an important piece, with no more fabric from which to cut it! As I remember the straight – or square – edge of the pocket is down. This makes sense as it follows the lower straight-ish contour of the hem. I definitely had some “puzzle” moments when I was making my jacket, when I wasn’t sure how to proceed, so you are not alone. I hope this helps. This is a great project for these quiet times and I wish you all the best!