
When Pantone announced the color of the year for 2013 last week, I was immediately smitten. Actually, I’ve been smitten with Emerald Green (Pantone 17-5641 TCX) for as long as I can remember – and finally, finally, it’s going to be center stage again after at least 30 years in hiding (as deliciously detailed by Christina Binkley on the Personal Journal front page of The Wall Street Journal on December 6.)
My initial euphoria turned to smug (yes, I admit it!) satisfaction. Why is this? Just this Fall I had seen emerald green silk matka on the website of Waechter’s Fine Fabrics. Well, I sent for a swatch and upon its arrival I speedily ordered three+ yards. I knew I would have to make a Spring suit out of this fabric.
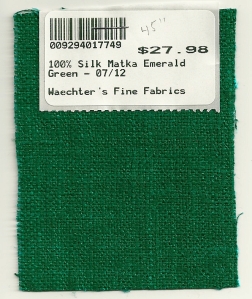
This is the swatch I ordered from Waechter’s Fine Fabrics.
Of course, this was before Pantone made its announcement. And although I still would have purchased it even if this shade of green were the “uncolor” of the coming year, I’m looking forward to being stylish, to boot!
But wait, that’s not all!
Much earlier in the year, I had purchased this yardage of Moygashel linen from an Etsy shop. What attracted me to it was that emerald green is featured so dominantly in it. I’ve shown this fabric before on this blog, but I could not resist showing another peek at it. I still keep thinking it would make a gorgeous Spring coat… or pants.
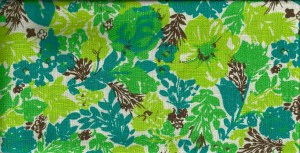
The emerald green in this design really makes it pop!
Finally, this color – this Emerald Green – has given me the perfect opportunity to tell (and complete) a story about a dress I made for myself in 1980 – and share some wonderful, wonderful family news, too. Here’s the pattern:
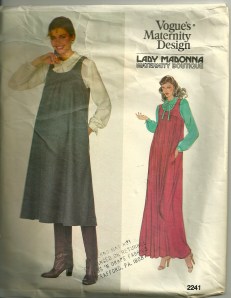
Yes – it is for a maternity dress… from 32 years ago.
And yes, I made it in Emerald Green:
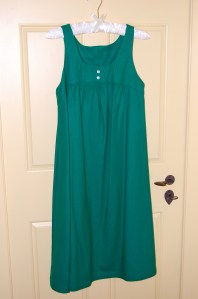
With a few hang lines after 32 years!

A detail of the yoke. I chose two pearl buttons from my button box of 32 years ago to add a little interest.
This was a piece of Pendleton wool I picked up on sale in the Fall of 1980 when I was scrambling to make some dresses for my first pregnancy (our daughter was born in April 1981). I loved the color and thought it would be quite beautiful over the holidays. In fact, two years later, when I was pregnant again (with our son), I wore it for our Christmas photo:

Our growing family, in 1982.
Whatever possessed me to save this dress, I’ll never know. I actually saved all the maternity clothes I made for myself. I dug them out of the cedar closet this Fall to show to our daughter (the little girl in the photo)– who (taa daa!), with her husband, is excitingly expecting their first child (our first grandchild!). Whatever thoughts I had about the suitability of these dresses for “today’s” pregnant style made both of us laugh! My daughter will not be wearing vintage maternity dresses, even if one of them is an au courant color. But oh dear, the wheels started to turn in my head. Hm-m-m-m, why not take this green “tent” and make a skirt for MYSELF out of it?? Wouldn’t that be a story to tell?
So now, I’m realigning my winter projects. Come January I’ll be seeing and sewing GREEN.
By the way, Pendleton fabric yardage used to come with labels to sew into finished garments. I never sewed the label into this dress, but here it is:
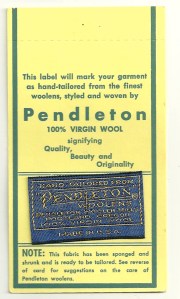
A pristine label, still attached to its card…
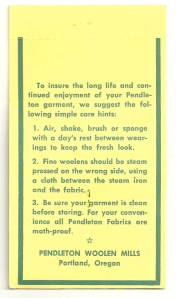
… with care instructions on the back.
This time around I plan to use it!


