Tag Archives: vintage fashion

At The Met

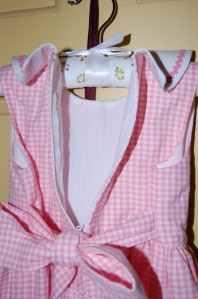
Much has already been written about the current fashion exhibit at The Metropolitan Museum of Art in New York City, Manus x Machina. People far more savvy about current fashion than I am are certainly more qualified to offer a critique of the Exhibit. (Check out The Vintage Traveler’s three-part review of the Exhibit, for an excellent overview.) However, having just had the opportunity last week to view the Exhibit, I feel compelled to add my two cents.

The Exhibit Logo

The Exhibit Logo

I found the title of the Exhibit off-putting. Yes, I know it is a trendy way of saying “hand-made by(?) machine made,” but exactly how does one pronounce the title? It is not a comfortable invitation to what is a unique way of looking at haute couture fashion and fashion history.

The entrance to the Exhibit, which was difficult to find, especially with the crowds at the Museum on the day I attended, includes storyboards to introduce the viewer to the premise of the Exhibit. It is worth quoting from this introduction:

“Manus x Machina is structured around the métiers, or trades of dressmaking outlined in [Diderot’s] Encyclopedie, [which] placed these trades on the same footing as the arts and sciences, which had been regarded as the noblest forms of scholarly activity since Greek antiquity. The elevation of these . . . métiers served as an incendiary challenge to established prejudices against manual labor, biases that the authors sought to refute by showing the creativity and complexity such work involved.”   These trades – or métiers – which are still cornerstones of haute couture today, were listed as: embroidery, featherwork, artificial flowers, pleating, lacework, and leatherwork. Also included were sections on the actual arts of dressmaking and tailoring, including the development of toiles (muslins) and paper patterns. As lovely as some of the fashions were (but not all!), I found myself drawn to the storyboards in these sections for their clear explanations and definitions, which spoke to this dressmaker’s heart!

But first, some of the creations on display, culled by my hearty preference for classic and/or vintage fashion:

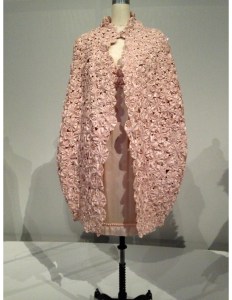
This cape and dress from the House of Chanel, Spring/Summer 2010 was stunning. The cape is made from “1,300 hand-pieced pink silk satin Flowers by Lemarie with pink frosted crystals.”

Met - Chanel cape copy

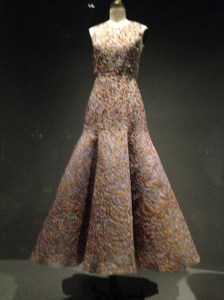
Although my photo for the next dress is very poor, I have to share it. From the House of Dior, Autumn/winter 2015-16, this evening dress is “machine-sewn, hand-finished, gray silk tulle and organza, hand glued with blue, orange, brown, and black rooster feathers by Lemarie.” It was simply remarkable and gives a whole new meaning to “King of the Barnyard!”

Met - rooster dress

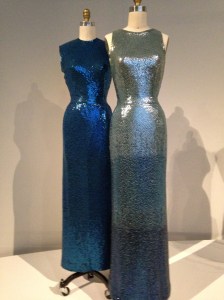
The next two dresses, two of my favorites, are both by Norman Norell (American, 1900-1972). The dress on the left is from 1965, hand-embroidered with blue sequins, and the dress on the right, ca. 1953, is also hand-embroidered with blue-ombre sequins. Both of these dresses have a timeless quality to them, being chic, elegant and with an understated sexiness to them.

Met - Norell Dresses.PDF

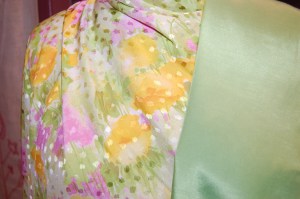
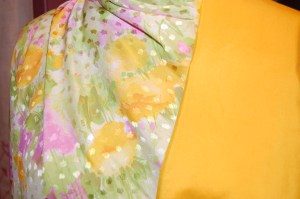
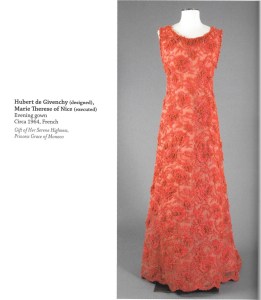
Imagine my surprise when I saw this next dress. From the House of Givenchy, this evening gown from 1963, is made from a “hand-sewn orange cotton Mechlin-type lace hand-embroidered with red-orange glass beads, tinsel, and pieces of coral.”

Met Givenchy Dress

The Robert and Penny Fox Historic Costume Collection at Drexel University in Philadelphia, Pennsylvania (USA) has a similar example, which I actually prefer. Circa 1964, it was owned and worn by Her Serene Highness, Princess Grace of Monaco and given by her to the collection:

MET - coral dress, Princess Grace copy


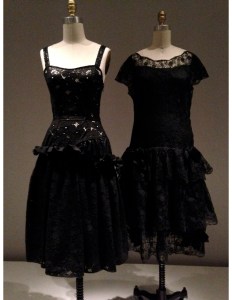
Of all the gorgeous Balenciaga cocktail dresses out there (and many surely owned by the Met), this example on the right, looked a bit dowdy to me. From 1963-64, it was “hand-sewn black silk machine-embroidered lace, hand-applied self-fabric flounces and silk satin bows.” The dress next to it is by Simone Rocha (Irish, born 1986), 2014, “Wet Lace Frill Dress,” so called by the use of nylon and polyester laminated with polyurethane foil, which evokes a wet look!

Met - Black Balenciaga dress copy

No exhibit is complete without an Yves Saint Laurent ensemble. This one, Spring/Summer 1963, was stunning with its overlay of machine embroidered cutwork, hand-stitched with guipure lace:

Met - Dior ensemble copy

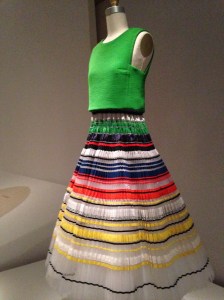
I loved seeing this dress from the House of Dior, the prototype of which had been the feature of a Dior video in 2015. Hand-pleated, hand-embroidered with silk grosgrain ribbon, topped off with a green wool-silk crepe bodice. And don’t miss the Dior darts and the 1960-ish look of the armholes and overblouse styling:

Met - Dior pleated dress copy

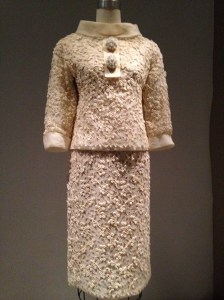
Well, what could be more classic than a Chanel suit? Circa 1963-68, the description reads: “machine-sewn ivory wool boucle tweed, hand-applied navy and ivory wool knit trim hand-braided with interlocking chain stitch.” Those of us who have made one or more “classic French jackets” know how much hand-work is in one of these jackets!

Met Chanel suit

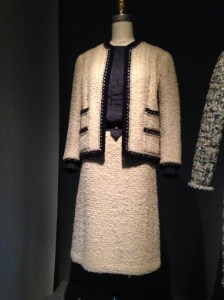
After reading the storyboards on tailoring and dressmaking, I really wonder where a Chanel jacket fits in? The tailoring division of a fashion house specializes in suits and structured garments, with an emphasis on “manipulating fabric on the grain,” and “precision and accuracy when cutting.” The dressmaking division “specializes in draping and soft construction,” “being less beholden to line and structure.” It seems to me that a Chanel jacket straddles the line between the two concepts, being structured, but with a soft fluidity that feels like a dream to the wearer.

The final storyboard, which I found captivating, was the treatise on toiles and the related development of dressmaker’s dummies. To quote: “Alexis Lavigne, a French professor, introduced one of the earliest patented dummies in the 1850s. His figures – composed of papier-mache lightly padded with cotton batting or wadding and covered in pieced and seamed canvas – contributed to the precision with which a garment could be fitted and gradually evolved to help delineate measurements and geometries essential to dressmaking.” Leave it to the French to be innovative in this regard!

There was much in the Exhibit that unfortunately brought to mind this quote from P. J. O’Rourke: “Never wear anything that panics the cat.”   But there was plenty to admire, and obviously, that is what I concentrated on. The mark of any good exhibit is its ability to make you think and expand your knowledge, and this one, despite its awkward title, certainly does that.

17 Comments

Filed under Capes, Cocktail dresses, Dior darts, Fashion Exhibits, Uncategorized

Blame It on the Buttons

It can be a little overwhelming to look at my (growing) collection of beautiful summer linens, and then try to make a decision on which piece to select for my next project.

Fortunately, a random purchase of buttons helped me make up my mind this time around. I found these buttons at Britex Fabrics in San Francisco last year, and purchased them on a whim, not knowing when or how I would use them. I also don’t know what possessed me to purchase 6 of them, but that’s what I did.

Yes, those are interlocking "a la Chanel" Cs.

Yes, those are interlocking “a la Chanel” Cs.

When I got them home, I realized they were a perfect match with a length of vintage, pale yellow, Moygashel linen in my possession. I tucked the fabric and the buttons away together, confident that the perfect pattern would also be found amongst my many vintage Vogue patterns.

It was a bit of a trick finding a pattern that needed 6 (or fewer) ¾” buttons. This one kept surfacing as the most ideal candidate:

I am making the short sleeve version - but a little shorter!

Ideal, except for the yardage needed, that is. Many of you know by now that being a “little shy” of the prescribed fabric usually does not keep me from my desired goal! After making a fitting muslin and making the necessary adjustments, I cut out my underlining (light weight linen/cotton blend) and used that as my pattern. It was immediately evident that I did not have enough of that 35” width linen.

Or did I? I figured if I eliminated the center back box pleat and replaced it with just a slit in the back center seam, I’d save a bit of yardage requirements. I could make the sleeve hem facings out of the underlining, saving a bit more. And if I cut the collar on the horizontal straight of grain rather then the vertical, I could just fit the pattern pieces onto my yardage. It was a good thing I had already decided to eliminate the chest pockets (a little too 1950s.) And a self-belt?   Out of the question!

A belt turned out to be a perplexing question. I had been fortunate enough for a few years to have my belts and covered buttons custom made by Pat Mahoney, but since her retirement last year, I have found no replacement for her services. I was dreading the prospect of making my own belt. The only good thing was I knew I had a piece of vintage Moygashel linen in a medium navy blue (see the button photo above) which would be a good contrasting color for the yellow dress. I decided I would think about actually making the belt after I had the dress itself finished.

For a simple shirtwaist dress, there were a number of time-consuming details, like the gussets I covered in my last post. There were also six bound buttonholes to work.

It always amazes me how long these buttonholes take to make!

It always amazes me how long these buttonholes take to make!

Blame it on the buttons


There were separate front bodice facings, and a front skirt placket with separate facings. There were sleeve hem facings (as mentioned above), and lots of trimming, clipping, and grading of seams! And then the dress was done.  Except for the belt, of course.

After giving myself a pep talk, I took out one of Pat’s belts and studied it, vowing to duplicate as closely as possible her techniques and precision. Fortunately I had a belt buckle from long ago, which I had saved. It was for a 1.25” width belt, which is exactly what I wanted.  I plunged ahead and this what I made, working the eyelets by hand (which fortunately don’t show much on the dark linen!):

Blame it on the buttons

The underside, just in case you are curious!

Although not my favorite dress of all time, I think I’ll get good use out of it, and I do love its pairing with “summer” blue.

Blame it on the buttons

Blame it on the buttons

Blame it on the buttons

Blame it on the buttons

The clutch is a perfect match with the belt – how lucky is that?

Cool linen for a hot summer!

Cool linen for a hot summer!

Best of all, the buttons add just the right, somewhat mysterious, touch.

19 Comments

Filed under bound buttonholes, Day dresses, kimono sleeves, Linen, Mid-Century style, Moygashel linen, Uncategorized, Vintage fabric, vintage Vogue patterns from the 1950s

Gazing at Gussets and Fashion Exhibits

We are almost halfway through the sewing year! Time for me to just keep plugging along, being grateful for any hours I can spend sewing – or dreaming about sewing. Lately it seems I have spent more time dreaming about it than actually accomplishing anything. But that’s not quite true. I have actually done a lot of sewing (I call it necessary sewing) – just not anything worth sharing. But that is about to change.

I am working on a yellow linen shirtdress, using this pattern:

I am making the short sleeve version - but a little shorter!

I am making the short sleeve version – but a little shorter!

I am really getting to be a fan of kimono sleeves. They were incredibly popular in the 1950s (and early ‘60s), and their construction varies according to the type of gusset used. The dress in this pattern has a gusset that forms part of the sleeve, itself.

Usually gussets are diamond shaped. However, the curved lower edge shows that this gusset incorporates part of the sleeve in it.

Usually gussets are diamond shaped. However, the curved lower edge shows that this gusset incorporates part of the sleeve in it.

The instructions for inserting the gusset are quite explicit and interesting, I think. The first step is to work a “bar” across the point on the bodice where the matching point of the gusset is placed. I have actually never seen this done, but it makes sense as it reinforces that stress point.

Gazing at Gussets 1st diagran

I also like the double stitching on the interior seams of the gusset as shown in this section:

Gazing at Gussets 2nd diagram

Here is how the finished short sleeve is diagrammed:

Gazing at Gussets 3rd diagram

And here are some photos of the finished gussets on my dress:

Gazing at Gussets

This photo clearly shows how the gusset becomes part of the underpart of the sleeve.

This photo clearly shows how the gusset becomes part of the under-section of the sleeve.

Here is an inside look. While the dress is underlined in a very light weight cotton/linen blend, I opted not to underline the gusset, in order to add to flexibility. I got this brilliant idea from Laura Mae of Lilacs and Lace sewing blog.

Here is an inside look. While the dress is underlined in a very light weight cotton/linen blend, I opted not to underline the gusset, in order to add to flexibility. I got this brilliant idea from Laura Mae of Lilacs and Lace sewing blog.

The seam you see at the top of this photo is the shoulder seam which runs down the length of the sleeve.

The seam you see at the top of this photo is the shoulder seam which runs down the length of the sleeve.

I managed to tear myself away from my sewing room for a few hours this week to go to see an exhibit at the Michener Museum in Doylestown, Pennsylvania (USA). Entitled Philadelphia In Style, the exhibit featured fashions either made, worn or purchased in Philadelphia, PA over the course of about 100 years (1880-1980).

Duskin - Exhibit title

All are part of the Robert and Penny Fox Historic Costume Collection at Drexel University in Philadelphia, a veritable treasure trove of designer, haute couture and ready-to-wear dresses, coats, ensembles, shoes, handbags, and accessories of all types. The Exhibit has special meaning for those of us with Philadelphia ties, but universal meaning for lovers of fine fashion anywhere.

Although the clothing on display was fascinating and, for the most part, lovely, it was the numerous fashion illustrations, framed and lined up one after the other, which really caught my attention. They had all been done in 1954 for a specialty ladies’ shop in Philadelphia, called Nan Duskin. The most amazing thing is that each one had a swatch of the intended fabric taped in the corner of each drawing. Here is a sampling:

Duskin sketch - purple dress

The buttons were still in question for this dress – note the line in the upper right side “buttons?”

Such a lovely coat! Note the fabric swatch, held in place with yellowing tape!

Such a lovely coat! Note the fabric swatch, held in place with yellowing tape!

So many of the illustrations were of dressmaker suits. This one is made in brown checked wool.

So many of the illustrations were of dressmaker suits. This one is made in brown checked wool.

I love the saucy pose in this sketch - and the posy perched on the shoulder!

I love the saucy pose in this sketch – and the posy perched on the shoulder!

One of my favorites: in red, of course!

One of my favorites: in red, of course!

Here are a couple of the fashions represented in the Exhibit:

This was called a Day Ensemble. It bears the table "Irene for Nan Duskin." This was Irene Lentz Gibbons, 1952-53, USA.

This was called a Day Ensemble. It bears the table “Irene for Nan Duskin.” (Irene Lentz Gibbons, 1952-53, USA)

This shirtwaist dress, Norman Norell for Trina-Norell, circa 1955, had finely done bound buttonholes. the fabric is s ilk and wool brocade.

This shirtwaist dress, Norman Norell for Trina-Norell, circa 1955, had finely done bound buttonholes. The fabric is silk and wool brocade.

The Exhibit did manage to include one of the most unattractive Chanel suits I think I have ever seen.

The Chanel suit on the left is shown with an ultra-suede shirtdress by Halston, on the right.

The Chanel suit on the left is shown with an ultra-suede shirtdress by Halston, on the right.

But it was still fascinating to look at the cuff detail:

Duskin Chanel suit detail

One of the most charming displays in the Exhibit was a collection of hat boxes from the stores in Philadelphia which were the purveyors of so many fine fashions over the decades.

Duskin - hat box display

As a lover of pretty boxes and bags, I found this vignette not only delightful, but also evocative of the thought and care inherent in buying and wearing beautiful fashions. They reminded me of the same little thrill I get when a piece of beautiful fabric which I have purchased shows up in the mail, elegantly presented in crisp tissue and tied with silky ribbons.   It makes it oh-so-easy to fall in love immediately!

23 Comments

Filed under bound buttonholes, Coco Chanel, Day dresses, Dressmaker suits, Fashion Exhibits, Gussets, kimono sleeves, Mid-Century style, Uncategorized, vintage Vogue patterns from the 1950s

“To the Most Imaginative Woman in the World”

“You see her leafing through pattern books – picking out a collar here, a cuff there, a new way of pleating a skirt . . . You see her fingering a tiny swatch of fabric, Yet she’s seeing it as a whole dress, or a blouse, or a jacket . . . Who is she – this lady with the limitless imagination? She’s the woman who sews. YOU . . .”

Most imaginative woman - Burlington-2

This is just one of many ads placed by manufacturers of fabric in the April-May 1950 Vogue Pattern Book Magazine. Ordinarily I would not have purchased this issue, as most Vogue patterns available before 1955 were not printed, and I rarely buy a vintage pattern which is not printed! My particular interest in these vintage magazines is the opportunity they provide to identify dates for patterns, fabrics and style trends, making the experience of sewing with vintage patterns (and fabrics) even more enjoyable.  However, when this issue was available in an Etsy store, I succumbed. I was born in May of 1950, and my curiosity just got the better of me.

I find the haughty expression on the cover model somewhat amusing.

An early haughty expression on a  model!

Looking at this issue made me realize how old I am… NO, NO, NO! Just kidding, I think. Actually, what really popped out at me was how exciting it must have been to be a home dressmaker at this point in time, with the home sewing business booming, post-war, and fine fashion – and the desire to look wonderful – such important aspects of a woman’s life.

And then, as I was leafing through the magazine, I found an unexpected surprise. Tucked in between two pages was Vogue Patterns April 15 Collection, an 8-page flyer, available at pattern counters and easily something that could be tossed away. I find it remarkable that this slim printed piece survived.

Most imaginative woman - flyer cover-5

The format is larger than what I am used to seeing in later Vogue pattern flyers from the 1960s and 1970s.  When one looks at the fashions and patterns detailed, it is easy to imagine the woman who picked this up, looking at it again and again.

This is one of the inside pages of the flyer.

This is one of the inside pages of the flyer.

Not only that, also tucked in with this flyer was this page from Harper’s Bazaar, March 1st, 1950.

Most imaginative woman - Harpers Bazaar

How many of you save pictures of dresses/blouses/coats you would like to copy? Pinterest, anyone? I certainly do!

Clearly she had in mind making the dress pictured on the back cover of the flyer:

"Consider them two by two - the pattern and the fabric, and you will always have a happy result." Timeless advice!

“Consider them two by two – the pattern and the fabric, and you will always have a happy result.” Timeless advice!

Some of my favorite pages in this, my “birthday” issue? I was delighted to find an ad for Moygashel linen, for which I have a particular passion:

Most imaginative woman - flyer cover-1

A lover of polka dots makes me partial to this gorgeous blouse:

Most imaginative woman - flyer cover-3

This blouse is very similar to one I made a few years ago.

And how can I resist this stunning “moulded sheath dress with a draped cascade”?

Most imaginative woman - cascade dress-4

I am so struck by the sophistication of the styling of the fashions and illustrations, the emphasis on Designer offerings, and the exciting abundance of piece goods being sold by manufacturer’s name to the home sewing population. Times and fashions change, but I believe we have much in common with these mid-century home dressmakers plotting their wardrobes with creativity and skill – pairing fabric and pattern. We are the women who sew – and are still the ones with the limitless imaginations!

21 Comments

Filed under Messages from past owners of vintage patterns, Mid-Century style, Moygashel linen, Pattern Art, Polka dots, The Conde Nast Publications, Uncategorized, vintage Vogue patterns from the 1950s

An Evening Jacket for the Ages

“Very up and coming” for the Fall of 1962, according to Vogue Pattern Magazine, was “the striking medium between a straight line and a bold curve – the gentle convex ‘barrel’ shaping of this coat:”

An Evening Jacket for the Ages - picture

It is from this time period – perhaps a year or two later – that this Designer Pattern comes:

Oh the things we can learn, no 10

I don’t know many of us who want to look like they are in a barrel, so it was my intention to take the best parts of the design of the evening jacket and then adapt it to a more current look, or at least to one that did not scream 1963/64

The details I loved about it were: 1) the shaped, two-part collar, which doesn’t really look like a collar, rather as an extension of the body of the jacket, but with more definition to it:

Evening jacket for the Ages

2) the dipped back hem of the jacket:

Evening Jacket for the Ages

I purchased the yellow silk taffeta from Britex Fabrics, while the dress fabric, also silk, is from Mendel Goldberg.

Evening Jacket for the Ages

3) the below-elbow length, kimono sleeves with their clever built-in gusset, and 4) the prominent, offset buttons:

Evening Jacket for the Ages

The top buttonhole is a slot-seam one, while the other two are bound buttonholes.

Less attractive to me was the fullness of the body of the jacket.

My muslin (toile) showed me that I needed to eliminate quite a bit of that fullness from the pattern pieces. I took 2 inches right out of the back of the jacket, making for much less to be gathered into the collar:

Even with two inches removed from the center back seam, there is still enough to gather nicely into the collar.

Even with two inches removed from the center back seam, there is still enough to gather nicely into the collar.

I also took a large wedge out of the each side of the back:

The dark blue line on the left is my re-drawn seam line. the original seam line is marked in red.

The dark blue line on the left is my re-drawn seam line. The original seam line is marked in red.

Then to add a little more shaping, I re-drew the side seams in the side underarm sections:

Again, the blue line on the left is my re-drawn seam line.

Again, the blue line on the left is my re-drawn seam line.

Because the buttons are such a prominent feature of the jacket, I knew I had to find the right ones. The pattern called for them to be 1¼” in diameter. That is a big button! I also knew they had to be a bit fancy or elegant, and I envisioned mother-of-pearl as the ideal composition. It took a while, but I found these buttons on eBay, and they looked just about perfect to me: right size, beautifully carved mother-of- pearl with a swirl design which I thought would add just the right contrast to the silk taffeta of the jacket. As it turned out, they were also the right price (always a welcome surprise!), and more beautiful when they arrived than I had anticipated:

Evening Jacket for the Ages

These buttons have a substantial heft to them, making them well suited for their application on this jacket.

After getting the body of the jacket together, I tried it on to look at the length of it. Fortunately I had cut my pattern with about an extra half-inch in the length, and I used it, plus another ¼ of an inch, as it just looked better a little longer.

Another plus to lengthening the jacket is that the sleeve length lined up more attractively, something I didn't realize until I saw these photos!

Another plus to lengthening the jacket is that the sleeve length lined up more attractively, something I didn’t realize until I saw these photos.

I did my usual flat applied piping along the edge of the lining:

Here is the piping sewn in place.

Here is the piping sewn in place.

The green piping picks up the green in the dress. I opted for an off-white lining, which is a little boring but that's okay!

The green piping picks up the green in the dress. I opted for an off-white lining, which is a little boring but that’s okay.

And I added the label I had:

Evening Jacket for the Ages

Evening Jacket for the Ages

Evening Jacket for the Ages

A few wrinkles left over from the jacket’s first wearing!

Evening Jacket for the Ages

Evening Jacket for the Agea

Evening Jacket for the Ages

I have to say, I really love this evening jacket. I have decided it is going to have another life – with another dress, this one constructed with the double, slanted flounce on it (see pattern above).  It would look fairly fabulous with a black and goldenrod printed silk – or navy, white and goldenrod printed silk…   I’ll be on the search.

17 Comments

Filed under bound buttonholes, Buttons - choosing the right ones, couture construction, kimono sleeves, Mid-Century style, piping, sewing in silk, Silk taffeta, Slot-seam buttonholes, Uncategorized, vintage buttons, vintage Vogue Designer patterns, vintage Vogue patterns from the 1960s

Wedding Ready

Why is it that we so often think every wedding to which we are invited means we need a new dress? Sometimes it is warranted; maybe we really do need a new dress! Maybe what we already have in our closet isn’t right for the season or the “ambience” of the wedding site. Maybe the couple getting married is very dear to us, and it just seems right to celebrate this event with something new and special. Maybe the wedding season is busy enough that we really cannot wear the same dress to multiple events where we will probably see many of the same friends and people. But maybe, just maybe, a wedding invitation is exactly the perfect excuse we need to indulge our love of fancy, dressy clothes.

Fortunately, I have not only a wedding to attend, but also, the following weekend, another elegant evening of “cocktails, dinner and dancing,” so it just seemed appropriate – necessary even! – to make a dress/ensemble that could suffice for both. Well, the dress is done, but not the jacket.

Front . . .

Front . . .

. . . and back

. . . and back

Wedding Ready

This is, of course, the pattern I had to alter in order to fit it onto my available fabric.

Oh the things we can learn, no 10

I made a couple more small changes to the dress. I broadened and lowered the neckline by a small amount, to make it more pleasing on me. I eliminated the neck facing and used the couture method of finishing that edge, with the dress lining brought up to the edge, fell-stitched in place, and secured with small back stitches. I also decided to make the center back zipper a focus when I found a vintage spool of green silk buttonhole twist in my collection. Using an idea I had seen one of my readers do (thank you, Cissie!), I pick-stitched the zipper with the twist, leaving a little trail of bright green dots along the center back.

In the Department of “Nothing is Easy,” I ran into a problem with the fullness of the “half-skirt” on the front of the dress. You may recall from my last post, that I doubled one of the back skirt sections to use for the front skirt (replacing the diagonally shaped flounces as shown on the pattern which required more fabric than I had.) When I made my muslin (toile), I did not realize that the front skirt was fuller than the two back skirt sections. I had all three sections of the fashion fabric sewn together, with the seams all catch-stitched, and the lining attached too (in order to treat both pieces as one in the ruffling process.)  I was half way through basting the skirt onto the body of the dress when I realized there was too much fullness in the front. I had to take it all apart, and figure out where I had made the mistake. It turned out that the front section of the dress was narrower than the two back sections sewn together. So I had to do some calculations, coming up with the fact that I had to take 4.5” off the width of the front skirt. That took a whole afternoon of sewing to take care of that adjustment!

The skirt was attached to the bodice in an rather unusual way as you can see in this photo and the instruction sheet below.

The skirt was attached to the bodice in an rather unusual way as you can see in this photo and the instruction sheet below.

Wedding ready - instruction sheet

I also had to figure out how to line the top part of the dress. I finally decided to leave the top part of the lining hanging loose inside the dress – and it actually works beautifully!

Wedding ready

The skirt lining is not attached to the bodice lining at all.

The skirt lining is not attached to the bodice lining at all.

Two small interesting design notes on this pattern are worth noting. First, if you look at the pattern envelope, you see small neckline darts on the back of the dress.

Wedding ready - pattern thumbnailWhen I studied the pattern, those darts were not there! Either the artist made a mistake, or the darts were eliminated when the pattern was drafted.

Another interesting design aspect is the center back seam in the skirt. Usually center back seams are there because there is an opening that the seam needs to accommodate. That is not the case in this dress, as the zipper does not extend into the skirt. However, even though it is very subtle, it just looks better to have a seam in the skirt that matches up with the center back seam of the bodice section.

That center back seam which is picked up in the skirt.

That center back seam which is picked up in the skirt.

It has been rainy and cold all week so no photos outside. I need a dress like this to remind me that it is actually May.

It has been rainy and cold all week so no photos outside. I need a dress like this to remind me that it is actually May.

Wedding Ready

Wedding Ready

Wedding Ready

Another back view

Another back view

Wedding Ready

I have decided I am “wedding ready” even without the jacket. However, if I get the jacket finished, I’ll be very happy!

27 Comments

Filed under Cocktail dresses, couture construction, Formal or fancy dresses, Mid-Century style, sewing in silk, Uncategorized, vintage Vogue Designer patterns, vintage Vogue patterns from the 1960s

The Silky, Shimmery Colors of Spring

Just as with the elusive answer to “Which came first, the chicken or the egg?,” those of us who sew can try to answer “Which comes first, the fabric or the pattern?” The answer, at least as I see it, is “It depends.” And sometimes, even, it is a little of both.

When I saw this fabric on the website of Mendel Goldberg Fabrics last Fall, I really did not stop to think about a pattern. It was a “bolt end,” 1 3/8 yards of 58” wide Italian silk. With that width, I wasn’t particularly concerned about the length being under 1 and ½ yards. I just ordered it as soon as I could.

The colors of Spring

Upon arrival, the fabric was even prettier in person, shimmery with “polka dots” woven in, fluid as only silk can be, and the picture of Spring. At that point, I was up to my ears with my Winter sewing, so I thought about it only casually until just a few weeks ago. I already had this pattern in my collection, and in the back of my mind, I had paired that fabric with the dress in View B on the right.

Oh the things we can learn, no 10

One interesting thing about vintage patterns is the yardage requirements are often given for widths that are narrower than many modern fabrics are produced in. For that reason, it can be difficult to determine exactly how much fabric is needed for a particular design. I’m getting better at sensing what I need, so I just assumed that I would have enough fabric to make that dress.   I had my heart set on it, actually. So much so, that when Britex Fabrics announced an upcoming sale of silk fabrics, I sent off for swatches for coordinating silk for the short jacket (in view A) and lining for the dress.

The green is a lightweight silk/cotton blend. The goldenrod yellow is silk taffeta from Italy, without the stiffness that taffeta so often has.

The green is a lightweight silk/cotton blend. The goldenrod yellow is silk taffeta from Italy, without the stiffness that taffeta so often has.

Dutifully ordered, the fabric arrived from California, and it, too, was even prettier in person! I was in love, and really could not wait to get started, first on the dress, and then on the jacket.

DSC_0036

The green for the lining . . .

The colors of Spring

… and the yellow for the short jacket in View A.

Then reality hit. When I took out the pattern pieces, here is what I found for that unusual flounced skirt:

This skirt piece uses almost a yard in length, and the diagonal shaping on it uses more fabric than normal.

This skirt piece uses almost a yard in length, and the diagonal shaping on it uses more fabric than normal.

My heart sank as I knew immediately I did not have enough fabric. There was going to be no Rumplestiltskin to help me with this one.   I went back to my pattern collection and pulled out two more possibilities.

I love this dress, but I thought it might be too tailored for the fabric. Also, the seaming detail would be lost entirely with the busy design of the silk.

I love this dress, but I thought it might be too tailored for the fabric. Also, the seaming detail which adds so much to this dress would be lost entirely with the busy design of the silk.

I felt like Goldilocks evaluating this pattern for my fabric. Just not right...

I felt like Goldilocks evaluating this pattern for my fabric. Just not right…

With both these dresses I would have to rethink the jacket, as the styles would not compliment each other. I stewed over this, re-measured, re-thought, and left it all in a heap in my sewing room. There was something about that shimmery silk that kept telling me that a dress made from it needed to have some movement to it –  like the flounced half-skirt pictured in the pattern. And then it hit me. If I made the front part of the skirt the same as the back, I could probably just squeak it out.

I did a quick diagram to consider this option.

I did a quick diagram to consider this option.

My completed muslin verified this for me, and, not only that, I loved the look, at least done up in muslin. Once again, using the couture technique of laying out and cutting each pattern piece individually enabled me to manipulate the pieces to make the most of the fabric I had available to me. Fortunately, there was no matching to be done, although there is a specific up and down to the design.

Now this is what is called making the most of one's available fabric!

Now this is what is called making the most of one’s available fabric! This shows my silk organza underlining pieces in place, ready to cut.

As far as the jacket – losing the diagonally shaped flounces on the skirt, makes the effect of the jacket not quite as dramatic, but I think it will still be very flattering – and appropriate. (The jacket has a million pieces to it, so it will be quite the project…!)

Well, I can’t leave this post without sharing another color of Spring, although this one is not silk and not shimmery. Pink cotton gingham is the picture of Spring, especially in a little dress for a little girl! When I made a crib quilt for my younger granddaughter, Carolina, I backed it in pink gingham, appropriately called “Carolina Pink.” I ordered enough so that I would be able to make her a dress for her first birthday (earlier in April) and here it is:

The colors of Spring

The colors of Spring

The bodice is lined in soft white cotton, which makes a lovely finish.

The bodice is lined in soft white cotton, which makes a lovely finish.

In my tins of buttons, I found these little ceramic ones, purchased years ago when Carolina’s mommy was my little girl. (Well, she is still my little girl, but you know what I mean.) How appropriate to use them for one of her daughter’s dresses.

The colors of Spring

These buttons, with their delicate cross-hatch design, were just waiting for this dress.

And with this dress –  the fabric absolutely came first!

17 Comments

Filed under Buttons - choosing the right ones, Formal or fancy dresses, Heirloom sewing for children, Mid-Century style, Sewing for children, sewing in silk, Silk taffeta, Uncategorized, vintage Vogue Designer patterns, vintage Vogue patterns from the 1950s, vintage Vogue patterns from the 1960s, vintage Vogue patterns from the 1970s

The ABCs of D-R-E-S-S-M-A-K-I-N-G, Part II

One of the most intriguing aspects of couture dressmaking is that the techniques and the sewing procedures have really not changed much in over 60 years, perhaps even longer. There seem to be very few short cuts when it comes to MAKING a quality garment. (And, although sergers are handy and have their place, they are unnecessary – nay, unwelcome, even! – in the world of couture dressmaking.)          Thus we come to our second half of  The ABCs of D-R-E-S-S-M-A-K-I-N-G

M, of course, is for MUSLIN. Although many of my fellow dressmakers around the world refer to this as a toile, in the States we call our test garment a muslin, after the basic cotton fabric, purchased cheaply, which is used for its construction. Once I started taking classes with Susan Khalje, I learned the true value and versatility of this basic part of dressmaking. Subsequently, my muslins are written upon with abandon, torn apart, discarded when too many fitting issues are revealed, and regarded with a certain restraint, for what they can and cannot do. They CAN help you fit your pattern to your particular shape and needs. They CAN be a test run for the construction of your garment. They CAN suggest to you if the design you have chosen is right for you (although not always). They CAN’T mimic the flow and drape and weight of your fabric. So – as always – one needs to use her sewing brain to compensate for the lack of this important detail – and make a best guess as to how the finished garment will actually fit and look.

How many muslins does one dress need? Sometimes, several!

How many muslins does one dress need? Sometimes, several!

A is for ACCURACY. Accuracy in marking straight-of-grain, seams, notches, darts, buttonholes, buttons, center front and center back, fold lines, pleats, tucks, pockets, etc. etc., is absolutely paramount for a successful garment. This is often time-consuming and tedious work, isn’t it? But have you ever had to go back to your tissue pattern to see exactly where a notch or seam junction are? That’s also time-consuming.   I try to do it right the first time, but sometimes I miss. So – I am always striving to increase my accuracy when it comes to marking my fashion fabric.

Just for example, the most important ingredient in making successful bound buttonholes is precise marking.

Just for example, the most important ingredient in making successful bound buttonholes is precise marking.

K is for KEEP. When you have a workable muslin pattern which has been successfully made into a finished garment, and you have notes and diagrams, and suggestions written on it, KEEP it. You never know when you might want to use it again. I think I have kept all my muslins – in large plastic zip-lock bags for the most part – except for one. I could not wait to get the muslin for what I call my Ghost Dress out of my house! I will never make this pattern again! The moral of the story is, Keep the good, discard the bad…

I also like to keep extra buttons, and at least a little bit of extra fabric and trim (if appropriate) for each of the pieces I complete. One of these days, I’m going to put together a notebook of fabric swatches, so that I can keep a record of all these yard goods which have stolen my heart.

I is for INNER WORKINGS. The inside story of any couture dressmaking is a story of attention to details. Interfacings, inter-or-under-linings, linings, seam finishes, bar tacks, waist stays, boning, pad-stitching, even labels (and the list goes on and on) – give your garment a professional look. Skimp on this part of dressmaking and results will be compromised.

Here is just one page from the 1957 Vogue Dressmaking Book which shows some "inner workings."

Here is just one page from the 1957 Vogue Dressmaking Book which shows some “inner workings.”

N is for NEEDLES. Using the correct needles will go a long way in making your sewing experience a pleasant one. I have only recently started using real basting needles for attaching silk organza underlining to the fashion fabric – and what a difference it makes.

These are excellent basting needles!

These are excellent basting needles!

Of course, everyone knows the importance of changing your machine needles frequently. I even find that my hand sewing needles sometimes need to be “retired” if they start to show signs of losing their sharpness – or get a bend in their spines.

All in all, sewing needles are amazing things! The magic within them has been recognized by artists, poets, and, of course, by dressmakers, for centuries. Samuel Woodworth summed up their charms and inextricable human connection in this charming quote:

The bright little needle – the swift-flying needle, the needle directed by beauty and art.”

G is for GET ON WITH IT. Sometimes the most difficult part of dressmaking is getting started. Starting a new project – especially a complicated one, can be daunting, but the only way to get started is to . . . get on with it.

So, there we have it – the ABCs of D-R-E-S-S-M-A-K-I-N-G, a simplified synopsis of a very complicated and diverse undertaking. Dressmaking has it all for those of us who love to sew fine fashions – and find joy in the process.


7 Comments

Filed under couture construction, Love of sewing, Quotes about sewing, The Conde Nast Publications, Uncategorized

A Fine February Finish

Leap Year, with its extra February day, seemed to be custom made for my sewing schedule. I had hoped to have my gray cashmere coat finished by the end of the month, and thanks to those extra 24 hours, I managed to do just that – barely! I will confess to taking out basting stitches, steaming, and adding two bar tacks to the lining on March 1st (gasp), but now my coat is finished.

A Fine Feb Finish

A Fine February Finish

Photos of me in this coat will be in a future post…

Like Claire McCardell, who said “I believe in a collection of coats,” and coats are “revealing, a clue to your taste, and your knowledge of Fashion,” I also believe that one should not “make a coat too basic.” The unique aspect of fashion sewing is that one can start with a basic (or not-so-basic) coat pattern and then make it her own.

The first owner of this Vogue Designer Original pattern, designed by Guy Laroche, which I used for my coat, had obviously used it. (This isn’t always the case – many vintage patterns are still “factory-folded” and in their unused condition.)

When I purchased the pattern, I had already decided to lengthen the sleeves, which are shown on the pattern envelope as “below-elbow” or bracelet-length. I wanted full-length sleeves as a practical matter. Much to my delight, the original owner had decided the same and had added tissue paper inserts into the sleeve pattern pieces. As it turned out, the length she had decided upon was also exactly right for me.

What a nice surprise to find the sleeves already lengthened!

What a nice surprise to find the sleeves already lengthened!

There are really only a few details I chose for this coat which serve to make it “not basic.” Besides the bound buttonholes (which used to be basic but are not so much anymore!), I put emphasis on the buttons, the lining and a couple of the finishing details.

First the buttonholes and buttons: because the cashmere fabric is coat-weight, I needed to make the “lips” of the buttonholes a bit wider than normal. Once again, I used an organza patch on the underside of the buttonholes, which makes a very nice interior finish:

The line of basting stitches is the fold line - the organza patch is on the facing part of the front edge.

The line of basting stitches is the fold line – the organza patch is on the facing part of the front edge.

Here is the patch ready to be sewn onto the back of the buttonhole.

Here is the patch ready to be sewn onto the back of the buttonhole.

I found these vintage buttons in an Etsy shop. Although they appear to be gray mother-of-pearl, they are actually plastic. The iridescent strip through the middle of each one, along with the square detail on the tops, gave me the idea to arrange them on an angle. I think they add just the right amount of interest to the front of the coat.

The "square" detail on the buttons picks up the design in the lining fabric.

The “square” detail on the buttons picks up the design in the lining fabric.

A Fine February Finish

Using the printed wool challis for the lining certainly elevates this coat to a notch above ordinary. The sleeves are lined with gray rayon Bemberg for practicality’s sake.

An inside out view, trying out the lining.

An inside out view, trying out the lining.

This photo shows a good look at the finished buttonholes, too.

This photo shows a good look at the underside of the finished buttonholes, too.

Of course the detail I love the most is the flat piping I added to the front interior edges of the lining.  As I have said before, doing this is so easy and adds so much.

A Fine Feb Finish

A Fine February Finish

Here is the flat piping stitched in place - so easy!

Here is the flat piping stitched in place – so easy!

The final small detail, which helps the collar to keep its shape, is under-stitching (by hand) on its underside.

A Fine February Finish

So what else did Claire McCardell say about coats? To quote from her book, What Shall I Wear, page 69, “… you can take another step and get a coat and dress that go together—never to be separated, never to be worn with any other dress or any other coat, and always with a special feeling of satisfaction. If you take a little trouble, you may be able to manage a heavy fabric skirt to go with the coat.”  I plan to take that little bit of trouble – a skirt out of the gray cashmere, and a blouse from the printed challis – to complete the outfit, and I will hope for that “special feeling of satisfaction.”

30 Comments

Filed under bound buttonholes, Buttons - choosing the right ones, Coats, couture construction, Dressmaker coats, Mid-Century style, Quotes about sewing, Uncategorized, vintage buttons, Vintage fabric, vintage Vogue Designer patterns, vintage Vogue patterns from the 1960s, woolens

Can a Coat be Glamorous?

And what exactly is glamour? A recent quote by Carolina Herrera – “It’s important for women to feel glamorous and feminine but always themselves” – prompted me to look up the definition of the word “glamour” – and I was surprised by what I found. Here is how Webster’s defines it in its noun form: 1) the quality of fascinating, alluring, or attracting, esp. by a combination of charm and good looks 2) excitement, adventure, and unusual activity, like the glamour of being an explorer 3) magic or enchantment; spell; witchery. And then there is the definition of “glamorous”: 1) full of glamour; fascinatingly attractive; alluring 2) full of excitement, adventure , and unusual activity: to have a glamorous job.

Glamour was the last thing on my mind when I started out on my current coat project. Making a muslin (toile) can be time-consuming and tedious, especially when it shows you that some serious alterations need to be made. Fortunately, my coat muslin revealed only some small changes to the shoulder of my raglan sleeve coat, compensating for my square shoulders. My go-to book to guide me through these complexities is Fitting and Pattern Alteration, by Liechty, Rasband, and Pottberg-Steineckert (recommended to me by Susan Khalje.)

I highly recommend this book.

I highly recommend this book.

One of the things I love about this book is that it covers all sorts of situations. Square shoulders for Raglan sleeves? Not a problem.

The diagrams take the guess work out of alterations to patterns.

The diagrams take the guess work out of alterations to patterns.

Once I had my muslin adjusted, my silk organza interlining marked and cut (to be used as the pattern for the wool), I felt like I was off to the races. Not so fast. A careful steaming of my wool fabric revealed three small “thin” areas (not holes, but thin enough that I would need to work around them). This is not unusual for vintage fabric, and is one of the reasons why a careful pre-steaming or pre-pressing of any fabric is important, but especially so for vintage goods.

I marked these small imperfections with yellow chalk.

I marked these small imperfections with yellow chalk.

And then double-marked the areas with orange post-its when I was arranging the pattern pieces.

And then double-marked the areas with orange post-its when I was arranging the pattern pieces.

After untold hours of basting the layers of silk organza and fashion fabric together, I was finally ready to sew.   And this is when I think it began to get glamorous. The first major details to be completed were the pocket plackets. I thought I might faint when I had to make that first cut into one of the side panels of the coat front. But bravery saw me through!

I have the placket catch-stitched temporarily so it does not get caught on something while I finish the remainder of the coat.

I have the placket catch-stitched temporarily so it does not get caught on something while I finish the remainder of the coat.

Here is the inside of the pocket and placket.

Here is the inside of the pocket and placket.

With the first pocket and pocket placket successfully completed, the second pocket placket was simply fascinating and alluring, my progress encouraged by the charm and good looks of the first one. Definitely glamorous!

Progress - both pockets/plackets finished!

Progress – both pockets/plackets finished!

More seams ensued, each one carefully pinned, sewn, pressed and catch-stitched. Particularly rewarding were the shoulder seams of the raglan sleeves. Properly clipped, pressed and catch-stitched, the seams lie beautifully and look good, too.

The benefits of a silk organza interlining (or underlining) are manifold, but not least of which is a foundation upon which to secure the seams.

The benefits of a silk organza interlining (or underlining) are manifold, not least of which is a foundation upon which to secure the seams.

A view of the back of the coat (in progress.)

A view of the back of the coat (in progress.)

Although I have many more hours to go with the construction of this coat, I can’t help but feel that not only is this coat going to be glamorous, with its elegant gray cashmere, its vintage sensibility and all its hidden, inside secrets used to tame those seams, it is also going to be feminine and definitely me.

Perhaps the next question to ask is “Can sewing be glamorous?” It is “fascinatingly attractive, full of excitement, adventure and unusual activity.” It is magical and enchanting, too. The answer would have to be, “Yes, sewing most definitely can be very glamorous!” Even when we are in our bedroom slippers and blue jeans, covered in threads and pins, if we are sewing, I say we are glamorous.

20 Comments

Filed under Coats, couture construction, Dressmaker coats, Love of sewing, Mid-Century style, Uncategorized, underlinings, Vintage fabric, vintage Vogue Designer patterns, vintage Vogue patterns from the 1960s, woolens