I have finished making a new dress from an old pattern, which isn’t anything too unusual for me. What is unusual is the spell which this pattern cast over me from the time I first saw it last January, and then purchased it from an Etsy shop.

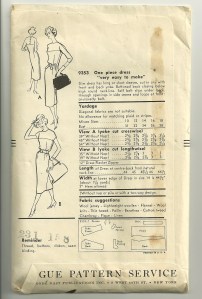
The back of the envelope, showing the back yoke detail. Don’t you love the handbags that the artist included?
Copyright 1957, this pattern has intrigued me for both how modern it looks, and how quintessentially “1950s” its various details are – such as:
1) Kimono sleeves in three-quarter length. Cut in one with the bodice, kimono sleeves were common in the ‘50s, and now seem to be making a comeback. Three quarter length is extremely flattering for most women, and was popular then and now.
2) Side zipper. This dress goes over the head and needs that side zipper to accommodate the wiggle room needed to accomplish this method of dressing. A back zipper would completely ruin the effect of the four-buttoned back yoke.
3) No pockets. While pockets are lovely inventions, this dress would lose some of its slim and flattering line should pockets bulge out from the side seams.
4) Mid-calf length. This length looks great in the pattern illustration, but not so much on me. One of the beauties of these vintage patterns is adapting them for current wear – so I opted for knee-length instead.
5) Bound buttonholes. Although this pattern is called “easy to make” on the back of the envelope, it still calls for bound buttonholes. And, oh, they add such a nice detail.
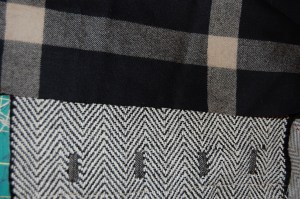
Now to the specifics. I found this black and white herringbone alpaca wool (made in the USA) on Britex Fabrics’ website, and purchased it on sale a few months ago, specifically for use with this pattern.

This is the swatch I ordered from Britex sometime over the Summer.
I wanted to make the dress using couture techniques (learned in the online Craftsy course The Couture Dress taught by Susan Khalje.) This meant that I would 1) make a muslin for fitting and pattern tracing; 2) underline the entire dress with silk organza; 3) eliminate the separate neck facing; 4) finish all the interior seams by catch-stitching them to the underlining; and 5) line the entire dress, which I did using Bemberg instead of china silk (more on that in a bit).
There were a number of decisions/problems/successes involved in making this dress. First, the nature of the fabric is that there are slight imperfections in the weave, and it is quite loosely woven, making it quite susceptible to raveling. When I laid it out to cut it, I wanted to avoid any obvious imperfections front and center. Patterns with kimono sleeves demand large expanses of fabric and thus do not allow a lot of jiggling of their placement. I can honestly say that I had JUST enough fabric and not an inch more than I needed!
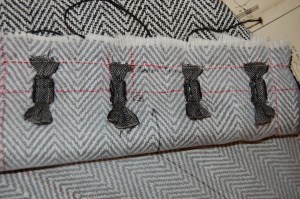
One of the first problems I realized I was going to have concerned the buttonholes. I quickly discovered that the loose weave of the fabric meant that I was not going to be able to make bound buttonholes using self-fabric for the “strips”. I considered using a plain black wool for these strips, but I thought that would be too much of a contrast. Well, now I know why I save all kinds of scraps from previous projects – you never know when one of those random pieces of fabric will come in handy. I spied a scrap in my fabric closet and quickly decided that one part of the weave would be perfect to delineate those buttonholes:
I used the “gray” portion of this windowpane check for the buttonhole “strips”. Click on the photo to see this up close.
An inside look at the buttonholes in progress
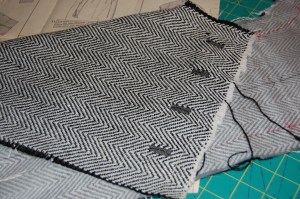
And an outside look…
When it came to deciding on buttons, I could not find any I liked. But I remembered some buttons I had sewn onto a RTW jacket several years ago (to replace the ones that came on it.) They have a “herringbone” look to them – it’s very subtle, but effective. The jacket is one I haven’t worn in a couple of years, so I just robbed the cuffs of their buttons and used them on my dress. (Now I guess I know for sure I won’t be wearing that jacket again!) But – the buttons are perfect for this dress.
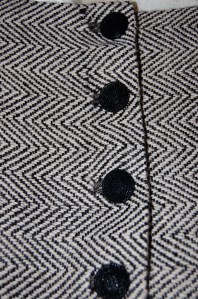
My buttons of choice!
Choosing to use couture techniques was a “dress-saver”. The larger seam allowances took away the panic I might have felt, once I realized the fabric frayed so easily. And finishing off each interior seam with catch-stitching controlled the fraying and helped the seams to lay perfectly flat.
Eliminating the separate neck facing was also a bonus to ease construction. First of all, I wanted to widen the neckline, which I worked out in my muslin. Using the seam allowance and hand-applied, under-stitched lining for the neck facing made it lay flat, and of course, it’s not itchy either!
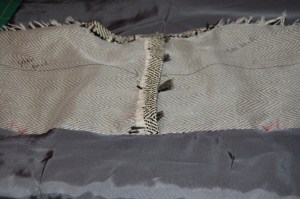
The “couture-constructed” neckline, before the lining is attached.
Even though I did not have “plaids” to match, I needed to pay close attention to the rows in the herringbone weave, so that none of them were crooked. This is where Clover two-pronged pins (recommended by Susan Khalje in The Couture Dress class) came in handy and helped me keep those rows lined up evenly.
Clover “fork” pins
Finally, I decided to use Bemberg lining fabric instead of China silk because I thought it might be a bit more substantial for this somewhat heavy weight wool. When I was deciding what color to make the lining, I considered ivory, black, and even a bright color, such as red. But I settled on deep gray, and it seems just right.
In fact, everything about this dress seems just right. It is delightfully rewarding when a pattern does not disappoint – and when it turns out to be a complete winner, well, that is reason to make it again (which I will)!

I can wear this dress as a sheath, unbelted, but I love it with this Coach black belt.


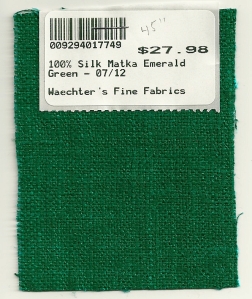
With a touch of emerald green for the holiday season.

With green gloves for a ’50s’ look!

And another back view. Alpaca is a very warm wool – so this dress is very cozy.
For now, however, my sewing room is “gift-wrap central”. The colorful ribbons, paper and tags are cheerful tokens of a season of blessings and family and home. To all of you celebrating the season, may it be a time of great peace and love for you and yours. And, as I take a couple of weeks “off”, I send a heartfelt Merry Christmas from me to you…