A Sewing Draught

The weather outside is frightful, as the popular Christmas song goes.  It has been too hot and too wet here in eastern Pennsylvania (USA) this summer.  Our family travels, however, took us to areas that were both too hot and much too dry. It was exactly those lengthy travels which helped determine the atmospheric conditions in my sewing room during the past weeks.  There has been a definite draught in that part of the house.  The sewing machines have been huddled under their covers, the fabric has lain folded and fallow, there has not been even a bubble of moisture from the steam iron, nor the slightest snip from the scissors.  It has been a place undisturbed and quite barren.

So, finally, it is time to change all that!  Now I am faced with the question – Do I try to squeeze in the making of one more summer dress (it certainly still feels like summer) – or do I forge ahead with a project which has a mid-October deadline?

If I go with one more summer dress, it will be one made from this vintage Moygashel linen, which has been in my queue for quite some time – and somehow never made it to the top.

Realistically, it would probably be wiser to focus on that mid-October dress, which is going to be a cocktail dress made from this amazing fabric, a lightweight brocade, embroidered and with with lace appliqués.  One of the perks of attending Susan Khalje’s Couture Sewing School in Baltimore (which I did last April) is the opportunity to see and purchase fabric from Mendel Goldberg Fabrics.  Alice Wildes, the proprietress, arrives at the beginning of each week-long class with a car full of her gorgeous, carefully selected yard goods, and that is where I purchased this piece.

The embroidered flower stems are a light gray, and the flowers themselves are a pale pink.

Getting this brocade was actually a last minute decision, as I already had one cotton piece selected – and I was trying to be circumspect in buying more fabric (remind me again of why I ever think this will work?) Anyway, I’m so glad I succumbed as I love it and have determined which pattern to use for its construction:

I will be making the shorter dress, without the jacket.

I like the notched neck detail on the shorter dress. I may make below elbow length sleeves – still to be determined.

Although this dress appears to be a simple silhouette, I have plans to change it up a bit, which will add to its complexity, so it certainly cannot be rushed.

With any luck, the weather will start to change for the better no matter which project I embark on.  The only question is – which one will get the nod?

13 Comments

Filed under Cocktail dresses, Formal or fancy dresses, Lace, Linen, Moygashel linen, Uncategorized, Vintage fabric, vintage Vogue patterns from the 1960s

Secrets and Tips for Making a Tailored Bow Belt

After adding the final details – specifically, attaching lingerie straps and sewing on a back neckline hook and eye – to my silk polka dot dress, I was feeling quite happy with my accomplishment.  This dress did not seem to take forever to finish, as many dresses do.  But I could not rest on my laurels for more than a few minutes – as I knew I still had to make a tailored bow – and belt – before this project would be really complete.

I started with the belt.  I had already determined that a 1.5” wide belt would be the most attractive.  I remember “back in the day” when belt-making canvas in various widths was readily available.  Now, however, it takes a search on eBay or Etsy to find such a thing (as far as I can tell.)  Fortunately, one of the last times I was in Britex Fabrics in San Francisco (on the opposite side of the country from where I live), I found a product – kind of a buckram – that I knew would work well for belts.  I bought it in two widths – 1.5” and 1.25”.  I used the wider width as the basis for my belt.

A segment of the belt buckram.

1)  I first cut the desired length of belt buckram, leaving a good amount of overlap.

2) Next I cut out the fashion fabric to cover the buckram, which in my case was silk taffeta. I cut it out on the crossgrain as that gave me the color I wanted (the warp and weft of the fabric were in fuchsia and orange.) For a 1.5” belt I cut a width of 2.75” which allowed for a turn-under of 5/8” on either side. The length of this piece of fabric needed to be the entire length of the belt buckram, plus one inch for turning in the ends.

3) I wanted to line the belt with the navy blue crepe de chine I had used for lining the dress. I cut out a piece of the lining fabric identical in size to the long rectangle of the fashion fabric.  I seamed the two pieces together along one long edge. Then I pressed it so that the lining was slightly offset from the fashion fabric.

I interfaced the fashion fabric with silk organza.

The lining sewn onto one side of the fashion fabric.

4) I placed the belt buckram securely inside against that sewn edge, with the seam allowances towards the back of the belt.  I carefully secured the loose edge of the fashion fabric to the buckram using Dritz Wash Away Wonder Tape.  Then I folded under the raw edge of the lining, pinned it in place and hand-stitched it in place, leaving another slight offset along the second edge.

The underneath side of the belt with the lining attached, one side by machine, the other side by hand.

One end of the covered belt.

Next up was the tailored bow.

1)  I decided the bow should be the width of the front panel of the bodice of the dress, which was 7”.  For a finished bow, I needed to double that length, plus two ½” seam allowances, plus 1 inch for each tapered end of the bow.  7+ 7 + 1 + 1 + 1 = 17” length.   The width needed to be twice the width of the belt (1.5” x 2) plus 2 seam allowances of ½” each.  Total width needed to be 4”  – thus I cut out a piece of fashion fabric 17” x 4”, making sure I cut it out on the crossgrain to match the belt.

2) I interfaced my bow with silk organza, trimming it close to the seam line.

3) I then stitched the strip along its length only (not the ends), leaving about two inches open in the center.

4) I centered that seam along the length on the “inside” side.  I found inserting a metal ruler in the fabric tube helped me position that seam along the inside center.  I then pressed that seam, being careful not to press a crease in the outside edges.

Inserting the metal ruler into the tube of fabric made centering its seam so much easier.

5) I wanted double-peaked bow ends rather than a single angle.  I marked my sewing lines with a fine chalk marker and stitched, starting at the center and stitching to the edge.  I tied off the threads by hand rather than back-tacking. Then I trimmed and clipped the ends.

6) I turned the fabric “tube” to the right side and stitched the opening together by hand. (A hemostat is a huge help in turning narrow tubes of fabric like this.)

7) I don’t believe there is any magic formula for determining the spread of the bow – it is a visual determination, and I experimented until I had it looking well proportioned. I stitched across the width of the fabric tube at that spot.

The stitching is visible between the 13 and 14 inch markers.

This drawing explains the seam a little better.

Then I centered the loops and carefully pressed across the seam I had just sewn.   Basting by hand across this center point secured the position of the loops.

The loops of the bow are held in place by the center stitching line.

8) The bow was now ready for its “knot.”  I had to determine how wide I wanted my knot to be.  I chose to make it one half the width of the belt, or ¾” for the finished width.

9) The strip I cut needed to wrap around the width of the belt, front and back, with ample seam allowance to tuck in.  Twice around the width of the belt equaled 3” plus seam allowance of 1”.  So my strip of fabric needed to be 4 inches long. Its width was twice my chosen width of ¾” (1.5”), plus seam allowance of 1”.  Thus the knot would be made out of a piece of fashion fabric 4” x 2.5”.

10) I sewed the long edge of that piece together.  I again used a metal ruler (a smaller one this time) to position its seam along the center back of the piece.  I pressed it carefully along that center seam and then turned it right side out.

The inside seam on the knot.

The length for the knot turned right side out.

11) I centered this finished tube around the center of my bow, tucked in the raw edges on back, secured by small stitches, and slip-stitched it to the back of my bow.

This diagram shows the back of the bow with the knot being set in place.

12) I hand-stitched the finished bow to one end of the belt, added fasteners, and my belt was finished.

If you are still reading by now – and are still awake (good for you if you are!) – you will realize how much common sense techniques help make such a belt successful.  And in this instance, the success of my completed dress was largely dependent on the right belt – with its classic tailored bow.

12 Comments

Filed under Bows as design feature, sewing in silk, Uncategorized

Wearing Dots

From this …


To this…


How did that happen?

After my purchase of that pattern a couple of years ago, I definitely had second thoughts.  While I loved it when it was first available back in the 1970s – and at that time I was of the age when I probably could have actually worn it – I immediately realized it would not be appropriate for a 60-something-year-old! I tucked it away in my pattern file where I knew I would come across it occasionally and indulge a long-ago dream.  Little did I know it would play a major roll in the realization of this polka-dotted dress.

It took almost eight years for me to come up with a plan for this polka dot silk fabric.  I kept envisioning a waisted, sleeveless dress with a “flowy” skirt, but I could not find a pattern I liked, either vintage or new.  I wanted to avoid darts as much as possible (that’s a story in itself for someday), which meant I needed a princess style bodice.  Many princess line bodices have side seams, but I wanted one without side seams, and with princess line seaming on the bodice back as well.  Pondering all this, I again came across my Belinda Bellville pattern above and thought maybe it would work, with a few changes. But then I noticed that the bodice was supposed to be cut on the bias. 

This pattern detailing from the instruction sheet shows the thee bodice pieces at the top of the picture. The bias is clearly marked.

After not having any success in finding any other suitable pattern, I gave it another look.  Why not cut it on the straight of goods?  It was at least worth a try in muslin, so that’s what I did.  The changes I made to it included; 1) lowering the bust line, 2) eliminating the short-waisted front of the dress and restoring it to waist level, 3) placing the front center part of the bodice on the fold, eliminating the center seam, 4) lowering the neckline just a little, 5) making the waist larger, and 6) adding some ease across the back and shoulders.  With all those changes, I had a bodice I really liked.

But then I needed to make a skirt to complement the bodice.  When I looked at the skirt pattern, I knew I needed to divide it in thirds (for one half of the width of the skirt) and match the seam lines to the seams in the bodice.  Here is what I came up with:

On the left is the one-piece tissue pattern for the skirt. Using the dart lines on that pattern helped me determine the angles I needed for my skirt.

It was about this time I got the idea to make this dress in a longer skirt rather than knee-length, which is where I usually wear my dresses.  The only question I had was – did I have enough fabric to do this?  My silk was 45” wide, and I only had two yards.  I spent at least an hour laying out and eyeballing my muslin pieces on the silk, on the floor, just to see if I could possibly accomplish this task.  I found one combination that would allow this, and took a photo so I could remember how to do it!

It literally took an entire week to work out the pattern and perfect the muslin, but then the sewing began!

As soon as I completed the construction of the bodice, including its silk organza underlining, its catch-stitched raw seam edges, with the seam allowances around the neckline and armholes appropriately tacked in place, I knew I had a bodice which was just what I had envisioned.

Somehow the skirt seams all matched up perfectly with the bodice seams and the center front inverted box pleat, which I added, looked wonderful, I thought.  I made the lining out of navy blue crepe de chine, purchased from Emma One Sock Fabrics.

When it came to under-stitching the neckline and armholes, I decided to do it in white.  It mimics the white polka dots in the fashion fabric and also was much easier to see while doing all that handwork.

Instead of a box pleat in the lining, I did two side pleats to reduce bulk in that critical tummy region!

Fortunately, for the belt, I had silk taffeta left over from two previous projects, which turned out to be a perfect match.  I did not want the belt to take away visually from the rest of the dress, so I made it a modest 1.5 inches wide.  I think it is enough to complete the look, but not overpower it. And OF COURSE I wanted to finish it off with a tailored bow.  (I am planning a post on making this tailored bow belt, so I will not go into the details of it right now.)


An oyster-colored clutch helps to complete the look.

This is a very comfortable dress to wear!

No attempt was made to match any dots, as the pattern was completely random. This is the hand-picked zipper. I love the fact that the navy thread shows up on the white and coral dots.

And should I need a dress coat, this one matches the belt!

While this dress was firmly in my queue for summer sewing, at the time I did my planning I was not making it for any special occasion.  However, as good fortune would have it, two unforeseen occasions are now approaching in late summer for which this dress will be perfect.  I am definitely looking forward to wearing these dots!

41 Comments

Filed under Bows as design feature, Cocktail dresses, couture construction, Linings, Mid-Century style, Polka dots, sewing in silk, silk, Silk taffeta, Uncategorized, vintage Vogue Designer patterns, vintage Vogue patterns from the 1970s

Seeing Dots

Who doesn’t love a polka dotted motif?  The term “polka dot,” dating from 1880-85, is of American derivation, and of course it immediately conjures up a mental picture of a field of spots forming a pattern on a textile.

Here is what Christian Dior had to say about Dots in his Little Dictionary of Fashion, first published in 1954:  “I would say the same about dots as about checks.  They are lovely, elegant, easy, and always in fashion.  I never get tired of dots…  Dots are lovely for holiday clothes … and for accessories.  According to their color, so they can be versatile…  Black and white for elegance; soft pinks and blues for prettiness; emerald, scarlet, and yellow for gaiety; beige and gray for dignity.”  (The Little Dictionary of Fashion, by Christian Dior; Abrams, New York, New York, 2007, page 34.)

“Lovely, elegant, easy and always in fashion.”  That is quite an endorsement, and one with which I completely agree.  I also have to agree with these quotes, the first one  from Marc Jacobs: “There is never a wrong time for a polka dot,”  and this one from the American actress, Anna Kendrick, “You can’t have a bad day in polka dots.”

While images of polka-dotted dresses, blouses, ensembles, and sportswear are in abundant supply from many sources, it’s always inspiring to look at a few select examples, many from the 1950s.  The following two images were part of a feature in the February/March 1955 Vogue Pattern Book Magazine.  Although pictured in black and white the first example is described as “Tiny white polka dots on red crepe. A soft day-long dress.”

The next image is titled Gigantic Dots:  “Bold black dots on hot pink surah.  A dramatic sheathed bodice dress.”

Can you imagine how beautiful this dress was in hot pink with black dots?

The June/July 1957 VPB Magazine featured “the most romantic dress of the season – a pouf of black-and-white silk polka dots.”

Less than a year later, in the April/May 1958 VPB Magazine, an entire feature was on Polka Dots and Patent Leather:  “Exciting goings-on in polka dots: fresh new arrangements – at their most polished in black and white silk surah, spruced with gleaming black patent leather.”

Below is the dress of this description: “Dots blown up to impressive sizes – a look for relaxed but festive evenings.”

This two-piece dress could easily be worn today and look very current.

And here is the image for “Classic polka dots – square cut blouse [with] reverse-dot cummerbund:”

One of my favorite outfits from the show Mad Men was this white linen dress with a built-in silk polka dot sash. The two-color sash makes this dress a standout:

Image from The Fashion File; Advice, Tips, and Inspiration from the Costume Designer of MAD MEN, by Janie Bryant with Monica Corcoran Harel; Grand Central Life & Style, New York, New York, 2010, page 8.

This famous – and stunning – 1958 dress and coat ensemble by Arnold Scaasi, an American couturier, was featured prominently in the retrospective of his work at the Museum of Fine Arts in Boston, September 25, 2010 – June 19, 2011:

Now this is an exhibit I wish I had seen.

And finally, this is a Carolina Herrera ad which I plucked out of some magazine a while ago. The ad is for the handbag, but the polka-dotted dress, with its bright red sash steals the show:

So why all my focus on polka dots?  They have been much on my mind lately, as I have finally begun the many-step process of making a couture dress, using this vibrant silk, purchased seven or eight years ago:

This is a crepe de chine which I purchased from Britex Fabrics in San Francisco. Smaller irregular dots are woven into the design.

The background color is navy blue.

Now my hope is that one cannot have a bad sewing day when working with polka dots.


20 Comments

Filed under Cocktail dresses, Day dresses, Fashion Exhibits, Fashion history, Mid-Century style, Polka dots, The Conde Nast Publications, Uncategorized, vintage Vogue patterns from the 1950s

Forever Gingham

Gingham fabric has been around for a long, long time.  Since the early 17thcentury to be exact, although the look of the fabric has changed considerably since those days.  The word “gingham” is from a Malay word “gingang” which means “with space between,” hence, striped.  Yes, originally gingham was a striped fabric.  It appears that it became a checked fabric sometime in the mid 1700s, and of course, that is how we think of it today.

Gingham has a fresh, timeless appeal to it, and the iterations of it are countless.  The size of the checks can be absolutely miniscule or large and prominent.

Each check in this gingham is only a couple of threads wide. I do not have an example of a really large checked gingham, but you can surely visualize it.

There are two types of gingham; the entry in The Fairchild Dictionary of Fashion (Third Edition, by Charlotte Mankey Calasibetta and Phyllis Tortora; Fairchild Publications, Inc., New York, New York, c2003, page 209) explains it beautifully:  “Checked ginghams are two-colored effects made by using two colors, or one color and white, for groups of yarns in both the lengthwise and crosswise.  Plaid ginghams are yarn-dyed designs of several colors.”

And do you know what zephyr ginghams are?  “Zephyr ginghams,” according to Fairchild’s “are made with fine, silky, mercerized yarns.”   Obviously both checked and plaid ginghams can be zephyr ginghams.

And indeed, it was a zephyr plaid gingham which I used for my most recent blouse:

I purchased this fabric at the same time I ordered the fabric for my lavender gingham blouse. I still had the “blouse bug,” so I decided to go for it!  I made a few tweaks to the pattern; specifically I added a tapered half inch to the lower half of the  sleeves, to give me a little more ease in rolling them up.  Of course, this meant I needed to add a half inch to the diameter of the cuffs.  I also increased the length of the sleeve vent by about 1.25 inches. I find these changes just add a bit more finesse to the wearing of this blouse, which is super comfortable anyway.

I kept the center back pleat, as it just makes this blouse so comfortable to wear, especially on a hot summer day.

Now, do you see that double navy blue line at the center front?

That is a mistake. I thought I had calculated the grid of the plaid correctly to have a continuous pattern across the front of the blouse.  About halfway through its construction, I discovered I had calculated incorrectly.  At that point I did not have enough fabric left over to cut out two – or even one – new fronts, so my fate was sealed.  Now I know what I did wrong, and hopefully I won’t make that mistake the next time I make a gingham blouse.  (And there will be a next time, but probably not this year.)

This is a blue jean kind of blouse!

Being a button aficionado, I of course searched again for the right buttons for this blouse. I thought about using these vintage pearl buttons with their square motif. However, at 5/8” wide, they were just too big.

I finally admitted to myself that buttons on a blouse like this should not be the focal point; they should be delicate and discreet – which led me to this card of vintage buttons in my collection:

These buttons are 3/8″ in diameter.

The luminosity of the pearl in these buttons actually picks up the pink in the plaid in a very subtle way – and they are definitely discreet.

I used the spread collar again for this blouse.

I love any excuse to wear pink shoes!

Well, I don’t want to end this post without giving you a few more fun facts on gingham.  Did you know that “gingham” was a colloquial term for an umbrella in the 19thcentury?  Again, according to Fairchild’s Dictionary (page 462), “so called because the less expensive types were made out of gingham fabric.”

And who doesn’t know that Dorothy Gale in The Wizard of Oz wore a blue gingham dress?  Or that Brigitte Bardot wore a pink gingham wedding dress (which led to a shortage of this fabric in France, according to Wikipedia)?

If you have not recently read the classic poem by Eugene Field (1850-1895), “The Gingham Dog and the Calico Cat,” it might be time to reacquaint yourself.  Here is how it starts:  “The gingham dog and the calico cat, side by side on the table sat.” Just the mention of the fabrics creates a mental picture of what is to ensue between these two!

There are few fashion references to gingham that are noteworthy, save for this one from interior designer Kelly Wearstler,  “The best thing I ever bought is a vintage Oscar de la Renta short gingham dress that I wore to my rehearsal dinner the night before my wedding.”

And finally, this from Christian Dior on “checks”  (The Little Dictionary of Fashion, by Christian Dior, Harry N. Abrams, New York, New York, 2007, page 21): “I love checks. They can be fancy and simple; elegant and easy; young and always right….  They are always in fashion …  and there are so many styles of checks to choose that there will be one to suit every age and figure.”

Feeling happy about this blouse despite that center front mistake.

From “always right” cotton gingham, I now head to another “always right,” forever, classic motif: polka dots  – in silk!  New month, new project.  Happy July, everyone!

29 Comments

Filed under Blouses, Buttons - choosing the right ones, Shoes to make an outfit complete, Uncategorized, vintage buttons

Happy Hippos and Dotted Daisies

Sewing for children is a specialized category, one which is certainly not of interest to everyone. For that reason, I sometimes skip doing a post on some of the clothes I make for my two little granddaughters. However, these two dresses turned out so cute that I thought I would share them.

I had not really intended to make more summer dresses for my two little ladies, but this hippo fabric made me do it!

This fabric is by Hoffman California.

I have had this piece stored on my fabric shelves for well over twenty years.  I really do not remember why I ever purchased it.  I always thought it was cute and cheerful.  As luck will have it, my older granddaughter’s favorite animal is a hippo! Little Miss Aida has a stuffed hippo who is well loved (almost to the point of being bedraggled!) and definitely a member of the family.  There really could be no better time to use this fabric to make her a dress, especially as, at age 5, she is still happy to wear a cute print like this. (By age six, maybe not?)

As I only had enough fabric for one dress, I needed to make the dress for her 3-year-old sister from another selection.  This navy, pink, and white fabric I have only had for a couple of years (no time at all in the realm of my sewing room!), purchased specifically with my two girls in mind.

I found this fabric at JoAnn’s. It is one of their premium cottons, and really quite a lovely quality.

Over those two years, however, I have slowly been using sections of it to line a number of “baby bags” which I often make for gifts, leaving me with only enough yardage for one dress, not two.  So voila!  This worked out perfectly – and the cheerful daisy print suits little Miss Carolina’s personality quite well.

I have made so many of these bags and they always seem to be a welcome baby gift. These are made from a Noodlehead pattern.

Showing the daisy lining.

For the dresses, I used the Children’s Corner “Louise” pattern again, this time without a separate band on the skirt.

However, to add interest, I made the collars out of coordinating fabrics, and I added pockets to the skirts.  Luckily, in my fabric collection, I found dotted cottons which worked perfectly for the collars and pockets.  Then rickrack provided the finishing touch.

When I am sewing long-distance for these two little girls, I am usually in a quandary over the length of the hems, especially as they are always, always growing and growing so fast.  This time, they were here for a visit, so I saved the completion of the hems until they arrived.  No guessing this time!

The bodices are lined with a white, lightweight, and very soft linen.

I used aqua colored buttons on the hippo dress and pink buttons on the daisy dress.

This was a very satisfying project – the girls love their new dresses, and I felt very virtuous using two fabrics that have been folded away in my sewing room closet, waiting for their new lives to begin.  Hippos and daisies turned out to be a winning combination.

15 Comments

Filed under Buttons - choosing the right ones, Sewing for children, Uncategorized

The Mystery Dress

The last thing I need is more fabric for Spring and Summer dresses, but try telling that to my rational side.  She doesn’t listen. So last Fall, when I saw a cotton sateen in a large navy, orange and white floral print in the Etsy Store of Promenade Fabrics, and it was the last yardage on the bolt, I decided I had better act fast and put it in my “cart.” I certainly was not disappointed when it arrived, as it was beautiful quality, with a slight stretch to it, and the colors were just as dramatic as I had hoped they would be.

I forgot to take a photo of the fabric, so here is the finished dress instead.

Fast forward to a few weeks ago, and I was scratching my head as to what pattern to use for it After washing and drying the fabric, I had about 1 5/8 yards.  Fortunately it was 54” wide.  I originally thought I would make a shirtdress with three-quarter sleeves, but I quickly determined I did not have enough yardage for that.  Then I thought about a skirt, but that did not excite me too much.  I kept coming back to the idea of a sleeveless wrap dress, and enough yardage or not, I was determined to try to make it work.  I pulled out this pattern which I had made a few years ago (and it is still one of my favorite dresses to wear.)

The Simplicity “version” of the Diane von Furstenberg wrap dress. Obviously, I intended to make this sleeveless.

I had a very workable muslin for it, and as this particular wrap dress pattern is for woven, not knit, fabrics, I knew it would be appropriate.  I also knew I was going to have to be creative in my layout.   I almost always cut things out single layer, and of course, positioning your pattern on a single layer of fabric gives you much more flexibility and what I call “wiggle room.”  Also to my advantage was the fact that there was no right side up for this fabric, so I could arrange the pieces upright or down, without regard to the design on the print.  After much head-scratching and  many calculations, I  made a list of the changes I needed to make, thus solving the mystery of whether I could, indeed, make a wrap dress out of this fabric:

1)  reduce the flare of the skirt by about 9 inches.

2) eliminate the facings and, instead,  line the bodice.

3) forego pockets, which were not original to the pattern anyway

and the big concession, 4) reduce the length of the sashes by about 8 inches AND make the sashes with one side in the fashion fabric and one side in a dark navy blue cotton broadcloth (which I happened to have in my fabric closet, fortuitously!)

Fortunately, I was able to fit the collar pieces in!  Here’s what my pattern layout looked like:

The lined bodice, with that snap I always have to add to the front closure of wrap dresses!

The two-toned ties!

The shortened length of the ties means I cannot tie a bow, just a knot, but that’s okay!

I was so glad I managed to squeak out the collar!

Back to my story – with my fabric all cut and ready to sew, one would think this dress would speed right along. And it would have, except that about this time we were getting our porch furniture out of storage in our garage. I had forgotten that our porch cushions and pillows had looked so awful last year that I didn’t even want to use them.  This was the year I needed to do a major home sewing job and recover those cushions and pillows. So that’s what I did.  By the time I got back to my wrap dress, my momentum was definitely lacking speed, and then the mystery was just how I was going to get excited about completing it!

I have to say the only thing which kept me focused on finishing this dress was the fact that I have so many other projects in my queue.  Now that it is finished, I am so glad I pushed through!

Such a windy day – a good test for a wrap dress!

This is a good basic Summer dress!

One thing that is not a mystery – I think I am finished with making wrap dresses for a while!


31 Comments

Filed under Wrap dresses

Gingham and Pearls

Way back at the beginning of our just-past long winter, I was on the hunt for fresh cotton gingham to pair with some Liberty cottons for dresses for my granddaughters’ birthdays. Always having been a fan of gingham, I couldn’t help but notice the offerings of shirting gingham in the Etsy shop where I was making purchases.  Of course, I ordered two pieces.  (Why wouldn’t I?!)  One piece in lavender has been tugging at me and I knew it would be next to make after finishing my purple boucle coat.

What I did not realize when I purchased this fabric is that it is a printed, rather than woven, gingham. However, the quality is lovely and silky soft.

In the meantime, I came across this spread in the April (2018) issue of Harper’s Bazaar:

There in the lower left hand corner is – yes – a lavender gingham blouse.

Now at this point in my life, I do not sew to save money, although I am always happy to have that as an added bonus.  But in this instance, once I looked at the listed price of that blouse ($375!!!) I felt quite pleased with myself, knowing I could make this  knock-off, for well less than 10% of the cost of that shirt:

The feature I really liked about the “$375 blouse” was the spread collar.  A spread collar, of course, has a wide division between the points in front, as opposed to longer pointed ends.  I determined to alter my pattern to make my shirt look like the one in the magazine.

I used a Simplicity pattern from 1972, which somehow survived all my now-regrettable purges of sewing patterns over the last 40-some years.  I had to make several alterations to it in addition to the shape of the collar, but its basic lines – with a yoked back, single button cuffs, slightly fitted body, and a long shirttail – lent itself to my vision.

The pattern art here is so dated! I actually used this pattern once before for a silk blouse.

To me, buttons are always an important component of any style requiring them.  I went through my button collection to see what I could find, knowing that what I really wanted would be simple mother-of-pearl, two-hole buttons.  When I came across this card of “Lucky Day” buttons, I knew they would be perfect.

These buttons date from the 1940s!

These 2/3″ buttons are in good proportion to the 1/4″ gingham.

What is it about gingham that makes it so fresh and happy – and timeless, as the tag line in Harper’s Bazaar, states?

I added an inverted pleat to the center back below the yoke. I may eliminate that the next time I make this pattern.

Because the fabric is a printed gingham, when I roll up the sleeves, as I am wont to do, the reverse white of the fabric shows. This doesn’t bother me as much as I thought it might.

Well, I am quite certain my “Gingham Style” looks just as good as the much more expensive “Gingham Style” detailed above.  All the more reason to wear it with pearls!


31 Comments

Filed under Blouses, Buttons - choosing the right ones, Uncategorized, vintage buttons

A Coat For Many Reasons

When I started planning this coat, I could not then have known the many reasons why I am now so happy to have made it.

The journey – and yes, it has been a journey – started with the fabric, offered for sale to me by a reader several years ago.  Simply the provenance of the fabric  – a piece of stamped Ernest Einiger wool, from one of the great mid-century American wool manufacturers, now sadly long gone – was reason enough to give it some extra thought.  I knew I had to wait for the right time to put pattern and scissors to it. When the Pantone Color of 2018 – “Ultraviolet” – an orchid shade of purple – was announced, I knew the time had arrived!

In the meantime, I had given it much thought and the more I looked at it, the more I thought I would be wise to get some construction advice on it.  Happily I was able to go to Baltimore in mid-April for one of Susan Khalje’s week-long Couture Sewing Schools, during which everyone works on their own project.  Usually one is expected to arrive with a pattern selected, and a marked muslin (toile) of her project ready for fitting.  This time was no different, which meant that all my thinking about the best pattern to use for this coat was ready to come to fruition.

Because the fabric is a very heavy coat-weight boucle, I originally looked for a pattern which either did not include buttons and buttonholes (traditionally more difficult to do well on a fabric of this weight), or had slot-seam buttonholes. I thought I had the perfect pattern in this Vogue from 1962. However, when I actually opened out the pattern pieces, I realized it was not going to work.  The kimono sleeves would surely produce drag lines in this heavy fabric, and a double layer of the wool in the shawl collar could be quite bulky.

Then I pulled out two more patterns which I thought were possibilities:

The single slot-seam buttonhole in the Mattli pattern was ideal, but all the intersecting seams could be a problem to do well, so I eliminated that one.  The simple lines of the Christian Dior design were lovely, but then there were more buttons, in addition to my evolving thought that this fabric would work well with a pattern which did not have such a narrow silhouette. It was then that I went to a pattern which I had already used:

View A with the longer sleeve for this coat, although I originally made it with the shorter sleeve here.

I love the simple lines of this coat and its well-turned collar, and I especially love my addition of a half belt to the silk coat I made.  I still wasn’t sure what I would/could do about buttons and buttonholes.  Advice from Susan would be very valuable!  As it turned out, she helped me determine that I could do bound buttonholes even on this very substantial wool.  Another fortuitous finding was that this pattern lent itself to showing off the interesting windowpane weave of the boucle, which became much more apparent the further away from it we got.

Other of Susan’s recommendations included:

1) Making the coat dress length rather than coat length.  The intensity of the color, used with this pattern, looks better in a shorter length.

2) Cutting the belt on the bias.  This was brilliant and gives a nice subtle focus to the back of the coat.  She also recommended that I line the belt with the silk charmeuse lining fabric rather than using the boucle .  It reduces bulk and makes the belt lay much more nicely.  I sewed one side of the belt by machine and then hand-stitched the other side, making for a nice crisp turn of the charmeuse to the underside.

My addition of a belt to this pattern is an excellent example of what is known as a “dressmaker detail.”

Here the bias cut of the belt is quite apparent.

The entire coat is underlined in silk organza, including the belt, shown here with one side sewn by machine.

And here is the silk charmeuse belt lining almost ready to be applied by hand.

3) Underlining the collar with charmeuse (again to reduce bulk) and then under-stitching the underside, to make it turn beautifully.

The collar on this pattern is beautifully designed to sit perfectly on the neck.

4) Clipping the long back center seam, even though it is on the straight of grain.  Clipping it reduces strain on that seam and allows a much more fluid movement of the back of the coat.  (I’m sorry I forgot to take a picture of this, but it is certainly not rocket science, just common sense.)

5) Tips for matching the woven windowpane design in the wool, the weave of which was difficult to see close-up.  Forked pins and a walking foot  helped to keep the layers – even basted ones – from shifting.

Other procedures I used to help “tame” this fabric were:  lots of judicious trimming of seams and corners; clipping, clipping and more clipping; lots of steam and pressing; lots of basting of seams.

I even trimmed the edges of the bound buttonholes to reduce bulk down the front of the coat. I am not completely happy with the buttonholes (which were difficult to do on this fabric), but once I finished them, they looked better than I thought they would.

I found these buttons in an Etsy store. From the 1960s, they are a nice fit with the fabric and the pattern. And I like their wobbly edges!

By the time I returned home from my class, I had the coat about half finished, but I felt completely confident in my ability to finish it competently.   Here are a few more details:

The sleeves feature a turned- back vent which is secured by a button through all layers.

I used the pockets for this version of the coat (which I had eliminated for my silk version.)

The belt is attached to the side seams just about an inch below the armhole. This placement allows it to fall right at the center back waist.

It is always rewarding to get to the point in the construction of a coat when you are ready to put the lining in.  And to make it just a little more fun, I added flat silk piping on the inside front facings – which will match one of the dresses (still to be made) I intend to wear with this coat:

I ended the piping at the shoulder seam on either side. (I see a basting thread which is peeking out from the piping!)

So my “coat for many reasons” allowed me 1) to use treasured fabric which had been in my collection for a few years; 2) to take advantage of the focus of this beautiful purple color during the year of  “Ultraviolet;” 3) to use a coat pattern which I really wanted to use again after making it once; and 4) to have experience in working – successfully – with such a heavyweight wool.

But the most important reason?  I need another coat. I always need another coat.

33 Comments

Filed under Buttons - choosing the right ones, Coats, Dressmaker details, Mid-Century style, piping, Uncategorized, vintage buttons, Vintage fabric, vintage Vogue patterns from the 1960s, woolens

“A Fantasy of Fashion from Paris”

Not everyone who sews is interested in fashion history, of that I am aware.   There was, however, a pivotal moment in modern fashion history that had such an impact that its influence is still felt today, although many current dressmakers/sewers of fashions have never heard of it.  I am, of course, speaking about the Théâtre de la Mode, about which I wrote in August of 2016. If you are one of those who think fashion history is dull, I hope to convince you otherwise, by another visit to the years of 1945 and 1946, in postwar France and beyond.

In a nutshell, the fashion industry in Paris during World War II had struggled mightily due to the widespread shortages, rationing, and bare existence imposed on all Parisians during the occupation of France and even for a time after the War had concluded.  To quote from the back cover of Théâtre de la Mode, Fashion Dolls: the Survival of Haute Couture (Second Revived Edition c 2002 Maryhill Museum of Art.  Published by Palmer/Pletsch Inc. Portland, Oregon): “Liberation in the fall of 1944 after four years of foreign Occupation found Paris surviving on minimal resources.  Hoping to make a statement to the world that Paris was still the center of fashion, couturiers, jewelers, milliners, hairdressers, and theatre designers joined together to present the Théâtre de la Mode.  Using the ages-old tradition of traveling miniature mannequins dressed in current couture, the Chambre Syndicale de la Couture mobilized a whole industry with unprecedented cooperation and creativity to prove that life could begin again through these 27” tall ambassadors of fashion.  The exhibition, inaugurated in Paris in March 1945, began a long journey, first to other capitals in Europe and Great Britain, then in 1946 to the United States.”

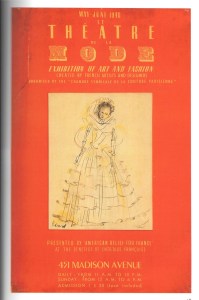
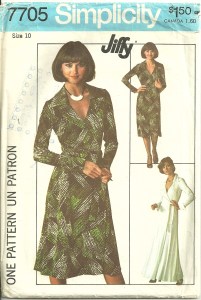
This is the poster for the Exhibition in New York City, page 49 of the book referenced above.

Many new fashions were added to the exhibition before it traveled to New York in May of 1946. It is worth noting here some of the names of the couturiers who participated in this endeavor: Balenciaga, Pierre Balmain, Jacques Fath, Jacques Heim, Hermès, Jeanne Lanvin, Lucien Lelong, Molyneux, Paquin, Schiaparelli, Worth, Jean Desses, Nina Ricci, Jean Patou, Madame Grès, plus many, many more not as well known to us today. Its New York opening was attended, with much excitement, by the city’s diplomatic and social elite.  After the drought of fashion leadership from Paris during the War, the New York fashion industry was anxious for renewed access to Parisian inspiration and patterns, and the Théâtre de la Mode seemed to be the kick-start both countries needed.

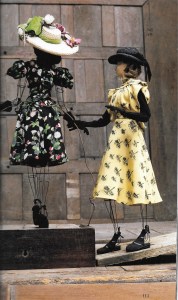
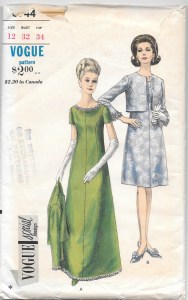
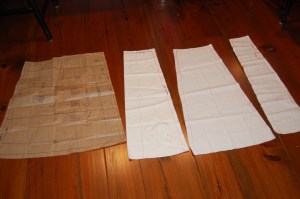
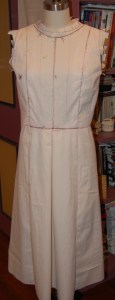
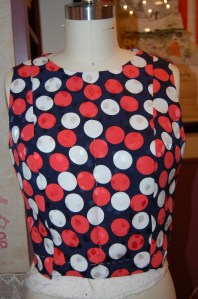
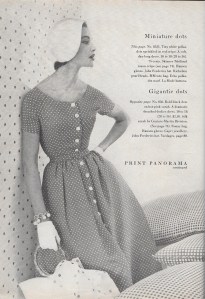
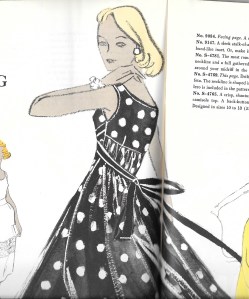
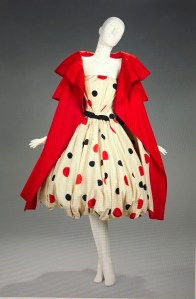
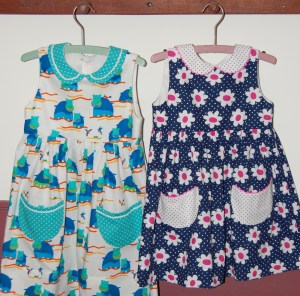
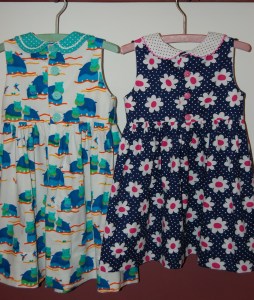
Two of the dresses which hint at some of the changes in the air for mid-century fashions. Henriette Beaujeu designed the dress on the left and Schiaparelli was the designer for the dress on the right.

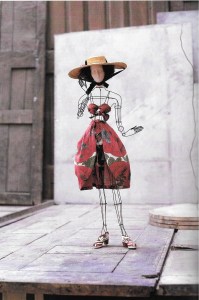
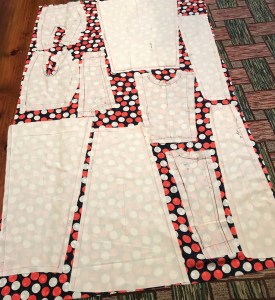
Even beachwear was included! Jacques Heim designed this ensemble of pareo pants, bra, and split skirt.

From New York, the Exhibit traveled, in September of 1946, to San Francisco to the de Young Museum, which turned out to be its final public viewing.   San Francisco at that time had a French population of over 20,000, and the response from that community was overwhelming. Sponsors of the Exhibition included I. Magnin, and two department stores (now defunct) both owned by French families, the White House and the City of Paris (who would not want to shop at that store?)  It is here that I want to pick up the story of this amazing period in time.  Hopefully I can add some details to its history and some weight to the esteem which the Théâtre de la Mode enjoyed at that pivotal time.

So what, you may ask, gives me the credence to do this?  Well, it all circles back to my sewing.  I am one of the very fortunate ones who have a room dedicated to sewing.  I, like so many of you in your own situations, spend hours and hours in this space.  It is filled not just with all the tools and machines and items I need for fashion sewing, but also with decorative objects which keep me company as I stitch away.  Over the years I have accumulated signs, millinery heads, and other fashion and sewing-related things (with support from a very understanding husband, I might add!)  I was not looking for my most recent find.  In fact, I did not even know that it existed.  However, when I saw it listed for sale on the Internet, I immediately knew what it was.  I also knew it could potentially add to the history of Théâtre de la Mode in the United States.

“IT” happens to be an original poster for the Exhibit at the de Young Museum in San Francisco, in September of  1946.

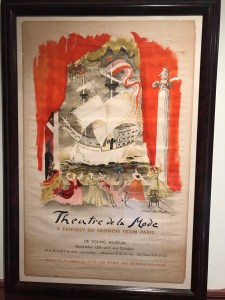
The pure visual quality of it struck me, especially when compared with the New York poster shown above.  It must have been a deliberate decision to commission an artist of the renown of Jean de Botton to produce the image for this poster, giving emphasis to the excitement and importance of this Exhibit.   De Botton (1898-1978) was a French artist living in New York City, known for his Abstractionist and Impressionist style of painting. (He became a naturalized American citizen before his death.)  I can only conjecture that he saw the Exhibit when it was in NYC, as his image for the poster is reminiscent of several of the sets on which the mannequins were displayed.  However, he added additional elements which enhance the intrigue of the Exhibit, some of which would have spoken directly to the French population in San Francisco at that time.

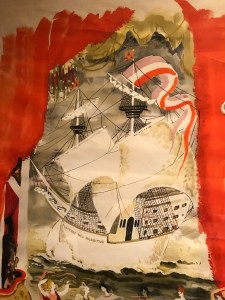
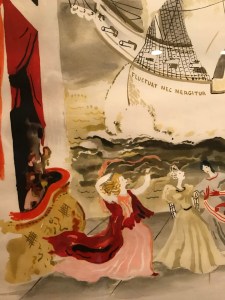
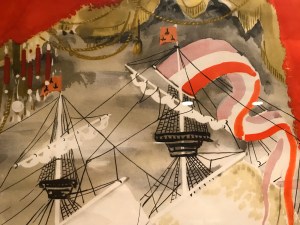
The image of the ship refers to the city of Paris. The latin motto of the city, “It floats, but does not sink,” appears on the ship, as seen below in the close-up.

More French imagery in the flags and pennants.

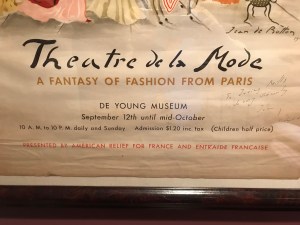
It appears that the term “A Fantasy of Fashion from Paris” was the artist’s idea or at the direction of the sponsors in San Francisco.

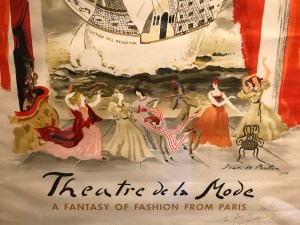
And what an incredible assortment of images in this section of the poster!

I feel very fortunate to have found this original poster, and to have it signed (and inscribed) by the artist makes it even more amazing.

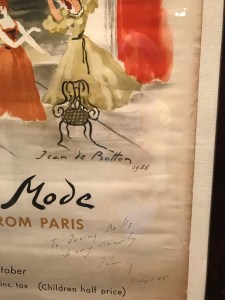
Signed by the artist in September of 1946 and inscribed to Irving Mills (1894-1985), possibly the music publisher, musician, lyricist and promoter of jazz artists who was a contemporary of de Botton’s in NYC.

No one could have imagined that the San Francisco showing of the Théâtre de la Mode would be its last public appearance. Arrangements could not be made to move it to other cities, so, in an unbelievable set of circumstances, the sets, the mannequins and fashions were moved to the basement of the City of Paris Department Store.  There they stayed, largely forgotten and thought by many to be “lost” until September of 1951 when Paul Verdier, President of the City of Paris department store made arrangements for them to be sent to the Maryhill Museum in Washington state, where you can see them now.

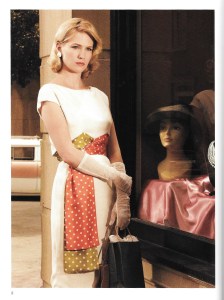
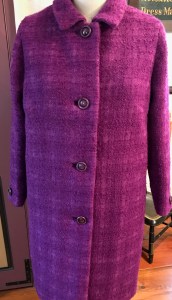
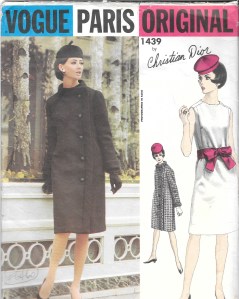
However, the impact of the Exhibit at that time cannot be overstated.  The concerted effort by the couturiers and others in the fashion industry to move past the barren War years realized success more quickly than anyone could have imagined. It was just a few months later, in 1947, that Christian Dior introduced his “New Look” – and the fashion industry as we know it today began to flourish.

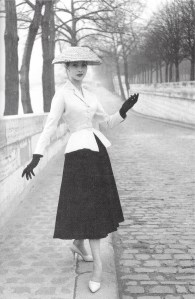
Christian Dior changed fashion history with the introduction of this new look.

This poster is a rare survivor of a pivotal time in fashion history.  If you are still reading by now, I hope this “Fantasy of Fashions from Paris” reminds you, as it does me, of the resilience of the human spirit, its love of beauty, and its indefatigable artistic inclination.

24 Comments

Filed under Fashion Exhibits, Fashion history, Mid-Century style