Category Archives: Uncategorized

Happy Hippos and Dotted Daisies

Sewing for children is a specialized category, one which is certainly not of interest to everyone. For that reason, I sometimes skip doing a post on some of the clothes I make for my two little granddaughters. However, these two dresses turned out so cute that I thought I would share them.

I had not really intended to make more summer dresses for my two little ladies, but this hippo fabric made me do it!

This fabric is by Hoffman California.

I have had this piece stored on my fabric shelves for well over twenty years.  I really do not remember why I ever purchased it.  I always thought it was cute and cheerful.  As luck will have it, my older granddaughter’s favorite animal is a hippo! Little Miss Aida has a stuffed hippo who is well loved (almost to the point of being bedraggled!) and definitely a member of the family.  There really could be no better time to use this fabric to make her a dress, especially as, at age 5, she is still happy to wear a cute print like this. (By age six, maybe not?)

As I only had enough fabric for one dress, I needed to make the dress for her 3-year-old sister from another selection.  This navy, pink, and white fabric I have only had for a couple of years (no time at all in the realm of my sewing room!), purchased specifically with my two girls in mind.

I found this fabric at JoAnn’s. It is one of their premium cottons, and really quite a lovely quality.

Over those two years, however, I have slowly been using sections of it to line a number of “baby bags” which I often make for gifts, leaving me with only enough yardage for one dress, not two.  So voila!  This worked out perfectly – and the cheerful daisy print suits little Miss Carolina’s personality quite well.

I have made so many of these bags and they always seem to be a welcome baby gift. These are made from a Noodlehead pattern.

Showing the daisy lining.

For the dresses, I used the Children’s Corner “Louise” pattern again, this time without a separate band on the skirt.

However, to add interest, I made the collars out of coordinating fabrics, and I added pockets to the skirts.  Luckily, in my fabric collection, I found dotted cottons which worked perfectly for the collars and pockets.  Then rickrack provided the finishing touch.

When I am sewing long-distance for these two little girls, I am usually in a quandary over the length of the hems, especially as they are always, always growing and growing so fast.  This time, they were here for a visit, so I saved the completion of the hems until they arrived.  No guessing this time!

The bodices are lined with a white, lightweight, and very soft linen.

I used aqua colored buttons on the hippo dress and pink buttons on the daisy dress.

This was a very satisfying project – the girls love their new dresses, and I felt very virtuous using two fabrics that have been folded away in my sewing room closet, waiting for their new lives to begin.  Hippos and daisies turned out to be a winning combination.

15 Comments

Filed under Buttons - choosing the right ones, Sewing for children, Uncategorized

Gingham and Pearls

Way back at the beginning of our just-past long winter, I was on the hunt for fresh cotton gingham to pair with some Liberty cottons for dresses for my granddaughters’ birthdays. Always having been a fan of gingham, I couldn’t help but notice the offerings of shirting gingham in the Etsy shop where I was making purchases.  Of course, I ordered two pieces.  (Why wouldn’t I?!)  One piece in lavender has been tugging at me and I knew it would be next to make after finishing my purple boucle coat.

What I did not realize when I purchased this fabric is that it is a printed, rather than woven, gingham. However, the quality is lovely and silky soft.

In the meantime, I came across this spread in the April (2018) issue of Harper’s Bazaar:

There in the lower left hand corner is – yes – a lavender gingham blouse.

Now at this point in my life, I do not sew to save money, although I am always happy to have that as an added bonus.  But in this instance, once I looked at the listed price of that blouse ($375!!!) I felt quite pleased with myself, knowing I could make this  knock-off, for well less than 10% of the cost of that shirt:

The feature I really liked about the “$375 blouse” was the spread collar.  A spread collar, of course, has a wide division between the points in front, as opposed to longer pointed ends.  I determined to alter my pattern to make my shirt look like the one in the magazine.

I used a Simplicity pattern from 1972, which somehow survived all my now-regrettable purges of sewing patterns over the last 40-some years.  I had to make several alterations to it in addition to the shape of the collar, but its basic lines – with a yoked back, single button cuffs, slightly fitted body, and a long shirttail – lent itself to my vision.

The pattern art here is so dated! I actually used this pattern once before for a silk blouse.

To me, buttons are always an important component of any style requiring them.  I went through my button collection to see what I could find, knowing that what I really wanted would be simple mother-of-pearl, two-hole buttons.  When I came across this card of “Lucky Day” buttons, I knew they would be perfect.

These buttons date from the 1940s!

These 2/3″ buttons are in good proportion to the 1/4″ gingham.

What is it about gingham that makes it so fresh and happy – and timeless, as the tag line in Harper’s Bazaar, states?

I added an inverted pleat to the center back below the yoke. I may eliminate that the next time I make this pattern.

Because the fabric is a printed gingham, when I roll up the sleeves, as I am wont to do, the reverse white of the fabric shows. This doesn’t bother me as much as I thought it might.

Well, I am quite certain my “Gingham Style” looks just as good as the much more expensive “Gingham Style” detailed above.  All the more reason to wear it with pearls!


31 Comments

Filed under Blouses, Buttons - choosing the right ones, Uncategorized, vintage buttons

A Coat For Many Reasons

When I started planning this coat, I could not then have known the many reasons why I am now so happy to have made it.

The journey – and yes, it has been a journey – started with the fabric, offered for sale to me by a reader several years ago.  Simply the provenance of the fabric  – a piece of stamped Ernest Einiger wool, from one of the great mid-century American wool manufacturers, now sadly long gone – was reason enough to give it some extra thought.  I knew I had to wait for the right time to put pattern and scissors to it. When the Pantone Color of 2018 – “Ultraviolet” – an orchid shade of purple – was announced, I knew the time had arrived!

In the meantime, I had given it much thought and the more I looked at it, the more I thought I would be wise to get some construction advice on it.  Happily I was able to go to Baltimore in mid-April for one of Susan Khalje’s week-long Couture Sewing Schools, during which everyone works on their own project.  Usually one is expected to arrive with a pattern selected, and a marked muslin (toile) of her project ready for fitting.  This time was no different, which meant that all my thinking about the best pattern to use for this coat was ready to come to fruition.

Because the fabric is a very heavy coat-weight boucle, I originally looked for a pattern which either did not include buttons and buttonholes (traditionally more difficult to do well on a fabric of this weight), or had slot-seam buttonholes. I thought I had the perfect pattern in this Vogue from 1962. However, when I actually opened out the pattern pieces, I realized it was not going to work.  The kimono sleeves would surely produce drag lines in this heavy fabric, and a double layer of the wool in the shawl collar could be quite bulky.

Then I pulled out two more patterns which I thought were possibilities:

The single slot-seam buttonhole in the Mattli pattern was ideal, but all the intersecting seams could be a problem to do well, so I eliminated that one.  The simple lines of the Christian Dior design were lovely, but then there were more buttons, in addition to my evolving thought that this fabric would work well with a pattern which did not have such a narrow silhouette. It was then that I went to a pattern which I had already used:

View A with the longer sleeve for this coat, although I originally made it with the shorter sleeve here.

I love the simple lines of this coat and its well-turned collar, and I especially love my addition of a half belt to the silk coat I made.  I still wasn’t sure what I would/could do about buttons and buttonholes.  Advice from Susan would be very valuable!  As it turned out, she helped me determine that I could do bound buttonholes even on this very substantial wool.  Another fortuitous finding was that this pattern lent itself to showing off the interesting windowpane weave of the boucle, which became much more apparent the further away from it we got.

Other of Susan’s recommendations included:

1) Making the coat dress length rather than coat length.  The intensity of the color, used with this pattern, looks better in a shorter length.

2) Cutting the belt on the bias.  This was brilliant and gives a nice subtle focus to the back of the coat.  She also recommended that I line the belt with the silk charmeuse lining fabric rather than using the boucle .  It reduces bulk and makes the belt lay much more nicely.  I sewed one side of the belt by machine and then hand-stitched the other side, making for a nice crisp turn of the charmeuse to the underside.

My addition of a belt to this pattern is an excellent example of what is known as a “dressmaker detail.”

Here the bias cut of the belt is quite apparent.

The entire coat is underlined in silk organza, including the belt, shown here with one side sewn by machine.

And here is the silk charmeuse belt lining almost ready to be applied by hand.

3) Underlining the collar with charmeuse (again to reduce bulk) and then under-stitching the underside, to make it turn beautifully.

The collar on this pattern is beautifully designed to sit perfectly on the neck.

4) Clipping the long back center seam, even though it is on the straight of grain.  Clipping it reduces strain on that seam and allows a much more fluid movement of the back of the coat.  (I’m sorry I forgot to take a picture of this, but it is certainly not rocket science, just common sense.)

5) Tips for matching the woven windowpane design in the wool, the weave of which was difficult to see close-up.  Forked pins and a walking foot  helped to keep the layers – even basted ones – from shifting.

Other procedures I used to help “tame” this fabric were:  lots of judicious trimming of seams and corners; clipping, clipping and more clipping; lots of steam and pressing; lots of basting of seams.

I even trimmed the edges of the bound buttonholes to reduce bulk down the front of the coat. I am not completely happy with the buttonholes (which were difficult to do on this fabric), but once I finished them, they looked better than I thought they would.

I found these buttons in an Etsy store. From the 1960s, they are a nice fit with the fabric and the pattern. And I like their wobbly edges!

By the time I returned home from my class, I had the coat about half finished, but I felt completely confident in my ability to finish it competently.   Here are a few more details:

The sleeves feature a turned- back vent which is secured by a button through all layers.

I used the pockets for this version of the coat (which I had eliminated for my silk version.)

The belt is attached to the side seams just about an inch below the armhole. This placement allows it to fall right at the center back waist.

It is always rewarding to get to the point in the construction of a coat when you are ready to put the lining in.  And to make it just a little more fun, I added flat silk piping on the inside front facings – which will match one of the dresses (still to be made) I intend to wear with this coat:

I ended the piping at the shoulder seam on either side. (I see a basting thread which is peeking out from the piping!)

So my “coat for many reasons” allowed me 1) to use treasured fabric which had been in my collection for a few years; 2) to take advantage of the focus of this beautiful purple color during the year of  “Ultraviolet;” 3) to use a coat pattern which I really wanted to use again after making it once; and 4) to have experience in working – successfully – with such a heavyweight wool.

But the most important reason?  I need another coat. I always need another coat.

33 Comments

Filed under Buttons - choosing the right ones, Coats, Dressmaker details, Mid-Century style, piping, Uncategorized, vintage buttons, Vintage fabric, vintage Vogue patterns from the 1960s, woolens

A Spring Tradition

Early to mid-Spring means birthday time in our family, especially so now with our two little granddaughters, who have birthdays in March and April.  Fortunately both little girls love dresses and love wearing them, so of course my Spring sewing agenda has to include making two “birthday dresses.”  (Last year’s dresses were a bit more elaborate than what I had planned for this year. In fact, I just lengthened the hems on these “strawberry” dresses so the girls can wear them for one more year!)

I found these Liberty fabrics last year on Fabric.com and immediately ordered yardage in two colors.  They stayed tucked away in my fabric closet until early March when I got serious about getting these dresses sewn.

All along I intended to pair each print with 16thinch coordinating cotton gingham, and then I set about finding a pattern which would accommodate this idea. I ended up using a Children’s Corner pattern (Louise) which turned out to be the perfect choice. View B showed a hem band and collar in contrasting fabric to the rest of the dress.

View B includes the Peter Pan collar and hem band.

These dresses are quite simple to make, and the pattern is precise.  I really, really like that this company gives you separate pattern pieces for each size in the envelope.  For example, this pattern included sizes 1 – 5.  So – there are full patterns for each size. I used size 3 and size 5, and it was such a pleasure not to have to trace a pattern for each dress. Mysteriously, the seam allowance allotted for the pattern pieces was only ¼”.  I increased it to a standard 5/8” as I am much happier sewing with a more substantial seam allowance.  The only other changes I made to the pattern were to make the back opening button on the left side rather than the right side, and to add three decorative buttons to the bodice.

I needed to move the bottom button on this dress as it was not quite lined up!

First I made the size 5 dress.  I realized once it was well underway that a touch of rickrack would add so much more interest to the dress.  Finding lilac colored rickrack was quite the task, but once again an Etsy shop (Creative Trims) had just what I needed.

Looks too plain without some additional embellishment.

The rickrack looks so much better!

I applied the rickrack by hand.

The second dress came together quickly (for me, at least!) Making the dresses alike, but in different colors was an idea I liked, and I was hopeful that the girls would like that, too!

A back view.

I am happy to report that, according to my daughter, the little girls love their birthday dresses.  Time to start planning for next year!

18 Comments

Filed under Liberty cotton, Sewing for children, Uncategorized

The Never-Ending Winter

One advantage to this never-ending Winter we are having in the Northeastern part of the United States is the focus – and extra time – it has given me in finishing my Winter projects. After completing my recent Classic French Jacket, I did some “birthday dress” sewing for my granddaughters (still to be shared) and made two baby gifts, and only then did I come back to making a matching sheath dress for that jacket.

I had thought long about how this dress should be constructed, and not having the advantage of taking a class in such a project, I knew I would have to figure it out on my own. I decided I would combine classic couture construction with the techniques used for making a classic French jacket.

First, I underlined the three pieces of the dress (front and two back panels) with black silk organza, and I anchored all the darts with a catch-stitch. (I always go back to that sound advice from Susan Khalje – couture is about control – and I know how this extra step helps to keep everything in its rightful place.)

Then I machine quilted the two back panels and the dress front just as I would quilt the separate pieces of a French jacket. I ended the quilting about two inches from the tops and bottoms of the pieces and tied off each line of quilting inside between the two layers. I figured the quilting did not need to be as closely placed as it is with a French jacket, so my quilting lines are about 2 inches apart. This following photo shows the quilted channels on the inside (they are virtually invisible on the fashion fabric):

The three pieces were sewn together as a Jacket would be sewn with the edges of the lining loose and then finished by hand with a fell stitch. At this point I felt fairly confident that the dress was going together as I had hoped. And yes, there is a lot of handwork involved! Next I inserted the long back zipper by hand and then finished the neckline and lining with a fell stitch.

Because I wanted to apply a length of trim above the bust – to match the trim placement on my jacket – I did the armholes last, as the trim needed to be attached before they were finished.


Finally, the hem. The length had to be precise, as there will be no lengthening nor shortening of this baby! The final step was to sew the hemline trim on by hand. I delineated the back vent with the trim to give it some extra interest. Also, although it is not visible here, I angled the edges of the vent slightly to the inside so that when the dress is on, the vent will not gape, but rather hang straight. This is another one of those lovely couture tricks I learned from Susan Khalje!

I must say this dress is a dream to wear, with that quilted silk interior.

And – I am quite happy with how it looks with my jacket.

Br-r-r-r-r!

As warm as this dress and jacket are, I was freezing when these photos were taken!

I have faith that Old Man Winter – who is truly ancient by now – will soon leave us, but not without a fond farewell from Fifty Dresses who appreciated his extra encouragement on seasonal sewing!


43 Comments

Filed under Boucle for French style jackets, classic French jacket, couture construction, Linings, Sheath dresses, Suit dresses, Uncategorized

Reflections on the Couture Legacy of Norman Norell

It was my distinct pleasure and good fortune to visit the current Exhibition on Norman Norell at the Museum at the Fashion Institute of Technology (MFIT) in New York City last week. For those of you not familiar with this mid-century American designer, you may be surprised to learn of his enduring influence on, and remarkable contributions to American fashion and glamour. He also, in his extensive and versatile body of work, employed the finest couture techniques, making his clothes still the envy of designers and those of us who strive for excellence in our fashion sewing.

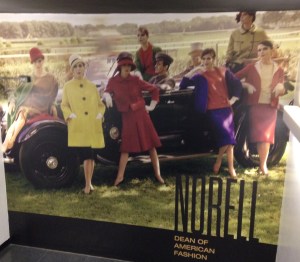
Norell: Dean of American Fashion opened on February 9, 2018 and will close on April 14th. Guest Curator and designer Jeffrey Banks and Deputy Director of MFIT, Patricia Mears, collaborated on this Exhibition. Included are examples from his entire career; however, the Exhibition focuses for the most part on his final, spectacular 12 years, from 1960 – 1972. Norell (1900-1972) left his native Indiana to pursue his interest in illustration and fashion design in New York. He worked under Hattie Carnegie, and then at the beginning of World War II he began a partnership with Anthony Traina, the label for which is the well-known Traina-Norell designation. It was in 1960 that Norell started his own eponymous line of clothing, and it was during this period, up to his untimely death in 1972, that he set his real mark on American fashion.

To all of you I commend the MFIT Exhibition website for learning more about Norell’s life and the evolution of his body of work, including a fascinating video presentation by Exhibition Curator Jeffrey Banks. (Be sure to click on “explore the Exhibition website” which will lead you to some excellent content.) It was with this background knowledge that I entered the Exhibition, knowing I wanted to view it on two levels – 1) as a dazzling display of some of the most beautiful fashions ever assembled, and 2) as an opportunity to see up close some of the construction details, style lines, and elegant touches in his fashions, serving as inspiration for my own fashion sewing.

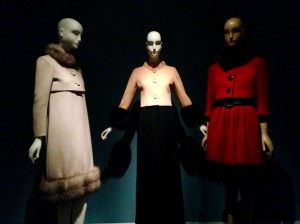
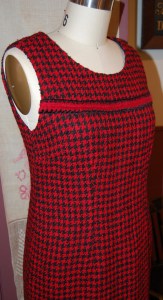
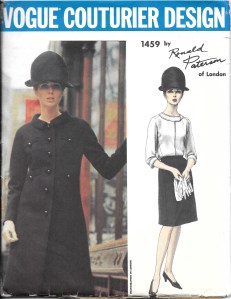
The Exhibit is physically divided into two areas, the first of which serves as a guide to his trademark themes, each with a small grouping of fashions. I was immediately smitten with this selection of LBDs:

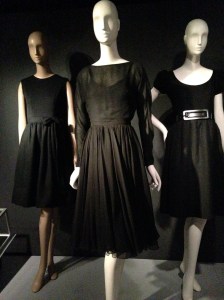
All of these dresses have a timeless appearance, making them as stylish today as when they were designed. From left to right, #1 Label: Norman Norell New York. Black sleeveless bodice with skirt and satin sash, 1963. wool jersey, wool twill. Lent by Kenneth Pool [a major lender to the Exhibit.];
#2 Label: Traina-Norell New York. Black cocktail ensemble, 1950. silk chiffon, silk satin. MFIT, Gift in memory of Miriam Abrams; #3 Label: Norman Norell New York. Black dress with belt, 1962-1963. Wool, leather. MFIT, Gift of Mortimer Soloman.

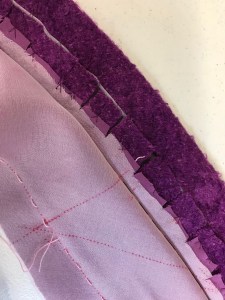
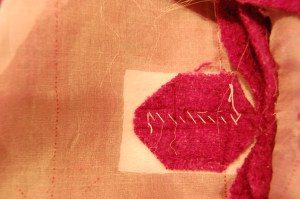
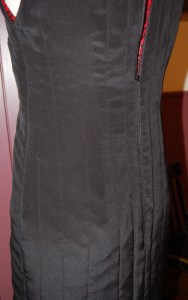
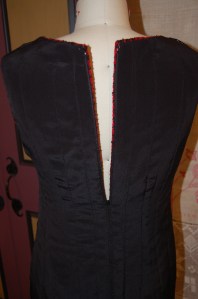
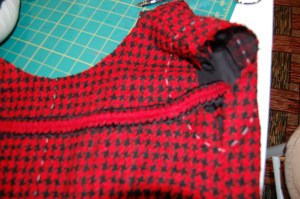
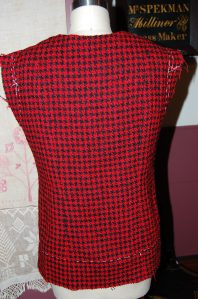
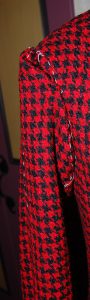
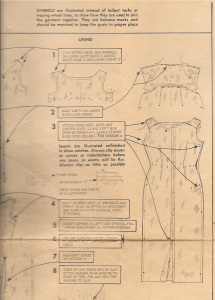
As a way of illustrating the impeccable couture construction for which Norell fashions are known, this “inside-out” dress was displayed.

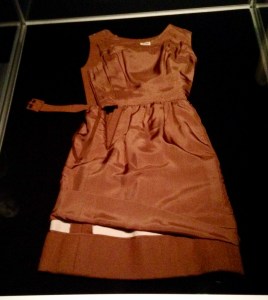
Click on the photo for a closer look.

It was all I could do to keep from reaching over to see more of it. Noted on the caption were ”the hand-picked zipper and extra wide seam allowance, the deep hem … edged with bias-cut silk so that it is softly defined yet sturdy. Furthermore, the neckline and armholes are minimally interfaced to give shape without impeding movement, and they are under-pressed in order to hide the seams.”

The larger gallery of the Exhibit practically took my breath away when I entered. The large center stage is resplendent with examples of his famous eveningwear, including his sequined “mermaid” dresses.

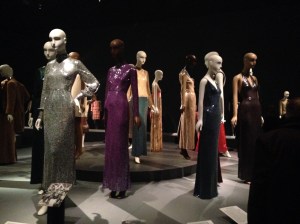
The low light in the Exhibition gallery only added to the ambience and allure of these creations.

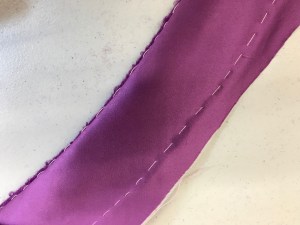
Around the perimeter of the gallery were featured many, many of his glorious coats, capes and dress suits, as well as dresses. I snapped this photo of one of his trademark sailor dresses to show the hand-picked zipper and the large patch pockets applied by hand (note the provenance on this dress in the caption):

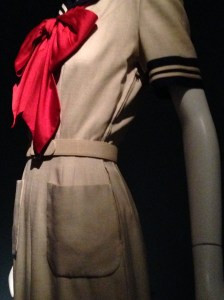
Label: Traina-Norell New York. Off-white sailor dress with navy collar and red tie, circa 1957. Linen. MFIT, Gift of Lauren Bacall.

There were so many terrific examples of Norell’s vibrant use of color, including this coral cape from 1962.

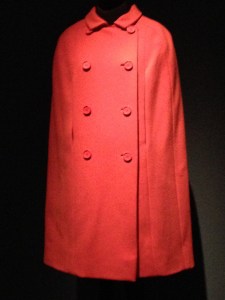
Label: Norell. Coral double breasted cape, 1962. Wool melton. Lent by Kenneth Pool.

And I could not take my eyes away from this combination of off-white evening gown with a red bolero jacket and peacock blue sash from 1968.

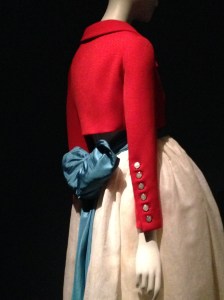
The beautiful shape of the jacket, with those amazing buttons and bound buttonholes, sets off the sash to perfection. Label: Norman Norell New York. Off-white evening gown with red bolero jacket and peacock blue sash, 1968. Cotton organdy, wool, silk taffeta. Lent by Kenneth Pool.

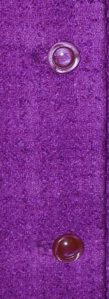
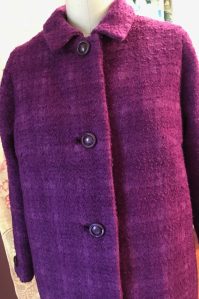
Another brilliantly hued ensemble is this pink evening coat with matching skirt and blouse from 1964. Note the rhinestone buttons, the beautiful bound buttonholes, the angled pockets, and the lovely seaming detail of the high yoke on the coat which descends into the sleeves.

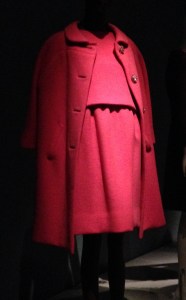
Label: Norell, Norman Norell New York. Pink evening coat with matching skirt and blouse, 1964. Wool, rhinestone buttons. MFIT, Gift of Lauren Bacall.

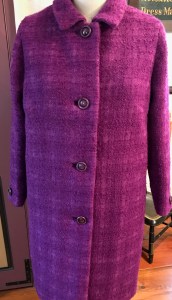
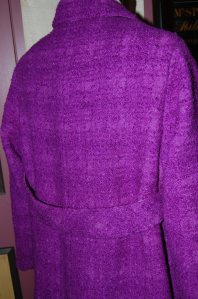
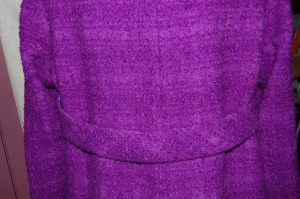
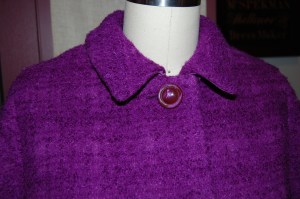
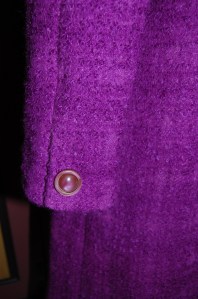
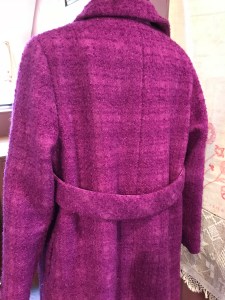
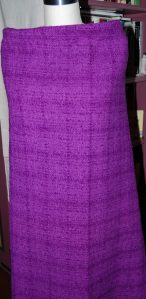
Norell was known for his cone and wedge-shaped coats, of which this purple one is an excellent example.  Note the spread of the descending buttons on this coat:

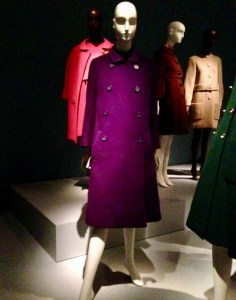
Photography was permitted, although flash photography was not, so my pictures do not do justice to many of these fashions. Label: Norell. Purple cone shaped double breasted coat with Peter Pan collar, 1966. Wool melton. Lent by Kenneth Pool.

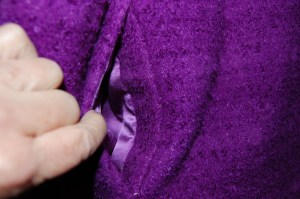
This coat and pants ensemble from 1970 is set off beautifully by its wide belt:

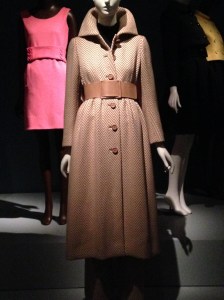
Label: Norell. Coat and pants ensemble, 1970. Wool herringbone, leather. Lent by Kenneth Pool.

The collar is absolutely stunning. And those bound buttonholes are a work of art in that heavy wool herringbone weave.

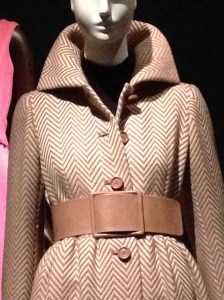
Norell used the talented stitchers of the garment worker’s union to make his clothing.

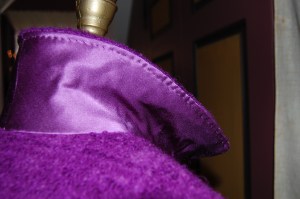
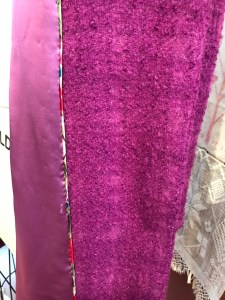
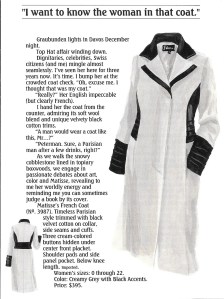
While I am writing about coats (one of my favorite subjects!), I want to show you details from two which help to illustrate the quality and finesse for which Norell’s fashions are known. First is this pocket detail from an off-white coat with black collar, 1962-1965.

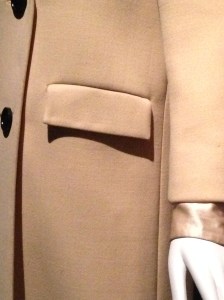
Label: Norell. Off-white coat with black collar, 1962-1965. Wool and velvet. MFIT, Gift of Mrs. Jane Albert

The right edge of the flap is angled slightly to follow the side seam line, a subtle touch which gives it a graceful appearance.

Second is another pocket detail on a beige coat with pilgrim collar from 1968:

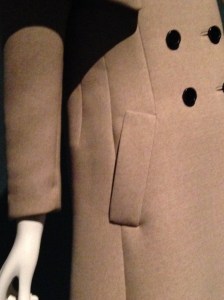
Label: Norell. Beige coat with pilgrim collar, 1968. Wool. MFIT, Gift from the collection of Margery J. Davidson, lovingly donated by her son Harold S. Graham.

The pocket is an extension of a princess seam, beautifully angled. And more shaping is apparent to the left of the full-length seam, giving this coat such elegant and refined lines.

Seeing this following grouping of dresses and jackets gave me a new appreciation of the concept of “less is more.” According to the caption, Norell “chose to trim his day and evening wear with mink, fox, and sable. The judicious use of this expensive and sensuous material elevated the glamour quotient of his restrained daywear.”

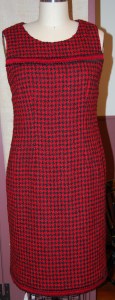
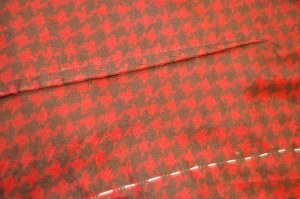
From left to right: #1 Label: Norell. Pale oatmeal midi dress and bolero jacket, 1967. Wool, crystal fox. Lent by Kenneth Pool. #2 Label: Norell. Pale peach jacket and black gown, 1966. Brushed wool, fox, sheer jersey. Lent by Kenneth Pool. #3 Label: Norell. Red and black check suit, 1962. Wool, black fox, leather. Lent by Kenneth Pool.

One more Little Black Dress has the most beautifully placed buttons:

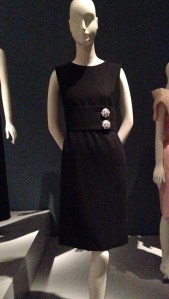
Label: Norman Norell New York. Black dress with jeweled buttons, 1965. Wool crepe. Lent by Kenneth Pool.

I loved the caption which (partially) stated: “Deceptively simple, Norell’s dresses were visually quiet but strategically constructed… to enhance a woman’s body.”

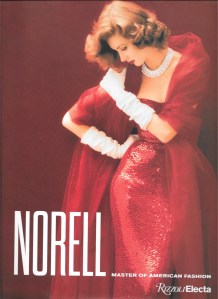
I could go on and on as there is so much more to celebrate about this remarkably talented “Dean of American Fashion.” Fortunately, the Exhibition is accompanied by a book, titled: Norell: Master of American Fashion, by Jeffrey Banks and Doria de la Chapelle.   Published by Rizzoli, the book is lavishly illustrated and beautifully presented, both in content and inspiration. I commend it to you.

In closing, on a personal note, I cannot help but think back to 1972, the year I graduated from college and the year Norman Norell died. So much has changed in the world of fashion and fashion sewing since those heady years. Seeing an exhibition like this one is a lovely reminder of the true timelessness of quality and restrained elegance, providing endless inspiration to those of us who dream and sew.

15 Comments

Filed under bound buttonholes, Capes, Coats, Cocktail dresses, couture construction, Day dresses, Dressmaker coats, Dressmaker suits, Fashion commentary, Fashion Exhibits, Little Black Dress, Mid-Century style, Suit dresses, Uncategorized

The Essential Coat

How many coats do you own? (Not enough?) How many do you need? (More than you know!) Putting need aside, how many should you have? (Plenty!) In your sewing and in planning your wardrobe, do you give as much thought to your coats as you do to your dresses or pants or blouses? My guess is that you do not.

In our very casual world, coats seem to have taken on the essence of “practical” or “function over form.”   To me, this is such a shame, as I believe coats have an aura to them unmatched by any other garment. They are, after all, so often a significant part of the first impression you make when arriving at an event or party – or anything for that matter. A fantastic coat can also leave a lasting impression when departing such an event.

In her iconic book, What Should I Wear, Claire McCardell devotes an entire chapter to coats. Here is just a small snippet of her thoughts on the impression that your coat can make: “…Remember that a first impression often comes when you are wearing a coat. When you are interviewed for a job, you keep your coat on. Your future employer’s first impression of you may be based on the coat you are wearing.

When you walk down the aisle of a theatre, you are wearing a coat … your audience has already judged you and the most beautiful dress in the world cannot alter that first impression. Coats ride buses and subways and taxicabs…. A coat is not something to be dismissed lightly.”   (The Rookery Press, New York, New York, 2012, pages 61- 62.)

In The Little Pink Book of Elegance: The Modern Girl’s Guide to Living with Style, by Jodi Kahn, she writes: “Many an elegant look is spoiled by throwing on a coat or a wrap that is anything but . . . [I]f you think about the most elegant women you know, or those in the pubic eye, you’ll probably realize they have fabulous outerwear. In the ‘60s, Jacqueline Kennedy asked her designer of the day, Oleg Cassini, to pay special attention to what she wore over her clothes since she was always being photographed coming and going. Even if you don’t have to worry about getting your picture snapped around every corner, a few great coats will transform almost any [look.]” (Peter Pauper Press, Inc., White Plains, New York, c2005, pages 29-30.)

A beautiful coat can also hint at what is beneath it. One of the most elegant looks one can wear (and make for herself) is a matching coat and dress ensemble, where the two pieces are intended only to ever be worn with each other. Such a coat and dress often share similar style lines.   This Vogue Couturier Design by Mattli of London is an example of this:

Another example of a coat and dress with complementary style lines is this Vogue pattern:

And although the style lines of the dress and the coat in this Vogue Paris Original by Madame Gres are not matching, clearly the coat and dress featured in blue on the pattern envelope are intended as such an ensemble:

Here is an example of a formal dress and matching coat, sharing seaming details and clearly designed to go together. Would this dress be anywhere as exciting without its matching coat?

This evening coat makes my heart skip a beat!

Not every coat needs to match a dress, however. Here is a small sampling of coats, both dressy “dressmaker” coats and classy, more tailored coats, the prototypes of which have their rightful place in your coat wardrobe:

This is my original pattern from which I made the featured coat when I was in my mid-twenties. I loved this coat and only wish I still had it!

I am very anxious to make a coat from this pattern.

This is a beautiful example of a dressmaker coat.

Another dressmaker coat.

A coat better suited for everyday wear, but still beautiful.

One of the many catalogs we receive here at our home is the catalog from the J. Peterman Company. It is so creatively conceived and presented, with each entry reading like a mini story, and often evocative of other times and places. The “Owner’s Manual” (as the company’s catalogs are called) arriving during this past holiday season was no exception. Imagine my delight when turning the page to this entry for a “French Coat with timeless Parisian style.”

Click on the image to read its story.

But what really caught my eye was the caption at the top of the page: “I want to know the woman in that coat.” In a nutshell, that sums up the power of a beautiful coat. What fun to know that, as ones who can make our coats, we can also be the woman who made that coat!

And now, in deference to some of my readers who want progress reports on my Number Four Classic French Jacket, here are a few photos – and a short quiz for those of you who have never made one of these jackets, but hope to one day.

Here is the neckline, ready to be stitched.

I call this the “vest” stage. This is the front of the jacket . . .

And this is the back of the jacket.

It is always fun to pin the sleeves on quickly just to see a jacket taking form!

As you can see, all the machine quilting is complete. I’ve finished the interior seams as much as I can at this point. The next step is to insert the sleeves. Then I can complete the finishing work on the interior seams and the hems and get to work on the trim and the pockets.

QUIZ: How much more will I be using my sewing machine to do this work?

  1. a) only for the insertion of the sleeves
  2. b) only to make the pockets
  3. c) both for the insertion of the sleeves and to make the pockets
  4. d) not for anything

Back to Coats:  Are you ready to make one after reading this post? I hope so!

30 Comments

Filed under Chanel-type jackets, Coats, Dressmaker coats, Mid-Century style, Uncategorized, vintage Vogue Designer patterns, vintage Vogue patterns from the 1960s, vintage Vogue patterns from the 1970s

Number Four – But Who’s Counting?

One of my more fortuitous undertakings upon my return to fashion sewing early in the current decade was learning how to make a Classic French Jacket. I traveled to Baltimore, Maryland (USA) to take one of Susan Khalje’s week-long classes devoted to this iconic fashion, and I never looked back. As soon as I had finished my first one, I could not wait to start another one and then another one.

From left to right, my first, second and third jackets. I made a sheath dress out of the charmeuse lining fabric for the first jacket: a blouse for the second jacket, again out of the lining silk; and a coordinating linen dress and silk scarf for the third jacket.

Choosing and applying trim is one of my favorite parts in the process of making these jackets.

Of course, the Classic French Jacket is based on Coco Chanel’s original 1920s’ cardigan jacket, updated and reintroduced as the “Chanel suit” when she reopened her couture house in 1954. A “Chanel suit” usually “consisted of two or three pieces: a cardigan style jacket, weighted with her trademark gilt chain stitched around the inside hem, a simple easy-to-wear skirt, worn with a blouse, the blouse fabric coordinated with the jacket lining.” (The Saint James Fashion Encyclopedia by Richard Martin, Visible Ink Press, Detroit, MI, c1997, page 81.) As I have said before, “Only Chanel is Chanel.” But a classic Chanel jacket is undeniably the prototype for the Classic French Jacket.

What a succinct and perfect “thumbnail” description of a Chanel Jacket. (The Fairchild Dictionary of Fashion, Third Edition, by Charlotte Mankey Calasibetta and Phyllis Tortora, Fairchild Publications, Inc., New York, New York, 2010, page 65.)

It is such a clever design, with some basic building blocks: 1) boucle fabric, the “sponginess” of which is necessary to help hide those quilting stitches which hold it to its silk lining fabric, 2) coordinating charmeuse/silk for that lining, 3) coordinating or contrast trim/trims, 4) usually fasteners of some sort, 5) a weighted chain for the hem, and 6) a pattern which includes three piece sleeves. One of its main charms, particularly for dressmakers, is the opportunity it gives to make a unique, creatively conceived jacket, whose “heritage” is nonetheless instantly recognizable.

As planned, after finishing my “Champagne Dress” in the first half of January, I brought out my red and black houndstooth boucle to get started on my fourth classic French jacket.

I decided to use plain black charmeuse for the jacket lining. I also plan to make a sheath dress out of the boucle to match the jacket. And I am quite excited to have found this trim!

As luck and life would have it, I then ran into a “snag” for three weeks, which I will not go into, but suffice it to say, I have just returned, finally, to serious work on this jacket. So – I am little behind where I wanted to be – but excited to see some progress and enjoying the process very much.

The quilting is complete, and now onto sewing the seams and finishing them.

Because I have written about making these jackets in previous posts, I certainly do not want to bore my readers with more of the same. To help fill the “space,” I plan to do a couple posts about other sewing and fashion subjects near and dear to my heart – and maybe a few updates on Number Four, too!

28 Comments

Filed under Boucle for French style jackets, Chanel-type jackets, Coco Chanel, Uncategorized

The Champagne Dress

It is a fact of sewing life that the construction of some dresses is just more difficult and time-consuming than other ones. This was a difficult dress to make and at times I really wondered just how long it would take to finish.

Before I go into the making of this dress, I want to put its pattern into historical context. This pattern is one of Vogue Patterns’ “Paris Originals.”

A former owner of this pattern made the notation about the bust enlargement.

As is obvious from the envelope cover, the dress was designed by Guy Laroche (1923-1989; pronounced Ghee Lah-rush); it is copyright 1960. According to the St. James Fashion Encyclopedia, Laroche was a French couture and ready-to-wear designer who worked for Jean Desses from 1950-57. Desses was known for his intricately draped dresses, asymmetry in his designs and ornament derived from the “architecture” of the garment, according to his profile in The St. James Fashion Encyclopedia by Richard Martin, Visible Ink Press, Detroit, MI, c1997, page 100. Bingo! It appears that Laroche learned well from his time with Desses and incorporated some of the same details into his couture designs once he opened his own fashion house in 1961.

I find it interesting that this pattern is dated 1960, one year before Laroche opened his couture house. Perhaps this statement in the Vogue Sewing Book from 1963 helps to explain how Vogue Patterns managed to obtain a Guy Laroche design before he had his own eponymous line:

Please click on the image to enlarge the print.

In any event, the appeal of this pattern, for me at least, was the asymmetrical draped bodice back and the tailored bow which anchors the drape on the right shoulder of the dress. It was also these details – and others – which made it a time-consuming project.

I made some alterations to the pattern before I even got started, as I wanted to eliminate some of the blousing above the waist of the dress. I do not have enough height to carry off too much excess around the mid-section, so I pulled most of the blousing into darts. Doing this made me rethink the instructions for the lining, the waistline of which was supposed to be sewn to the waistline of the dress itself. I assume the joining of these two elements was to insure that the blousing of the dress remained at the proper “elevation.”

The series of dots around the waistline indicate the sewing line to anchor the dress to the lining.

Having removed most of the blousing, I did not need to anchor the dress to its lining, so I left the lining loose.

This photo shows the loose lining and also the back neckline. Ordinarily, in couture sewing, facings are eliminated. However, in this case, knowing that the weight of the drape would be added to the back neck, I chose to use the facing to add more stability. I finished its edge with Hug Snug tape.

As you can see from the diagram of the lining (above), the back neckline is asymmetrical, to accommodate the attached drape on the bodice. I’m not sure why, but I found this rather confusing, resulting in sewing the lining together, first correctly, then thinking I had done it wrong, redoing it in what I thought was correct – and then realizing I had it right the first time. Fortunately it was easy to remove the stitching from the crepe de chine lining silk, but really? Three times? And then guess what this is?

Yes, this is a backwards back bodice!  Apparently I had flipped (or marked incorrectly) my silk organza underlining/pattern when I placed it on the fashion fabric, cut it out incorrectly and even had the underlining and the fashion fabric all carefully basted together.  When I discovered my mistake,  you can imagine my panic until I realized I had enough of the charmeuse left to cut it out again, this time correctly. Of course, then I had to baste it to the organza underlining for a second time. Tick tock, tick tock!

Things then went along fine until I got to the front neckline, which presented a quandary to me. From the instruction sheet, it seemed there was to be no interior finishing of it. It appeared to be a draped version of a bateau neckline. When I tried the dress on, it was uncomfortable as it pulled too tightly from the shoulders (which did not show up in my muslin).  It also did not look good. I decided the only way out of this predicament was to reshape it. I carefully basted and clipped and trimmed and clipped and trimmed some more (no photos of this, I am sorry to say. I was too intent on the task at hand to even think about photos!) But it all worked out. The front neckline certainly isn’t as draped as was intended, but I love the way it fits and looks.

The lining is not supposed to be attached to the dress at the front neck, according to the instruction sheet. In order to finish the neckline without adding any bulk (which would surely show up on that wide bias expanse), I stay-stitched and then catch-stitched the raw edge to the organza underlining. Not as finished a look as I would like, but it works well.

Another section of the pattern which did not present a proper interior finish for this very particular dressmaker, was the drape. It is partially gathered as you can see from the instruction sheet.

#7 shows the gathering of the interior drape.

As I did not care for a raw edge to be hiding under the drape, I decided to bind the edge with Hug Snug tape. This worked out so well and looks nice and tidy!

Besides these time-consuming corrections and additions, there were the hours of work involved in making the bow, attaching it to the dress, and making the belt. Then when I thought I was just about finished, I remembered I needed to add lingerie keepers, due to the wide stance of the shoulders. Okay, I thought. What else??

I have decided the belt is a little loose, so I need to reset the fasteners… What else, indeed!

What a good feeling of accomplishment to finish this dress and like it!

Here is a detail of the bow. I do love a tailored bow!

I haven’t worn it yet for any occasion, but when I do, I hope there is champagne involved, as I am going to toast myself for successfully finishing this one!


46 Comments

Filed under Bows as design feature, Cocktail dresses, couture construction, Linings, Messages from past owners of vintage patterns, Mid-Century style, sewing in silk, side-placed zippers, The Conde Nast Publications, Uncategorized, underlinings, vintage Vogue Designer patterns, vintage Vogue patterns from the 1960s

A Rosy Sewing Year

It seems that every new sewing year – at least for me – does not start right on time, as I am always finishing up a project from the month of December. Such is the case in this early January of 2018. However, that does not keep me from planning and dreaming about the coats and jackets, dresses and blouses to come. I can’t help but think of the new year at hand as a “rosy sewing year,” because the fabrics that are in my queue right now share a common theme – so many are predominantly red or pink or peach or floral, a bouquet of colors and textures.

First up is this red and black “hounds tooth” boucle which I found at Mendel Goldberg. Yes, it will be a Classic French jacket, with a sheath dress to match.

I am planning some variations in detail and trim for this jacket and dress, about which I am excited. It is a big project, so I hope January gives me lots of sewing time! No doubt this will spill over into February…

As I mentioned in one of my December posts, I hope to make a coat from this vintage purple boucle I am so fortunate to own.

A few years ago I found this silk charmeuse (also at Mendel Goldberg) which I intend to use for a coordinating dress with the coat.

Other silks I would love to concentrate on this year are purchases made several years ago from Britex Fabrics in San Francisco:

This is a French crepe de chine.

This silk helps satisfy my penchant for polka dots.

Then there are two linens I never got to in 2017, one a geometric red and the other a ecru and black floral. I assume they are waiting patiently for me. Add to all this my determination to sew for my two little granddaughters and – there’s the year! (And can I possibly finish another classic French jacket next Fall?  We will see.)

But let me complete 2017 first. Whatever made me think I should start (and could possibly finish) another dress for myself in December I will never know. But that’s exactly what went through my head. I had plans to make taffeta “Cinderella” dresses for my granddaughters for Christmas presents, but thought I would sneak in some personal sewing time before I started on that project. Perhaps it was the pattern that made me do it? Or was it the fabric?

When I purchased this pattern at the end of last summer, I really had no idea when I would be using it; I just did not want to miss the opportunity to own it, knowing that I would surely use it someday. Little did I know that someday would be just a couple of months later.

Now it just so happened that I had draped this fabric, below, over my dress form so I could admire it while I worked on other things. I purchased this silk charmeuse from Mendel Goldberg fabrics in 2016 as an end cut, three yards in length.

I knew with three yards I would be able to use a dress pattern which called for more than normal yardage, and I had found a pattern in my collection which I thought I would use:

My idea was to lengthen the sleeves to three-quarter length.

But something just did not seem right. I could not get excited about that pattern in that fabric, even with three-quarter sleeves. Well, I had one of those proverbial light bulb moments when it occurred to me to use the Guy Larouche pattern for the champagne-colored, floral silk. It seems to be a perfect match. The bodice of the pattern is cut on the diagonal, and the meandering flower and vine motif in the fabric lends itself to both straight of grain and diagonal placement. I made my muslin (with quite a few alterations) and was really quite excited about the draped back, shown here in muslin:

And here is the front, minus one sleeve. The front neckline is a bit unusual and I think it will be flattering.

I got as far as transferring the markings onto the silk organza underlining, cutting out the fashion fabric, and basting the two layers together, all ready to start sewing. Then reality hit like a sledgehammer! I had to get those dresses for my granddaughters finished in time for Christmas (which I did, after some frantic sewing – and they love them, which made it all worthwhile!)

Just in case anyone would like to see these dresses, here they are. Big bows in back, and the sleeves are adorned with little bows. Very girly!

So that’s how I am now at this point, finishing up 2017, with the hope of starting the new sewing year one of these days – with my Guy Laroche dress perched in my closet, awaiting its debut. May the New Year be rosy and kind to all of us, and may it end with many sewing dreams fulfilled!

25 Comments

Filed under Boucle for French style jackets, Chanel-type jackets, Coats, Linen, Moygashel linen, Polka dots, Sewing for children, silk, Uncategorized, vintage Vogue patterns from the 1960s